Linux Server Hacks Volume Two phần 6 pot
Bạn đang xem bản rút gọn của tài liệu. Xem và tải ngay bản đầy đủ của tài liệu tại đây (5.5 MB, 41 trang )
found that taking a nightly snapshot of the logical volume that contains the users' home directories and automatically
mounting it enables most users to satisfy their own restore requests by simply retrieving the original copies of lost or
incorrectly modified files from the snapshot. This makes them happier and also lightens my workload. Not a bad
combination!
This hack explains how to create a snapshot of an existing volume and mount it, and provides some examples of how
the snapshot preserves your original files when they are modified in the parent volume.
5.4.1. Kernel Support for Snapshots
Snapshots of logical volumes are created and maintained with the help of the dm_snapshot filesystem driver. This is
built as a loadable kernel module on most modern Linux distributions. If you cannot find this module or snapshots
simply do not work on your system, cd to your kernel source directory (typically /usr/src/linux) and check your kernel
configuration file to make sure this module is either built in or available as a kernel module, as in the following
example:
$ cd /usr/src/linux
$ grep i DM-SNAPSHOT .config
CONFIG_SM_SNAPSHOT=m
In this case, the dm-snapshot driver is available as a loadable kernel module. If the value of the
CONFIG_DM_SNAPSHOT configuration variable is n, this option is not available in your kernel. You will have to
rebuild your kernel with this driver built in (a value of y) or as a loadable kernel module (a value of m) in order to take
advantage of logical volume snapshots as discussed in this hack.
Even if the dm_snapshot module is available on your system, you may need to manually load
it using the standard modprobe command, as in the following example:
# modprobe dm_snapshot
5.4.2. Creating a Snapshot
This section explains how to create a snapshot of an existing filesystem. The filesystem that you are taking a snapshot of
must reside on a logical volume, as shown by the presence of the device mapper directory in the following example:
# df -Ph /test
Filesystem Size Used Avail Use% Mounted on
/dev/mapper/testvg-testvol 485M 18M 442M 4% /test
Next we'll use the dd command to create a few sample files in the test volume for use in testing later in this hack:
# dd if=/dev/zero of=/test/5M bs=1048576 count=5
5+0 records in
5+0 records out
# dd if=/dev/zero of=/test/10M bs=1048576 count=10
10+0 records in
10+0 records out
204
204
To create a snapshot of the testvol volume, execute a command like the following:
# lvcreate -s -L 100M -n testsnap /dev/testvg/testvol
Logical volume "testsnap" created
In this example, I allocated 100 MB for the snapshot. This means that we can make 100 MB in changes to the original
volume before the snapshot is full. Snapshots eventually fill up because they are preserving old data, and there is no way
to purge the files that it has preserved because it is a snapshot of another volume, not an original logical volume itself.
Once a snapshot is 100% used, it becomes uselessyou must remove it and create a new snapshot.
To confirm that the snapshot was created correctly, use the lvs command to display logical volume status information:
# lvs
LV VG Attr LSize Origin Snap% Move Copy%
testsnap testvg swi-a- 100.00M testvol 0.02
testvol testvg owi-ao 500.00M
5.4.3. Mounting a Snapshot
Having a snapshot of a logical volume is fairly useless unless you enable people to access it. To mount the sample
testsnap snapshot, use a standard mount command such as the following:
# mount /dev/testvg/testsnap /testsnap
# df -Ph /test*
Filesystem Size Used Avail Use% Mounted on
/dev/mapper/testvg-testvol 485M 18M 442M 4% /test
/dev/mapper/testvg-testsnap 485M 18M 442M 4% /testsnap
Note that a snapshot volume always lives in the same volume group as the logical volume
of which it is a copy.
Just to be sure, you can use the ls command to verify that both the snapshot and the original volume are available:
# ls -l /test
total 15436
-rw-r r 1 root root 10485760 Apr 21 23:48 10M
-rw-r r 1 root root 5242880 Apr 21 23:48 5M
drwx 2 root root 12288 Apr 21 23:15 lost+found
# ls -l /testsnap/
total 15436
-rw-r r 1 root root 10485760 Apr 21 23:48 10M
-rw-r r 1 root root 5242880 Apr 21 23:48 5M
drwx 2 root root 12288 Apr 21 23:15 lost+found
205
205
Now, create a 50-MB file in the /test filesystem and examine what happens to the /testsnap filesystem and the snapshot
usage (using our favorite lvs command):
# dd if=/dev/zero of=/test/50M bs=1048576 count=50
50+0 records in
50+0 records out
# df -Ph /test*
Filesystem Size Used Avail Use% Mounted on
/dev/mapper/testvg-testvol 485M 68M 392M 15% /test
/dev/mapper/testvg-testsnap 485M 18M 442M 4% /testsnap
# ls -l /test
total 66838
-rw-r r 1 root root 10485760 Apr 21 23:48 10M
-rw-r r 1 root root 52428800 Apr 22 00:09 50M
-rw-r r 1 root root 5242880 Apr 21 23:48 5M
drwx 2 root root 12288 Apr 21 23:15 lost+found
# ls -l /testsnap/
total 15436
-rw-r r 1 root root 10485760 Apr 21 23:48 10M
-rw-r r 1 root root 5242880 Apr 21 23:48 5M
drwx 2 root root 12288 Apr 21 23:15 lost+found
# lvs
LV VG Attr LSize Origin Snap% Move Copy%
testsnap testvg swi-ao 100.00M testvol 50.43
testvol testvg owi-ao 500.00M
Notice that the 50-MB file does not immediately show up in /testsnap, but some of the snapshot space has been used up
(50.43%).
Next, simulate a user accidentally removing a file by removing /test/10M and examine the results:
# rm /test/10M
rm: remove regular file `/test/10M'? y
# df -Ph /test*
Filesystem Size Used Avail Use% Mounted on
/dev/mapper/testvg-testvol 485M 58M 402M 13% /test
/dev/mapper/testvg-testsnap 485M 18M 442M 4% /testsnap
Note that disk space utilization in your snapshot increased slightly:
# lvs
LV VG Attr LSize Origin Snap% Move Copy%
testsnap testvg swi-ao 100.00M testvol 50.44
testvol testvg owi-ao 500.00M
When using the lvs command after significant file operations, you may need to wait a few
minutes for the data that lvs uses to be updated.
If you now need to recover the file 10M, you can get it back by simply copying it out of the snapshot (to somewhere
safe). Say goodbye to most of your restore headaches!
206
206
Remember, once the snapshot is 100% full, its contents can no longer be relied upon, because no new files can be
written to it and it is therefore no longer useful for tracking recent updates to its parent volume. You should monitor the
size of your snapshots and recreate them as needed. I find that recreating them once a week and remounting them keeps
them up to date and also usually prevents "snapshot overflow."
5.4.4. See Also
Snapshot section of the LVM HWOTO:
"Create Flexible Storage with LVM" [Hack #46]•
"Combine LVM and Software RAID" [Hack #47]•
Lance Tost
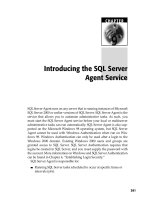
Hack 49. Clone Systems Quickly and Easily
Once you've customized and fine-tuned a sample machine, you can quickly and easily deploy other systems
based on its configuration by simply cloning it.
Now that Linux is in widespread use, many businesses that don't want to roll their own Linux systems simply
deploy out-of-the-box systems based on supported distributions from sources such as SUSE, Mandriva, Turbo
Linux, and Red Hat. Businesses that need a wider array of system or application software than these
distributions provide often spend significant effort adding this software to their server and desktop systems,
fine-tuning system configuration files, setting up networking, disabling unnecessary services, and setting up
their corporate distributed authentication mechanisms. All of this takes a fair amount of time to get "just
right"it also takes time to replicate on multiple systems and can be a pain to recreate if this becomes
necessary. You do have backups, don't you?
To speed up deploying multiple essentially identical systems, the classic Unix approach that I used to take in
the "bad old days" was to purchase large numbers of disks that were the same size, use the Unix dd utility to
clone system disks containing my tricked out systems to new disks, and then deploy the cloned disks in each
new system of the specified type. This still works, but the downside of this approach is that the dd utility
copies every block on a disk, regardless of whether it's actually in use or not. This process can take hours,
even for relatively small disks, and seems interminable when cloning today's larger (200-GB and up) drives.
Thanks to the thousands of clever people in the open source community, faster and more modern solutions to
this classic problem are now readily available for Linux. The best known are Ghost for Linux (a.k.a. g4l,
which takes its name from the commercial Ghost software package from
Symantec (formerly Norton) for Windows systems, and partimage, the popular GNU Partition Image
application (). Both of these are open source software packages that are designed to
create compressed images of partitions on your systems and make it easy for you to restore these partition
images on different drives. The Ghost for Linux software is largely targeted for use on bootable system disks
and provides built-in support for transferring the compressed filesystem or disk images that it creates to
central servers using FTP. It is therefore extremely useful when you need to boot and back up a system that
won't boot on its own. This hack focuses on partimage because it is easier to build, deploy, and use as an
application on a system that is currently running. Of course, you have to have enough local disk space to store
the compressed filesystem images, but that's easy enough to dig up nowadays. Like Ghost for Linux, you can't
use partimage to create an image of a filesystem that is currently mounted, because a mounted filesystem may
207
207
change while the image is being created, which would be "a bad thing."
The ability to create small, easily redeployed partition images is growing in
popularity thanks to virtual machine software such as Xen, where each virtual
machine requires its own root filesystem. Though many people use a loopback
filesystem for this, those consume memory on both the host and client. partimage
makes it easy to clone existing partitions that have been customized for use with Xen,
which is something you can easily do while your system is running if you have
already prepared a Xen root filesystem on its own partition.
partimage easily creates optimal, compressed images of almost any type of filesystem that you'd find on a
Linux system (and even many that you would not). It supports ext2fs/ext3fs, FAT16/32, HFS, HPFS, JFS,
NTFS, ReiserFS, UFS, and XFS partitions, though its support for both HFS (the older Mac OS filesystem)
and NTFS (the Windows filesystem de jour) is still experimental.
5.5.1. Building partimage
partimage is easy enough to build, but it has a fair number of dependencies. To build partimage, you must
build or already have installed the following libraries:
liblzo
Used for fast compression. Available from />libmcrypt
An encryption library required for newer versions of partimage. Available from
/>libnewt
A text-oriented, semi-graphical interface. Available from
/>libslang
An internationalization package used by newt. Available from .
libssl
A Secure Sockets Layer library required for newer versions of partimage. Available from
. Must be built in shared mode after configuring it using the following
configure command:
# ./configure prefix=/usr -shared
libz
208
208
Used for gzip compression. Available from .
libbz2
Necessary for bzip2 compression. Available at />Once you've built and installed any missing libraries, you can configure and compile partimage using the
standard commands for building most modern open source software:
# ./configure && make install
The fun begins once the build and installation is complete. The final product of the make command is two
applications: partimage, which is the application that you run on a system to create an image of an existing
partition; and partimaged, which is a daemon that you can run on a system in order to be able to save partition
images to it over the network, much like the built-in FTP support provided by Ghost for Linux.
At the time that this book was written, the latest version of partimage was 0.6.4,
which was not 64-bit clean and could not be compiled successfully on any of my
64-bit systems. If you need to run partimage on a 64-bit system and no newer version
is available by the time that you read this (or if you're just in a hurry), you can always
download precompiled static binaries for your Linux system. Precompiled static
binaries are available from the partimage download page listed at the end of this
hack.
5.5.2. Cloning Partitions Using partimage
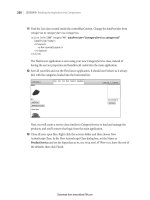
Using partimage to create a copy of an existing unmounted partition is easy. Because partimage needs raw
access to partitions, you must execute the partimage command as root or via sudo. As shown in Figure
5-1, the initial partimage screen enables you to select the partition of which you want to create an image, the
full pathname to which you want to save the partition image, and the operation that you want to perform (in
this case, saving a partition into a file). To move to the next screen, press F5 or use the Tab key to select the
Next button and press Enter.
Figure 5-1. Selecting a partition to image and specifying the output file
209
209
The second partimage backup screen, shown in Figure 5-2, enables you to specify the compression
mechanism that you want to use in the image file. Here you can specify that you want to check the
consistency of the partition that you are imaging before creating the partition image file, which is always a
good idea since you don't want to clone an inconsistent filesystem. You can also optionally specify that you
want to add a descriptive comment to the file, which is often a good idea if you are going to be saving and
working with a large number of partition image files. You can also specify what partimage should do after the
image file has been created: wait for input, quit automatically, halt the machine, and so on. (The latter is
probably only useful if you've booted from a rescue disk containing partimage in order to image one of the
system partitions on your primary hard drive.) Press F5 to proceed to the next screen.
Note that the existing type of the partition in /dev/hdb6 is ReiserFS. The existing type
of the target partition and the size of the partition that was backed up do not matter
(as long as the target partition can hold the uncompressed contents of the partition
image file). When restoring a partition image, the partition that is being populated
with its contents is automatically created using the same type of filesystem as was
used in the filesystem contained in the image file, but using all available space on the
target partition.
If you specified that you wanted to check the consistency of the filesystem before imaging it, partimage
checks the filesystem and displays a summary screen that you can close after reviewing it by pressing Enter.
partimage then proceeds to create an image file of the specified partition, as shown in Figure 5-3, displaying a
summary screen when the image has been successfully created. If you specified Wait (i.e., wait for inputthe
default) as the action to perform after creating the image file, you will have to press Enter to close the
summary screen and exit partimage.
Figure 5-2. Specifying compression methods and other options
210
210
Figure 5-3. Creating the partition image file
5.5.3. Restoring Partitions Using partimage
Using partimage to restore a partition image to an existing partition is even simpler than creating the image in
the first place. The initial partimage restore screen, shown in Figure 5-4, is the same as that shown in Figure
5-1. It enables you to identify the partition to which you want to restore the partition image, the name of the
image file that you want to restore from, and the action that you want to perform (in this case, restoring a
partition from a file). To move to the next screen, press F5 or use the Tab key to select the Next button and
press Enter.
211
211
Figure 5-4. Selecting a partition to restore to and the partition image file
The second partimage restore screen, shown in Figure 5-5, enables you to run a consistency check by
performing a dry run of restoring from the image file and also enables you to zero out unused blocks on the
target filesystem when it is created. As with the image-creation process, you can also specify what partimage
should do after the image file has been restored: wait for input, quit automatically, halt or reboot the machine,
and so on. Press F5 to proceed to the next screen.
partimage then proceeds to restore the partition image file to the specified partition, as shown in Figure 5-6,
displaying a summary screen by default when the image has been successfully restored. If you specified Wait
(i.e., wait for inputthe default) as the action to perform after creating the image file, you will have to press
Enter to close the summary screen and exit partimage.
Figure 5-5. Specifying restore options and completion behavior
212
212
Figure 5-6. Restoring the partition image
5.5.4. Summary
Creating partition image files of customized, optimized, and fine-tuned desktop and server partitions provides
a quick and easy way of cloning those systems to new hardware. You can always clone partitions containing
applications, such as /opt,/var,/usr, and /usr/local. (Your actual partition scheme is, of course, up to you.) If
your new systems have the same devices as the system on which the image file was created, you can even
easily copy preconfigured system partitions such as /boot and / itself. Either way, applications such as
partimage can save you lots of time in configuring additional hardware by enabling you to reuse your existing
customizations as many times as you want to.
5.5.5. See Also
"Make Disk-to-Disk Backups for Large Drives" [Hack #50]•
Ghost for Linux home page:
Ghost for Linux download page: •
partimage home page: •
partimage download page:
System Rescue CD home page: •
Hack 50. Make Disk-to-Disk Backups for Large Drives
Today's hard drives are large enough that you could spend the rest of your life backing them up
to tape. Putting drive trays in your servers and using removable drives as a backup destination
provides a modern solution.
213
213
Some of us are old, and therefore remember when magnetic tape was the de facto backup
medium for any computer system. Disk drives were small, and tapes were comparatively large.
Nowadays, the reverse is generally true disk drives are huge, and few tapes can hold more than
a fraction of a drive's capacity. But these facts shouldn't be used as an excuse to skip doing
backups! Backups are still necessary, and they may be more critical today than ever, given that
the failure of a single drive can easily cause you to lose multiple partitions and hundreds of
gigabytes of data.
Luckily, dynamic device buses such as USB and FireWire ( a.k.a. IEEE 1094) and adaptors for
inexpensive ATA drives to these connection technologies provide inexpensive ways of making
any media removable without disassembling your system. Large, removable, rewritable media
can truly simplify life for you (and your operators, if you're lucky enough to have some). A
clever combination of removable media and a good backup strategy will make it easy for you to
adapt disk drives to your systems to create large, fast, removable media devices that can solve
your backup woes and also get you home in time for dinner (today's dinner, even). If you're
fortunate enough to work somewhere that can buy the latest, partial terabyte backup tape
technology, I'm proud to know you. This hack is for the rest of us.
5.6.1. Convenient Removable Media Technologies for Backups
Depending on the type of interfaces available on your servers, an easy way to roll your own
removable media is to purchase external drive cases that provide USB or FireWire interfaces,
but in which you can insert today's largest IDE or SATA disk drives. Because both USB and
FireWire support dynamic device detection, you can simply attach a new external drive to your
server and power it up, and the system will assign it a device identifier. If you don't know every
possible device on your system, you can always check the tail of your system's logfile,
/var/log/messages, to determine the name of the device associated with the drive you've just
attached. Depending on how your system is configured, you may also need to insert modules
such as uhci_hcd, ehci_hcd, and usb_storage in order to get your system to recognize new USB
storage devices, or ohci1394 for FireWire devices.
This presumes that the default USB and FireWire controller
modules (usbcore and sbp2, respectively) are already being
loaded by your kernel (as well as the SCSI emulation module,
scsi_mod, if you need it), and that what you really need is support
for recognizing hot-plug storage devices.
Empty external drive cases with USB and/or FireWire interfaces start at around $35 on eBay or
from your local computer vendor, but can run much higher if you decide you want a case that
holds multiple drives. I was a Boy Scout eons ago and have been a sysadmin for a long time,
and I like to "be prepared." I therefore further hedge my external drive options by putting drive
trays in the external cases, so that I can quickly and easily swap drives in and out of the external
cases without having to look for a screwdriver in a time of crisis.
Figure 5-7 shows a sample drive tray. Drive trays come with a small rack that you mount in a
standard drive bay and a drive tray into which you insert your hard drive. This combination
makes it easy to swap hard drives in and out of the external drive case without opening it. I also
put drive racks in the standard drive bays in my servers so that I can quickly add or replace
drives as needed.
214
214
If you decide to use USB as the underpinnings of a removable media
approach to backups, make sure that the USB ports on your servers
support USB 2.0. USB 1.x is convenient and fine for printing,
connecting a keyboard or mouse, and so on, when speed is really not a
factor. However, it's painfully slow when transferring large amounts of
data, which is the best-case scenario for new backups and the worst-case
scenario for all others.
Figure 5-7. A removable drive rack with drive tray inserted
5.6.2. Choosing the Right Backup Command
Once you have a mechanism for attaching removable storage devices to your system and have a
few large drives ready, it's important to think through the mechanism that you'll use for
backups. Most traditional Unix backups are done using specialized backup and restore
commands called dump and restore, but these commands take advantage of built-in
knowledge about filesystem internals and therefore aren't portable across all of the different
filesystems available for Linux. (A version of these commands for ext2/ext3 filesystems is
available at .) Another shortcoming of the traditional
dump/restore commands for Unix/Linux is that they reflect their origins in the days of mag
tapes by creating output data in their own formats in single output files (or, traditionally, a
stream written to tape). This is also true of more generic archiving commands that are also often
used for backups, such as tar, cpio, and pax.
If you're using logical volumes, "Create a Copy-on-Write Snapshot of an
LVM Volume" [Hack #48] explained how to create a copy-on-write
snapshot of a volume that automatically picks up a copy of any file that's
modified on its parent volume. That's fine for providing a mechanism
that enables people to recover copies of files that they've just deleted,
215
215
which satisfies the majority of restore requests. However, copy-on-write
volumes don't satisfy the most basic tenet of backupsthou shalt not store
backups on-site. (There are exceptions, such as if you're using a
sophisticated distributed filesystem such as AFS or OpenAFS, but that's
a special case that we'll ignore here.) The removable storage approach
satisfies the off-site backup rule as long as you actually take the backup
drives elsewhere.
So I can use the same backup scripts and commands regardless of the type of Linux filesystem
that I'm backing up, I prefer to use file-and directory-level commands such as cp rather than
filesystem-level commands. This is easy to do when doing disk-to-disk backups, because the
backup medium is actually a disk that contains a filesystem that I mount before starting the
backup. After mounting the drive, I use a script that invokes cp to keep the backup drive
synchronized with the contents of the filesystem that I'm backing up, using a cp command such
as the following:
# cp dpRux /home /mnt/home-backup
As you can see from this example, the script creates mount points for the backup filesystems
that indicate their purpose, which makes it easier for other sysadmins to know why a specific
drive is mounted on any given system. I use names that append the string backup to the name of
the filesystem that I'm backing uptherefore, /mnt/home-backup is used as a mount point for the
backup filesystem for the filesystem mounted as /home. You're welcome to choose your own
naming convention, but this seems intuitive to me. The cp options that I use have the following
implications:
Table 5-1.
d
Don't
dereference
symbolic
links (i.e.,
copy them as
symbolic
links rather
than copying
what they
point to).
p
Preserve
modes and
ownership of
the original
files in the
copies.
R
Recursively
copy the
specified
directory.
u Copy files
only when the
original file is
216
216
newer than an
existing copy,
or if no copy
exists.
v
Display
information
about each
file that is
copied.
x
Don't follow
mount points
to other
filesystems.
5.6.3. The Code
The actual script that I use to do these sorts of backups is the following (feel free to use or modify it if you'd
like):
#!/bin/bash
#
# wvh's simple backup script using cp
#
if [ $# != 2 ] ; then
echo " Usage: cp_backup partition backup-device"
echo " Example: cp_backup /home /dev/sda1"
exit
fi
VERBOSE="no"
STDOPTS="-dpRux"
LOGFILE="/var/log/backup/simple.log"
TARGETBASE=`echo $1 | sed -e 's;^\/;;' -e 's;\/;-;g'`
FULLTARGET="/mnt/"$TARGETBASE"-backup"
DATE=`date`
export BACKUPTASK="$1 to $2"
trap cleanup 1 2 3 6
cleanup()
{
echo " Uh-oh, caught signal: tidying up…" | tee -a $LOGFILE
DATE=`date`
umount $FULLTARGET
echo "Aborted simple backups of $BACKUPTASK $DATE" | tee -a $LOGFILE
exit 1
}
if [ ! -d /var/log/backup ] ; then
mkdir -p /var/log/backup
fi
echo "Starting simple backups of $BACKUPTASK at $DATE" | tee -a $LOGFILE
if [ ! -d $FULLTARGET ] ; then
echo " Creating mountpoint $FULLTARGET" | tee -a $LOGFILE
mkdir -p $FULLTARGET
fi
217
217
MOUNTED=`df | grep $FULLTARGET`
if [ "x$MOUNTED" != "x" ] ; then
echo " Something is already mounted at $FULLTARGET - exiting" | tee -a
$LOGFILE
exit
fi
mount $2 $FULLTARGET
if [ x$? != "x0" ] ; then
echo " Mount of backup volume $2 failed - exiting" | tee -a $LOGFILE
exit
fi
#
# This block keeps copies of important system files on all backup volumes
# in a special directory called .123_admin. They're small, it's only slow
# once, and I'm paranoid.
#
if [ ! -d $FULLTARGET"/.123_admin" ] ; then
mkdir -p $FULLTARGET"/.123_admin/conf"
fi
echo " Backing up system files to $FULLTARGET/.123_admin" | tee -a $LOGFILE
cd /etc
cp -u passwd group shadow $FULLTARGET"/.123_admin"
if [ -d sysconfig ] ; then
cp -uR sysconfig $FULLTARGET"/.123_admin"
fi
find . -name "*.conf" -print | while read file ; do
cp -u $file $FULLTARGET"/.123_admin/conf"
done
#
# Now we actually do the cp backups
#
DATE=`date`
echo " Starting actual backup of $BACKUPTASK at $DATE" | tee -a $LOGFILE
cd $1
if [ x$VERBOSE != "xno" ] ; then
cp $STDOPTS"v" . $FULLTARGET
else
cp $STDOPTS . $FULLTARGET
fi
umount $FULLTARGET
DATE=`date`
echo "Completed simple backups of $BACKUPTASK at $DATE" | tee -a $LOGFILE
You'll note that I don't log each file that's being backed up, though that would be easy to do if running the
script in verbose mode by using the tee command to clone the cp command's output to the logfile. The
traditional Unix/Linux dump and restore commands use the file /etc/dumpdates to figure out which full
and incremental backups to use in order to restore a specific file or filesystem, but this isn't necessary in this
case because we're copying the updated files from the specified partition to a full backup of that partition, not
just doing an incremental backup in traditional Unix/Linux terms.
218
218
5.6.4. Running the Code
If you're following along at home, you can use this script by entering it in your favorite text editor, saving it to
a file called cp_backup in /usr/local/bin, making it executable (chmod 755
/usr/local/bin/cp_backup), and then executing it (after making sure that you've mounted a spare
disk as a backup target, and that the spare disk is the same size as or larger than the filesystem that you want
to back up). For example, to back up the partition mounted as /mnt/music on my system (which contains
100% legally purchased music in digital form) to a 250-GB disk containing the single partition /dev/sda1, I
would use the following command:
# /usr/local/bin/cp_backup /mnt/music /dev/sda1
You can even automate these sorts of backups by adding an entry that executes them to root's crontab file. As
the root user or via sudo, execute the crontab e command and append a line like the following to the end
of the file:
0 2 * * * $/usr/local/bin/cp_backup /mnt/music /dev/sda1
This will run the cp_backup script to back up /mnt/music to /dev/sda1 every night at 2 A.M.
5.6.5. Choosing What to Back Up
The previous sections explained why disk-to-disk backups are the smartest choice for low-cost backups of
today's huge disk drives, and advocated file-and directory-level commands as an easy backup mechanism that
is independent of the actual format of the filesystem that houses the data you're backing up. Keeping a large
number of spare drives around can be costly, though, so I try to minimize the number of filesystems that I
back up. The traditional Unix/Linux dump command does this through entries in the /etc/fstab file that
identify whether the filesystem should be backed up or notif the entry in the next-to-last column in /etc/fstab
is non-zero, the filesystem will be backed up. My general rule is to only back up filesystems that contain user
data. Standard Linux filesystems such as / and /usr can easily be recreated from the distribution media or from
partition images [Hack #49]. Since the backup script I use keeps copies of system configuration files, I'm not
that worried about preserving system configuration information.
5.6.6. Summary and Tips
This hack provides an overview of doing modern backups and a script that I use to do them on most of the
systems I deploy. To use this approach, the target devices that you're backing up to have to have at least as
much space as the filesystem that you're backing up, and you'll have to preen or wipe the daily backup devices
every so often (generally after a full backup) in order to minimize the number of copies of files and directories
that have been deleted from the live filesystem but still exist on the backup drives. If your systems use logical
volumes that span multiple disks, you'll have to use equivalent, multi-disk backup devices, but they can often
be simpler, cheaper devices than those that house your live data. For example, if you're backing up filesystems
that live on a RAID array, you don't have to have a RAID backup deviceyou can get away with sets of drives
that are large enough to hold the data itself, not its mirrors or checksum disks.
219
219
Hack 51. Free Up Disk Space Now
Moving large files to another partition isn't always an option, especially if running services are holding them
open. Here are a few tips for truncating large files in emergency situations.
Server consolidation takes planning, and it usually means adjusting the way you set up your OS installations.
Running multiple services on a single OS image means not only increased network traffic to the same
hardware, but increased disk usage for logfiles.
What's more is that administrators' thirst for more data about the services they run has resulted in a tendency
for logging to be more verbose these days than it was in the past, partially because the tools for analyzing the
data are getting better.
However, someday you'll inevitably be faced with a situation where you're receiving pages from some form of
service monitoring agent telling you that your web server has stopped responding to requests. When you log
in, you immediately type df h to see if what you suspect is true, and it isyour verbose logging has just bitten
you by filling up the partition, leaving your web server unable to write to its logfiles, and it has subsequently
stopped serving pages and become useless. What to do?
There are several commands you can use to deal with this. If the service is completely dead, you could
actually move the file to another partition, or simply run rm -f logfile if you know that the data is not
particularly useful. If the service is still running, however, and needs its logfile to be available in order to do
anything useful, truncation may be the way to go. Some admins have a watchdog script that polls for large
files created by noncritical services and truncates them before they get out of control, without having to restart
the service. A command that might appear in a script to do this (which can also be issued at a command line)
is:
$ cat /dev/null > filename
Obviously, you should run this command as root if the file you are truncating requires elevated privileges.
Why use /dev/null? You could also use the following command:
$ cat > filename
This is certainly a little shorter, but the downfall here is that it doesn't exit by itselfyou need to terminate it
manually. On the command line, that means typing Ctrl-C to exit.
While these commands definitely work, I'd like to show you what I believe to be the shortest file truncation
command known to bash. It goes a little something like this:
$ > filename
The above command has no dependency on anything except for the redirection operator >. Essentially, you
are redirecting what's on the left of the operator (which is to say, nothing) into the file in question. What
makes this perfectly elegant is that it exits all by itself and leaves behind a file of zero bytes in length. What
more could an admin ask for?
220
220
Technically, understanding what has happened above involves knowing how redirection in the shell works. In
the bash shell, if the redirection operator is pointing to the right (i.e., >), what is being directed is the standard
output of whatever is on the left. Since we've specified no command on the lefthand side, the standard output
is nothing, and our redirection operator happily overwrites our large file, replacing the contents
with…nothing.
Hack 52. Share Files Using Linux Groups
Traditional Unix/Linux groups have always made it easy to share files among users.
Though this is more of a basic system capability than a hack, creating files that other users can both read and
write can be done in various ways. The easiest way to do this is to make all files and directories readable and
writable by all users, which is the security equivalent of putting a sign on your computer reading, "Please
screw this up." No sysadmin in his right mind would do this, and most would also want to protect their users
against accidentally setting themselves up for a catastrophe by doing so.
This hack provides an overview of how to use Linux protections to create directories that can be protected at
the group level, but in which all members of that group will be able to read and write files. This doesn't
involve any special scripts or software packages, but provides a simple refresher that will help you help your
users get their work done as efficiently as possible and with as few phone calls or pages to you as possible.
5.8.1. Linux Protections 101
Basic Linux protection modes, inherited from Unix, provide the ability to protect files and directories at three
basic levels:
Owner-specific permissions that control what the person who owns a file can do•
Group-specific permissions that control what other members of the group that owns a file or directory
can do
•
One more set of permissions that control what anyone else on the system can do•
These permissions are reflected in the leftmost entry in the long listing of any file or directory, as in the
following example:
$ ls -al /home/top-secret
total 8
drwxrwx 2 ts top-secret 80 2005-07-04 16:02 .
drwxr-xr-x 8 root root 184 2005-07-04 15:57
-rw-r r 1 wvh top-secret 5386 2005-07-04 16:02 wmd_overview.sxw
This listing shows three sets of Unix permissions: those for the directory in which the command was executed
(.), those for that directory's parent directory ( ), and those for a file in that directory (wmd_overview.sxw).
The permissions for the directory show that it is owned by the user ts and the group top-secret, and that the
directory can only be read, written to, or searched by the user ts or anyone in the top-secret group. The
permissions entry for the wmd_overview.sxw file say that the file can be read or written to by its owner (wvh)
and by any member of the top-secret group. In practice, this seems pretty straightforwardanyone in the
221
221
top-secret group who needs to modify the wmd_overview.sxw file can just open it, make their changes, and
save the file. Because only the user ts user and people in the top-secret group have access to the directory in
the first place, it seems like a natural place for members of the group to create files that they can share with
other group members.
5.8.2. Setting the umask to Create Sharable Files
The ownership and permissions on files that a user creates are controlled by three things: the user's user ID
when creating the file, the group to which she belongs, and her default protection file settings, known as her
umask. The umask is a numeric value that is subtracted from the permissions used when creating or saving
files or directories.
In the previous example, assume that the users wvh and juser are both members of the top-secret group. The
user juser creates a file called juser_comments.txt in the /home/top-secret directory, but its protections are set
to -rw-r r
This means that no other user in the top-secret group can modify this file unless juser changes the permissions
so that the file is also writable by group members, which can be done with either of the following commands:
$ chmod 660 juser_comments.txt
$ chmod g+w,o-r juser_comments.txt
You find out a user's default umask setting by issuing the umask command, which is a built-in command in
most Linux shells. By default, most users' umasks are set to 0022 so that newly created files are writable only
by their owners, as in the example in the previous paragraph.
Setting the user's umask to 0002 may seem like an easy way to ensure that files are created with permissions
that enable other group members to modify them. This turns off the world-writable bit for the file, but leaves
the group-writable bit set. However, there are two problems with this approach:
It affects every file that the user creates, including files that are typically kept private, such as the
user's mailbox.
•
It applies only to the group to which the user belonged at the time the file was created.•
If you want to use a group-writable umask setting everywhere, the first of these issues is usually solved by
turning off the executable and read permissions for group members and standard users on your home
directory. (In Unix/Linux permissions, the executable bit on a directory determines whether the directory is
searchable.) This means that while the files being created there are writable by group members, group
members can't view the directory or locate the files in the first place.
If you don't want to globally set your umask to create files that are group-writable, another common approach
is to define an alias for file creation (in your shell's startup file, such as ~/.bashrc) that automatically sets file
permissions appropriately, as in the following example:
alias newfile=`(umask 0002 ; touch $1)`
This command forks a sub-shell, sets the umask within that shell, and then creates the file and exits the
sub-shell. You can do the same sort of thing without forking a sub-shell by manually changing the file
permissions within an alias:
222
222
alias newfile=`touch $1; chmod 660 $1`
Any of these solutions works fine if the group that you want to be able to share files with is the group that you
initially belong to when you log in, known as your login group.
Linux enables users to belong to multiple groups at the same time, in order to let people work on multiple
projects that are protected at the group level. For the purposes of creating files, Linux users function as
members of a single group at any given time, and they can change the group that is in effect via the newgrp
command. However, as explained in the next section, you can also set Linux directory protections to control
the group that owns files created in a particular directory.
5.8.3. Using Directory Permissions to Set Group Membership
Directory permissions in Linux have a different impact on the group ownership of files created in a directory
than they do in other Unix-like operating systems. On BSD-based systems, for example, files created in a
directory are always created with the group ownership of the group that owns the directory. On Linux
systems, files created in a directory retain the group membership of the user that was in effect at the time the
file was created.
However, you can easily force group membership under Linux by taking advantage of a special permission
mode, known as the s-bit. Unix systems have traditionally used this bit to enable users to run applications that
require specific user or group privileges, but when set on a directory, the s-bit causes any files created in that
directory to be created with the group membership of the directory itself. The s-bit on a directory is set using
the command chmod g+s filename. If the s-bit is set on a specific directory, the x in the group
permissions for that directory is replaced with an s.
The following is an example of group ownership after the s-bit has been set on the same /home/top-secret
directory (note the s in the executable bit of the group settings):
# chmod g+s /home/top-secret
# ls -al
total 8
drwxrws 2 ts top-secret 80 2005-07-04 16:02 .
drwxr-xr-x 8 root root 184 2005-07-04 15:57
-rw-r r 1 wvh top-secret 5386 2005-07-04 16:02 wmd_overview.sxw
At this point, creating any file in this directory gives it the same group ownership as the directory, as in the
following example:
$ touch testfile.txt
$ ls -al
total 8
drwxrws 2 ts top-secret 112 2005-07-04 16:06 .
drwxr-xr-x 8 root root 184 2005-07-04 15:57
-rw-r r 1 wvh top-secret 0 2005-07-04 16:06 testfile.txt
-rw-rw-r 1 wvh top-secret 5386 2005-07-04 16:02 wmd_overview.sxw
Because of the umask settings discussed earlier, this file was created with a mode that made it both user- and
group-writable, which is exactly what you want.
223
223
As you can see, Unix groups provide a useful and flexible mechanism for enabling users to share access to
selected files and directories. They work in the same way on every modern Unix system, and thus provide a
portable and standard protection mechanism.
5.8.4. See Also
"Refine Permissions with ACLs" [Hack #53]•
Hack 53. Refine Permissions with ACLs
Access control lists bring granular permissions control to your files and directories.
Standard Unix/Linux file permissions are fine if you have a relatively small number of users with limited
requirements for sharing and working on the same files. ("Share Files Using Linux Groups" [Hack #52]
explained the classic approaches to enabling multiple users to work on the same files.) However, using groups
to control shared access requires the intervention of a system administrator and can result in incredibly huge
and complex /etc/group files. This makes it difficult to set the group memberships for any new accounts
correctly and requires frequent sysadmin intervention as users leave or move between projects. ACLs, which
are supported in most modern Linux distributions, eliminate this hassle by providing a fine-grained set of
permissions that users can impose on their own directories, going far beyond the permissions and protections
provided by standard Linux groups.
Simply put, an ACL is a list of Linux users and/or groups and the access rights that they have to a specific file
or directory. ACLs enable you to define totally granular permissions such as "only the users wvh and alex can
write this file, but the user juser can at least read it" without requiring that you create any special-purpose
Linux groups.
ACLs as implemented on Linux systems today are defined by the draft Portable Operating System Interface
(POSIX) standard 1003.1e, draft 17, from the Institute of Electrical and Electronics Engineers (IEEE). This is
not an official standard, but it is publicly available and has become the foundation for ACL implementations
for modern operating systems such as Linux. (See the end of this hack for pointers to this document on the
Web.)
5.9.1. Installing and Activating ACL Support
To use ACLs to enhance the granularity of permissions on your system, you must have several things in place:
Your kernel must be compiled with both enhanced attribute and ACL support for the type(s) of
filesystem(s) that you are using.
•
Your filesystem(s) must be mounted with extended attribute and ACL support enabled [Hack #54].•
You must install the user-space ACL utilities (chacl, getfacl, and setfacl) in order to examine and set
ACLs.
•
224
224
5.9.1.1. Kernel ACL support.
Most modern Linux distributions provide support for ACLs in the default kernels that they deliver. If you
have access to the configuration file used to build your kernel, you can use the grep utility to check to make
sure that the POSIX_ACL configuration variable associated with the types of filesystems that you are using is
set to y, as in the following example:
$ grep POSIX_ACL /boot/config-2.6.8-24.16-default
EXT2_FS_POSIX_ACL=y
EXT3_FS_POSIX_ACL=y
REISERFS_FS_POSIX_ACL=y
JFS_POSIX_ACL=y
XFS_POSIX_ACL=y
If the POSIX_ACL value associated with any of the types of filesystems you are using is set to n, you will
have to enable it, save the updated kernel configuration, and recompile your kernel in order to use ACLs. To
enable the appropriate POSIX_ACL value, you will also have to enable extended attributes for that filesystem.
Extended attributes must be separately enabled for each type of filesystem you are using (with the exception
of the XFS journaling filesystem, which inherently supports them). The kernel configuration options that
enable them are located on the File Systems pane in your favorite kernel configuration editor (make
xconfig, make menuconfig, and so on). See "Make Files Easier to Find with Extended Attributes"
[Hack #54] for more information about enabling and using extended attributes.
5.9.1.2. fstab ACL support.
Once you are running a kernel with support for POSIX ACLs, you will also need to make sure that the
filesystems in which you want to use ACLs are mounted with ACL support enabled. Check your /etc/fstab file
to verify this. Filesystems mounted with ACL support will have the acl keyword in the mount options
portions of their entries in the file. In the following example, the reiserfs filesystem on /dev/sda6 is mounted
with ACL support, while the ext3 filesystem on /dev/hda1 is not:
/dev/sda6 /usr reiserfs noatime,acl,user_xattr 1 2
/dev/hda1 /opt2 ext3 defaults 0 0
If your kernel supports ACLs, you can edit this file to enable ACL support when you initially mount a
filesystem by adding the acl keyword to the mount options for that filesystem, as in the following example:
/dev/hda1 /opt2 ext3 defaults,acl 0 0
After updating this file, you can enable ACL support in currently mounted filesystems without rebooting by
executing a command like the following, which would remount the example ext3 filesystem /dev/hda1,
activating ACL support:
# mount -o remount,acl /dev/hda1
225
225
5.9.1.3. User-space ACL support.
The last step in using ACLs on your system is to make sure that the user-space applications that enable you to
display and set ACLs are present. If your system uses a package management system, you can query that
system's database to see if the acl package and its associated library, libacl, are installed. The following is an
example query on a system that uses RPM:
# rpm -qa | grep acl
acl-2.2.25-2
libacl-2.2.25-2
You can also look for the utilities themselves, using the which command:
# which getfacl
/usr/bin/getfacl
# which setfacl
/usr/bin/setfacl
# which chacl
/usr/bin/chacl
If the acl package is not installed and the binaries are not present on your system, you can find the source code
or binary packages for your system by following links from . You'll need to install these
packages before continuing.
5.9.2. Overview of Linux ACLs and Utilities
Linux supports two basic types of ACLs:
ACLs used to control access to specific files and directories•
Per-directory ACLs (known as mask ACLs), which define the default ACLs that will be assigned to
any files created within that directory
•
Conversationally and in print, ACLs are represented in a standard format consisting of three colon-separated
fields:
The first field of an ACL entry is the entry type, which can be one of the following: user (u), group
(g), other (o), or mask (m).
•
The second field of an ACL entry is a username, numeric UID, group name, or numeric GID,
depending on the value of the first field. If this field is empty, the ACL refers to the user or group that
owns the file or directory. mask and other ACLs must have an empty second field.
•
The third field lists the access permissions for the ACL. These are represented in two forms:
A standard Unix-like permissions string or "rwx" (read, write, and execute permissions,
where execute permissions on directories indicate the ability to search those directories). Each
letter may be replaced by a dash (-), indicating that no access of that type is permitted. These
three permissions must appear in this order.
♦
A relative symbolic form that is preceded by a plus sign (+) or a caret symbol (^), much like
the symbolic permissions that are designed for use with the chmod command by people who
are octally challenged. In this ACL representation, the + or ^ symbols are followed by single
r, w, or x permission characters, indicating that these permissions should be added to the
♦
•
226
226
current set for a file or directory (+) or removed from the current set (^) for a given file or
directory.
When listed or stored in files, different ACL entries are separated by white space or new lines. Everything
after a # character to the end of a line is considered a comment and is ignored.
The Linux acl package provides the following three utilities for ACL creation, modification, and examination:
chacl
Lets you change, examine, or remove user, group, mask,or other ACLs on files or directories
getfacl
Lets you examine file ACLs for files and directories
setfacl
Lets you set file and directory ACLs
5.9.3. Displaying Current ACLs
As an example of using ACLs, let's use a directory with the following contents and permissions:
$ ls -al
total 49
drwxr-xr-x 2 wvh users 80 2005-07-04 13:59 .
drwxr-xr-x 106 wvh users 5288 2005-07-04 14:47
-rw-r 1 wvh users 44032 2005-07-04 13:58 resume.xml
The default ACL for this directory is the following:
$ getfacl .
# file: .
# owner: wvh
# group: users
user::rwx
group::r-x
other::r-x
The default ACL for the file resume.xml is the following:
$ getfacl resume.xml
# file: resume.xml
# owner: wvh
# group: users
user::rw-
group::r
other::
227
227
The default ACL for a file in a directory for which a default ACL has not been set reflects the default Unix
permissions associated with the user that created the file. The default Unix permissions for a file are based on
the setting of the umask environment variable [Hack #52].
5.9.4. Setting ACLs
There are three common ways to change the ACL of a file or directory:
By setting it explicitly using the setfacl command, which overwrites any existing ACL settings•
By using the setfacl command with the -m (modify) option to modify an existing ACL•
By using the chacl command to modify an existing ACL•
For the examples in this hack, I'll use the chacl command to change ACLs, since this doesn't overwrite the
existing ACL. It also provides a bit more information about how ACLs really work than the shorthand version
of the setfacl command.
For example, to add the user alex as someone who can read the file resume.xml, I would use a chacl
(change ACL) command like the following:
$ chacl u::rw-,g::r ,o:: ,u:alex:r ,m::rw- resume.xml
No, that isn't static from a bad modem or Internet connection (though it probably is a command in the old
TECO editor)that's the way ACLs look in real life. As mentioned previously, ACLs consist of three
colon-separated fields that represent the permissions of the user (the owner of the file), group (the group
ownership of the file), and others. When changing an ACL with the chacl command, you need to first
specify the ACL of the file and then append the changes that you want to make to that ACL. The
u::rw-,g::r ,o:: portion of the ACL in this example is the existing ACL of the file; the
u:alex:r ,m::rw- portion specifies the new user that I want to add to the ACL for that file and the
effective rights mask to be used when adding that user. The effective rights mask is the union of all of the
existing user, group, and other permissions for a file or directory. You must specify a mask when adding a
random user to the ACL for a file.
Using the getfacl command to retrieve the ACL for my resume shows that the user alex has indeed been
added to the list of people who have access to the file:
$ getfacl resume.xml
# file: resume.xml
# owner: wvh
# group: wvh
user::rwx
group::r
other::
user:alex:r
mask::rw-
Though the content is the same, the format of the output of the getfacl command
depends on the version of the ACL suite that is being used on your Linux system.
228
228