art and design in photoshop - phần 9 potx
Bạn đang xem bản rút gọn của tài liệu. Xem và tải ngay bản đầy đủ của tài liệu tại đây (5.36 MB, 26 trang )
)''
Any other
business
yy
So far in this book we’ve looked at how to choose and use typefaces well
and wisely. We’ve explored the basic rules of design and composition, from
perspective to the Rule of Thirds.
We’ve seen how to create a variety of posters, how to make graffiti, and how
to design book covers for anything from historical non-fiction to trashy 1950s
pulp stories. We’ve seen how to create medieval manuscripts, picture postcards,
cereal boxes and soup cans. We’ve even discovered the secrets of some of the
greatest painters of this or any other age.
There are some designed objects that don’t fit within any of the categories
we’ve covered so far. Stained glass windows, for example, or credit cards, or
carved stone. This chapter is for the miscellaneous.
Art & Design in Photoshop
Any other
business
miscellany
1. A mass or mixture of
various things; a medley;
esp., a collection of
compositions on various
subjects.
‘Tis but a bundle or
miscellany of sin; sins
original, and sins actual
.
l
l
– Hewyt.
2. Miscellany madam,
a woman who dealt
in various fineries; a
milliner. [Obs.]
Webster’s Revised
Dictionary
)'(
)')
The idea of the credit
card was first put
forward in the novel
Looking Backward,
written by Edward
Bellamy as long ago as
1887. It tells the story of
a young American who
falls into a sleep induced
by hypnosis, and wakes
up in the year 2000, by
which time the United
States has become a
socialist Utopia.
Well, at least he got
the credit card part
right. Bellamy mentions
them, by name, no less
than eleven times in
the book, as the lead
character frequently
uses them to buy goods.
Although they have
little to do with socialist
Utopian states, credit
cards have steadily
replaced both cash
and checks since their
introduction in the
1950s. Key elements
apply to all cards: the
embossed name and
numbers, making the
card machine readable,
are an essential part of
the system.
Credit cards
+
I’ve been unable
to find a font that
accurately reproduces
that found on credit
cards – and so I’ve drawn
my own characters.
They’re colored gray
with a slight touch of
blue. Apply an Inner
Bevel using the Layer
Style dialog, with a small
size – just 2 pixels should
be enough, as these
characters are going to
be very small.
!
The hologram is
a tricky element.
First, we’ll draw a round-
cornered rectangle
and place a picture
of a bird on it. Merge
the two layers and
desaturate, then darken
the rectangle corners to
make some variation in
tone. Open the Curves
dialog, and draw a step
curve like this one: the
result will be a solarized
view, which looks
convincingly like a real
hologram.
.
Credit cards use
a bewildering
variety of background
images – some
photographic, some
pure design. I’ve drawn
this abstract pattern
using the Brush and
the Dodge tool to add
highlights, but you can
use any image you like.
The fictional bank name
here has a very small
bevel added, using Layer
Styles, to add some life
to it.
)'*
Art & Design in Photoshop
Any other
business
FEK?<:;
DFI<@E=F
image
Although the credit card O
numbers have not been
made into a font, I’ve drawn
the full set here – copy them
in the order you want to
make a convincing set of
figures. But remember, it’s
always four groups of four
figures for standard cards.
The Shapes tool, used O
for the hologram backing in
step 3 and for the card itself
in step 4, has three modes:
it can create Shapes layers,
draw Pen paths or paint
pixels directly. The modes
are chosen using the three
icons on the Options bar:
In this instance it’s easiest
to use the Pixel Fill mode,
the last of the three buttons,
to create our card.
The position of the O
elements on a card varies
from card to card. But it’s
common practice to place
the numbers so they overlap
the hologram – an additional
fraud protection.
A drop shadow has been O
added to the numbers when
placed on the card, to make
them stand out from the
surface. This should be a
very small shadow that’s
barely noticeable: we don’t
want the numbers to look as
though they’re floating.
J?FIK:LKJ
MAC WIN BOTH
0
To add some
metallic shine
to this, we can use the
Contour section just
below the Bevel and
Emboss section. Choose
an upwards curve from
the Contour pop-up,
as shown here – or
experiment with some of
the other curves to see
the result. You can even
draw your own.
,
We can draw
our credit card
using the Round Corner
Rectangle mode of the
Shapes tool. The Shapes
tool can be set to Fill
Pixel mode (see More
Info); drag on a new
layer to fill with the
foreground color. If the
corner radius is not right,
Undo and then change it
on the Options bar.
1
The computer
chip below the
word ‘Bank’ has to be
drawn, copying the real
thing. Draw it in gray,
then use the Dodge
and Burn tools to add
diagonal stripes to make
it look metallic. The card
holder’s name and the
dates have the same
layer style applied to
them as the numbers;
the other wording is
set in straightforward
Helvetica.
)'+
The Trajan Column, in
Rome, completed in
113AD, commemorates
the emperor Trajan’s
victory in the Dacian
wars. It tells the story of
his conquests in pictorial
form on a continuous
spiral that winds all the
way around the column.
We won’t attempt
anything quite as
ambitious. But we do
have a good method of
carving text onto stone
without having to raise
a chisel.
Carving in stone
+
First, take your
lump of stone.
I’ve provided one on the
CD, but there are many
sources of stone and
marble on the internet:
look for free textures for
3D modelers. You’ll find
an excellent selection
at www.mayang.com/
textures.
!
Change the color
of the text to
around 50% gray, and
change the mode of
the layer to Hard Light.
It will more or less
disappear, depending
on whether you hit
exactly 50% gray: this
doesn’t matter. It’s just
there as a basis for the
embossing.
.
Let’s make
some cracks in
this stone to go with
the lettering. Make a
new layer, above the
type; then select both
and press
*-D
!D to use the
stone layer as a Clipping
Mask. Select areas of the
new layer with the Lasso,
and fill with mid gray.
/
We need to chip
away at the outer
stone, to tie in with the
large cracks we’ve made.
Make a layer mask for
the stone layer, and erase
V-shaped notches at the
ends of the cracks. We’ll
need to hide the lettering
where it intersects with
these cracks as well –
see More Info for how to
do this.
)',
0
The text is set
in Optimus
Princeps, a wonderfully
evocative font that
accurately reproduces
the Roman style of
carved typography. Don’t
be tempted to use Times
Roman instead, it just
won’t look right!
,
Choose Bevel
and Emboss in
the Layer Styles dialog.
We only need to make a
couple of changes from
the default settings
here: set the Technique
to Chisel Hard, and
the direction to Down.
Increase the Size setting
to create an appropriate
carved appearance.
1
Change the mode
of this layer to
Hard Light as well, and
copy the Layer Styles
from the text layer
onto it – hold
-
and drag the style in
the Layers palette. The
carved effect will now
show through on this
layer as well.
%
One of the best
features about
creating this effect with
live text, rather than text
that has been rasterized
to become a regular
pixel layer, is that we
can change the wording
or the font at any point
– and the effect will
remain in place.
Art & Design in Photoshop
Any other
business
FEK?<:;
DFI<@E=F
texture
font
In step 4 we choose O
Chisel Hard as the style for
the Inner Bevel. There are
three modes here: Smooth,
which is the standard bevel
method, and the two Chisel
modes – Hard and Soft.
Rather curiously, Chisel Soft
produces a harder-edged
effect, with clear striations
in the bevel edges: this
effect would work well on
wood, but is too rough for
polished marble.
In step 7, we need to O
hide the text where it
intersects with the cracks.
This is a straightforward
procedure: first, load up the
pixel area taken up by the
cracks by holding
*!
and clicking on the layer’s
thumbnail in the Layers
palette. Then switch to the
Type layer, and, with the
selection still active, choose
Layer > Add Layer Mask
> Hide Selection. This will
make a new layer mask, with
the selected area already
painted out.
When we change the O
text in step 8, we retain the
Layer Style that produces
the incised effect – and, of
course, we keep the layer
mask added in step 7 as
well. All that changes is
the wording: the rest of
the effect is exactly as we
intended it to be.
J?FIK:LKJ
MAC WIN BOTH
)'-
Stained glass windows
have been decorating
churches since the 10th
century. By cutting down
the amount of light
entering the building,
they added a mysterious
and awe-inspiring
ambience; they also gave
worshippers inspirational
images to look at during
the long sermons.
Individual pieces
of colored glass were
made for each of the
main color areas in the
window, joined together
by strips of lead into
which the panes of glass
were welded.
But windows were
very rarely, if ever, made
of plain colored glass.
Details such as faces and
folds in clothing were
painted onto the glass
afterwards.
Although Photoshop
includes a Stained Glass
filter, this produces
random arrays of
leading that never look
convincing. Here’s a
better way to make a
stained glass window
from photographs.
+
The first step is to locate and combine your
picture elements. We’ve used figures from the
Hemera Photo-Objects collection: a saint, a nun, both
images of figurines, and a photograph of a real sheep.
0
To make them seem more painted, each of these
figures has had the Poster Edges filter applied
to it (found in Filter > Artistic). Since black is a rather
dull color for glass, I’ve also brightened the nun’s robes,
adding color using the Curves dialog: simply achieved by
raising the curve on both the red and the blue channels.
.
To make the leading, first create a new layer
above the figures. Hold
!* as you click
on the thumbnail for the Sheep layer, and use Edit >
Stroke to add a 6pt black stroke to the new leading layer.
Repeat this process for the hills and the halo layer. Don’t
worry about the outlines cutting through the saint!
1
Now hold !* as you click on the saint
layer’s thumbnail. Press
to delete
the area from the leading; add a stroke in the same way
as before. Layer Effects adds an inner bevel and slight
shadow to the leading. Use a hard-edged brush with a 6
pixel size to paint in additional leading within the figures.
Stained glass windows
FEK?<:;
J?FIK:LKJ
DFI<@E=F
image
In steps 5 and 6 we’re O
loading selection areas
from several layers, but only
working on the one layer –
the leading. Using the
!
* key to load a layer’s
pixels as a selection, while
working on a different layer,
is a useful ability that we’ll
use many times in this book.
To draw the straight lines O
in step 7. first click the brush
at one end of the line; then
hold
1 as you click the
other end, and a straight line
will be drawn between the
two click points.
Making the curved band O
of glass in step 7 is easier
than it looks. On the frame
layer (made in step 3),
select the interior of the
arch with the Magic Wand.
Then, on the leading layer,
press
to delete
the existing leading; add
a stroke as before. Then
use Select > Modify >
Contract to reduce the size
of the selection by around
24 pixels, and add another
stroke. All the interior lines
are drawn one at a time.
By default, the inner glow O
added in step 8 will be at the
edge of the selected panes
of glass. Change the mode to
Center rather than Edge to
make an interior glow.
MAC WIN BOTH
!
Stained glass works best within a suitably shaped
frame. The basic outline (left) was drawn on a
new layer, using a combination of the Rectangular and
Elliptical Marquee tools to draw the shapes. Then, Layer
Styles are used (right) to add embossing, as well as a
sandstone texture using the Texturizer filter.
,
The hills, sky and halo are drawn on separate
layers. After drawing the shape for the hill, fill
it with pale green: then choose a darker green and use
the Gradient tool, dragged from bottom to top, to add
a deeper hue. The same process is used for the sky; the
center of the halo is lightened with the Dodge tool.
/
Add further leading to the background to break
it up into manageable panes. The border is first
drawn on the leading layer, then alternate panes are
selected with the Magic Wand tool, and filled with red
and blue on a new layer behind the leading.
%
Finally, let’s add some glow. On the leading layer,
use the Magic Wand to select the interior of the
large panes of glass. Flatten the hills and sky into a single
layer, then use
!G*G to make a new layer
from the selection. In Layer Effects, add an inner glow,
adjusting the size and choke until the effect looks right.
)'.
Art & Design in Photoshop
Any other
business
)'/
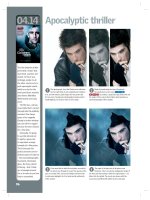
Neon lettering is made
of glass tubes that have
been heated up and
bent into shape. It’s
not possible to create
hard corners using
this technique, as the
example above shows:
to make the letter R, the
neon has had to be bent
backwards in front of
itself.
Creating accurate
neon lettering is a long
and fairly tortuous
business. I deal with
it in some depth in my
book How to Cheat
in Photoshop, so I
won’t repeat the same
procedure here. Instead,
let’s look at a quick and
simple way to make neon
lettering using Layer
Styles. The advantage
of this method is that
it’s easy to create, and
once the Layer Style
has been defined it can
be applied to any other
object. The disadvantage
is that it isn’t an exact
reproduction of neon
– but it’s a speedy
alternative.
Quick and dirty neon
+
The lettering
I’ve used here is
Junegull, made by Ray
Larabie. It has the curved
corners that are ideal
for turning into neon,
and will save us some
time. Alternatively, you
could use the approach
described on page 20
for turning any font into
one that’s suitable for the
neon process.
!
While we’’re not
going to attempt
to make the creases as
the tube doubles back
on itself, we can insert
breaks where each
section of tube is masked
to join the next. Make a
layer mask for the neon
layer, and use a hard-
edged brush to paint out
small gaps in each letter.
Try to paint out the gaps
in appropriate places.
.
Make another
new layer, and
fill with black; then hold
- as you drag
the Layer Style from the
neon layer onto this new
one, and the style will
be copied across. There
are some places where
the reduced neon effect
really doesn’t work, such
as inside the ‘M’ of ‘Time’;
delete these with the
Eraser tool.
)'0
Art & Design in Photoshop
Any other
business
FEK?<:;
DFI<@E=F
font
In step 2, we need to O
add multiple layers as a
single selection. To do this,
first hold
*! and
click on the thumbnail of
the first layer in the Layers
palette, to load up its pixels
as a selection. Then hold
*1!1 and
click on each additional
layer’s thumbnail in turn:
when you do so, the pixels on
that layer will be added to
the selection.
When we paint gaps in O
the letters in the layer mask
in step 3, we’re likely to be
left with hard ends. A good
solution is first to make the
gaps slightly larger than
you want them to end up.
Then switch the foreground
and background colors so
that we’re painting in white,
which will paint back in
on the layer mask. Choose
a small, hard brush that’s
the same size as the neon
tubing, and carefully paint
back the end of each piece
of tubing. The result will be
neatly rounded ends that
look far more convincing.
In step 6, I’ve revealed O
the original lettering behind
the neon effect – reduced
in opacity, so it’s only
just visible. This gives the
impression of the wooden
backing to which the neon
tubing is attached, and
which allows it to be read
clearly in daytime.
J?FIK:LKJ
MAC WIN BOTH
0
Load up all
the words as a
selection (see More Info
for details), then make
a new layer and apply
an 8pt stroke to it (left).
Using Layer Styles, add
a bevel and emboss
(center); then add an
Outer Glow to make the
neon shine. The neon
style is included in the
file Art&Design.asl on
the CD.
,
Let’s add a
second row of
neon inside the first.
Hold
*! and click
on the neon’s thumbnail
to load the selection,
then use
*O
!-Oto open
the Refine Edge dialog.
Use the Contract slider
to make the selection
a lot smaller, and raise
the Contrast slider to
hide any fuzziness in the
edges. Then hit
# to
apply the effect.
1
We could add
color to the neon
by changing the color of
each layer, and modifying
the colors in Layer
Styles to match. But
here’s a much quicker
way: make a selection
around the word ‘UP’,
and make a new Hue/
Saturation adjustment
layer using the pop-up
menu at the bottom of
the Layers palette. When
you drag the Hue slider,
the adjustment will be
confined to the area you
selected.
)('
Since the dawn of
time people have been
fascinated by fire and
water. The invention of
the aqualung has helped
divers to discover the
wonders of the deep.
Closer to home, the
British artist David
Hockney made an early
name for himself with
A Bigger Splash, the
first painting to depict
the pattern of sunlight
reflected on a swimming
pool as a graphic
illustration. The painting
is also unusual in that
the subject, a diver, has
disappeared beneath the
surface.
We’ll use the texture
already present in our
swimming pool to place
text on the bottom of
the pool.
Writing under water
+
We can see the
distorted tiles
through the surface of
the water, and it’s this
rippling distortion that
we want to emulate. The
pattern of sunlight on
the surface follows the
‘contours’ of the water,
outlining the various
rippling hills and valleys
that make up the surface.
!
Use Layer >
Rasterize > Type
to turn the text into a
regular pixel layer, then
use Free Transform to
distort it so it’s seen in
perspective. This effect
is achieved by holding
*!as you drag
each corner handle:
the modifier key allows
each corner to be moved
independently. It can
take a while before the
effect looks right, so be
experimental and try
to match the original
perspective of the pool.
.
Now for the
clever bit. Hide
the gray version of the
water, and choose Filter
> Distort > Displace.
You’ll be presented with
this dialog: choose a
horizontal and vertical
scale of 20 to begin
with. When you click OK
you’ll be presented with
a standard Open dialog:
navigate to the .psd file
you saved in the last
step, and click on that.
)((
Art & Design in Photoshop
Any other
business
FEK?<:;
DFI<@E=F
texture
font
In step 4, we blur the O
water before saving it as our
displacement map. That’s
because the original gray
version of the water is too
intricate, and will produce
a very fiddly outline on
the text. Here’s the text
distorted by itself:
And here’s the text after
adding some blur to the
displacement map:
The second version gives
us the distortion we want –
following the major contours
of the water, without
replicating each little ripple.
When you save the .psd O
file in step 4, it’s only the
uppermost visible layer of
the saved file that’s read by
the Displace filter – so you
can carry on working on the
rest of the image beneath it.
J?FIK:LKJ
MAC WIN BOTH
0
Because we’re
going to distort
the text, we need to
choose something bold
and straightforward. This
is Headline One, a plain
sans serif that will be
perfect for our needs.
,
Duplicate the
water layer,
and desaturate it
using
*1R
!1R. Drag the
copy to the top of the
layer stack. Now, we
need to blur the gray
version and increase the
contrast slightly: use
Filter > Blur > Gaussian
Blur to add around a
2 pixel blur (see More
Info for the reason why).
With the layer at the top
of the stack, save the
document as a .psd file
on your hard drive.
1
The Displace
filter distorts
the image according to
the ‘displacement map’
we saved in step 4: the
brighter the image, the
more it’s distorted. Here,
I’ve moved an unblurred
copy of the gray water
and made a clipping
mask with the distorted
text, setting its mode to
Hard Light so that the
bright ripples stand out
on top.
)()
Every school child who
has ever worn a uniform
has had one of these
badges emblazoned on
their chest. They’re worn
by retired colonels, and
security guards alike: the
badge of belonging.
Creating these badges
in Photoshop is, like any
other task, a question of
replicating the material
and style of the original.
The fabric part is easy –
it’s just a scan of a coat.
The only tricky part
here is the stitching,
which requires us to
create a Photoshop
brush specially to do the
task. But even though
this might take us a few
minutes, it’s very much
easier than having to
draw individual cotton
strands all the way
around the object – and
we can save the brush
and use it again.
+
This piece of fabric is a photograph of the inside
of a coat. I’ve desaturated it and sharpened it
slightly to make an all-purpose gray fabric background.
The odd shadows and creases will simply add to the
texture.
0
There are several ways to draw the shield shape:
you could use the Pen tool and draw it from
scratch, or use a combination of rectangular and elliptical
Marquee tools. Or you could use the shape on the CD.
Color it using Hue/Saturation.
.
Time for our new brush. Select a small brush –
this one’s 9 pixels in size – and open the Brushes
dialog. In the Brush Tip Shape section, set the Roundness
to just 8% for a very thin brush, and the angle to 90°.
Drag the Spacing slider to its maximum value of 1000%,
so we get big gaps between each stroke.
1
Switch to the Shape Dynamics section of the
Brushes palette, and look at the section marked
Angle Jitter. We’ll leave this value at 0 – the ‘jitter’ is
the amount of random variation – but set the Control
pop-up here to Direction. This makes the brush follow the
direction of painting.
Fabric badges
)(*
!
We created this monogram on page 18, so we
can reuse it here. The outer band was created
by modifying the outline of the shield shape (see More
Info for details); this band is then merged down into the
monogram layer to make a single layer.
,
Hold *! and click on the monogram layer’s
thumbnail to load it as a selection, then switch to
the fabric shield layer and use
*G!G to make a
new layer from it. In the Bevel/Emboss section of Layer
Styles, select Pillow Emboss as the style and recolor.
/
We can make the Brush tool follow a Pen path
automatically – but first we need a Pen path.
Load the outlines as described in step 4, then choose
Make Work Path from the pop-up menu in the Paths
palette. With the path visible and the Brush tool selected,
make a new layer and press
#.
%
The #key makes the Brush tool paint along
the line of the current path. Switch to the Pen
tool, and press
# again to hide the path: you’ll have
just the stitching on a new layer. Add a small bevel and a
tiny drop shadow using Layer Styles to give the stitching
some three-dimensionality, and the badge is complete.
Art & Design in Photoshop
Any other
business
FEK?<:;
DFI<@E=F
image
texture
In step 3 we need to O
make a border around the
edge of the shield. Do this
by first holding
*!
and clicking on the shield
layer’s thumbnail in the
Layers palette to load it
as a selection, then use
Select > Modify > Contract
to reduce this selection
by 16 pixels. We now have
a shape 16 pixels smaller
than the shield. Inverse the
selection using
*1F
!1F, so everything
outside this reduced shape
is selected; then, with the
shield layer selected, choose
*G!G to make a
new layer from the selection.
The result will be the border
around the edge.
In step 7, we’ll get a O
double edge around the
outer border when creating
a Work Path. We don’t want
stitching at the very outside
of our badge, so select that
outer path by holding
-and clicking on it with
the Direct Selection tool
(
>) and then delete it.
In step 8 I’ve painted O
the stitching in white so it
stands out. The color you
use depends entirely on the
colors in your badge; you can
always change the stitching
color later, or reduce its
transparency if you think it
stands out too much from
the background.
J?FIK:LKJ
MAC WIN BOTH
)(+
If you have a cause, get
a badge. It’s the literal
equivalent of wearing
your heart on your
sleeve: badges proclaim
your political, social,
musical or anarchic
views to anyone who
passes you in the street.
While the more
conservative may scoff
at badge-wearing youths,
it’s directly paralleled
by the dazzling array of
medals and ribbons worn
by senior soldiers and
boy scouts.
As I write this, a
friend peering over my
shoulder tells me that
he used to have a job
designing badges. They
always tried to avoid
the circular designs,
apparently, as they were
so difficult to press
correctly: the machines
that punched the paper
and fixed it onto the
badges were notoriously
inaccurate, it seems. Still,
we can make it work in
Photoshop…
+
Start with a circular selection. On a new layer,
fill this with the color of your choice. It doesn’t
matter too much what it is – we can always change it
later if we need to.
0
With the Shapes tool set to Path mode, draw a
circle rather smaller than the size of the badge.
Switch to the Type tool and when you click on the path,
the tool will type onto the path, following its shape. The
text used here is OldSansBlack.
.
The text was upside down at the end of the last
step because we dragged it around the circle, so
it kept the same orientation it had originally. We need
to flip it the other side of the line, so hold
*! once
again to grab the I-beam, and drag it to the other side
of the path.
1
We now need to shift the text down so its
top, rather than the bottom, aligns with the
path. Select all the text with the Type tool, and use
1p-1p to shift the text baseline
down a couple of times, until it sits with the tops just
touching the line.
Button badges
)(,
!
Make sure the text is centered, and enlarge it to
the size you want. If you hold
*! you’ll get
an I-beam which you can drag where you want it; it will
snap to the top center marker, so you know the text is
centered on the badge.
,
To make the other half of the text, first duplicate
the layer. Click in the text with the Type tool, then
Select All and retype the new words. Grab the I-beam
again with the
*! key, and drag the type to the
bottom half. You’ll notice it’s upside down.
/
With the upper and lower text now centered
around the perimeter of the badge, we can add
our interior text – a giant NO set in red, in the same
font. You’ll see badges like this all over the place: from
a distance you can tell they’re protesting, but you can’t
always tell what about.
%
To make the badge itself look three-dimensional,
switch to its layer and add an Inner Bevel using
Layer Styles. Add the maximum amount of Softness for
a really smooth edge; the drop shadow makes it sit just
above the surface of the paper. Rotating the design also
helps it to look more like a real object.
Art & Design in Photoshop
Any other
business
FEK?<:;
DFI<@E=F
font
The Shapes tool, used in O
step 2, has three different
modes: it can create a new
Shapes layer, make a Pen
path or draw filled pixels:
We want the middle of these
three: we can only set text
along a standard path.
Paths with text on them O
behave rather differently
to other Photoshop objects.
When we distort the path
using Free Transform,
only the path itself will be
distorted, and not the text
attached to it: the text will
reflow along the new path.
So in step 8 here, I reduced
the size of the text circles
slightly to make them fit
better within the badge. The
text itself didn’t get smaller,
but it tightened up slightly
as it reset itself to fit on a
smaller radius.
Once the basic badge O
has been made, complete
with bevel shading and drop
shadow, it can be reused to
make any number of badges:
simply copy it and recolor
as necessary. If you want to
use a design on the badge
that wraps around the
edges, as opposed to simple
text, then make a clipping
mask with the badge layer
and the design will only
show up where it overlaps
the badge beneath.
J?FIK:LKJ
MAC WIN BOTH
)(-
The leather jacket has
long been a symbol of
rebellion. From Marlon
Brando in On the
Waterfront, through The
Fonz in Happy Days, right
up to Harrison Ford in
Indiana Jones, the jacket
has signified an outsider,
a maverick, someone
beyond the bounds of
respectable society.
No jacket is complete
without a slogan
emblazoned on the back.
It might be painted on,
or – if the wearer pays
a little more – it will be
made out of pieces of
dyed and shaped leather,
sewn onto the top of the
jacket.
We’ll look at how to
create both methods,
since the effect is largely
the same (until the jacket
starts to get worn, of
course).
+
The text here is set in the Ray Larabie font
Deftone Stylus, which perfectly captures the
1950s automotive feel. It’s a highly stylized script, which
would be equally at home spelling out the name of a car
in gleaming chrome.
0
We can use the Warp Text dialog (click the button
on the Options bar when the Type tool is active)
to bend the text into shape. Adding a little horizontal
distortion within the dialog gives it a feeling of some
perspective.
.
Make a layer from the expanded region, and
brighten it using the Curves dialog, raising the
curve center. You’ll need to use Hue/Saturation to take
some of the color out of it as well. If we were merely
painting on the jacket, we’d stop here; we’ll continue for
a stitched look.
1
To give the new layer some depth, use the Bevel/
Emboss settings in the Layer Styles dialog. From
the Style pop-up menu choose Pillow Emboss. This has
an effect both inside and outside the layer, giving the
impression of stitching between the two. You may need
to soften the effect if it’s too harsh.
Leather work
)(.
!
Hold *! and click on the text layer’s
thumbnail to load it as a selection, then go to
the jacket layer and use
*G!G to make a new
layer. Use Hue/Saturation to brighten and colorize the
text; adding some Unsharp Mask gives it definition.
,
To make the backing, we need to make a larger
selection. Load up the type selection as in the
previous step, and use Select > Modify > Expand to make
it 8 pixels larger. As we can see here, there are holes; use
the Lasso tool to loop around these to include them.
/
We need to copy the Layer Style from the
previous layer onto the main (red) text layer. To
do this, hold
- as you click on the style in the
Layers palette, and drag it to the red text layer: the style
will be copied between the two. Reduce the radius and
softness as needed for a tighter effect.
%
Although we made the lettering out of the jacket
texture, some additional shading helps it to
look as if it’s wrapping around the jacket. Load up the
selection of the white text layer, and make a new Hard
Light layer (see More Info) above it. Use the Burn tool to
darken it, following the lines of the creases.
Any other
business
FEK?<:;
DFI<@E=F
image
font
In step 8 we need to O
make a Hard Light layer to
hold the shadow. We could
simply make a new layer,
using the text outline as a
clipping mask, and paint on
this in black; but the Hard
Light layer gives us more
control over the shading,
and stores the selection so
we can continue to work
on it later. Hold
*!
and click on the white text
layer’s thumbnail to load the
selection, then make a new
layer using
*1K
!1K
. In the dialog
which pops up, specify that
the layer mode should be
Hard Light, and that the
layer should be filled with
Hard Light Neutral color:
When the layer’s created,
inverse the selection using
*1F!1F
and delete to remove
everything outside the
selection. You won’t see
anything, because the layer
is filled with 50% gray,
and that’s invisible in Hard
Light mode. But when we
add shading using Dodge
and Burn, anything that’s
brighter or darker will show
up: the layer makes the
perfect base for shading
work.
J?FIK:LKJ
MAC WIN BOTH
)(/
In Great Britain, enamel
shield badges are worn
by school students to
indicate that they have
rank and authority over
their fellow students.
These things have
been around, virtually
unchanged, for over a
hundred years; they’re
instantly recognizable,
and are frequently
parodied.
We can create the
enamel effect easily,
adding our own lettering.
We’ll stick with the
traditional ‘prefect’
badge, although you
may wish to substitute
this for a more ironic or
playful word.
The key to making this
work is softening the
edges, which we round
over using the Refine
Edge dialog. This is found
in Photoshop CS2 and
higher, so if you have
an earlier version of the
application you won’t
have this feature.
+
Begin by drawing half a shield, with the Pen tool.
This is the only tricky part. Fill it with black, then
flip it to make a full shield (half shown, left). Use Edit
> Stroke to make the outline, on a new layer; choose
around an 8 point stroke to begin with.
0
The disgonal lines are easily added on a new layer,
using the Shapes tool set to Pixel mode (so they
paint directly onto the layer). The text here is plain old
Helvetica: we want a simple, boring, readable font for
this job.
.
Select the original badge area, and make a
new layer filled with your choice of color. Red
is traditional for these badges, although other primary
colors such as blue and green are also used occasionally.
Darker colors will help the gold to stand out, so choose
dark rather than bright red.
1
Create an array of dots by drawing one and
duplicating it (left). I’ve made an array on the
CD for you. Use the shield layer as a Clipping Mask using
*D!-Dso the dots only show up
where they overlap the red layer beneath; add some
bevel and emboss (right) to give them texture.
Enamel pin badges
)(0
!
Load up all the layers as a selection (see More
Info) and use
*O!-Oto open
the Refine Edge dialog. Drag the Smooth slider to round
off the edges, creating subtle curves at the corners of
the lettering and at the joins.
,
Make a new layer from the selection, and use
Layer Styles to make a gold effect (see page 236
for how to do this). Use a very small bevel, just one or
two pixels in size: the lettering should look almost flat on
the badge surface.
/
To add some realism, use Layer Styles to add a
Drop Shadow to the gold layer. Set the Distance
to zero, so the impression is equal all round the gold.
The shadow will spill over the edge, so use
*D
!-Dhere as well to make this layer join the
Clipping Mask set.
%
Add a shadow to the red fill layer for a little extra
realism. Make a new Hard Light layer the same
shape as the shield, and use the Dodge and Burn tools on
here to paint in a little extra shading and a highlight on
the top left – see More Info if you need help here.
Any other
business
FEK?<:;
DFI<@E=F
image
texture
In step 3, we need to load O
up all three layers we’ve
created – the shield outline,
the diagonal lines and the
text – as a single selection.
To do this, hold
*!and
click on the thumbnail of one
of the layers; this will load
it as a selection. Then hold
*1!1and
click on the thumbnails for
the other two layers, to add
them to the selection.
When we open the O Refine
Edge dialog, there are
several ways in which we
can view the selection. For
our purposes, we want the
last choice, on the right:
This will show the selection
in white on a black
background, which makes
it easy for us to see exactly
what we’re going to get.
To create the Hard O
Light layer in step 8, load
up the selection by
*
!clicking on the shield
thumbnail, then choose New
Layer. Specify Hard Light as
the mode, and fill with Hard
Light Neutral color (this is
an option in the New Layer
dialog). After it’s created,
inverse the selection and
delete the area outside
it. Now, when you use the
Dodge and Burn tools on
it, only the highlights and
shadows will be visible.
J?FIK:LKJ
MAC WIN BOTH
))'
The term ‘bling bling’
first appeared in the
1990s, coined by a
New Orleans group
of rap artists called,
appropriately enough,
the Cash Money
Millionaires.
Although it started as
a street style, bling bling
quickly spread beyond
the hip-hop culture
in which it began and
entered the mainstream,
where jewelry
manufacturers suddenly
found themselves able to
sell items that attained
previously undreamed-of
levels of vulgarity, with
price tags to match.
It’s a style that’s
instantly recognizable,
and one that’s relatively
simple to create – we
just need to define a
Layer Style for the gold
outer, and a diamond
pattern for the inner
lettering.
Bling bling
+
Two kinds of
fonts tend to
be used for bling bling
jewelry – chunky sans
serifs and slab serifs, and
stylized italics. We’ll take
the latter route: this is
Deftone Stylus, by Ray
Larabie.
!
To make the
gold outer work
properly, we need to
remove the text region
from this layer. Load
up the text area again,
then press
to
delete it from the yellow
layer. With a hard brush,
paint in any stray holes in
the B and L.
.
To give the gold
a more realistic
appearance, try adding
some texture using the
Texture pane beneath
Bevel and Emboss. Keep
the depth to a fairly
small amount or it will
swamp the image: I’ve
used about 18% here.
/
When we put
the diamond text
together with the gold
outer edge, we start to
get a feel of the bling
jewelry effect. To make
the diamond text look as
if it’s recessed, use Layer
Styles to add an Inner
Shadow to the layer.
))(
Art & Design in Photoshop
Any other
business
FEK?<:;
DFI<@E=F
texture
The diamond pattern in O
step 6 is defined as follows.
First, take a picture of a
real diamond: reduce it and
make three copies, placed at
corners of a square. Make
a square selection with the
Marquee tool that touches
the centers of each diamond:
With the background layer
hidden so that the diamonds
have a transparent
background, choose Edit >
Define Pattern, and give the
new pattern a name.
When the diamond O
pattern is applied using
Layer Styles, we can change
its scale. It will look sharp at
100%, 50% and 25%, and
a little soft at intermediate
sizes; use these sizes if you
can, for a better result.
The sparkle brush O
used in step 8 is a default
Photoshop brush:
Use it at a large size, on a
new layer. In case you have
trouble locating it, I’ve
included a sparkle in the
Photoshop file that you can
use instead.
J?FIK:LKJ
MAC WIN BOTH
0
Load up the font’s
area by holding
*! and clicking its
thumbnail in the Layers
palette. Then use Select
> Modify > Expand to
make it 16 pixels larger.
On a new layer, behind
the text layer, fill this
selection with yellow.
,
The gold effect is
added using Layer
Styles. Check the Bevel
and Emboss tab, applying
an Inner Bevel using the
Chisel Hard method; in
the Shading pane, add a
Gloss Contour. See page
236 for more on creating
shiny effects with Layer
Styles.
1
This diamond
pattern is made
from a photograph of
a real diamond – see
More Info for details.
It’s applied to the text
layer as a pattern using
Layer Styles, so we can
reduce its scale to 25%,
producing this densely
packed look.
%
Adding a black
background
always helps to make
jewelry look better.
Here, I’ve added three
sparkles: these are
created with the sparkle-
shaped brush (it’s one of
the default brushes). I’ve
also added a distorted
diamond to the ‘i’.
)))
A few years ago I was
looking for a boat to
take me from the south
of England to northern
Spain. After a short
search I found exactly
the right crossing –
except Google had
dropped me into the
middle of a frame-based
site, with the main
frames missing. There
was no indication of
which company was
offering this service,
and the URL was a
meaningless string of
numbers so there was no
way to guess.
Good design on the
web isn’t just a matter
of aesthetics, it can
crucially affect your
business.
On these pages I’ve
pointed out some of the
major irritations that I
see daily on the internet.
This is by no means an
exhaustive list of errors:
it’s a minefield out there,
and you have to tread
carefully.
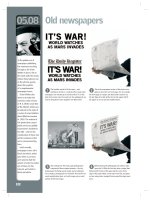
www.wrong
nnn%n_f6
‘Use your browser’s Back button to return’ – how many
times have you seen that instruction on a website? The
problem is that most users don’t come in through the
front door. They’ll start with a Google search and end up
somewhere in the middle. Make it easy for them to get to
your home page – always give them a dedicated button.
nnn%n_\i\6
At some point, a user may have to read your website’s
URL over the phone to a friend. What are the chances of
this one being written down correctly? If you don’t want
to lose users, give them an address they can understand.
nnn%nXZbp
It’s a common enough situation. Your logo
has always been in black and white, because
it’s cheaper to print that way. But hey, this is
the internet, color comes free – so let’s do a
glistening chrome version! On second thoughts,
let’s not. Especially if it’s unreadable.
nnn%nXm`e^k_\]cX^
It doesn’t really matter how patriotic you
are: waving flags, like any other off-the-shelf
animated GIF elements, simply look distracting
and awful. Leave the flag-wearing to the
politicians.
nnn%nfi[niXgg`e^
If users have to enlarge type so they can read
it, make sure that any type on the page won’t
then be too big to read to avoid this sort of
mishap. Make the text big enough in the first
place.
nnn%nife^]fek
Once you’ve chosen a font for your text, stick
with it. It always looks clumsy when an edited
piece of text ends up with one or two words in
a different font from the rest.
nnn%n_\e6
Placing a News slot on your front page is a
great way to show that your site is current, up
to date and moving with the times. Unless you
fail to update it, of course, in which case all
it will do is show that your site is out of date,
poorly maintained and unloved.
nnn%nX`k`e^]fim`j`kfij
It’s easy to place a visitor counter on your site. But if
you don’t expect many visitors then all it will do is show
how unpopular your site is: wait till you have some traffic
before boasting about how much you have.
nnn%n\cZfd\
You know when you go on vacation, and you go out for
an evening meal to a tourist area? Outside the seedier
restaurants you’ll find waiters beckoning you inside. It’s
off-putting and counter-productive.
DFI<@E=F
))*
J?FIK:LKJ
MAC WIN BOTH
Art & Design in Photoshop
Any other
business
Jb`g`ekif
If your Flash intro is any
good, enter it for a film
festival. Don’t make people
sit through it when they just
want to get into the site. Skip
intro? Everyone does.
Dlj`Zf]]
You’ll see this button all too
frequently. If you can find
it, that is – chances are, by
the time you’ve searched the
page for it everyone in the
office will have been annoyed
by the soundtrack. How
about a Music On button
instead?
Gcl^$`eefk]fle[
There are many accepted
ways to display movies,
panoramas and 3D content
on your website. So why
pick an untried method
that means the user has to
download a special plug-in?
Because they probably simply
won’t bother.
CfX[`e^`dX^\j¿
Images on websites are
displayed at 72ppi (pixels per
inch). If you place a 300ppi
image on your site and shrink
it, it will still be a 300ppi
image and will take forever
to load. Shrink it first!
=8H
Make sure the questions
really are frequently asked,
and not just questions you’d
like your customers to ask.
J\c]$c`eb`e^
Too often, we’ll click what
looks like an enticing link only
to find it reloads the page
we’re on. Don’t frustrate your
users.
nnn%n_Xk\m\i
If you have important information, don’t place it in a
flashing sign at the top of your site. Most web users are
so used to flashing banner ads that they’ll ignore them,
even if this one turns out not to be an ad from another
site. Don’t make them confuse your info with junk.
nnn%nX`k`e^¿
If your site is so long, or so graphic intensive that it
doesn’t load in a couple of seconds, then you’re going to
lose viewers. Unless there’s an exceptionally good reason
for filling your site with graphics, then keep them to a
minimum.
nnn%nfn#k_XkËjXcfe^gX^\
Web pages have links for a reason. It’s so
you can break up your site into manageable
chunks. A scrollbar this size tells your viewers
that they’ve got an awful lot of page to wade
through.
nnn%n`[k_dXkk\ij
Visitors to your site should never, ever, have to scroll
horizontally to see the whole site. If it won’t fit on a
standard monitor, then redesign it so it does: the monitor
width is your only physical constraint.
nnn%n_Xk6
There’s a tendency among arty, designer sites
to replace obvious links with teasers. If the site
is created in Flash, these will often be floating
so you have to chase them around the screen.
Don’t treat your users like this – let them find
what they’re looking for.
nnn%n_ffgj
Cascading Style Sheets, pop-up windows, Flash
navigation – all very well, as long as it behaves
itself. But users shouldn’t have to scroll just to
see a window that the site has opened. If you
can’t fit it in the main window, miss it out and
do something simpler.
nnn%nXk\idXibj
Web authoring programs allow us to create
custom backgrounds behind our pages. Often,
you’ll see watermark effects, where the
company logo is repeated a hundred times in
the background. Because you can never push
your logo too hard, right? Wrong. It’s awful.
nnn%nfi[pnfi[p
The internet is not a book. It’s not even a
magazine. Reading text on screen is harder
than reading it on paper, and when something
more interesting is just a click away you need
to work harder to keep your readers’ attention.
Keep text chunks short, pithy, and narrow
enough to take in at a glance. The art is all in
the cutting.
))+