art and design in photoshop - phần 8 docx
Bạn đang xem bản rút gọn của tài liệu. Xem và tải ngay bản đầy đủ của tài liệu tại đây (5.32 MB, 26 trang )
(.+
Francis Bacon
The painter Francis
Bacon (1909–1992)
was a noted English
figurative artist, known
for his striking, often
nightmarish imagery.
Bacon frequently
painted triptychs
– three part works
reminiscent of medieval
altar screens – which
portrayed a figure
from three different
views. His paintings of
human figures often had
grotesquely distorted
heads and limbs: this is,
incidentally, a feature
that’s easy to replicate
in Photoshop using the
Liquify filter, which we’ll
use here to a limited
extent.
Bacon’s most famous
painting is probably the
so-called Screaming
Pope, or – to give it its
full title – Study after
Velázquez’s Portrait of
Pope Innocent X (1953).
While we’re not going to
attempt a slavish copy of
Bacon’s work, we’ll look
at how to replicate some
of the techniques he
used, taking the original
Velásquez portrait as our
starting point.
.
We can make use of those streaks to create folds
and wrinkles in that large expanse of white robe.
Again using the Smudge tool, tweak out each streak over
the robe and bend it into the shape of a fold in the fabric.
Smudge up from the bottom as well: any color that’s
slightly different to the body of the robe can be used to
create shadows and highlights.
1
To create the strong vertical texture – Bacon
himself described it as ‘a head painted as if
folded in on itself like the folds of a curtain’ – we can
use the Fibers filter. Fill a new layer with black, and set
the background color to black and the foreground to dull
yellow. A small Variance setting creates widely spaced
streaks; a high Strength setting creates streaks that
reach all the way down to the bottom.
0
A startling feature of Bacon’s painting is the
open, screaming mouth. While we could copy an
open mouth from another painting, we can just as easily
open the one he has using the Liquify filter. With a small
brush, push out from the mouth to create the illusion of
a gaping hole. We can also use this filter to coarsen and
exaggerate his features somewhat.
+
The original portrait of Pope Innocent X was
painted in 1650 by Diego Velásquez, and so is
thankfully out of copyright. This means that although
Bacon had to create his masterpiece from scratch, we
can use the original and build upon it.
(.,
Art & Design in Photoshop
Great works
of art
FEK?<:;
DFI<@E=F
image
texture
J?FIK:LKJ
MAC WIN BOTH
texture
image
This tutorial involves O
several steps that work
directly on the image –
the Liquify and Smudge
procedures in particular.
To avoid hard-to-rectify
mistakes later, it’s always
worth duplicating the layer
before performing either
of these tasks, so you can
always revert to an earlier
version if you need to.
Painting the interior of O
the mouth in step 3 is not a
difficult process, although
the idea of painting teeth
may seem daunting at first.
The trick is to use a small,
soft-edged brush at an
opacity of around 40%.
Where painting with solid
white will always look
artificial, at a low opacity
you have the opportunity to
build up the teeth in stages:
because we can see through
the brushstrokes, they
appear to blend into the
rest of the painting to a far
higher degree than if we’d
just painted them solid to
start with. The same applies
to the dark interior of the
mouth.
/
So that we can see through the streaks to
the painting beneath, change the mode of the
Fibers layer from Normal to Screen. In this mode all the
black disappears, leaving us with just the pale yellow.
Experiment with other modes as well: Hard Light and
Overlay, for example, produce dramatic results.
%
To increase the power of the image, add an
Adjustment Layer to increase the contrast: both
Curves and Brightness/Contrast will do the job well, so
use whichever one you’re happier with. Here, I’ve also
added a Hue/Saturation adjustment, selecting the reds
in the image and taking the magenta and yellow out to
create a robe color more suited to Bacon’s original.
,
We’ll reproduce the streaks in the original
painting in two ways. First, using the Smudge
tool set to around 80%, start at the top of the image and
hold
1 as you drag vertically downwards, making
strong streaks in the image. Vary the opacity of the tool
to create a more realistic impression.
!
To give the painting a harder edge, we can use a
combination of the Dry Brush and Poster Edges
filters. Using the Filter Gallery, it’s easy to combine the
two effects to make a starker image, Here, I’ve also
painted in some teeth and darkened the interior of the
mouth.
(
The artist Roy
Lichtenstein (1923-1997)
was one of the foremost
proponents of Pop Art in
the 1960s.
The pop art
movement, which
included Andy Warhol
and Jasper Johns, began
in the 1950s as a way of
making art come more
in line with popular mass
culture. The movement
took many forms, but
Roy Lichtenstein is
best known for his
adaptations of the art
style found in comic
books of the period.
The Lichtenstein
style is best known
for its stark, graphic
images, strong outlines,
and cartoon lettering.
The dot screen which
overlays much of the
colored areas refers
back to the dots used
to print comic books: as
they were printed on low
quality paper, a coarse
dot had to be used to
avoid the ink bleeding
into the paper, and this
dot was clearly visible to
the reader.
!
Hold !* and click on the plane layer’s
thumbnail to load its selection once more, then
make a new layer below the outlines and fill this with
white to match the plane. Make another new layer,
with the plane region still selected: paint shading colors
in green, with blue for the windows, and red for the
propeller.
/
To complete this flame, draw another path just
inside the black area. Don’t try for an exact fit:
the variable thickness of line is part of the style. Then
turn this into a selection, and fill it with red.
,
Click the eye icon next to the Texture layer in
the Layers palette, and drag it above this new
shading layer. Change its mode to Multiply, using the
pop-up menu at the top of the Layers palette; then press
!-D*D to make a clipping mask with
the layer beneath, so it only shows up where the two
overlap.
%
Repeat this process on new layers to make the
yellow flame, and the white smoke beneath
it. Don’t try for a realistic effect, but keep the flames
stylized in keeping with the original.
Roy Lichtenstein
FEK?<:;
J?FIK:LKJ
DFI<@E=F
image
texture
Although I’ve provided O
the dot screen texture
(steps 4 and 5) for this
tutorial, it’s easy to make
your own. First, create a
layer filled with solid gray.
Then use Filters > Pixelate
> Color Halftone, and set all
the angles to 45°. This way,
they’ll line up and so look
like a single color. When you
apply the filter, the size of
the dot will depend on how
dark the gray base is. The
darker the gray, the larger
and closer together the dots
will be. Experiment with
different gray levels to get
the effect you want.
The font used for the O
caption here is Comics
Sans MS, which comes
as standard on most
computers. The only
drawback with this font is
that it doesn’t come with
an italic version; here, the
whole text block has been
sheared horizontally to
simulate italic text.
When drawing the pen O
paths for the outlines in
step 2, it can be hard to see
where you’ve drawn before
you stroke the paths. Try
reducing the opacity of
the Plane layer, so you can
see the drawn paths more
clearly.
MAC WIN BOTH
+
Almost any image can be used as the basis for
a Lichtenstein painting, as we’ll draw over it in
outline in the next step. Here, we’ve chosen a plane, as
this is the object used in his most famous painting, the
iconic Whaaam!
.
To make the sky, fill the background layer with a
pale blue. Duplicate the Texture layer and move it
to the bottom of the layer pile. Set its mode to Multiply,
and lower the opacity to around 50%. You’ll be able to
see through it to the blue background beneath.
)
The text here has been made using the font
Comics Cartoon. The exclamation mark has been
drawn in, as the equivalent in this font is far too weak.
Filled with yellow, it’s given a black stroke.
0
Make a new, empty layer. Load up the pixels in
the plane layer by holding
!* as you click
on its thumbnail in the Layers palette, then use Edit >
Stroke to make a black outline, 5 pixels wide, on the new
layer. Use the Pen tool to draw in the contour and edge
lines within the plane; then, with all the Pen paths visible
– but not selected – switch to the Brush tool. Choose a
hard-edged brush 5 pixels in diameter, and press
#
to stroke the pen paths with black.
1
On another new layer, at the top of the layer
stack, paint in the red fire. This is most easily
done by drawing the outline with the Pen tool: press
# to turn this path into a selection. Set the
foreground color to black, and press
-ss
to fill the selection with the chosen color.
The shadow on the BLAM lettering is made by
duplicating the layer, filling it with black and
moving it behind the original text. The clouds and caption
are easily added on new layers.
(
Great works
of art
Art & Design in Photoshop
(./
The word ‘iconic’ is used
frequently in the world of
contemporary art, often
claiming an inflated
status for the subject.
But the work of Andy
Warhol (1928–1987)
can truly be said to fall
into this category. In
particular, two of his
pop art screen prints
are now so well known
that they form part of
everyday popular culture:
his Campbell’s Soup Can
and his image of Marilyn
Monroe.
I’m not able to show
the original Marilyn
image for copyright
reasons, but we can use
this production still from
one of her movies for
which the copyright has
expired.
Of course, this is a
technique that can be
applied to any image,
and is perhaps the most
copied modern art style
of all. You’ll find tutorials
for creating this style
on many websites; but
it would make this book
incomplete if we were to
miss it out.
+
The original photograph needs to be cropped to
just the size of Marilyn’s head, and enlarged to
fit the space. It’s essential that it’s in black and white; if
you’re working with your own photograph, desaturate it
using
*1R!1R first.
0
The cutout should be smooth around the head,
but not trying to follow every hair: Warhol cut
out his version with a scalpel, and that’s the effect we’re
aiming for. Use Unsharp Mask to sharpen the image,
which has become fuzzy once enlarged.
.
Lock the transparency of the color layer by
pressing
(see More Info). Choose a strong
yellow and, using a hard-edged brush, paint over the hair
area. Because the transparency has been locked, there’s
no danger of painting over the edge of the image, which
has already been filled with the skin color.
1
Switch to white and paint in the eyes and the
teeth. It doesn’t matter if you go slightly over
the edge on the teeth, since we’ll be painting the lips in
afterwards. If you make a mistake, it’s easy to resample
the skin color and paint it out again.
Andy Warhol
(.0
FEK?<:;
DFI<@E=F
J?FIK:LKJ
MAC WIN BOTH
In step 3 we could O
have used Brightness and
Contrast or even Curves to
add contrast to this image.
But duplicating it with a
Hard Light layer in this way
gives us an instant result,
which we can control by
lowering the opacity of the
duplicated layer.
Choosing the right colors O
can be a little hit and miss.
To help you, the file on
the CD includes a layer
called Colors, which holds
swatches of color sampled
from the Warhol original:
Make this layer visible if you
need it, and sample colors
from here by holding the
* key as you paint
with the Brush tool.
To lock the transparency O
in step 5, either press
or choose the Lock
Transparency icon at the top
of the Layers palette:
This will prevent anything
painted on the layer from
spilling out beyond the
already filled area.
texture
image
!
The sharpened version of the image added detail
and texture, but we need a starker version for the
effect to work. Duplicate the Marilyn layer, and change
the mode of the new layer from Normal to Hard Light.
This produces a stronger, stylized result.
,
Make a new layer, and set its mode to Multiply
so we can see through it. Hold
*! and click
on the Marilyn layer’s thumbnail in the Layers palette to
load it as a selection, then fill with a flesh color on this
new layer.
/
I don’t know if Marilyn Monroe wore this shade
of eye shadow, but it was clearly popular enough
in the 1960s for Warhol to want to use it here. When
painting this and the teeth, go slightly over the edges
rather than being too precise: we want to recreate the
feeling of a slightly misaligned screen print.
%
Even though all the colors are in the right place,
the finished result needs more. With no texture,
the background in particular simply looks flat and lifeless.
The answer is a scan of a piece of rough paper, placed on
top and with its layer mode changed to Hard Light so we
can see through it.
Art & Design in Photoshop
Great works
of art
(/'
Bridget Riley was born
in 1931 in England, and
became the leading
proponent of op art, as
typified by her 1964
painting Metamorphosis,
above.
The movement’s name
is short for optical art,
and is chiefly concerned
with the fallibility of
the human eye – the
way in which we can
be fooled by what we
look at. As the author
John Lancaster put it,
‘Optical Art is a method
of painting concerning
the interaction between
illusion and picture plane,
between understanding
and seeing.’
Unlike the sort of
optical illusions you’ll see
in puzzle books, op art
tends to employ strong
geometric forms and
seeks to confuse and
disturb.
Bridget Riley
initially worked almost
exclusively in black
and white, producing
variations on her work
using squares and
circles. Later on, she
experimented with
adding color to her
paintings.
+
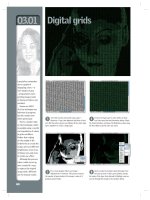
To recreate this painting we first need a regular
array of dots. Draw a circular ellipse, and fill
with black; then hold
1-1 as you drag it
diagonally to make a copy at 45° to the original. Select
both with the Rectangular Marquee tool, and choose Edit
> Define Pattern.
0
Now that we have those dots as a pattern, we
can fill our entire canvas with them. Make a new
layer, filled with white; then choose Pattern Overlay from
the Layer Styles menu in the Layers palette. Here, we can
choose the size of our pattern.
.
The Spherize filter tends to be a little over-
enthusiastic, and distorts the dots in the middle
by making them much wider. Scale this layer horizontally
so that the dots in the middle are truly circular: that
way they’ll join up to the original array of dots when we
reveal this layer again.
1
Split this layer in half down the middle by
selecting one half with the Marquee tool, and cut
that half to a new layer (
*1G!1G).
Move both halves over to one side, rearranging them
so that the narrow dots which were at the edges of the
cylinder now appear in the middle.
Bridget Riley
(/(
!
In order to work with the pattern and distort
it, we need to turn that Layer Styles layer into
a regular, editable layer. The best way to do this is to
make a Merged Copy by pressing
*1B
!-1B.
,
Now duplicate this new layer and hide the original
– we’ll need to use it again later. To create the
effect of the dots rolling around a cylinder we’ll use
the Spherize filter; but rather than wrapping around a
sphere, choose Horizontal Only as the mode, to create a
cylindrical effect.
/
When we view the original layer, we’ll need to
rearrange the two halves of the spherized version
so that they line up with the original dots. Generally, this
is just a matter of dragging the component parts left and
right until they align correctly.
%
The last step is to make the two opposite
corners fade away. Make another new layer, and
choose the Gradient tool. Set its mode to Foreground to
Transparent (using the pop-up menu on the Options bar),
and set the foreground color to white. Drag diagonally
from each corner to create the fading effect.
Great works
of art
FEK?<:;
DFI<@E=F
texture
In step 2, we could have O
just chosen Edit > Fill and
selected Pattern as the
fill type, and this would
have flooded the layer
with our chosen pattern.
The advantage of using
the Layer Style approach
is that it allows us to scale
the pattern as we fill our
layer with it: often, we don’t
know how large we want
a repeating pattern until
we see it in place. The only
drawback is that we need
to make a visual copy of the
layer in order to apply filter
effects to it afterwards.
Bridget Riley produced O
a very similar image to this
using squares instead of
dots. Try reproducing the
effect shown here with
a checkerboard pattern
instead, to make your own
unique Riley artwork.
The final step, fading the O
corners away to white, is
unusual in an op art work:
generally, the artist aims
for a purely geometric,
flat texture. But the effect
here is a good one, adding
interest to the painting,
and is worth keeping in our
version of the image.
The only tricky part here O
is making the spherized
halves align with the original
grid. Remember, these can
be squeezed horizontally
until they fit the space.
J?FIK:LKJ
MAC WIN BOTH
(/)
+
Begin by drawing a balloon
shape (left) on a new layer.
Fill with a midtone gray.
0
Use the Burn tool, set to
Highlights, to add some
shading around the bottom and
right side of the balloon (right);
then switch to the Dodge tool to
add a highlight down the left-hand
side. Remember, you can hold the
- key with either tool to
temporarily use the other one.
,
A little more Dodge and Burn
helps to even out the texture.
Because we added the Curves effect
as an Adjustment Layer, we’re
seeing through it as we add extra
shading, so the tools will produce
unexpected results: paradoxically,
darkening the image can actually
make it lighter.
.
Duplicate the single balloon
several times to build the
animal. Here, we’ve distorted
and rotated the separate balloon
elements to make the legs, body,
head and ears.
The contemporary
artist Jeff Koons (born
1955) is best known for
two styles of work: his
oversized reproductions
of everyday kitsch
objects, and his highly
pornographic models of
his wife, the former porn
star and one-time Italian
politician Cicciolina.
Needless to say, it’s
the first style we’ll be
attempting to emulate
here.
Among the objects
Koons reproduces are
giant ballon sculptures,
cast in shiny, gaudily
colored metal. Often
taller than a man, these
sculptures are at once
appealing and baffling:
how can anything in such
obvious bad taste be so
entertaining to look at?
Building a Koons
balloon animal is not a
tricky task, and it’s one
of the few examples
in this book for which
there’s no accompanying
image on the CD.
Everything here can be
made from scratch with
no photographic sources,
directly in Photoshop.
Jeff Koons
(/*
Art & Design in Photoshop
Great works
of art
FEK?<:;
DFI<@E=F
J?FIK:LKJ
MAC WIN BOTH
1
With the body complete, it’s time to add some
color. Make another Adjustment Layer, this time
using Hue/Saturation, above the Curves layer. Check the
Colorize box, and drag the Hue and Saturation sliders until
you get the metallic color that looks best for your model.
You can always change it later!
!
At the end of the previous step, our balloon
looked like it was made of plastic, rather than
metal. Here’s how to add shininess to the surface.
Make a new Curves Adjustment Layer (chosen from
the pop-up menu at the bottom of the Layers palette).
Click and drag in the curve at the mid point, and drag
it downwards; then click either side of this mid point
and drag upwards, to make an N-shaped curve as seen
in this dialog. The result of this operation is to make the
surface appear shiny. It works by virtue of the fact that
metal reflects light in unpredictable ways, adding its own
highlights and shadows.
It can take a while to get the curve to work well,
but experiment with the technique and you should find
it possible to create spectacular effects in a relatively
short time.
The result we get in step O
3 depends on a combination
of the shading and the
Curves adjustment: the
shape shown here is only an
example. You may need to
vary it to achieve a similar
effect on your own shaded
artwork, depending on the
exact amount of shading.
To place the model in O
an outdoor setting, as in
the main image, it was
necessary to add some
reflections. This was done
by taking a section of the
background and applying
the Spherize filter to it: this
piece then uses one of the
balloons as a clipping layer,
so it only shows up where
the two overlap. The opacity
of this layer was then
reduced to 10%. Further
copies of this Spherized
background were copied
above each balloon in turn,
and distorted to fit.
Because the Curves and O
Hue/Saturation were added
as Adjustment Layers, they
would normally affect the
background as well. To
make the main image, each
of the balloons was loaded
as a selection by holding
!1*1 and
clicking on their thumbnails;
then the selection was
inversed, and the mask for
each Adjustment Layer
filled with black to hide their
effect in that area.
(/+
Packaging
In 1885 William and James Lever bought a small soap factory in Warrington,
in the north of England. They were so proud of the soap they made there that,
rather than sell it loose in grocer’s shops – as had previously been the way all
goods were sold – they decided to give it a name, Sunlight Soap, and to package
the bars in their own wrappers.
Sunlight Soap was among the first pre-packaged goods. The Lever brothers
were innovative marketeers; so much so that in 1930 Lever Brothers became
Unilever, the first modern multinational company.
Over the years packaging design has become more and more standardized,
enabling consumers to recognize what type of product they’re looking at from
the packaging alone. We can distinguish at a glance between cans of beans and
cans of cat food, between soap powder and cereal boxes, without having to
search the container for the appropriate wording.
In this chapter we’ll look at what makes products identifiable by their
containers, and see how to reproduce the most typical examples of each product
category.
Art & Design in Photoshop
Packaging
packaging
1. The act, process,
industry, art, or style of
packing.
2. Material used for
making packages.
3. The manner in which
something, such as a
proposal or product,
or someone, such as a
candidate or author, is
presented to the public.
American Heritage
Dictionary
(/,
(/-
Once upon a time, we’d
all have gone off to the
local drugstore to ask
our friendly pharmacist
what would be the best
remedy for croup, or
rickets, or gout. And
he or she would spill a
few capsules from an
unmarked bottle, which
would either cure us or
kill us.
Today the experience
is rather different: when
we search the shelves for
an appropriate remedy
we’re overwhelmed with
choice, with a dozen
different marketed
brands each claming to
be better than the next,
despite the fact that they
appear to contain exactly
the same ingredients.
There are several
tricks that many
drug manufacturers
commonly use to make
their products appear
cleaner, faster, more
efficient and more
clinical. We’ll look at
how to simulate their
packaging here.
Pharmacy cartons
+
Start with the
background. Fill
the background layer
with mid gray, then
use the Dodge tool, set
to Highlights, to make
several diagonal stripes
across it. This is the
first step in making the
background look as if it’s
covered in metallic foil.
!
Let’s add a human
element to our
image. This woman
looks like she’s in need of
some serious painkillers.
Use Filter > Sketch >
Stamp to produce this
black and white version
of the image. Raise
the Smoothness value
enough to produce clean
outlines, but not so much
that the features are lost.
.
To give the
lettering a bit of
a lift and a slightly three-
dimensional feel, add a
bevel using Layer Styles.
Rather than the standard
variety, choose Outer
Bevel from the pop-up
list at the top of the
dialog. This mode applies
the bevel effect to the
background, making the
text appear raised.
(/.
,
Use Hue/
Saturation to
colorize the woman,
giving her a blue tint –
see More Info for details.
For the lettering, I’ve
used good old Helvetica.
Choosing the Bold
Oblique weight makes
the drug name appear
faster, as oblique styles
always do. The orange–
yellow–orange fill is a
standard gradient, added
as a Gradient Fill in the
Layer Styles palette.
0
Make a series
of rectangular
selections within this
background: the easiest
way to do this is to
use QuickMask mode
(see More Info panel
for details). Once the
selection has been made,
turn it into a new layer
using
*G!G
then flip it horizontally to
make this simple striped
effect.
1
The rest of the
text is set in the
same font, again using
the oblique style to give
the sense of rapid action.
Set in red, a white stroke
is added using Layer
Styles in order to make
the text stand out from
the background. I’ve also
added a clock here, since
this is something drug
companies like to do:
it doesn’t say anything
specific, but it implies
quick results.
Art & Design in Photoshop
Packaging
FEK?<:;
DFI<@E=F
image
texture
To make the striped O
texture in step 2, you first
need to create an array
of horizontal stripes. The
easiest way is to use
N
to enter QuickMask mode,
and make a rectangular
selection. Fill this so
it stands out from the
background. Then hold
- as you use 1p
to make a copy 10 pixels
below; then release
-
and nudge down a couple
more times. Repeat this
process until you have an
array of horizontal bars;
when you leave QuickMask
by pressing
N once
more, you’ll have a striped
selection. Use
*G
!G to turn this selection
into a new layer.
To color the woman O
in step 4, open the Hue/
Saturation dialog and
check the Colorize button.
Raise the Lightness value
to brighten the black,
then drag the Hue and
Saturation sliders to get a
subtle blue. We now need
to add the color overlay.
Duplicate the woman layer,
choose a pale blue and
press
1
-1 to fill
with the chosen color (the
1 key prevents the color
from leaking out of the edge
of the layer), then change
the mode of this layer from
Normal to Multiply so we
can see through it.
J?FIK:LKJ
MAC WIN BOTH
(//
There are several
occasions in this book
where we look at how
to draw flat artwork
for packaging. Although
it’s interesting to see
how different products
are marketed, it’s not
until we see our designs
appearing on an actual
box that we really come
to appreciate them.
Rather than explain
each time the technique
is used in the book, we’ll
go through it once here
and then refer to these
pages elsewhere.
Of course, you don’t
need to go quite as
far as this: adding the
reflection is appropriate
for some boxes, such as
this medicine carton, but
would probably not suit a
cereal box, for instance.
As is always the case,
the final judgment is
always up to you. See
how the various options
are constructed, then
take your pick as to
which you include.
.
With the reflections
of the face and side
complete, we need to lower their
opacity to make them more
convincing. Select them both,
and choose New Group from
Layers from the pop-up menu
on the Layers palette: lower the
opacity of this group to around
50%, to start with. Placing the
elements into a group means we
can reduce the opacity of the
entire group, and add a layer
mask to it if we wish.
Flat artwork into 3D
+
This is the box we
created on the previous
tutorial. To make it fit a three-
dimensional form, we first need
to merge all the visible layers
together so we can work on
them as one. The best way to do
this is to make a Merged Copy
(see More Info). Then enter
Free Transform mode (
*Q
!Q) and distort the box
using perspective distortion to
make it appear to be receding
away from us – see the More
Info panel for details.
!
The side we created
in step 2 can now
be distorted using the same
technique we used for the face,
but in the other direction. We
need to darken this side to give
the sense of a light direction:
it makes the object look more
three-dimensional. Finally, select
a thin border about 2 pixels wide
on the side nearest the face, and
brighten it up. This gives the
impression of cardboard rolling
around an edge, and is far more
effective than a simple butt joint.
(/0
Art & Design in Photoshop
Packaging
FEK?<:;
DFI<@E=F
image
We need to make a O
Merged Copy in step 1 so
we can work on all the
layers as one. Don’t flatten
your image: instead, when
all the layers you want to
show are visible, click on the
topmost layer in the stack
and press
*1B
!-1B. This will
place a Merged Copy at the
top of the pile.
We use Perspective O
Distortion in step 1 to place
the box at an angle. We can
do this by choosing Edit >
Transform > Perspective;
or, we can simply use the
Perspective mode within the
standard Free Transform
mode. Press
*Q!Q
to enter this mode, then hold
*1!-1
as you drag one of the
corner handles up or down.
This will move the facing
handle in the opposite
direction, producing
a smooth perspective
transformation. If you
then want to change the
apparent viewing height of
the box, just hold
*1
!1 as you drag one of
the side handles up or down.
In step 5, we place the O
reflected elements into a
group before lowering their
transparency. By doing
this, we’re able to add the
transparent capsule in step
7 quickly and easily.
J?FIK:LKJ
MAC WIN BOTH
0
The side of the box is our
first building project. The
elements are already there – the
metallic background, the title,
the stripes; all we need to do
is rearrange them slightly (and
hide the figure of the woman)
to make a suitable image for
the side.
,
To make the reflection,
duplicate the face and side
layers, and flip them vertically. We
can now use the Shear component
of Free Transform to stretch them
downwards: hold
*1!1
as you grab a center handle on one of
the sides, and drag it downwards. The
*! key moves just that side; the
1 key constrains the movement
to purely vertical. Repeat the process
with the side. Here., I’ve separated
the original and the reflection to show
the two more clearly: you won’t be
working with this gap.
1
To complete
the effect, I’ve
created a simple black
background with a blue
gradation (made with the
Gradient tool) to give the
suggestion of a backdrop
behind the surface. The
reflection works well
against black: I’ve also
added a layer mask to
the reflection group, and
used the Gradient tool to
fade the reflection away
gradually. The pill adds an
additional dimension to
the image; it’s duplicated
to make the reflection.
(0'
Cereal boxes do much
more than hold breakfast
cereal. For one thing, as
one wag had it, they’re
generally more nutritious
than their contents.
Whatever your
views on the amount of
sugar we’re feeding to
our children, we can’t
escape the fact that
cereal makes up the daily
breakfast for a huge
number of households.
And, while we’re
munching, we study the
back of the box because
there’s often nothing else
readable to hand.
Cereal boxes have
evolved a graphic style
all of their own. They go
for bright, welcoming
colors, and the lettering
tends towards a bevel
effect with a strong
stroke and a drop
shadow.
We’ll put all the typical
elements together in our
version of the breakfast
staple.
+
Begin with the name of the cereal. To make the
contents appear filling the manufacturers often
opt for a chunky, sometimes slightly wacky font; this is
called Strenuous. We’ll set it on a strong, dark orange
background.
0
Use Layer Styles to add the effects. Here a simple
bevel adds highlights and shading to the lettering,
giving it an instant three-dimensional look. The type is
often left black; I’ve changed it here to red, and used
Layer Styles to add a white stroke.
.
A good solution to the text problem is to tighten
up individual characters so their strokes run into
each other (see More Info panel). We can also nudge
some letters up and down: highlight each one, and use
*1!-1with the up and down
cursor keys to move them.
1
The cereal bowl itself is essential – we have to
show what the stuff looks like, after all. To give
it a healthy glow, make a new layer behind it, and use
the Gradient tool set to Foreground to Transparent, with
yellow as the foreground color, to make this warm, sunny
background.
Cereal boxes
(0(
!
The solid black shadow is a common cereal title
technique. This can be added using Layer Styles
as well. The system is designed for soft shadows, but if
you change the Spread value to 100% you can change
the Size value to make it match the stroke size.
,
Rotating the text gives it a more dynamic, more
playful feeling. After all, this is supposed to be a
fun food, not something that your mother would nag you
to eat. But we don’t want it butting out over the edge –
and we don’t really want to reduce the text size either.
/
The bowl itself needs an extra lift; I’ve used Layer
Styles to add an Outer Glow to it, changing the
color of the glow from the default yellow to pure white.
Add more text to fill up the spaces: it’s these additional
elements that really make the cereal box start to look
more convincing.
%
The background from the box front, as well as the
title, have been repurposed here to make the box
side. Both the front and the side have been distorted to
turn the flat artwork into a 3D image: see the previous
pages for more details on this technique.
Art & Design in Photoshop
Packaging
FEK?<:;
DFI<@E=F
image
font
We’ve used red lettering O
on a yellow-orange
background – warm colors
that suggest an appetizing,
warming breakfast.
Many cereal varieties
vary the colors to make
them more distinctive:
Kelloggs Cornflakes goes
for a distinctive white
background, Rice Krispies is
generally pale blue, and so
on. The only cereals that use
green or brown backgrounds
tend to be of the muesli
variety, which make overt
claims of health – appealing
to adults, perhaps, but off-
putting to most kids.
In step 5 we’ve tightened O
up the letter spacing, or
‘tracking’ as it’s known. We
can do this for the text as a
whole, using the Character
palette; here, though, we
want more overall control.
Place the cursor between
each pair of letters, and use
1-1 and
the left and right cursor
keys to nudge the following
character left and right.
Adjusting the tracking by
eye means we can apply
different values to each pair
of letters.
In step 6 we can use the O
Gradient tool to add the
glow behind the bowl. The
tool should, of course, be set
to create circular gradients,
chosen from the icon in the
tool’s Options bar.
J?FIK:LKJ
MAC WIN BOTH
(0)
The buying of wine is
an art that’s shrouded
in mystique – from the
moment a young man
wants to impress his
date, to the billionaire
who spends thousands
on a single bottle.
We’re savvy enough
consumers to know
that we shouldn’t rely
on packaging alone,
but when we’re buying
unknown wines we have
little to go on but the
label. Whether we go for
the traditional, the ultra
modern, the cut price or
the gold embossed, we’re
affected by the label
to a degree larger than
most of us would care to
admit.
We’re going to put
together a traditional
red wine label, of the
kind you’ll see in every
liquor store. The quality
of the bottle’s contents is
entirely in the mouth of
the imbiber.
+
No need to give you the font for this one: Old
English, or a variation on it ships with just about
every computer ever sold. Use the parchment background
(see page 110), and set the first letters of each word in
red to make them stand out.
0
To create the offset ‘shadow’, duplicate the
lettering, then make a layer mask for the copied
version. Load the text as a selection by holding
*!
and clicking on its thumbnail in the Layers palette; then
nudge the selection a little to the left and up, and fill with
black on the mask to hide all but the remaining edge.
.
The text is spaced out by tracking – see More
Info for details on this. To give the text a
shallower curve, press the Warp Text button once more
and reduce the Bend value. Because this type remains
live, we can change the Bend value at any time.
1
Every traditional bottle needs a graphic; it’s often
a view of the chateau where the wine is made (or,
sometimes, a more picturesque one nearby). I’ve opted
for a naked foot crushing a bunch of grapes, to match the
name of the wine.
Wine labels
(0*
!
Here’s the ‘shadowed’ text shown with the
original text visible again (I’d hidden it in the
previous step to show the effect more clearly). Here, the
shadow has been filled with a gold-like color, and the
Dodge tool dragged across it a couple of times to give
the effect of a slight shine.
,
The text above is plain old Times Roman – any
traditional serif font will do here. Use Warp Text
(the button appears on the Options bar when the Type
tool is active) to add an arc to straight text. Here, a Bend
value of 50% has been used to give the text a slight
curve – leave the Horizontal and Vertical settings alone.
/
The border is made by making a rectangular
selection on a new layer, and using Edit > Stroke
to apply a 2 point black stroke; then, on a slightly smaller
selection, a 4 point stroke is added. Don’t forget the extra
text elements for greater realism.
Art & Design in Photoshop
Packaging
FEK?<:;
DFI<@E=F
texture
To recolor the initial O
letters in step 1, select them
wih the Type tool and choose
a red from the Swatches
palette. Alternatively, make
a new layer using the type
layer as a Clipping Mask (see
page 233); paint in here on
red to apply the color.
In step 5, we add tracking O
to the lettering – spacing
it all out – by selecting the
type and holding
1
-1 while pressing
the left and right cursor
keys to add or remove
additional space. But there’s
a problem here: if all the
text is selected, the type will
become unbalanced. That’s
because Photoshop will add
extra space after the ‘e’ of
‘Table’, and with this much
space the text would look
like it’s lurching to one side.
The solution is to select from
before the ‘V’ of ‘Vin’ to just
before the ‘e’ of ‘Table’: that
way, the space after the ‘e’
isn’t extended along with
the rest of the lettering.
The bunch of grapes with O
the naked foot image is a
pair of photographs that
have been desaturated and
treated with the Poster
Edges filter to achieve this
graphic effect. If you have
the time and inclination,
you can produce more
convincing engraving effects
– see page 50 for details on
the technique.
J?FIK:LKJ
MAC WIN BOTH
(0+
Action Man, G.I. Joe…
however we came to
know him, the first doll
for boys (although we’d
never admit him as such)
sparked the imagination
of a generation.
Manufacturers have
been marketing action
figures at boys and girls
ever since. It’s grown
into a multi-million dollar
industry; no kids’ movie
is complete without its
range of spin-off figures
in every moviegoer’s
pocket.
Making these
colorful, overpriced
lumps of articulated
plastic sell requires the
manufacturer to make
them as appealing as
possible in their boxes.
There’s been a long
tradition of boxes with
cutout holes that follow
the shape of the lettering
or other design element;
they offer a tantalising
glimpse of the goodies
within, without showing
absolutely everything. Of
course, you have to buy
the box to find out what
else is inside.
+
THe font we’ve used here is Superheterodyne,
in which the capitals and lower case forms are
identical except for the lightning flashes on the capitals.
Rotating the text adds interest and action; the black
stroke and bevel are added using Layer Styles.
0
The main text is duplicated, and then edited to
make the rest of the wording: that way, we can
be sure they’re both at the same angle. Inverting the
colors ties the two text elements together, without the
bottom text detracting from the title.
.
Now that we have a selection for the hole, inverse
that selection using
*1F!1F
and fill the outer portion with the color of your choice, on
a new layer. Adding a Drop Shadow using Layer Styles
gives the box its depth; use a large shadow to accentuate
the sense of depth.
1
Fill the background with a cardboard color. To
avoid copyright issues, I’ve filled this box with
a robot and its gun. These also have a drop shadow
attached to their layers, using Layer Styles once again;
but because they’re right up against the backing board,
we need closer, tighter shadows.
Action figure box
(0,
!
We can make a selection inside the text area with
the Lasso tool: hold
- as you draw to
make the tool trace straight lines between click points.
We can draw this shape as a straightforward polygon,
and smooth it in the next step.
,
Open the Refine Edge dialog, and set the Contrast
value to 100%. When we now raise the Feather
setting, we end up rounding off those corners: if it
weren’t for the high contrast, we’d be making them fuzzy.
The simplest way to create rounded corners!
/
We need to add some cellophane to this box.
Make a new layer, and fill with 50% gray; then
paint diagonal stripes on it with the Dodge tool. Apply
Filter > Artistic > Plastic Wrap to make a shiny effect,
and set the mode of the layer to Hard Light so we can
see through it. See More Info on page 197.
%
A piece of crumpled card is added as a texture
to make the box look old and tatty. Because the
texture would cover the whole canvas, we need to add
a layer mask to hide the window portion; load up the
selection of the card made in step 5, then inverse it and
delete on the crumple layer mask.
Art & Design in Photoshop
Packaging
FEK?<:;
DFI<@E=F
image
font
In step 8, we need to give O
a slight thickness to the
cardboard, to accentuate
the fact that the robot is in
a container behind it. To do
this, first load up the card
layer we created in step 5
as a selection by holding
*! and clicking on
its thumbnail in the Layers
palette. Now inverse the
selection using
*1F
!1F, make a new
layer, and fill with a very
pale brown. Don’t deselect:
instead, make sure one of
the selection tools is active
(but not the Move tool)
and nudge the selection
a couple of pixels down
and to the right, using the
cursor keys; then delete the
selection, You’ll be left with
a thin border that makes
a convincing impression of
thickness.
If we wanted to view O
this box from an angle, it
wouldn’t be as simple as
rotating and skewing it,
as we did with the cereal
box earlier in this chapter:
we’d need a photograph of
the robot from a different
angle as well. Assuming we
don’t have a limitless supply
of robot photographs, the
only viable solution is to
find a photo from a suitable
angle, and then distort and
build the angled box around
that. It’s the only way to
guarantee a perfect match.
J?FIK:LKJ
MAC WIN BOTH
(0-
Drawing box artwork
is one thing; making
it fit around a three
dimensional object is
another skill entirely. In
this tutorial we’ll skip
over the details of how
the box art is created,
and concentrate on
the process of fitting it
around the sushi.
A common mistake
that many Photoshop
artists make when
constructing boxes is to
build the box first, and
then find suitable objects
to go inside it. It’s one
approach, but it’s bound
to cause problems:
finding a photograph of
the chosen object from
exactly the right angle
will be almost impossible,
and distorting it may not
produce good results.
The trick is to find
your object first, and
then build the box
around it to match the
perspective of the object
photography. That way
you can be sure the
box will fit, since you’re
constructing it for this
express purpose.
Container perspective
+
The box artwork
is made in two
sections – one for the
top, and one for the front
side. The font is called
Zorque, and the effects
are added using Layer
Styles. This is a popular
contemporary Japanese
style of rendering text,
which can look rather
brash and toylike to
Western eyes.
!
Draw the other
side of the box
with either the Lasso
or, better, the Pen tool.
This can take a while to
get exactly right; adjust
the shape until the
perspective works. Fill
this with a darker version
of the green color.
.
With the two
sides in the right
place, all you have to do
now is to move the top
left corner (still in Free
Transform) until the
perspective of the box
looks right. This is largely
a matter of judging it by
eye: you’ll know when it
works.
/
Shadows added
to the interior
later halp the sushi look
like it’s in there. Giving
the interior of the lid
some thickness adds
realism, and makes it
look much more like a
three-dimensional object:
see More Info for a
simple way to do this.
(0.
Art & Design in Photoshop
Packaging
FEK?<:;
DFI<@E=F
image
font
To make the interior edge O
of the lid in step 7, select the
hole with the Magic Wand
tool. Fill this selection with
mid gray on a new layer.
Nudge the selection down
and to the right a couple
of pixels; you should be
moving the selection area,
not the contents. Delete the
selection, and you’ll be left
with just the edge. Darken
or lighten it as appropriate
using Dodge and Burn.
To make the O cellophane
effect in step 8, begin with a
layer filled with mid gray:
Then use the Dodge tool to
add some streaky highlights:
Then use the Plastic Wrap
filter to make it shiny:
Finally change the mode
of this layer to Hard Light,
and it will look like a plastic
sheet. Raise or lower the
brightness (and contrast) as
required.
J?FIK:LKJ
MAC WIN BOTH
0
Make a single
layer from the
front side of the box,
and use Free Transform
to distort it to match
the angle of view of the
sushi. It can help to view
the layer at 50% opacity,
so you can see the sushi
through it. Darken this
layer slightly, as it’s
partly in shadow.
,
To make the lid
fit, enter Free
Transform mode and
skew it, using the center
handles, until the bottom
and right edges line up
with the two visible sides
of the box. Don’t leave
Free Transform yet!
1
The inside of the
box is a new layer
behind all the others. Fill
with a mid gray, then
make a selection of one
side that goes up to the
inside corner of this
box. Darken this area,
to give the box a more
convincing interior.
%
The cellophane is
made using the
Plastic Wrap filter – see
More Info. Finally, on a
new layer draw white
lines with the Brush
tool (set to a small, hard
brush) over the three
edges facing us; reduce
the opacity of this layer
to 30% to make more
rounded edges.
(0/
However much work
a food stylist, home
economist and still life
photographer might
put in, it’s hard to make
soup look appetizing.
This might be the
packaging the words
‘serving suggestion’ were
invented for: add a sprig
of parsley, a couple of
handfuls of herbs and
you’ve got something far
more appealing. We’ll
try to make our won
ton soup look as tasty
as possible by means of
tasteful packaging.
But creating the
label is only half the
battle: we then have to
wrap it around a can.
The technique we’ll use
involves both Smart
Objects and the Image
Warp distortion, so is
only possible for users
with Photoshop CS2 or
higher. It’s a powerful
technology, well worth
the upgrade price on its
own, as we’ll see: once
we’ve wrapped the label,
we can still edit it.
+
The photograph of our won ton soup is about
as appealing as we can make it – certainly, the
colorful leaves help distract the eye from the beige
soup itself. The rich purple background aims to speak of
quality and sophistication.
0
We’ve used two Ray Larabie fonts, Dream
Orphans and Guanine, for the wording. A slight
graduation from dark to light helps the bowl look as if
it’s sitting on a surface; the darker band at the top makes
the text stand out more clearly.
.
Click the Image Warp button on the Options bar,
to get the Warp grid. Drag the top two handles
up, to make the top of the label fit the can; drag them
outwards as well, towards the edges. This will help give
the impression of the label wrapping around the can, as
the sides are now viewed in perspective.
1
Drag the bottom handles to make the bottom
of the label fit the can, then drag the four cross
points within the grid outwards as well. This is a tricky
procedure, as grid points will move when you drag those
nearby; it’s hard to control this grid, and there’s really no
option but to persevere until you get it right.
Soup cans