art and design in photoshop - phần 7 pptx
Bạn đang xem bản rút gọn của tài liệu. Xem và tải ngay bản đầy đủ của tài liệu tại đây (5.5 MB, 26 trang )
(+/
I have a friend who,
feeling his life was not
running according to
plan, turned to self-
help books. His interest
became an obsession.
Last time I saw him, he
was reading a self-help
book about how to give
up reading self-help
books.
Whatever you think
about the genre, there’s
no doubt that the need
for a mystic, alternative
or spiritual approach
to managing our lives is
of supreme importance
to a large section of
the population. And
these people have to be
marketed at just like any
other interest group: the
marketing may be more
low key, but the sell is
just as hard.
We’ll look at how to
put together a typical
inspirational text, using
elements that are
common in the field.
We’ll also explore the
particularly tricky issue
of relevant typography
for this genre.
+
Every book cover starts with an idea. The idea
here is to use a bird to represent freedom and
peace. We have a pair of seagulls to choose from: but
which is best? The lower one, flying towards us, will have
more cover impact.
0
Given the fact that we’re using a seagull, we
clearly need some sky behind it. Dawn and dusk
make for dramatic skies, but we’re not selling drama –
precisely the opposite. A bright, sunny day with fluffy
clouds is the right choice here.
.
Choosing the typeface for this cover is a difficult
task. Should we be elegant, informal, playful or
relaxed? Here’s one possibility: Times Regular and Chopin
Script. The script font is attractive, but that first letter
is hard to read. This, in itself, is a good enough reason for
turning to a different font.
1
Setting the whole cover in Times is one approach:
it’s detached, inoffensive, traditional. But it
doesn’t really speak of tranquility. There’s a formality
here that’s potentially off-putting: we’re aiming at an
alternative culture, after all. Still, the font works well for
the author’’s name at the bottom.
Mystic and inspirational
(+0
!
Having scaled and rotated the seagull to the
correct angle, we need to address the way it
blends into its surroundings. Changing the layer mode
from Normal to Hard Light allows us to see the sky blue
color through the wings, producing an instant match.
,
That piece of ground at the bottom damages the
image. Here’s a quick way to replace it with sea.
Select the bottom portion of sky with the Rectangular
Marquee, and make a new layer from it. Then flip the
layer vertically, darken and drag to the bottom.
/
This is Echelon, a font by Ray Larabie. It’s a much
looser, friendlier serif, that speaks of relaxation
– a far better choice altogether. But note how the top
line, ‘How to Achieve’, looks too wide: even though it’s the
same width as the main title word, it seems to overhang
it. See More Info for the reasons why.
%
Reducing the size of the ‘How to Achieve’ line,
and tightening the loose letterspacing, means it
balances the large word ‘Tranquility’ rather better. The
cloud in the previous step interefered with the lettering;
here, I’ve added a blue to transparent gradation, on a
new layer, to strengthen and simplify the lettering area.
Books and
magazines
FEK?<:;
DFI<@E=F
image
font
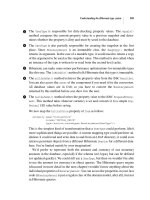
In step 7 the ‘How to O
Achieve’ text looks too wide.
The reason is that the first
and last letters beneath, ‘T’
and ‘y’, both have stresses
that are inset from their
outer edges: in the ‘T’ it’s the
large vertical stroke, and in
the ‘y’ it’s point at which all
the strokes come together.
When we arrange type, we
have to look at the optical
alignment rather than being
strictly mathematical about
it. Here’s a simpler example
of the same phenomenon.
In the first example, the
top line is exactly the same
width as the next: and yet it
looks too wide:
The reason is that although
the serif at the top left of
the ‘B’ sticks out, the stress
is that strong vertical. So
that’s the position we have
to line up with:
There’s no equivalent
vertical stress on the ‘K’ at
the end, so we just balance
the beginning ‘B’ instead.
J?FIK:LKJ
MAC WIN BOTH
(,'
The supernatural has
always played a strong
role in children’s fiction.
From the Narnia of Lord
of the Rings, through
the fantasies of the
Wizard of Oz, to the
magical world of Harry
Potter, children have
been enthralled by the
mystical element in
fiction.
Frequently, the story
will center around a
single object with special
powers: a ring, a chalice,
a compass. The object
is nearly always gold,
partly because it reads
well on the page and
partly because it looks
good on the cover.
We’ll base our
version of the genre on
an orrery, a scientific
instrument for showing
the relative motion of
the planets. With its
celestial connotations
it already carries the
right sense of mystery
and wonder. By adding a
couple of special effects
we can make a routine
image of this device into
something wonderful.
+
Our photograph of the orrery shows it supported
on the shoulders of Atlas, who himself stands on
a plinth. We don’t need any of these extra details, so we’ll
chop the device off at the bottom to remove the visible
support.
0
Now apparently floating in space, the orrery
becomes a more interesting object in its
own right. To make it even more impressive, use the
Brightness/Contrast dialog to boost the contrast
considerably.
.
The red glow in the middle of the orrery is
impressive – so let’s make it even more so.
Make another new layer, behind the orrery, and set the
Gradient tool to create a radial gradient. Sample a red
from the Lens Flare layer, and drag from the center to
make an additional red glow on the new layer.
1
We need quirky but traditional looking text
for our headline. This is the Ray Larabie font
Euphorigenic, which has these descending capitals as
standard. Set in one text block, the S and O overlap in
an uncomfortable way; placing the words ‘of the’ on two
lines in a separate block helps avoid this problem.
Adolescent fiction
(,(
!
We want to add an extra glow to the sun in the
center of the device. Make a new layer, fill it with
black, and choose Filter > Render > Lens Flare. Drag the
center marker so the flare comes directly towards us to
create this glowing effect.
,
If we were to change the mode of the new layer
to Screen, the black would disappear, leaving us
with just the glow. Changing the mode to Hard Light,
however, produces a shading effect from the black as
well that’s far more impressive.
/
The brassy, metallic style on this text is created
using Layer Styles. See page 236 for a tutorial
on how to create metal in this way. The style used here
is saved within the file on the CD, so you can adapt it for
use in your own projects (and you can, of course, apply it
to any font).
%
The author’s name is added in the same font, but
without the gold effect so it stands out more
clearly at the top. Because the orrery touches the letter
S in the main title, there’s a potential conflict here: so
I’ve added a Drop Shadow to the text style to darken the
region immediately behind this letter.
Art & Design in Photoshop
Books and
magazines
FEK?<:;
DFI<@E=F
image
font
What really makes O
this cover work is not the
gold text but the enticing,
beautiful image of the
orrery itself. And yet the
object we started with was
a pedestrian, rather dull
photograph. Just about any
image can be made to look
more magical through added
lighting effects and boosted
contrast: we don’t need
to spend hours arranging
complex lighting in a
photographic studio when
we can produce a better
effect directly in Photoshop.
The arrangement of the O
text in step 6 is crucial to
the legibility of the cover.
As designers, though, we
don’t have the luxury of
being able to change a book
title to suit our layout; we
must always modify the
size and arrangement of the
type in order to fit in with
the individual demands of
the text.
Because we’ve applied O
the gold effect to the type
as a Layer Style, we can
continue to adjust the text
after we’ve applied it. It
helps tremendously to be
able to see the text fully
styled in this way: the letter
spacing looked too loose in
the original, but works well
when the gold style is placed
onto it.
J?FIK:LKJ
MAC WIN BOTH
(,)
Great works
of art
We’re surrounded by works of art in a way that people never before have been in
history. It leaps out of book covers, beams down from billboards, and assails us
through advertising.
These days even the least visually literate of viewers will recognize a couple of
dozen famous paintings, starting – of course – with the
Mona Lisa
, and working
through the history of popular art.
But how are these works created? And do we need to mix oil paints in order
to reproduce them? We’ll look at how to simulate a range of artistic styles, from
the ancient to the contemporary.
It would be presumptuous of us to think that we could paint like
Gainsborough, or imagine like Warhol. So in this chapter we’ll only look at those
artists whose work lends itself to being replicated in Photoshop: you won’t see
a tutorial on how to do a Da Vinci drawing here, because if you could draw like
that you’d have no need of Photoshop to begin with.
Art & Design in Photoshop
Great works
of art
art
1. the products of human
creativity; works of
art collectively; ‘an
art exhibition’; ‘a fine
collection of art’
2. the creation of beautiful
or significant things;
‘art does not need to
be innovative to be
good’; ‘I was never any
good at art’; ‘he said
that architecture is the
art of wasting space
beautifully’
3. a superior skill that
you can learn by study
and practice and
observation; ‘the art of
conversation’; ‘it’s quite
an art’
4. photographs or other
visual representations
in a printed publication;
‘the publisher was
responsible for all the
artwork in the book’
Wordnet Dictionary
(,*
(,+
Thomas Gainsborough
(1727-1788) was the
foremost English
painter of portraits and
landscapes. More often
than not, the subjects
of his portraits owned
the landscapes they
stood in front of: favored
by the landed gentry,
Gainsborough had little
interest in social realism.
In fact, realism played
very little part in his
work, except for the fine
detailing in the foliage
and distant views: his
subjects were always
meticulously posed
in stylized, artificial
arrangements. His
subjects tended to be
dukes and earls, and he
was the favorite painter
of King George III (yes,
the mad one).
As well as making
a straightforward
photograph look like an
oil painting, we’ll add
a canvas texture to
complete the effect.
!
Now return to the RGB composite, using the
Channels palette, and open the Lighting Effects
filter (found in Filters > Render). We don’t want to use
the spotlight effect here, so make sure the Intensity
setting is low, and the Ambient setting high enough so
that the preview looks like our original. From the pop-
up menu at the bottom, choose Alpha 1 as the Texture
Channel. This will form the basis for a bump map, giving
the appearance of depth to the image.
,
Once we press OK in the Lighting Effects dialog,
we can see the result: the flat artwork now
appears to have depth to it, giving the illusion of thick oil
paint on the background.
Thomas Gainsborough
FEK?<:;
J?FIK:LKJ
DFI<@E=F
image
The Lighting Effects filter, O
used in step 3, is capable
of producing dramatic
three-dimensional effects.
We’ll look at some of its
capabilities elsewhere in this
book. For now, all you need
to be concerned about is the
Height slider, which raises or
lowers the apparent depth.
It’s hard to see the results
in the tiny preview window,
though; the only solution is
to guess at a setting and see
if it looks right. If not, then
Undo and use
!-C
*C
to reopen the
dialog for the filter.
If you want to simulate a O
painting that’s not painted
on canvas, but still want it
to look old, then don’t apply
a Canvas texture in step 5.
Instead, take a look at the
Craquelure filter, which adds
a simulation of a broken,
cracked surface. Again,
be careful not to overuse
this one: begin with the
lowest settings and increase
gradually until you get the
effect you want.
Nothing helps an oil O
painting look authentic
as much as a gilt frame.
The frame used here is on
a separate layer, with a
drop shadow applied using
Layer Effects; the shadow
also appears on top of the
painting itself, adding a
sense of depth to the whole.
MAC WIN BOTH
+
Here’s our starting image: a bucolic maiden from
the Photos.com collection, placed against a new
background. The layers have been flattened together so
that we can work on them as a single unit. The first thing
we need to do is to get some texture into the picture.
0
To make the texture, first select all and copy;
then make a new channel, using the pop-up menu
in the Channels palette. When the new channel opens,
choose Paste (
!S*S) and the image will
appear in grayscale in the new channel.
.
Now for some canvas texture. Choose the
Texturizer filter from the Filters > Texture menu,
and pick Canvas from the pop-up menu. Don’t go for too
strong an effect here, as it will look artificial: the canvas
should be just about visible in this painting, rather than
swamping the image.
1
Finally, we need to boost the contrast in this
picture. There are many ways to do this in
Photoshop, and the simplest is to use the Brightness/
Contrast adjustment. Since version CS3 this has been
reworked so it’s non-destructive: previously, it could
cause blown-out highlights that couldn’t be fixed.
(,,
Great works
of art
Art & Design in Photoshop
(,-
Joseph Mallord William
Turner (1775–1851) was
a prodigious English
landscape painter who
was accepted into the
Royal Academy of Art at
the age of just 14.
Although he started
conventionally enough,
painting landscapes
and the occasional
portrait, he soon became
obsessed with natural
events – sunlight, storms,
rain, and especially the
sea, whose raw power
intrigued him. He was
particularly interested
in disasters, rushing to
witness the burning of
the Houses of Parliament
in 1834 so he could
commemorate the event
on canvas.
Turner is best known
for his seascapes, which
explore light and shade
in a way no painter had
before: his work, far
in advance of its time,
prepared the way for the
French impressionists
who were to follow.
We’ll explore his
techniques through a
homage to The fighting
Temeraire tugged to her
last berth to be broken
up, above, which Turner
painted in 1839.
+
The sky is one I photographed; the ship is a 3D
model, imported into the Extended edition of
Photoshop CS3. If you don’t have the Extended edition,
it’s not a problem – I’ve provided the ship image as a
regular layer on the CD.
0
The reason I chose a 3D model rather than a
photograph of a ship is that it gives us the ability
to create a better reflection than we could achieve by
simply flipping the ship vertically. Even so, it took a while
to achieve a suitable angle of view.
.
In order to make the reflected ship look more
real, add a Layer Mask (using Layer > Layer Mask
> Reveal All). Painting in black on this mask will hide the
ship; painting in white will reveal it. Try to achieve a soft
fading away as the ship reflection nears the bottom of
the canvas.
1
To apply our filters, first make a Merged
Copy of the image using
*1B
!-1B. The first effect is Filter > Artistic
> Watercolor: I used the maximum Brush Detail and
Texture values of 14 and 3 respectively, with the Shadow
Intensity set to 0.
J. M. W. Turner
(,.
!
We need to make that sky more colorful. Make
a new layer, above the sky (and behind the ship),
set to Color mode. Paint on here with a large, soft-edged
brush, in tones of blue, yellow, red and orange, to add
some of Turner’s exotic colors to the image.
,
To make the sea, all we need to do is take a copy
of the sky and flip it vertically. I’ve added some
black shading with the Gradient tool just below the
horizon line, to mark a clearer distinction between the
sea and its reflection.
/
The second filter to be applied is Filter > Brush
Strokes > Spatter. The values used here depend
on the image you’re working on, and the size at which
you’re working; I used Spray Radius and Smoothness
values both set to 9.
%
To make the image come alive, we need to beef
up the lighting. Make a copy of the layer (so we
can return to the original if we make a mistake) and
use the Dodge tool, set to Highlights mode, to brighten
the area around the sun; then use the Burn tool, set to
Midtones, to darken the side of the ship that’s in shadow.
Art & Design in Photoshop
Great works
of art
FEK?<:;
DFI<@E=F
image
In step 6, we make O
a Merged Copy of our
artwork. This is necessary
so that we can apply our
filters to the image as a
whole, rather than to each
layer individually. Up until
this point, the ship model
and the photographed sky
looked quite out of keeping
with each other; applying
the filters to both helps
to unify them into a single
image.
We’ve applied the O
Watercolor and Spatter
filters as two separate steps
here, in order to show how
each one affects the image.
But we could apply both at
the same time: when in the
Filter Gallery dialog, click
the New Document icon at
the bottom right to add an
additional filter, and then
change it to the one you
want. The advantage of this
approach is that we can see
the effect of both filters
simultaneously, allowing us
to modify their appearance
in concert with each other
until we get the right effect.
The effectiveness of the O
Dodge and Burn tools in step
8 depends very much on
the mode to which they’re
set. Here we use Highlights
for the Dodge tool, but
Midtones for the Burn
tool; these modes have the
strongest effect on color for
each tool.
J?FIK:LKJ
MAC WIN BOTH
(,/
Georges-Pierre Seurat
(1859–1891) was the
founder of the neo-
impressionism art
movement. The painting
above is a detail from
Sunday Afternoon on
the Island of La Grande
Jatte, probably his most
famous work.
Seurat was the
foremost exponent of
pointillism, a technique
involving creating a
picture from many
thousands of tiny dots,
rather than naturalistic
brushstrokes. The
intention was that the
viewer’s eye would do
the job of mixing the
colors, rather than
the artist doing it on
his palette: the result
is a rich, dense effect
that’s full of tiny detail,
creating a detached,
other-worldly impression
in the viewer.
+
Here’s a suitable scene: two Victorian ladies
sitting on a park bench, while a gentleman strolls
past. I’ve put this together from four separate sources,
but of course there’s no reason why you should copy the
period dress precisely.
0
The first step is, naturally enough, the Pointillize
filter – found under Filter > Pixelate. The only
control here is the size of the resulting dot: a value of
4 is a good starting point. Work on a copy of your base
artwork, as we’ll need the original later.
.
The Pontillize/Gaussian Blur combination worked
well enough, but we were left with an image that
had altogether too much white space behind the dots.
We need a way to tie it together better, and to unify the
image. Working on a copy of the original background,
apply the Sponge filter (Filter > Artistic).
1
With the Sponge-filtered version placed on
top of the layer stack, we can’t see the original
Pointillized version beneath it. But if we change the
mode of the layer from Normal to Hard Light, using the
pop-up menu at the top of the Layers palette, we can see
through to the Pointillized layer beneath.
Georges Seurat
(,0
!
This is the result of applying the Pointillize filter.
It’s not a bad start, but the result is very harsh:
these dots look like they’ve been created by a machine,
rather than painted with a soft brush, as the inset shows
clearly.
,
The simple remedy is to apply a little Gaussian
Blur to the filtered image (Filter > Blur). A value
of around 1 pixel will do fine – we only want to soften the
edges. You can raise or lower the amount in 0.1 steps, so
experiment with different settings.
/
The result of combining the two filter effects
produces a good result – but it’s rather too
strongly contrasted. To recapture some of the pastel feel
of Seurat’s originals, we need to brighten the darkest
tones. Open the Curves dialog, and raise the left-hand
edge of the curve to brighten the shadows.
%
Here’s the finished result: a softly speckled, low
contrast image that matches the feel of the
pointillist originals.
Art & Design in Photoshop
Great works
of art
FEK?<:;
DFI<@E=F
image
The technique used here, O
combining multiple layers
using different filters while
using Hard Light mode, is
a good way to build up a
complex effect. Because
each effect is on a separate
layer we can experiment
with different ‘light’ modes
– Soft Light, Overlay, and
so on.
When simulating an O
artistic style like this, it
helps to copy the style of
the composition as well as
the detail in the brushwork.
If you’re photographing
your family for a similar
treatment, try to arrange
them in a manner that suits
Seurat’s observational,
serene and rather distant
approach to his subjects.
The choice of cell size O
when using the Pontillize
filter in step 2 depends very
much on how you’re going
to present your work. If it’s
going to be displayed on a
website, then what you see
at 100% will be what you
get. But if you’re working for
high resolution print, you’ll
need to raise this figure to
avoid simply seeing a messy
result. Even in this book,
the CMYK print screen used
to reproduce the images
on glossy paper inevitably
clashes with the pontillist
effect and hides it to some
degree.
J?FIK:LKJ
MAC WIN BOTH
(-'
Paul Cézanne
(1839–1906) was
the French post-
impressionist painter
who, perhaps more
than any other, changed
the style of painting in
France from the 19th to
the 20th century.
Both Matisse and
Picasso described
Cézanne as ‘the father
of us all’, acclaiming him
for his pioneering work in
taking the impressionist
style prevalent at the
end of the 19th century
and preparing the ground
for the cubist movement
that was to follow.
Although Cézanne
painted many figures
and landscapes during
his career, he returned
time and again to still life
paintings featuring bowls
of fruit. It’s this aspect
of his work that we’ll
attempt to emulate on
these pages.
+
I’ve put this image together from a variety
of sources: the fruit bowl, jug, table, curtain
and background are all separate layers. But whether
you make your own composite or start with a single
photograph, you’ll need one layer to work on. Use
*B!-Bto make a Merged Copy.
0
We’ll need a couple of separate filter effects to
make this image work, so let’s start with the
basic brush strokes. Duplicate the Merged Copy you’re
working on, and choose Filter > Artistic > Dry Brush to
create the initial effect. Choose a medium sized brush,
with high texture and detail values.
.
The last step neatly outlined all the edges in our
document. But we want to turn those edges to
blue; as the second step in the process, choose Image >
Adjustments > Invert (or use
*F!F) to invert
the image.
1
Now to change all those lines to blue. Open the
Hue/Saturation dialog (
*R!R) and
check the Colorize button: this will change all the hues to
a single color. Drag the Hue slider until you get a strong
blue result.
Paul Cézanne
(-(
!
To bring a little more life into those oranges, use
the Burn tool set to Midtones. This both darkens
them and adds saturation, turning the rather insipid
orange we started with into a strong, burnt umber.
,
One of Cézanne’s recurring habits was to outline
the elements of his compositions in blue. We can
automate this process with a three step approach. First,
take the copy of the original composition (the one you
didn’t apply the Dry Brush filter to) and apply Filter >
Stylize > Glowing Edges.
/
When we change the mode of this second layer
from Normal to Multiply, all the white disappears
and we’re just left with the blue outlines, neatly running
around all the contours of our composition.
%
The last step is to paint a little additional color
into the image. Make a new layer, set to Color
mode; with a soft-edged brush, paint blue into the
shadows to replicate the shadow effect used commonly
by Cézanne and his contemporaries.
Art & Design in Photoshop
Great works
of art
FEK?<:;
DFI<@E=F
image
Both the Dry Brush filter O
(step 2) and the Glowing
Edges filter (step 4) appear
in Photoshop’s Filter Gallery
list, from which we can add
multiple filters at once. But
the Filter Gallery feature
doesn’t allow us to modify
filter effects to the extent
of inverting, colorizing and
changing layer modes; that’s
why we need two separate
layers to perform the task.
Using multiple copies of the
same layer, each treated
differently, is a common
Photoshop process that
gives us more control and
flexibility.
In this workthrough O
we’ve attempted to copy the
work of Cézanne as closely
as possible. But there’s no
need for you do take this
approach: if you find other
combinations of filters, or
diffferent filter settings,
produce a better result, then
go for it. What matters in
the end is the quality of the
finished image.
In this example we’re O
working with Merged Copies
of a multi-layer file. But if
you have Photoshop CS3
or later, you can group all
the layers ready to apply a
Smart Filter to the lot. This
means you’ll still be able
to disassemble and move
or replace elements of the
composition later.
J?FIK:LKJ
MAC WIN BOTH
(-)
Henri Matisse
(1869–1954) was a
printmaker and sculptor
as well as a painter.
Initially his work was
considered so outlandish
that he and his kind were
labeled ‘Fauves’ – wild
beast, in French.
The Fauvists rejected
the pastel hues and
representational values
of the Impressionists,
preferring strong colors
and vigorous, almost
aggressive brushstrokes.
Initially, as with so
many art movements,
the result was an outcry:
as one French critic put
it, ‘a pot of paint has
been flung in the face of
the public.’
Matisse formed a
close friendship with
Picasso, and the two saw
themselves as artistic
rivals.
Reproducing his style
of painting is difficult,
because so much of his
work depended on his
use of color and texture:
but we can look at how
to simulate his painting
Portrait of Madame
Matisse, above.
+
Here’s a suitable subject for our painting, cut
out on a separate layer. Too many portraits
show the subject grinning at the camera, and this isn’t
a style which Matisse would choose: he far preferred a
melancholy expression.
0
The hair has to look painted, rather than
naturalistic, so cut off the loose fringes on top
with the Eraser tool. We can also use the Smudge tool to
smooth out those loose strands of hair that are falling on
the forehead – don’t worry about the resulting blurring.
.
Next, apply the Paint Daubs filter (Filter >
Artistic once again). Choose a small brush size
with medium Sharpness in order to get this detailed,
almost three-dimensional oil paint texture.
1
The texture we produced following the Paint
Daubs filter is all very well, but the result is just a
little too sharp to be believable – it looks too crisp to be
a painting. Use a small amount of Gaussian Blur (Filter >
Blur) to smooth it out: around a 1 pixel radius should be
sufficient.
Henri Matisse
(-*
!
Our simple background is made from panels of
solid color, matching Matisse’s original. The added
shading isn’t to create naturalistic shadows, but to give
the texture process, which we’ll look at next, something
to work with.
,
We need a couple of filters to generate the oil
paint texture. First, make a Merged Copy of both
layers by pressing
*1B!-1B.
We’ll begin with Fresco (Filter > Artistic), which adds a
posterizing quality to the image.
/
Now to add some colors to this – the key to
making the effect work. Make a new layer, and
set its mode to Hard Light. Now, when we paint on the
layer, our colors are translucent: we can still see through
to the figure beneath. Choose oranges, yellows and
greens for the skin, and save your blues for the hair.
%
It often helps to create a second Hard Light layer
half way through the coloring process. Here,
we’ve used the second layer to add detail around the chin
line and eyebrows, to add more color to the side of the
face, and to change the color of the clothing.
Art & Design in Photoshop
Great works
of art
FEK?<:;
DFI<@E=F
image
In steps 4 and 5 here O
we first add the Fresco
filter, then go on to add
the Paint Daubs filter on
top. We could do this in a
single operation: every time
we open the Filter Gallery,
we’re presented with the
option of applying any of the
Artistic or Sketch filters.
At the bottom right of the
dialog is a ‘new document’
icon, which allows us to add
an additional filter effect.
Now, we can see how the
image looks with two or
more filters applied. We
can change their order by
dragging them, and adjust
the settings until they look
good together.
In step 4 we made a O
Merged Copy of the two
layers, rather than merging
them together. It’s a good
idea to keep your original
layers intact for as long as
possible, just in case you
need to make any changes
later on.
This is the kind of image O
you can keep working on
for as long as you have
the patience. Try using the
Smudge tool to clean up
ragged texture, and keep
refining those Hard Light
layers with different color
choices until you get the
result you want.
J?FIK:LKJ
MAC WIN BOTH
(-+
Piet Mondrian
The work of the Dutch
painter Piet Mondrian
(1872–1944) is among
the most difficult
examples of modern art
for the casual viewer to
get to grips with.
One of the foremost
members of the
De Stijl movement,
Mondrian’s stark,
non-representational,
paintings – he
called them merely
‘compositions’ – take
abstraction to a level
rarely seen before
or since. Thick black
lines separate sparse
rectangles of color, as
paintings are reduced to
the pure play of form and
color: modernism taken
to extremes.
Although Mondrian’s
work has been
reproduced everywhere
from coffee mugs to wall
cabinets, it’s a mistake
to assume that he was
striving for perfect flat
lines and shapes. The
brush strokes are an
integral part of the work,
and it’s that quality of
surface texture that we’ll
aim for in this version of
a painting he created in
1921.
.
To make the colored rectangles, make a new
layer behind the black lines. Draw rectangles with
the Marquee tool – no need to fit them accurately, as
long as the edges are behind the thick black lines. Pick a
foreground color, and use
-ss to fill the
selection with the chosen color.
1
We now need to add texture to the colored
rectangles as well, otherwise they look too flat
and computer-generated in front of that textured canvas.
This is simply achieved by changing the mode of the
color layer from Normal to Multiply: in this mode, the
colors darken up the texture beneath, so we can still see
it clearly.
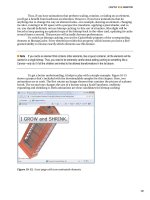
0
Creating the texture is a multi-step process. Make
a new layer, and set the foreground color to pale
brown and the background color to white. Apply the
Clouds filter from the Render section of the Filters menu,
to create this random pattern of light and shade. Each
time you use the filter it will produce a slightly different
effect, so experiment until you get a pleasing result. I’ve
enlarged a section of the view over these three steps so
we can see the texture more clearly.
+
The black lines that make up the work are the
starting point. Create one vertical line as a
marquee selection first, then duplicate it around the
canvas to make all the other lines. That way, you’ll be
sure to make all the lines of uniform thickness.
(-,
FEK?<:;
DFI<@E=F
J?FIK:LKJ
MAC WIN BOTH
Art & Design in Photoshop
Art & Design in Photoshop
Great works
Great works
of art
of art
texture
In step 1, we created all O
the black lines by copying
sections of one line around
the canvas. Make the three
vertical lines that extend all
the way from top to bottom
first; hold
- as you
drag a filled selection to
duplicate it, adding
1 to
constrain its movement to
just vertical or horizontal.
Use Edit > Transform >
Rotate 90° to make the
horizontal lines. Where the
lines don’t reach all the way
to the edge of the canvas,
hold
- as you drag
over the unwanted area
with the Marquee tool to
remove it from the selection.
The remainder of the lines
can be copied from existing
horizontals and verticals.
Although we’re basing O
this on an original Mondrian
painting, there’s no reason
why you should follow this
pattern exactly: feel free to
make your own composition
in this style. Although it
may look like child’s play, it’s
harder than it might seem
to create an image that
contains the balance and
grace of Mondrian’s work.
The texture we’ve O
created here can be used as
the background for many
painting styles. If you want
to add it to an image, change
the mode of this layer to
Multiply and place it at the
top of the layer stack.
/
Let’s now address those black lines: as they stand,
they’re just too perfect. To make them appear
painted, first apply the Diffuse filter, found in Filters >
Stylize. This produces the effect shown on the left in the
enlarged view, above. Then apply a little Gaussian Blur to
the layer, which softens the edges (right) and creates a
far more hand-painted appearance.
%
Here’s the finished painting. The background
texture and the softening of the thick black
lines combine to create a work that looks as if it has
been painted by hand, rather than created entirely on a
computer.
,
The noise in the previous step made the whole
effect too bitty, so let’s add some Gaussian Blur
to soften it. The setting should be enough so that the
noise is smoothed overall, withough losing sight of it
altogether. When this is done, move the texture layer
behind the lines layer.
!
The next step is to add some noise. Choose Add
Noise from the Noise section of the Filters menu,
and pick Gaussian rather than Normal noise for a more
natural, varied effect. Make sure it’s monochromatic
noise (we don’t want any stray colors creeping in here)
and choose a low setting of around 10%.
(
Pablo Picasso
(1881–1973) was
perhaps the most famous
and influential painter
of the 20th century. His
painting Les Demoiselles
d’Avignon, painted in
1907, brought cubism
to the attention of the
world.
Picasso was a
supreme draughtsman
as well as being a
consummate stylist. It
would be absurd for us
to attempt to reproduce
one of his paintings here,
as only Picasso can paint
a Picasso.
But he also created
sculptures, such as his
1912 model Maquette
for Guitar. We may not
be able to paint like
him, but we can pay
homage to the master
by reproducing his
cardboard and string
model in a public space.
+
Just like Picasso’s original model was built from
several sheets of cardboard, so we’ll use an equal
number of layers to make our version of it. We’ll begin
with the base stand: trace the shape on an empty layer
with the Polygonal Lasso tool, and fill with mid gray.
0
Because the next shape has a curve on the side,
we’ll need to draw a path with the Pen tool to
capture it correctly. Use
*#!#to turn
the path into a selection, then fill with gray on a new
layer once again.
.
Here’s the finished sculpture, made up of
individual layers and shaded. As it stands it
looks far from photorealistic – more like a plastic model
awaiting the addition of color and texture. We’ll add the
texture shortly; first, we need to make it fit better into
its environment.
1
Paint a shadow on a new layer at the bottom, so
the object sits on the ground. We now need to
load all the layers as selections. Hold
*!and click
on the thumbnail of the first layer; then hold
*1
!1
and click on each subsequent layer’s thumbnail
to add that to the selected area.
Pablo Picasso
(
!
We’ll now need to add some shading to the layer
beneath to make it stand out. Using the Burn tool
set to Highlights, paint a shadow on the first layer, cast
by the layer we’ve just drawn. This helps us to see the
two layers clearly.
,
Continue this process of making new layers and
shading the layers beneath as we go along. The
shading helps to define each layer as a separate object,
as well as adding texture to the layers.
/
With all the layers loaded up, we should have
a selection that matches all the layers in the
construction. Make the Texture layer visible, then inverse
the selection and press
to delete everything
outside the selection area.
%
The texture we added in the previous step
completely obscures the image, so we need
to make sure we can see our hard work beneath it.
Changing the mode of this layer from Normal to Multiply
means that it only darkens up the layers beneath,
producing this rough metal appearance.
Art & Design in Photoshop
Great works
of art
FEK?<:;
DFI<@E=F
image
texture
In step 1 we need to fill O
a selected area with a mid
gray color. We could go
through menus to do this –
but there’s a quicker way.
With gray as the foreground
color, press
- ; this will
fill any selected area with
the foreground color. If you
want to fill an area with
the current background
color, use
*
! instead.
In step 7, we first load O
up the pixels on a layer
by holding
*! and
clicking on that layer’s
thumbnail in the Layers
palette. If we simply repeat
this on another layer’s
thumbnail, we’ll load that as
a selection instead; but as
with all selections, holding
1 as we click adds the
new selection to the old one.
We don’t need to stick to O
a metallic texture: anything
can be added onto this base.
Here’s a wooden effect.
J?FIK:LKJ
MAC WIN BOTH
(-/
The British artist Henry
Moore (1898–1986) is
best known for his large
figurative abstracts,
either carved in stone or
cast in bronze.
He usually depicted
figures, returning
frequently to his favorite
subject of ‘mother and
child’. Moore’s work
abstracted human
anatomy to basic
constituent parts, often
featuring holes inside his
figures: the use of these
hollow regions within his
work became a sort of
trademark.
Moore almost always
depicted women,
whether nursing children
or, commonly, reclining
on a plinth.
Rather than producing
a slavish copy of a
single Moore work, we’ll
produce an original
sculpture based on his
ideas. It’s a mother
and child composition,
in which the child is
represented by the hole
within the mother’s
torso.
+
Begin by drawing the outline of the figure on a
new layer. While it is just about possible to paint
this with a hard-edged Brush, the only way to achieve
smooth lines is by using the Pen tool, turning the path
into a selection and filling with gray.
0
Add some basic shading around all the edges with
the Burn tool, set to Highlights. You don’t need
to be too exact here; we just want to create the initial
impression of some rounding at the edges. Use a small,
soft-edged brush to achieve the effect.
.
To add highlights we can use the Dodge tool. We
can also access this tool temporarily while using
the Burn tool, by holding down the
- key: this
makes it easy to switch between the two tools. Use the
two to build up light and shade, increasing the overall
contrast of the figure.
1
With the basic figure complete, we need to add
texture on a new layer. The easiest way to create
the effect of a bronze surface is to set the foreground
color to a warm yellow and the background color to
brown, and use Filter > Render > Clouds: choose. Repeat
with
*C!C until you get the desired effect.
Henry Moore
(-0
!
Now use the Burn tool once again to sketch in
some of the contours within the piece. We’ll build
up the suggestion of an arm on the right, and add some
shading around the base for the sake of realism. Use a
low pressure and build up the effect gradually.
,
Now for the lighting. If we imagine that the light
source is at top right, we need shadows placed
bottom left: so use the Burn tool once more to paint in
shading on the sides of the model that fall away from the
source of the light.
/
To make the texture show up only where it
overlaps the figure, make a Clipping Mask by
pressing
*D!-D or holding -
and clicking between the two layers in the Layers palette.
When we change the mode of the texture layer to Hard
Light, we can see the shading beneath.
%
As with all isolated objects, the effect works best
when placed in a realistic setting. Here, placing
the sculpture in a park scene makes it look far more
convincing.
Great works
of art
FEK?<:;
DFI<@E=F
image
texture
This exercise makes use O
of the Dodge and Burn
tools to a high degree, so
it’s worth looking at how to
use these tools effectively.
For best results, invest in a
pressure-sensitive graphics
tablet: Dodge and Burn
are much easier to control
when you can vary the
pressure. If you don’t have
access to one, then set a low
pressure – around 30% or
so – and build up the shading
gradually, using your mouse
or trackpad. Remember, you
can change the pressure at
any time using the number
keys on your keyboard: use 2
for 20%, 5 for 50% and so
on, up to 0 for 100%.
The Clouds filter, used O
in step 6 here, creates a
random texture that’s a
blend of the foreground and
background colors. Because
it’s random, we don’t always
get the effect we want first
time; repeat the process by
pressing
*C!C
to apply the filter again.
For a tighter texture, press
*C!-C
instead.
Because we’re applying O
the texture on a separate
layer, we can continue to
adjust the lighting of the
sculpture beneath using
Dodge and Burn. Remember,
too, to adjust the brightness
of the texture layer itself if
it doesn’t look quite right.
J?FIK:LKJ
MAC WIN BOTH
(.'
The Belgian painter René
Magritte (1898–1967)
was one of the foremost
surrealist artists. He
may not have had the
technical skill of Dali, but
he more than made up
for this with a fervent
imagination that had the
ability to delve deep into
our collective psyche.
More than any other
surrealist, Magritte’s
work strikes a chord
with the viewer.
La Condition Humaine
is a theme that he
returned to again and
again, painting numerous
variations on this theme:
a canvas in front of
a window or an open
doorway. At what point
does the view through
the window become the
view as depicted on the
canvas? It’s often hard
to spot the join – and
that’s deliberate. The
view through the window
is itself, of course, just
another painting of the
scene.
We’ll reproduce
Magritte’s technique in
a photographic manner,
while staying true to the
style of the original.
+
There are two starting elements in our
montage: a blank canvas on an easel,
and a square-on view of a window. It would, of
course, be possible to photograph a canvas in
front of a real window, but the lighting issues
would be severe. Magritte would have placed
the canvas directly in front of the window, but
we’ll exaggerate the effect by moving it slightly
to one side.
!
Now for a new view. Magritte always
used pastoral scenes, so we’ll follow
suit. We couldn’t use the original view through
this window, unless we went to the trouble of
leaning out of the window first to photograph
it. By placing the landscape on a layer behind
the window layer, the layer mask allows us to
see through the glass areas to the view beyond.
.
Duplicate the background layer
by holding
- as you drag
a copy of it above the canvas layer, then
press
*D!-D to make use
the canvas layer as a clipping mask for this
duplicated background. Now, it will show up
only where it overlaps the canvas. Notice how
that thin white edge we left on the right hand
side marks the point where the canvas ends.
René Magritte
(.(
0
The first thing to do is to take out the
original view. Having hidden the easel
layer, the best way to remove the view is to
make a layer mask for the window layer. Select
the individual panes with the Lasso or Pen
tools, then fill with black on the layer mask to
hide these regions.
,
To carry this view onto the canvas, first
select the canvas area on the easel – a
simple matter using the Magic Wand tool. We
need to show a slight edge on the window
side, however: this is what makes the illusion
work. Since the canvas is vertical, we can use
the Rectangular Marquee tool to remove a
thin slice from this selection. With the whole
canvas selected, hold
- and drag the
marquee over the right-hand edge of the
canvas to remove it from the selected area.
Then use
*G!Gto make a new layer
from the resulting selection. I’ve hidden the
original easel layer here to show just the new
canvas layer.
1
All the versions Magritte painted of
this subject had both the window and
the canvas more or less straight on in the
scene. And it’s not hard to see why: when we
attempt the same technique with an angled
window and easel, the horizon line in the view
fights with the diagonals made by the tops and
bottoms of the easel and window, destroying
the effect.
Art & Design in Photoshop
Great works
of art
FEK?<:;
DFI<@E=F
image
In step 2 we could remove O
the glass area from the
window – and the view with
it – by simply selecting and
deleting it. But the problem
with deleting anything in
Photoshop is that this is an
irrevocable step: we can’t
change our minds later. By
hiding it on a layer mask,
we have the option of fine-
tuning the operation at any
point. Find out more about
layer masks on page 233.
In step 4, we hold the O
- key to remove a
thin sliver from our selection
of the canvas. This is a
standard key for removing
a new selection from an
existing one, and needs to be
held down before you start
to drag with the tool. If you
hold it after you’ve started,
it will have the different
function of making the
Marquee tool draw from the
center out.
If you’re photographing O
your own window for
this technique, be sure
to compensate for the
excessive amount of light
that will be coming through
it. Either do this with manual
settings on your camera,
or use a flash or other
additional lighting inside
the room. Alternatively, you
could use the Shadows/
Highlights adjustment in
Photoshop to adjust the
image afterwards.
J?FIK:LKJ
MAC WIN BOTH
(.)
Dalí’s painting The
Persistence of Memory,
of which a portion is
shown above, is one of
his best-known pieces.
Salvador Dalí
(1904–1989) was
a great showman,
and an accomplished
artist; there are many
who claim his work
to be frivolous and
meritricious, cashing
in on the surrealist
movement without truly
being a part of it.
Whether or not we
like or even approve of
his body of work, there
can be little doubt that
it has had a profound
influence on the art of
the 20th century, and
has invaded the popular
consciousness in a way
few have managed.
Of the dozens of
possible Dalí paintings
I could have chosen to
emulate, I picked this
one as being the most
suitable for recreation
in Photoshop – and
because it’s an instantly
recognizable example of
his work.
+
We’ll start with just two elements – a pocket
watch, and a table to bend it over. The image
we’ll end up with is more photographic than Dali’s oil
paintings, but will capture the style of his work.
0
The key to melting the watch is to use
Photoshop’s Liquify filter, chosen from the
top of the Filters menu. You can also choose it with
*1U!1U as a shortcut.
.
With the basic distortion complete, we can carry
on to make the perimeter of the watch more
lumpy. Lower the brush size – you can use the
9and
; keys, or hold the 1 key as well for bigger jumps –
to get more control. Try to make the rim around the face
a more or less even thickness all the way around.
1
Press # to exit the Liquify filter. We now
need to darken the watch where it hangs over the
table. In Dali’s original, this portion was brighter; but as
our table is clearly lighter on top, we need to copy this
lighting approach. Select the bottom portion and feather
it by about 8 pixels, then darken with Curves or Levels.
Salvador Dalí