art and design in photoshop - phần 5 doc
Bạn đang xem bản rút gọn của tài liệu. Xem và tải ngay bản đầy đủ của tài liệu tại đây (5.21 MB, 26 trang )
0-
The film Children of Men
presented a future that
was bleak, anarchic and
violent. In this it was
strikingly similar to all
the other movies set in a
post-apocalyptic world,
which are also for the
most part bleak, anarchic
and violent: Mad Max,
Waterworld, and many
more.
The film has a strong
visual style that’s carried
through into the publicity
material. Clive Owen
gazes at us ruggedly
though a broken window:
you can tell he’s rugged
because he hasn’t shaved
for a few days.
Unusually, I’m going
to use this tutorial not
to typify a genre, but
to reproduce a single
example of a film poster.
That’s because this
poster presents several
distinct points of interest
– the stark photographic
treatment, the broken
glass, the fuzzy stencil
lettering – that I think
are of enough interest
for us to want to see how
they’re assembled.
+
This photograph, from the Photos.com collection,
has the right kind of anti-establishment rebellion
to it, and will make a good subject for the poster. But
it’s too warm, having been photographed under perfect
studio lighting: we need to make it more gritty.
0
Begin by duplicating the layer. Desaturate
the duplicated version using
*1R
!1R, to produce a grayscale copy (left); then set
the mode of this copy to Hard Light, which produces a
stark photographic effect (right).
.
If we want this to look like real glass, we need to
be able to see through it. Lower the opacity of the
layer to around 70%, and use the Dodge and Burn tools
to add some highlights to it, to break up the uniformity
of the surface.
1
Thc edge of the glass has to be given some
thickness. This is created by nudging the shape of
the hole and intersecting it with the original glass – see
More Info for details. The cracks are drawn with the
Lasso tool, and filled with white on the same layer.
Apocalyptic thriller
0.
!
Add a little blue to the grayscale version of the
photograph, and we get an image that more
closely matches that seen on the original poster. To
make the background, choose dark blue and black as the
foreground and background colors, and choose Filter >
Render > Clouds.
,
The ‘hole’ in the glass is selected using the Lasso
tool. Inverse the selection using
*1F
!1F, and make a new layer: choose white and
pale blue as the foreground and background colors, and
run the Clouds filter again to make the glass. This filter
adds a useful starting texture.
/
The font used here is Wunderback Mix, and it’s a
useful degraded stencil design. Create each letter
as a separate text block, so they can be moved around
and sized independently. The shadow is painted on a new
layer behind the text.
%
To make the headline a little softer, add a faint
Outer Glow to it using Layer Styles. Be sure to set
the glow color to white, rather than the default yellow.
The remaining text is set in a deep blood red color to add
to the sense of menace.
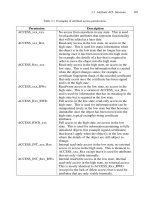
Poster design
FEK?<:;
DFI<@E=F
image
font
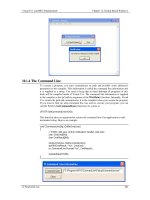
The Clouds filter, used for O
the background in step 3 and
the glass in step 4, produces
a random texture. If the
first attempt doesn’t look
right, keep pressing
*C
!C to repeat the
texture until you get a result
you like. You can also press
*C!-C
for a tighter version of the
Cloud texture.
In step 6, we can create O
the glass edge as follows.
Select the hole in the
glass layer with the Magic
Wand tool, then nudge this
selection a couple of pixels
down and to the left using
the cursor keys (
q and
p). Hold *1
!-1 and click on
the glass layer’s thumbnail
in the Layers palette: this
key combination produces
the intersection of the new
selection with the old one,
and so in this case will create
a selection of just a couple
of pixels around the edge.
Use the Lasso tool to add the
cracks from the corners to
the selection, holding
- to trace straight lines.
Then make a new layer, and
fill the selection with white:
use the Burn tool to add a
little shading to it. Lower
the opacity of this layer to
around 50% for a convincing
glass effect.
J?FIK:LKJ
MAC WIN BOTH
0/
At one time, every
student’s wall would be
adorned with posters. In
the 1960s and 70s these
were guaranteed to be
one of two subjects:
either a girl lifting
her tennis skirt, or a
multicolored piece of
psychedelia.
The subjects of these
posters varied from Che
Guevara to Janis Joplin,
but they all had features
in common: a dazzling
array of colors, and an op
art background image.
The colors were
produced from
photographs by messing
around with the plates
in the printing process.
We’ll use a simpler
method directly in
Photoshop, using a
standard adjustment.
We’ll also see
how to make an eye-
popping background of
interfering lines from
scratch, which we’ll place
behind our treated image
to complete the poster.
+
In the absence of a platinum-selling rock star,
we’ll have to make do with this image of a singer
from www.photos.com. I’ve recolored the shirt, which
was originally black – we need some color in there to
start with.
0
To make the psychedelic colors, open the Curves
dialog (
*J!J). Click roughly one
quarter of the way along the curve, and drag upwards;
then click just before the halfway point and drag down.
Continue to drag up and down, making this stepping
effect. Adjust as necessary – see More Info for details.
.
Deselect using *A!A. Hold - as
you drag a copy of the finished layer, and the two
will interact to make this interference pattern. You’ll see
that when you drag the copy to the side it will no longer
reach that edge; scale it to fit, as necessary.
1
Recolor the new version of the interference
pattern using any color that seems appropriate;
then color the background using a different color. Here,
I’ve used shades of blue and purple because they match
the colors in the treated photograph.
Psychedelia
00
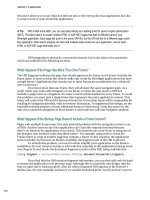
!
Hide the figure so you can work on the
background. With the Lasso tool, hold
-
and click just to the right of the top left corner, then just
to the left of the bottom right corner. Click just above the
bottom right, then just below the top left: fill with color
on a new layer, and you’ll get this thin double triangle.
,
Select All (*>!>) and use Free
Transform (
*Q!Q) to rotate the shape
by about 5° and press
# to apply the transformation.
Then press
!1Q*1Q and you’ll
duplicate the transformation: keep pressing that key
combination to rotate in a complete circle.
/
With the photograph visible once more, we can
see how the psychedelic lines seem to radiate
from behind the head. Avoid the temptation to add any
drop shadows or outer glows, even though these might
improve the image: the technique wasn’t available then.
%
This text is set in the Ray Larabie font Velvenda
Cooler, and the main color is the same blue as the
background. The shadow could have been made using the
Drop Shadow in Layer Styles, but it’s sometimes easier
just to duplicate the font layer and recolor it.
Art & Design in Photoshop
Poster design
FEK?<:;
DFI<@E=F
image
texture
In step 2, when you first O
drag up on the curve the
whole image will simply get
much brighter: that’s what
the Curves adjustment is for.
It’s only as you click more
points along it, and drag up
and down, that the colors go
haywire like this. Depending
on your image, the curve
you get may not look exactly
like this one: experiment
with dragging points up and
down once you have the
basic curve, to see how it
affects the image.
In step 3 it helps to trace O
with the Lasso tool just
outside the Canvas area. To
do this, drag the window
size so it’s slightly larger
than the canvas, and you’ll
be able to click the Lasso in
the gray area outside. The
click points are numbered:
If you don’t like holding
- while tracing, you could
instead choose the Polygonal
Lasso from the Toolbar – it’s
behind the regular Lasso.
J?FIK:LKJ
MAC WIN BOTH
+
,
0
!
(''
In 1966 Time magazine
devoted an edition
to Swinging London,
celebrating as well as
fueling the explosion
of counter-culture that
made the 1960s such a
memorable decade.
As well as the
psychedelia, the tuning in
and the dropping out, the
1960s was the decade
of cool. Music was cool,
clothes were cool, design
was cool; even comedy
was cool, for a while.
The 1960s produced
an outpouring of visual
styles. We’ve already
looked at psychedelia;
here we’ll examine
a design style that
used black and white
photographs, bold
splashes of color, and a
wackiness of typography
that had never been seen
before. And since the
1960s saw the birth of
the James Bond movie,
we’ll mark the era of the
spy film with a typically
wacky comedy that
combines some of the
most common themes of
the day.
+
It’s not easy finding models in appropriately
groovy gear for the 1960s, but I came across this
one on the excellent photos.com royalty-free site. Her
pose is perfect, and will define the layout for the rest of
the poster.
0
Desaturating the model using *1R
!1R turns her to grayscale; changing the
mode of the layer from Normal to Hard Light means she’ll
only darken up the background. As it stands, though, the
image has lost some of its power.
.
The text here is set in Baveuse, which captures
the spirit of the 60s well. Each word is set as
a separate text block, to make it easier to arrange the
words: we could do it using letter spacing and leading,
but as there are only three words it’s better if we’re able
to drag them around as required.
1
The stroke is added using Layer Styles, which
gives the words more legibility. The drop shadow
is also from Layer Styles: set the Size value to zero to
avoid any feathering, which would be out of character
for the period. Set the opacity to 100% so we get a solid
black shadow.
Swinging sixties
('(
!
Duplicate the layer, and change the mode of
the copy to Hard Light. Now the white areas, of
which there are a lot in this image, are returned to full
strength: but the blue background is still seen through
the midtones, such as the face and leg.
,
Draw irregular polygons with the Lasso tool –
hold
-to use it in Polygonal Lasso mode.
On new layers, fill the selections with pink and yellow, or
choose whichever colors you think are appropriate (but
see More Info about the choice).
/
To add a little life to the title, and to stress that
it’s a comedy, rotate the words slightly. This
misalignment adds a slight wackiness to the overall
effect. Another good reason for setting the text as three
separate blocks: it would be impossible to rotate them if
it were all one.
%
The names of the stars are set in Kenyan Coffee.
Set each group of firstname and surname as
a separate text block, then duplicate the text block to
make the other names – it would be hard to try to align
two lines if it were all one block. The script at the bottom
is Honey Script.
Poster design
FEK?<:;
DFI<@E=F
image
font
In step 4 we create two O
new color panels, making
three colors in all. It’s
important that the colors all
match in terms of density
and feel. We’ve used pastel
shades of pink and blue here,
whose paleness matches the
strong yellow. There’s quite
a wide range of pastel colors
that could be chosen:
The yellow, incidentally,
would be equally at home
with stronger hues:
But these colors are not only
out of keeping with the era,
they’re also far too strong to
form a background – they’d
just leap right out of the
page at us, distracting the
viewer from the poster’s key
elements.
J?FIK:LKJ
MAC WIN BOTH
(')
I don’t know who
invented the motivational
poster. I don’t know
who buys motivational
posters. And above all, I
can’t imagine how bored
and unmotivated office
and factory workers
would have to be in order
to be uplifted by these
crass, corny, clumsy
truisms.
That said, the genre is
ripe for parody. There’s
a distinct look to these
posters that’s seen
nowhere else: the black
frame, the serif white
text with oversized first
and last characters.
But there’s more
to these posters than
the obvious. They
tend to have very high
production values, since
they’re stared at (in
theory, at least) for days
on end: glossy sunsets,
warm glows, and a sense
of overall perfection
mark these posters out.
+
We’ll begin
this poster by
drawing a frame to
hold thie image. Draw
a rectangle with the
Marquee tool to the size
of the ‘window’, then
inverse this selection
using
*1F
!1F and fill
with black on a new
layer. Use Edit > Stroke
to apply a 1 pixel outside
stroke. Here, I’ve also
added a sunset – the first
element of the montage.
!
To make the
reflective surface,
we can begin by making
a copy of the sky layer.
Flip it vertically using
Edit > Transform > Flip
Vertical, and move it
down to the bottom so
that the reflection butts
right up against the
original sky. Don’t lower
the transparency yet –
we’ll do that later.
.
Select the
reflected sky,
kitten, and both parts of
the tray, and choose New
Group from Layers from
the pop-up menu in the
Layers palette. We can
now lower the opacity
of the group as a whole:
around 30% produces
this subtle sense of
reflection in a black
surface, which adds
an immediate sense of
luxury and sophistication
to the image.
Motivational
('*
0
The sunset
needs to be
strengthened to make
it more impressive: I
used the Brightness
and Contrast controls
to do this, setting the
Brightness to zero and
the Contrast to 100
(recent versions of
Photoshop only; smaller
values before CS2). The
cat is placed to fit well
within the frame; the
litter tray is moved right
out of the picture, since
it should only be noticed
on second glance.
,
The kitten is
duplicated and
flipped vertically as well.
The tray needs special
treatment: first, the
bottom section (below
the rim) is selected,
copied to a new layer,
then flipped and sheared
using Free Transform so
that it fits beneath the
original. Then the rim is
copied to a new layer,
and moved without being
flipped behind the copied
lower section. See More
Info for how this works.
1
The text here is
set in Optimus
Princeps: it’s an elegant
and tasteful traditional
serif. The first and last
characters are enlarged
by selecting them and
using
*1
!1,
then shifted down
using
1p
-1p. Finally,
I turned a copy of the
cat’s eyes upside down to
make it look down – and
to make it look slightly
worried.
Art & Design in Photoshop
Poster design
FEK?<:;
DFI<@E=F
image
font
Creating the reflection O
of the tray is the only tricky
part of this job. To begin
with, select the bottom of
the tray and copy it to a new
layer, and flip vertically:
Then enter Free Transform,
and hold
*! as you
grab a side handle to shear it
to meet the original:
Then select the rim of the
tray, and copy it to a new
layer. No need to flip this:
just drag it down beneath
the previous layer:
Once the opacity is reduced,
any errors will be hidden,
and the result will look like a
convincing reflection.
J?FIK:LKJ
MAC WIN BOTH
('+
Some exhibitions sell
themselves. Any showing
of Tutankhamun, for
example, will draw
enough crowds to be a
guaranteed sell-out in
just about any city in the
world. For everything
else, it’s a hard sell.
Getting the paying
public interested in a
possibly minor art form
requires skill, tact and a
good deal of persuasion.
We may think of museum
curators as dusty, kindly
folk who spend their
days polishing fossils, but
behind them there’s the
publicist whose job it is
to keep these curators
in work.
Museum posters need
to convey sophistication
and elegance. After all,
they’re appealing to a
rather select portion of
the community, and the
posters need to flatter
their sense of intellectual
achievement. They also
have to include a large
amount of information,
making the job harder.
+
Every poster begins with an image. It’s been
decided that this figure should feature on the
posters, but which angle should we use? While it might
seem that the head-on view is more immediate, it’s also
more confusing. The three quarter view is clearer.
0
A red background is sampled from the elephant’s
ear, so we know it will be a good match for the
original item. We have to place the mask on the right,
facing into the page, so that the text can appear in its
proper place on the left.
.
The drop shadow helps to position the object in
front of the wall. Hold
*! as you click on
its thumbnail to load it as a selection, then make a new
layer behind; use
*A-!A to Feather the
selection by, say, 8 pixels, and fill with black. Reduce the
opacity of the layer, and move into place.
1
The font needs to be authoritative, traditional,
and elegant. It’s quite a tall order: we certainly
can’t set this in Times, because it’s too staid and clunky.
This is called Timeless, and has that extra refinement
that makes it a good choice for this job.
Museum exhibitions
(',
!
The shadow is painted on a new layer behind the
mask, using a very large (around 500 pixels) soft-
edge brush. This gives the impression of a spotlight being
shone on the object in a darkened room, which enhances
the sense of mystery and discovery.
,
We can’t modify the object, but we can adjust its
lighting. Here, the mask has been duplicated, and
the mode of the copy changed to Hard Light. This is a
little strong, so I’ve reduced the strength of the copy to
50% which gives a good compromise.
/
Once we’ve included the exhibition description,
the logo of our fictional museum and the date
of the exhibition, we’re starting to fill up the space. The
description can go in a less strong color – here, I’ve
reduced the opacity of the layer to 50% – so that it fades
more into the background, strengthening the headline.
%
It’s a painful fact that just about every serious
artistic endeavor needs commercial sponsorship.
Painful for the designer, that is, since they’re the ones
who are going to have to fit all those clashing logos in at
the bottom of the publicity. There’s no way around it; just
grit your teeth and get on with it.
Art & Design in Photoshop
Poster design
FEK?<:;
DFI<@E=F
image
font
In step 5, we add the O
shadow below and to the
left of the mask. Normally,
we’d choose to add a
shadow on the outside,
rather than the inside of a
composition; but the mask
here is so clearly lit from the
right that to put the shadow
anywhere else would be
confusing.
To make the National O
Museum of Antiquities logo,
I began with the main words
in Optimus Princeps:
The ‘OF’ and ‘THE’ are set
in smaller type, placed
appropriately in the text:
Tracking on the words
helps them to fill the space;
the lines accentuate the
regularity of the form.
If we wanted to reuse this
logo, we could convert the
layers into a Smart Object
and scale it as a single layer.
J?FIK:LKJ
MAC WIN BOTH
('-
Works on
paper
Printed matter assails us today as never before. Even in the age of email and the
paperless office, we’re besieged daily by junk mail, magazines and newspapers.
We’re handed flyers in the street, we’re sent leaflets in the mail. And every single
one of these has been designed to catch our attention, to make us buy into the
product it’s promoting.
The one thing all these disparate items have in common is that they’re printed
on paper. In this chapter we’ll look at how to design a range of printed material,
from medieval manuscripts to ransom notes.
Partly, we’ll be exploring the design process, to find out why certain designs
work and show how to implement them. But we’ll also be looking at how to
create the textures we need for parchment and certificates, and how to make
flat artwork into a three-dimensional object.
Art & Design in Photoshop
Works on
paper
paper
1. a material made of
cellulose pulp derived
mainly from wood or
rags or certain grasses
2. an essay (especially
one written as an
assignment)
3. a daily or weekly
publication on folded
sheets; contains
news and articles and
advertisements
4. a medium for written
communication
5. a scholarly article
describing the results of
observations or stating
hypotheses
6. a business firm that
publishes newspapers
7. the physical object
that is the product of a
newspaper publisher
Wordnet Dictionary
('.
('/
The ransom note,
painstakingly assembled
from letters cut from
newspapers, has a
special place in our
collective consciousness
– even if the vast
majority of us have never
seen one, and hope never
to do so.
There are a number
of automated ways of
creating ransom notes,
such as the font Ransom
Threat, shown above;
there’s also a website,
http://contactsheet.
org/junk/ransom.html,
at which you can enter
text to have it turned
into a version of the note
without your even having
to install the font.
The trouble with this
approach is that, first,
it’s hard to believe that
hardened criminals
making ransom demands
would have the time to
clip individual letters
from a newspaper, when
whole words are widely
available. And, second, if
every instance of a letter
looks exactly like every
other instance of the
same letter, the whole
thing is going to look
utterly false.
+
We need a crumpled piece of paper for the
background for our note – and it’s the same piece
we’ve used before, brightened and desaturated. Type the
first word as a text block on its own, since we’ll need to
treat each word separately.
0
Continue to create a new text block for each
word in the note, changing font as you go. When
all the words have been created, select all the layers and
make a new group from them; then duplicate the group
and flatten it, so that all the words are on one layer.
.
In some cases, we’ll want to add color to the
lettering before adding the background. Choose
the color you want to add (red, in the case of ‘marked’)
and, with the selection made, press
1
-1 to fill the lettering with the
foreground color.
1
When all the words have backgrounds, and have
been suitably rotated, we need to add a shadow
effect to give the note a sense of three-dimensionality.
Use Layer Styles to do this, but set the distance and the
opacity very low: we don’t want it to appear as if the
scraps are floating above the surface.
Ransom notes
('0
!
Now to turn each word into a scrap of paper.
Using the Lasso tool, make a selection around
each one, and pick a suitable foreground color (in this
case, I’ve inverted the word first). Press
1
to open the Fill dialog, and choose Behind as the method.
,
Repeat the process for each word in the note.
Remember that the bulk of the words will have
a white or off-white background. After the background
has been put in using the Fill dialog, rotate the selection
slightly to make the words more uneven.
/
To add some texture to the scraps of paper,
duplicate the background (the crumpled sheet)
and make a clipping layer with the scraps of paper layer.
Set the mode of this duplicated version to Hard Light,
and darken it slightly. Now, on a new layer behind the
scraps, paint some glue in gray with a hard-edged brush.
%
The glue we painted at the end of the previous
step needs to be made to look more like glue
and less like gray paint. Use Color Balance to add a little
red and a little yellow to it, and add a bevel using Layer
Styles. You may need to reduce the opacity of the layer if
the effect is too strong – it should be just visible.
Art & Design in Photoshop
Works on
paper
FEK?<:;
DFI<@E=F
texture
In step 2, we make all O
the words into a group by
selecting the layers and
choosing New Group from
Layers in the pop-up menu
at the top of the Layers
palette. Duplicate the group
by dragging it onto the New
icon at the bottom of the
palette, then use
*B
!B to merge all the
layers into one. There are
several reasons for doing
this: first, it’s easier then
to add drop shadows to a
single layer, as we do in step
6, rather than adding them
to each layer in turn; and
second, it’s easier to apply
the texture to a single layer,
as we do in step 7.
When shown in movies, O
ransom notes are almost
always black and white.
They do have a certain
power that way – but we’ve
recognized the fact that
large words may well be
found in glossy magazines,
and the likelihood is that
headlines in these magazines
are more likely to be in color
than in black and white. The
choice is yours.
Painting the glue at the O
end of step 7 adds a subtle
touch that most viewers
would barely notice; and yet
the difference is marked,
as it creates a visible bond
between the cutout scraps
of paper and the background
sheet.
J?FIK:LKJ
MAC WIN BOTH
(('
Some illuminated
manuscripts were very
highly decorated, with
extensive use of gold
leaf and hand painted
imagery. We’ll attempt
something a little less
ambitious for our first
foray into the world of
medieval parchment: a
simple drop capital will
do to suggest the form.
Originally, of course,
these manuscripts (as
the name implies) were
painstakingly written
by hand. The thick quills
were ideally suited to the
‘black letter’ format of
the characters, despite
their lack of clear
legibility.
With the advent of
printing, many texts,
such as bibles and other
devotional material,
continued to be printed
using typeset versions
of these old-style
characters. It wasn’t
until the pioneering work
of such typographers
as Garamond that the
letterform as we know it
today began to evolve.
+
The first step in making our manuscript is to
prepare the parchment. Creating a convincing
texture here is easy, but it does require having the right
starting foreground and background colors: aim for dark
and light versions of tan, as seen here.
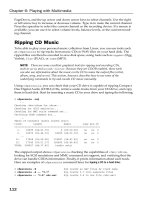
0
On a new layer, use Filter > Render > Clouds to
create a texture like this. This filter creates a
random texture using the foreground and background
colors, so try a few variations until you achieve a pleasing
result.
.
To add a little more texture, choose Filter >
Texture > Texturizer, and choose Sandstone. The
amount of relief should be minimal – you should barely
be able to see it here. In this case, a relief setting of just
2 is sufficient. I’ve also added a Drop Shadow here, using
Layer Styles.
1
The drop capital is part of the font Medieval
Victoriana. Create the letter you want, then
select inside it using the Magic Wand tool; on a new
layer, behind the font, fill with yellow. Repeat for the
red outline, filling on the same layer; the brown can be
painted in by hand more easily.
Medieval manuscripts
(((
FEK?<:;
DFI<@E=F
J?FIK:LKJ
MAC WIN BOTH
font
texture
The success or failure of O
the texture creation in step
2 depends on two factors:
the random action of the
Clouds filter, and the colors
used within it. The first is
easy; simply keep pressing
*C!C until you
get the result you want.
For a tighter texture, hold
- as well. Sample
your foreground and
background colors from the
Swatches palette, if you
like, but be prepared to use
the Color palette to adjust
the values, repeating the
filter each time, until you
get a convincing effect.
Remember, you can use the
U key to switch foreground
and background colors,
which makes sampling and
defining them much easier.
Instead of deleting the O
edges in step 4, you could
create a layer mask and
use the Lasso tool to select
areas on that, filling with
black to hide the unwanted
portions. If you set black
as your background color,
you can use the
key to fill with this color on
the mask; the effect will be
the same as if you’d deleted
that area on the parchment,
except that you’d always be
able to paint it back in again
later.
Always work on a copy O
of the layer before adding
shading, just in case.
!
The torn-edge effect is easily created by making
selections using the Lasso, and deleting them.
Make the edges uneven, then take out a few tears that
rip into the manuscript itself – but don’t go too far, or
you’ll interfere with your artwork area.
,
Use the Burn tool, set to Midtones, to add a little
shading around the edges, going up into the tears
as well. It’s important to set it to Midtones to achieve
this warm effect: set to Highlights and you’ll just get a
muddy gray result.
/
The text here is set in the medieval style font
Cantebriggia. Although there are many Black
Letter style fonts available, this one has a slightly uneven,
worn feel that makes it look more handwritten. The text
used here is from the first chapter of the book of Genesis,
in the Latin version.
%
Select all the text layers, and (if you have
Photoshop CS2 or higher) choose Make Smart
Object from the pop-up menu in the Layers palette.
Adding a little Image Warp distortion makes the effect
less rigid. On a new layer, I’ve painted the word Deus in
red each time it appears for added effect.
Art & Design in Photoshop
Art & Design in Photoshop
Works on
Works on
paper
paper
(()
Earlier in this chapter
we looked at how to
make a ransom note;
here, we’ll see how to
make the check used
to pay that demand.
(On second thoughts, I
have to admit it’s likely
that kidnappers, like
plumbers, prefer cash.)
Checks are typified
by the information they
all have to contain – the
amount in words and
figures, the date, the
person to whom the
check is payable, the
signature, as well as
the various account
numbers, sort codes, and
so on. But they also tend
to have a background
pattern of words,
designed to make forgery
and alteration that much
harder, and that’s what
we’ll begin with here.
Interesting aside:
in the 1990s a bank
in England came out
with checks that were
completely black and
white. When these
were photocopied, the
word FRAUD appeared
across the copies in
unmistakeable letters.
Clever stuff, indeed.
Bank checks
+
Start by typing
two or three
lines of the background
texture (top). Here,
I’ve typed National
Bank of Toytown three
times, with offset word
arrangements. This is so
that the elements will
join together after the
Text Warp style Flag is
applied (bottom).
!
Make a new
background layer,
filled with a paler blue
than the wavy lettering.
Then select bands at
the top and bottom, and
brighten them: this gives
a lighter space where
we put the name of the
bank (which is no longer
the Bank of Toytown, for
reasons which escape
me) and at the bottom.
.
I’ve never found
a font which
accurately reproduces
the machine readable
numbers at the bottom –
so these are hand drawn.
You’re welcome to take
them apart and reuse the
numbers; I’ve included a
whole set here, as well
as those odd punctuation
marks.
/
There are many
handwriting
fonts available, but they
always look just like
fonts and rarely like real
handwriting. Far better
to write your own, on a
new layer; or, if you find
writing on the screen
that hard, write on paper
and scan it in.
((*
Art & Design in Photoshop
Works on
paper
FEK?<:;
DFI<@E=F
image
texture
The monospaced font O
Andale Mono, used in step
4, adds a convincing version
of the checkbook holder’s
name and account number.
You should already have this
font on your system, but
if you don’t just about any
monospaced font should
do instead: it simulates the
machines that print the
information, together with
the check number, on each
check.
In step 8, the addition O
of the shadow beneath
the check makes it very
much more realistic. You
might be tempted to add
a shadow using the Drop
Shadow feature of Layer
Styles, but this would look
unconvincing: as the check is
on a slight curve, the shadow
would follow this and look
false. Instead, the solution
is to draw the shadow on
a new layer, ignoring the
curve of the check entirely:
if it were lit from above, this
is exactly how the shadow
would appear.
It is, of course, highly O
illegal to attempt to forge
checks for the purposes
of deception, and such a
procedure is punishable
by a sentence that makes
Guantanamo Bay look
welcoming. Don’t even think
about it.
J?FIK:LKJ
MAC WIN BOTH
0
Turn the text into
a regular layer by
using Layer > Rasterize
> Text, then shrink the
layer down to tiny size.
Select All, and hold
- as you drag
to make a copy; hold
1 to make that drag
horizontal. After you’ve
made a row from the
pattern, duplicate it to fill
the canvas, and change
the color to light blue.
,
All the text
elements can
be added in, one by
one. Although it’s
conventional to use
a plain font such as
Helvetica for the words
‘Pay’ and ‘Date’, those
that vary from check to
check – the name, the
account number – should
go in the fixed width
font, Andale.
1
The horizontal
lines are best
drawn on a new layer.
Draw a marquee
selection one pixel high,
and fill with black; then
duplicate this to make all
the other lines. The pale
box after the dollar sign
is a white box with a blue
border, positioned just
above the background.
%
Like most paper
items, it really
only looks realistic
when viewed in three
dimensions. This has
been distorted using the
Flag option in Image
Warp – see the following
pages to find out how
this is done.
((+
Throughout this chapter
we’ll be looking at
creating flat artwork
on paper. But paper is
a three-dimensional
surface: about the only
time we see it head on
is when we’re drawing
on it, and even then we’ll
most likely see it from a
slight angle.
Here, we’ll look at
using warping techniques
to distort paper objects
so that they can be
viewed from a different
angle. The Image
Warp button appears
in Photoshop CS and
later; you won’t find it
in earlier versions of the
application.
We’re using the
Flag Warp method to
distort the check in this
example. In fact, I used
exactly the same method
to distort the sheet of
parchment, above, which
is borrowed from the
tutorial on page 110.
Paper in perspective
+
Begin by pressing
*Q!Q
to enter Free Transform
mode. On the Options
bar you’ll see the Image
Warp icon; press
it, then choose
Flag from the pop-up
Warp menu (the default
setting is Custom).
You’ll see this massive
distortion, which is the
preset Flag amount.
!
To add some
perspective, don’t
press
# yet. Instead,
switch back to standard
Free Transform by
pressing
*Q!Q
once again. Grab one
of the corner handles,
and hold
*1
!-1 as you
drag it towards the
center to produce a
symmetrical distortion.
.
This is a
convincing
shadow method for
curved paper, and it
depends on the shadow
being straight. With
the Polygonal Lasso,
mark the four corners of
where the check would
lie if we hadn’t curved its
surface. Feather using
*A!-A
(about an 8-pixel feather)
and fill with black on a
new layer.
((,
Art & Design in Photoshop
Works on
paper
FEK?<:;
DFI<@E=F
image
Although we can just use O
Custom Warp and adjust
all the handles ourselves
in step 1, it’s a lot easier to
begin with one of the preset
methods. Note that the
default for the Flag setting
is to warp vertically; when
distorting the parchment for
the introductory image, we
need a horizontal distortion.
There’s a button on the
Options bar to change this:
click the button to
switch between
horizontal and vertical warp
directions for all Image
Warp presets.
By switching directly O
from Image Warp to
standard Free Transform
in step 3, we maintain the
quality of the image by
applying just one transform
procedure, rather than two.
It’s a useful technique that’s
well worth knowing.
In step 5, I recommend O
using the Polygonal Lasso to
trace a four-sided shape. Of
course, we can just use the
regular Lasso tool, holding
- to give us the
Polygonal mode temporarily;
when we release the button
we’ll get the regular Lasso
back again.
In step 6, holding the O
1 key ensures that the
color fill applies only to
pixels already present within
the layer.
J?FIK:LKJ
MAC WIN BOTH
0
There’s only
one control for
this distortion, and it’s
the tiny handle about
a quarter of the way in
from the left-hand edge.
Grab this, and drag it up
to produce a much more
subtle distortion, in the
opposite direction.
,
With the basic
distortion in
place, we now want to
view the check more
from the side. Release
the keys, and hold just
*! as you drag
each corner handle in
turn, until you create
a perspective view at
the right angle for your
work.
1
Lower the
shadow opacity
to around 50%. Finally,
we need a little thickness
for the paper. Select All,
then hold
- as
you nudge the check up
two pixels using the
o
key. Inverse the selection,
pick a pale color from
the check and press
1
-1 to
fill the check edge with
that color.
((-
To some cultures it
might seem absurd that
several years spent in
academic study should
culminate in a rolled-
up piece of paper. The
certificate, with its piece
of colored ribbon, is no
more ridiculous than
the mortar board hat or
pleated gown.
Certificates are
society’s way of putting
their recognition of
someone’s worth in a
tangible form. Whether
it’s a school child
receiving praise for
swimming 100 yards,
a student collecting a
degree or a physicist
receiving the Nobel
Prize, the certificate will
always share elements
in common. There will
always be a formality
of style, usually an old-
fashioned typeface, an
intricate border, and
frequently a series of
decorative elements.
We’ll incorporate
some of these features
into our version of the
certificate style, and
we’ll see how to make
them easily.
Certificates
+
The hardest
step is to make
the intricate border.
Here’s one solution:
first type a row of 8s
in Times Regular. Then
use
q-q to
tighten up the letter
spacing, and finally
condense it using Free
Transform. When this is
duplicated and applied
around the edge – with
a suitable parchment
background, of course –
the effect is convincing.
!
The remainder
of the text can
be set in the same
font, except where it’s
very small (the word
‘President’). Adding a
slight Bevel using Layer
Styles gives the font
a raised look, as if the
type has been embossed.
The dotted lines are no
more than a string of
full stops reduced to an
appropriate size.
.
We’ll add a
gold seal to the
certificate – but first,
we need a red star on
which to place it. Use the
Shapes tool, and choose
the Polygon option. Set
the number of sides
high – I’ve used 60 – and
set the Indent value
(click the arrow to open
the dialog) to around
5%, so that the star is
barely indented at all.
Adding a small amount
of embossing using Layer
Styles makes it look
more three-dimensional.
((.
Art & Design in Photoshop
Works on
paper
FEK?<:;
DFI<@E=F
image
texture
The creation of script O
fonts is a specialist task,
even more so than regular
typography. The letters each
need to flow into the next,
as if it has been written by
hand – without the author
knowing, of course, what
order you’re going to type
the letters in. Look at these
few letters:
The letters t, h, o, s and
e look unfinished and
awkward when seen on
their own. But when placed
together the effect is almost
miraculous:
The letters appear linked
together perfectly. Note how
the leading tail at the top of
the ‘s’ begins inside the ‘o’,
and how the tail on the ‘t’
sweeps up into the loop of
the ‘h’. It’s the same with all
well-designed script fonts:
even the more informal
Honey Script, used for the
name, has tails that lead
between the characters,
greatly strengthening the
hand drawn appearance.
J?FIK:LKJ
MAC WIN BOTH
0
There are many
script fonts
available; we’ll use Dieter
Steffmann’s font Chopin
Script. Note that while
we might frequently
tighten a font’s letter
spacing, we can’t do
this with a script like
Chopin: the characters
are precisely designed to
link perfectly from one to
the next.
,
We need to
use a different
font for the recipient’s
name: it has to look
as if it’s been written
on afterwards. This is
another Steffmann font,
Honey Script; setting it
in a different color helps
to make it look separate
from the rest of the text.
The signature is best
scrawled with a hard-
edged brush directly in
Photoshop.
1
The seal placed
on top gives the
certificate a sense of
luxury and authority.
This is just a silver dollar,
recolored using the
Color Balance dialog:
add maximum amounts
of Red and Yellow to
achieve the gold effect,
then just a little Green to
make it less brash.
font
((/
Postcards have come
a long way since the
earliest photographic
examples – such as
the one shown above,
dating from 1905.
Color printing, cheap
production and reliable
postage have all
contributed to the huge
explosion of the form.
Postcards have had a
long and fairly checkered
history. The British
postcard artist Donald
McGill begain drawing
postcards in 1904, and
continued to produce his
unique brand of saucy,
irreverent cards – packed
full of double meanings
and suggestive phrases –
until the 1950s. In 1954
he was prosecuted under
the Obscene Publications
Act for the production of
cards which, today, seem
to contain nothing more
damaging than mild
innuendo.
We’ll look at a more
traditional form of card,
of the kind that can be
found in hotel bookstores
throughout the world,
using the popular four-
view format.
Picture postcards
+
Begin by drawing a rectangle, slightly smaller
than your canvas area. Make a new layer, and fill
this with very pale gray, rather than white. This will help
us to see the edges later: viewing a white card against a
white background is never easy.
.
Place the first image, and press *D
!-D to use the mask layer as a clipping
mask. Rotate and scale the image so it fits within one
of the quadrants, then delete the area outside that
quadrant.
%
The words ‘GREETINGS FROM’ are set in capitals,
and distorted using Warp Text. Then, on a new
layer behind, make an elliptical selection that matches
the top of the lettering, and fill with yellow.
Now use the Elliptical Marquee tool to make
another elliptical selection, this time lining up just
below the bottom of the lettering: delete this area.
0
To make the four views, we need to make a mask.
Draw a rectangle on a new layer about a quarter
the size of the card, and fill with black; then duplicate
this selection on the same layer to make another smaller
rectangle next to it.
1
Place the remaining images in the same way,
rotating and scaling as necessary. Remember to
keep the center of the card clear, as that’s the position
where our title will go.
)
Use the Lasso tool, holding the - key to
trace straight lines, to select and delete the sides
of this ellipse. The cuts should go through the first and
last letters, rather than outside them.
Draw circular selections at each end of the
banner, the same height as the banner, and fill
with yellow to complete the effect.
((0
!
Deselect, then stretch the whole layer until it fits
the width of the card *with a small border around
the edge). This is the easiest way to divide the card into
two, and avoids having to bring up rulers and guides.
,
Select both these rectangles, and drag
downwards, holding
- as you do so to
make a copy. Leave a small gap between the pairs, then
repeat the process in step 3 to scale the group so it
matches the size of the postcard.
/
The title is here
set in Georgia
Bold Italic, which you
should already have
loaded. It’s set in red,
with a thick yellow
stroke created using
Layer Styles. The stroke
should be large enough
so that there are no
longer any holes within
the letters ‘a’ and ‘e’ –
this would look ugly.
Art & Design in Photoshop
Works on
paper
FEK?<:;
DFI<@E=F
image
At the end of step 4 O
we’ve created a mask which
has four quadrants; this
means that when we place
the images on top, in step
5, we have to trim away
the excess that appears in
the other quadrants. An
alternative method would be
to duplicate the rectangle
as a new layer, rather than
a new selection, in steps 2
and 4: we’d then end up with
four separate panel layers,
each of which could be used
as a mask individually. This
way, we wouldn’t need to
trim the images placed on
top, so it would be easier
to adjust them later if we
need to.
To make the shadow in O
step 12, hold
*! and
click on the thumbnail of
the base layer to load it
as a selection. Then use
*A!-A to
feather this selection – a
feather radius of around 6
pixels will work well. Make
a new layer, and fill this
with black; then reduce
the opacity of this layer
to around 60% for a good
shadow effect. By having a
straight shadow beneath a
curved card, we accentuate
the curve and the sense
of the card lying on a flat
surface. This is a far more
convincing approach than
merely adding an automated
drop shadow using the Layer
Styles dialog.
J?FIK:LKJ
MAC WIN BOTH
To finish the
card, hide the
background layer and
use
*1B
!-1B to
make a merged copy.
If you have Photoshop
CS2 or higher, you can
use Image Warp to curl
the edges up slightly;
otherwise, use a large
brush to do this in the
Liquify filter. When
you create the shadow,
though, use the original
postcard shape rather
than the distorted one:
see More Info for details.
()'
Postage stamps are
unique in that their
design is virtually
identical in every country
in the world. There
are varying sizes and
colors, of course, but the
perforation principle and
the appearance of an
engraving or photograph
remain largely the same.
We’ll feature Thomas
Edison on this stamp,
for a traditional, old-
fashioned appearance.
These days, stamps
are just as likely to
feature space stations,
or Disney characters, in
commemoration of some
anniversary or other.
The only tricky part
here is creating the
perforated edges: we’ve
got a quick and easy way
to do this, which avoids
having to draw a whole
string of holes.
+
Begin by making a gray rectangle on a new layer.
To make the holes, we need to modify a brush:
open the Brushes palette, and select a small hard-edged
brush. Drag the Spacing slider until the spaces between
the dots are the size of the dots themselves. I’ve used a
setting of 191% here.
0
Press N to enter QuickMask mode. Hold the
Shift key as you click near the top left corner
and drag down to the bottom to draw a string of dots. It
probably won’t fit (left); so use Free Transform to scale
the dots to fit the side better (center), then nudge across
so the dots are three-quarters over the edge (right).
.
To make the wavy lines, first draw a single line
with the Pen tool, by clicking and dragging to
the anchor points shown here. Then switch to the Brush
tool and, on a new layer, press
# with the Pen path
still active: it will stroke the path with the brush size.
Duplicate the resulting stroke several times.
1
The first circle is drawn with the Elliptical
Marquee tool, holding
1 to make a perfect
circle, then the outline added using Edit > Stroke. This is
duplicated for the inner circle. The outer text is added by
placing text on paths drawn with the Shapes tool – see
page 214 for more about how to do this.
Postage stamps