art and design in photoshop - phần 3 pdf
Bạn đang xem bản rút gọn của tài liệu. Xem và tải ngay bản đầy đủ của tài liệu tại đây (5.59 MB, 26 trang )
++
Long before computers
were capable of
displaying colors – or
even shades of gray
– programmers were
printing images made
of strings of letters and
numbers.
Known as ASCII
Art, the technique was
laborious to program:
but the results were
often spectacular.
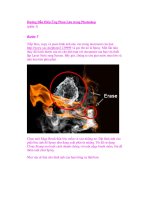
Here’s a modern take
on that technique, which
is possible using a careful
correspondence of values
in grids and filters.
Rather than relying
on the weight of the
letterforms to create the
image, we’ll use different
brightnesses of an array
of binary ones and zeros
to create our effect.
Although the process
takes a while to set up,
once created it’s easy
to replace the original
image with a different
one for instant results.
!
Turn that text box into pixels using Layer >
Rasterize > Type, then duplicate the block of text
so it fills the entire canvas area. Merge all the raster type
layers together to create a single layer.
/
For a more graphic effect, use Image >
Adjustments > Posterize. This process reduces
the number of gray shades in the image: a value of 4
produces good results.
,
Inverse the type layer to make white on black
text, then open the Hue/Saturation dialog. Check
the Colorize button, and lower the Brightness value; drag
the Hue slider to get the color you want.
%
Now to make the numbers show through. From
the pop-up menu in the Layers palette, change
the mode of the layer from Normal to Multiply: now we
can see through the image to the numbers below.
Digital grids
FEK?<:;
J?FIK:LKJ
DFI<@E=F
image
texture
In this tutorial we’ve used O
ones and zeros to create the
text texture – but we can
use any numbers we like, as
in the above example. They
work because numbers are
set to be the same width
in just about every font, to
enable columns of figures
to line up. If you want to
use text letters instead
of numbers, you’ll find
that most fonts won’t fit
neatly to the grid, because
the characters are all
different widths. To make
the technique work with
letters, be sure to choose
a monospaced font such
as Courier. That way, each
character will fit neatly
within the grid space. You
can find a wide sleection of
monospaced fonts available
for free on many websites.
MAC WIN BOTH
+
Begin by opening the Preferences dialog: go to
the Guides, Grid & Slices section. Set up gridlines
with the spacing you need for the size of the job. Here,
we’re using a 12 pixel grid.
.
Now for the photograph. It helps to choose an
image with strong light and shade; increase the
contrast if you need to. Erase any fiddly elements in the
background so that the foreground image stands out.
)
Zooming in on the image shows us how the
Mosaic effect and the grid coincide perfectly.
Each number is an entire unit – there are no cutoff
portions of numbers in the whole image.
0
Make sure the grid is visible (use View > Show >
Grid) and create a new text box; type in a random
string of ones and zeros. Adjust the size and leading until
the numbers fit exactly within the grid spaces.
1
To treat the image to match the grid, choose
Filter > Pixelate > Mosaic. This turns the image
into an array of large, square pixels. A cell size of 12 will
make the squares match the grid exactly.
If you want some of the numbers to be visible
in the background, open the Levels adjustment
(
!I*I) and drag the bottom left slider to the
right to brighten the darker areas.
+,
Contemporary
design
Art & Design in Photoshop
+-
Love it or loathe it,
graffiti is as much a part
of the urban landscape
as streetlamps, phone
boxes and discarded
burger wrappers.
Where the ‘tagging’
that adorns so many
public buildings – the
scrawling of a stylized
name with a felt tip pen –
may be seen by many as
mere vandalism, there’s
another side to graffiti
that’s far more creative.
I’m not talking about the
glorious, multicolored
extravaganzas that are
an art form in their own
right, but the stencilled
images that are easily
repeated on just about
every available surface.
Although most stencil
graffiti is carefully
hand drawn – such as
the demonic George W.
Bush, complete with
horns, above – we’re
going to look at how
you can create your own
version of this street
art using just about
any photograph as your
starting point.
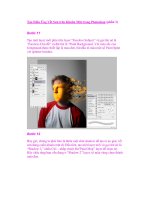
+
We could use just about any image as the basis
for our stencil – a politician, a pair of lovers, any
household object. I thought this figure of a boy on a
skateboard suited the subject matter well; it’s taken from
the photos.com collection.
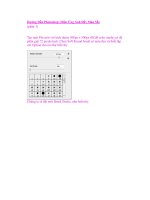
0
To turn the photograph into a graphic element,
we first need to turn it into pure black and
white. We can do this using the Threshold adjustment.
Rather than applying it directly, though, we’ll add it as an
Adjustment Layer.
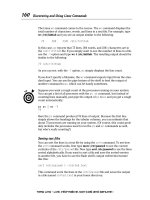
.
The Threshold adjustment made pure black and
white, but followed the variations in the image
too precisely. To make it look like a stencil, we need to
get rid of the jagged edges: the Median filter (Filters >
Noise) is the best way to smoothe out those contours.
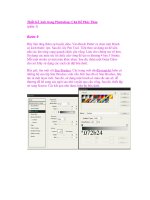
1
Move to the Threshold Adjustment Layer, and
press
!B*B to merge it down into
the skateboarder, then make the wall layer visible (it’s
in the psd file on the CD). Change the layer mode of the
skateboarder to Multiply so we only see the black – in
this mode, all the white will disappear.
Stencil graffiti
FEK?<:;
J?FIK:LKJ
DFI<@E=F
image
texture
The big advantage of O
applying Threshold as
an Adjustment Layer,
rather than as a standard
adjustment, is that we can
see through it to the layer or
layers beneath as we work
on them. Using the Dodge
and Burn tools in steps 4
and 5 would have the wrong
effect if we’d simply applied
the adjustment directly;
similarly, the Median filter
would have produced quite a
different result on a regular
Thresholded layer.
When using the Dodge O
and Burn tools, you don’t
need to reach for the toolbar
to switch between them.
Holding the
- key
while either one of them is
the active tool will give you
temporary access to the
other one – a real time saver.
In step 7, we use the O
Polygonal Lasso tool to
trace the outline. We can
also use the regular Lasso,
holding
- as we click
the corners; release the key
to close the selection.
Although we stopped at O
step 8 here, you could go
on to add as many extra
touches as you like to
increase the realism. Maybe
the paint should drip down
the wall a little way: use the
Smudge tool with a hard-
edged brush, set to around
90% pressure.
MAC WIN BOTH
!
Because this is an Adjustment Layer, it means
we’re looking through it to the layer beneath.
Using the Burn tool, we can now darken up the arm and
the trousers where the image was too faint. As before,
we still get pure black and white.
,
The Dodge tool – the flip side of the Burn tool
– lets us brighten the image. We can use it to
good effect here, to bring out some highlights in that
otherwise solid mass of black shirt. But the image is too
ragged to make a convincing stencil just yet.
/
To make the spattering around the edges, draw
a rough bounding shape with the Polygonal
Lasso tool. Inverse the selection using
!1F
*1F
, and use a soft-edged brush set to
Dissolve to paint some spill over the edge: this creates a
spattering effect which adds a lot of realism.
%
To color the graffiti, open the Hue/Saturation
dialog and check Colorize. Move the Lightness
slider to the right to make the black brighter, and
experiment with the Hue and Saturation sliders to
change the color. Finally, apply some Gaussian Blur to
soften all the edges, including the spattering.
+.
Contemporary
design
Art & Design in Photoshop
+/
Artists have been
drawing stylized images
of people for as long as
there have been artists.
This Victorian caricature
depicts a man with a
head far too large for his
body: but we’re familiar
with the genre, so we let
it pass without further
comment.
Where the traditional
artist has to draw
figures from scratch,
we’re able to use
Photoshop to make the
process rather simpler.
Here, we’ll start with a
photograph and trace
over it to define the basic
outlines and features,
then use a filter to
generate the fine detail.
The result should be an
image that’s immediately
recognizable to anyone
who’s acquainted with
the subject.
+
This close-up view of a woman seems to
present some problems at first sight. The hat
is an unnatural element, which doesn’t blend well into
the head; and that wispy hair, surely, must be almost
impossible to draw.
0
Begin by tracing the outline. Make a new Shapes
layer, set to Shape layers mode (see More Info),
and use the Pen tool to draw around the perimeter. Set
a black stroke with a white fill, and lower the opacity of
the layer so we can see through it.
.
Make a copy of the original photograph, and drag
it to the top of the layer stack. Use
*1R
!1R to desaturate it (knocking all the color
out), and use Filters > Artistic > Poster Edges to turn
it into this stark, monochromatic view. You’ll need to
experiment with the sliders to get the right effect.
1
When we now set the mode of this layer to
Multiply – having hidden the original photograph
– we can see through it to the layers beneath. The black
and white Poster Edges layer fits well with the drawn
outlines; the first stage of the process is now complete,
ready for us to add color.
Line art: simplified
+0
!
Make a new, empty layer. Make sure the Pen
tool is now set to Paths (rather than Shapes,
as before) and draw individual paths tracing the main
features – around the nose and eyes, the lips, beneath the
chin, and so on.
,
Choose the Brush tool, and set a small, hard-
edged brush – around 3 pixels in diameter. Set the
foreground color to black, and, with the Pen paths still
selected, press
#; the paths will be stroked with the
brush size and color on the new layer.
/
For the base color fill, load up the selection of
the Shapes layer by
*!clicking on its
thumbnail in the Layers palette, and set its mode to
Multiply. Make a new layer beneath it, and fill with a
flesh color: we’ll be able to see through the Shapes layer
to this color beneath.
%
Make a new layer above the previous color layer,
using it as a clipping mask (press
*D
!-D). Paint the shirt and hat with a hard edged
brush, then switch to a smaller brush to add red to the
lips and white in the eyes. Add shading with the Burn
tool, set to midtones, on the lower color layer.
Art & Design in Photoshop
Contemporary
design
FEK?<:;
DFI<@E=F
image
Shapes layers, used in O
step 2, have three modes:
they can draw Shapes
layers, Pen paths, or pixels
on the current layer:
It’s important to choose the
right variant. Here, we want
to choose Shapes layers:
these are vector layers with
editable paths, which can
have both a stroke and a fill.
The Fill is set by a swatch
attached to the layer’s
thumbnail in the Layers
palette; the Stroke is set
using the Stroke section
of the Layer Styles dialog.
It’s important to remember
when the Pen tool has been
set to Shapes mode, since
you’ll need to change it back
to Paths mode after you’ve
used it.
When drawing the paths O
in step 3, we need to draw
several individual paths that
are not linked. Hold
*!
and click anywhere while
using the Pen tool to stop
one path, in order to then
draw a new one.
In step 7 we could have O
changed the color of the
Shapes layer swatch. But
that would have made
coloring difficult in step 8;
this solution presents us
with far fewer problems
later.
J?FIK:LKJ
MAC WIN BOTH
,'
One of the earliest
methods of printing
pictures was using
engravings. The image
would be scratched into
a metal surface, which
was then inked, rubbed
clean and pressed
onto paper; the ink
which remained in the
scratched lines would
appear in reverse on the
paper’s surface.
To create the sense
of light and shade, a
crosshatching effect was
used – regular arrays of
fine lines, duplicated in
opposing directions for a
darker result.
The technique is
still used on banknotes
and other hard-to-
reproduce documents,
and has acquired a fine
art cachet for its clean
lines and clarity. We’ll
mark our contemporary
take on the style with
this portrait of General
James Garfield, 20th
president of the United
States.
+
This crisp portrait of James Garfield will provide
a good basis for our crosshatch illustration. If
you’re using a photograph of your own, first turn it to
grayscale then, if necessary, boost the contrast to make
it crisper.
.
Take another copy of the original photograph, and
run the Threshold adjustment again – but this
time, drag the slider to get a much brighter image (left).
Flip the diagonal line layer so it faces the other way, then
repeat the Select All/Copy/QuickMask/Paste procedure
to make a second set of lines.
Line art: crosshatching
0
Take a copy of the photograph, and this time run
Image > Adjustments > Threshold. Drag the slider
until you get a very dark version of the portrait. There
should be some clear area of skin remaining, but not very
much. Choose Edit > Select All, then Copy.
1
When we set the mode of the new diagonals
to Multiply, we can see through this layer to
the original diagonal line layer beneath. The opposing
direction of the crosshatch produces a darker, more
highly shaded area where we want it. All we need to do
now is to bring back some extra detail.
,(
/
Run Filter > Blur > Smart Blur on another copy of
the original photo. From the pop-up Mode menu
at the bottom of the dialog choose Edge Only to produce
this white on black effect (left). Invert the image using
*1F!1F for a black on white version
(right). This gives us our fine detail.
,
Press N to leave QuickMask, and the threshold
image will have been turned into a selection (but
see More Info). Use
*G!G to turn the selection
into a new layer made of diagonal lines, and hide the
original diagonal lines layer.
!
It’s easy enough to draw a layer made of diagonal
lines but it does take time, so I’ve provided
one for you. Turn this layer on and press
N to enter
QuickMask mode, then choose Paste (
*S!S) to
paste the copied Threshold image in here.
%
Change the mode of the new detail layer
to Multiply as well, and place it above the
two crosshatch layers. All three combine to make a
convincing crosshatching effect. There may well be some
stray black pixels around the place: paint these out in
white on a new layer.
Art & Design in Photoshop
Contemporary
design
FEK?<:;
DFI<@E=F
image
texture
In step 4 we paste the O
threshold version of the
image into QuickMask.
The default setting is for
unselected (masked) areas
to be highlighted in red;
but we want the opposite.
In fact, when working
in Photoshop we almost
always want QuickMask to
behave in the opposite way.
To change the way it works,
double click the QuickMask
icon at the bottom of the
toolbar to see this dialog:
Check the Selected Areas
button. Now when you paint
in black in QuickMask, the
area you paint will be the
selected area. If you don’t
want to change the default,
then simply inverse the
selection before making a
new layer. See more about
QuickMask on page 227.
If you’re attempting O
this with one of your own
photographs, be sure to
erase the background first.
Any complications behind
the figure will produce ugly
and confusing results.
In step 5, we can flip the O
diagonal lines layer using
Edit > Transform > Flip
Horizontal.
J?FIK:LKJ
MAC WIN BOTH
,)
Artists have been
creating collages from
cut or torn paper almost
since the invention
of paper itself. Henri
Matisse was a devotee
of the form, producing
many collages from torn
paper.
The image above uses
pieces of paper that
have then been inked
over. We’re going to take
a more conventional
approach, producing
striking artwork from a
photograph by creating
our own cutouts directly
in Photoshop.
This technique is
easy to achieve and is
capable of producing
intriguing artwork. It
helps greatly if you have
an original photograph
to work from, as we
do here. Don’t feel
you have to stick too
closely to that original,
though: while changing
a person’s features too
much may make them
unrecognizable, changing
the color of their
clothing can add a useful
enhancement.
+
In our original photograph, the girl is wearing
a black hat and a black T-shirt with a rather
confusing logo. We’ll replace this with a more
conventional shirt, which won’t detract so much from the
focus of the piece.
0
Begin by making a new layer. Use the Lasso tool
to trace around the outline of the figure with
straight lines (see More Info panel for help). Then fill the
selection with a fleshtone color, and use Layer Styles to
add a simple drop shadow effect.
.
Now return to the first layer we created, make a
new selection for, say, the hair, and make a new
layer from it and recolor as before. As long as we keep
making new layers from the original, they’ll all be created
with the same opacity and with the drop shadow, so we
don’t have to add it afresh each time.
1
Finally, make a new layer for the face, going
beneath the chin. Although ‘logically’ we should
have created this layer straight after the initial layer, the
combined opacity of the two means that we wouldn’t be
able to see the original photograph through it; this way
we can see the features as long as we need to.
Cut paper montages
,*
!
With the first piece of ‘paper’ in place, we can’t
see the photo beneath – so reduce the opacity
of this layer to 80% so we can see through it. This
procedure also gives the ‘paper’ a slightly translucent
quality, which adds to the overall effect.
,
Make a selection within the layer we’ve just
created – in this case, the lips. Use
*G
!G to make a new layer from the selection, and it
will appear at the same opacity, with the drop shadow
intact. Fill with a suitable lip color.
/
We could stop there – but we can add interest
to the flat areas of the image by creating a
simulation of shading and texture. Make new selections
within both the hair and the hat regions, and use
*G
!G once more to turn them into new layers; darken
as appropriate to create the best effect.
%
As a last step, we can add the texture. Hold *
! and click on the thumbnail of the first layer
we created, then make a new layer: fill the selection with
50% gray, and change the layer’s mode to Hard Light.
The gray will disappear. We can now add texture using
the Texturizer filter –the Sandstone texture works well.
Art & Design in Photoshop
Contemporary
design
FEK?<:;
DFI<@E=F
image
In step 2, we need to O
trace the outline roughly,
as a series of straight lines.
We could switch to the
Polygonal Lasso tool, but
we might forget we’ve done
so next time we want to
use the Lasso tool. A better
method is to hold the
- key while tracing, which
will give us the Polygonal
Lasso temporarily – forcing
the Lasso to draw straight
lines between each point we
click. When you release the
key, the start and end points
will join up to complete the
selection.
By making each new O
layer directly from the base
layer, we copy that layer’s
attributes – the shadow and
the opacity. Remember to
return to the base layer to
turn each new selection into
a layer of its own.
We’ve here added the O
texture as a final step, above
the artwork. We could have
added texture to our original
layer, of course, and then
each new layer made from
it would have that texture
as well; but if we found the
overall effect too strong, or
too weak, we’d be unable
to do anything about it at
that stage. By creating the
texture as a separate layer
above all the others, we
can lower the opacity or
increase the contrast to get
exactly the effect we want.
J?FIK:LKJ
MAC WIN BOTH
,+
Drawings have used the
outline and fill technique
for hundreds, if not
thousands, of years:
the artist first draws
the outlines, then fills in
the drawing with solid
colors.
The aim in the past
was always to be as
realistic as possible, with
the fills carefully shaded
and fitting neatly to the
outline.
Recently, however, a
variation on the theme
has appeared. In this
new take on the old style,
the fills clearly miss the
outlines: they follow the
same rough shape, but
fail to conform exactly to
the original design.
It’s a style that gives
a fresh, relaxed feeling
to the artwork. Where a
neat fit using flat colors
might have produced a
sterile, almost technical
style of illustration,
this looser approach
enables us to create
drawings that look
more contemporary,
more stylized, and less
buttoned-up.
Outline and fill
+
We’re
starting with
a photograph of an
arrangement of fruit.
Reduce the opacity of
the fruit layer to around
30%, so it doesn’t swamp
us; then start drawing
the fruit outlines with
the Pen tool. We don’t
need to follow every
nook and cranny in each
piece of fruit.
!
Although we’re
using a starting
photograph, we don’t
need to stick precisely to
it: some embellishment
is often required. Here,
for instance, I’ve added a
stalk on the plum, a stalk
and a couple of leaves on
the apple, and the signs
of a stalk on the Kiwi.
.
Choose strong,
flat colors that
best represent the fruit
you’re painting. You don’t
have to be faithful to
the original, and in fact
sampling colors from
the original photograph
would produce dull,
lifeless work.
/
You have to make
a judgment as to
what detail is necessary.
We definitely need the
pips on the two melons
to make them read
correctly as melons, and
a fair amount of detail
is needed to make that
pineapple clear. Add
highlights to the rear
fruit as well.
,,
Art & Design in Photoshop
Contemporary
design
FEK?<:;
DFI<@E=F
image
When drawing with the O
Pen tool, the tendency is for
the tool to keep drawing a
single path until it’s closed
off by clicking on the
starting point. But we need
to draw multiple open paths.
To do this, after a path has
been drawn, hold
*!
and click anywhere away
from the path. This will end
the current path, so you can
start drawing a new one.
The pastel color feel we O
achieve in the fiinal step is
typical of this sort of work:
the aim is for it to look
rather like a washed-out
watercolor. But finding
suitable pastel colors to
paint with would be tricky
and very time consuming.
It’s far better to fill with
strong colors sampled
from the Swatches palette;
when we then reduce the
opacity of the fill layer, we’re
adding the same amount
of the pastel quality to
all the colors together, so
maintaining the consistency
off the image.
This style would look O
good with a slightly textured
background, to simulate the
sort of paper watercolor
artists use. To reproduce
this technique, use the
Texturizer filter (Filter >
Texture), but don’t overdo
it – too much texture can
simply overwhelm the
image.
J?FIK:LKJ
MAC WIN BOTH
0
When you’ve
finished, hide
the original photograph.
Then make a new layer,
set the foreground color
to black and choose a
small (around 3 pixel)
hard brush. With the Pen
paths all active (but none
selected), press
# to
stroke the paths with the
brush on the new layer.
,
Make another
layer, and move it
behind the outlines layer.
Use a hard-edged brush
to start painting in some
of the fills. There’s no
need for accuracy of any
kind at this stage!
1
Paint in all the
fruit roughly,
making sure that
every element has a fill
associated with it. This is
the basic fill; next, we’ll
add the details that will
make those blobs look
more like fruit.
%
Finally, reduce
the opacity of
the fill layer – here, I’ve
taken it down to 70% of
its original strength. This
gives the outlines more
of a pastel feel. I’ve also
nudged the whole fill
layer down by 10 pixels,
which makes a looser fit
and looks better.
,-
Although many
manufacturers would
have publicized their new
MP3 players through a
hard examination of their
features, Apple took
the lifestyle approach
instead. The decision to
make the iPods and the
headphones in white was
a break from the gray
and black of everything
else; and so they used
the fact in their print
and TV advertising, with
a white iPod standing
out against a black
silhouetted figure.
The key to making
this technique work lies
in the initial choice of
figure. The jumping girl,
above, seems to have
all the energy we need
for this technique: but
while it’s clear from the
photograph that one arm
is behind her, by the time
it’s a silhouette she’ll just
have an arm missing.
Choose your image with
care!
+
This figure has everything we need: a dynamic
pose, a good sharp outline, and a sense of fun.
Sure, his dress sense might leave much to be desired –
but since we’re going to turn him into a silhouette, this is
not an issue.
0
To fill this layer with black, first make black the
foreground color (the
A key will do this). Then
press
1 -1 to fill
the layer with the foreground color, while preserving
transparency (see More Info panel).
.
The iPod we’ve just drawn can now be reduced,
if necessary, and distorted with Free Transform
to make it fit into the pocket. To create the pocket effect
itself, simply erase the bottom portion of the iPod (or use
a layer mask): the eye will interpolate the pocket for us
from the missing portion.
1
To make the cable, draw it with the Pen tool.
Make a new layer and, with the path still visible,
switch to the Brush tool. Choose a very small, hard-
edged brush, and make white the foreground color; press
*#!# to stroke the path with this color.
You’ll need a colored background to see it, of course.
iPod advertising art
,.
!
Simply converting the image to a silhouette isn’t
enough: we need to make sure that everything in
this silhouette makes good sense. Here, the strap hanging
from the back of his waist is a confusing item, so use the
Eraser tool to remove it.
,
To draw the iPod, zoom in to an area of black
and make a new layer. Use the Round Cornered
Rectangle tool in the Shapes tool (
R) to draw the basic
iPod shape (see More Info panel), then select a screen
and clickwheel area and fill with gray.
/
Making the shadow involves a couple of steps.
First, duplicate the silhouette layer, and use Free
Transform to compress it. You may need to paint in
some extra shadow around the feet, or even erase some
unwanted portions, to make the compressed version fit
the body well.
%
Lower the opacity of this shadow layer using
the number keys – around
for 50% opacity
works well. Make a layer mask for this layer, and use
the Gradient tool, set on black to white, to draw a
vertical gradient on this mask. It will hide the shadow
progressively as it recedes into the background.
Art & Design in Photoshop
Contemporary
design
FEK?<:;
DFI<@E=F
image
In step 2 we fill the O
layer with a different color
without using any menus.
Pressing
- will fill any
layer with the foreground
color, but unless there’s
an active selection or the
layer’s transparency has
been locked, the whole
image area will be filled
with this color. By adding
the
1key we prevent
the color from ‘leaking
out’ beyond the bounds
of the existing image, so
temporarily preserving the
transparency of the layer.
In step 4 we use the O
Shapes tool to create a
round-cornered rectangle.
The Shapes tool has three
modes of operation, and it’s
important to choose the
right one:
The first button creates
a new Shapes layer,
which is filled and colored
using Layer Styles. The
second makes a Pen path
conforming to the shape.
The third simply creates
a pixel-fill based on the
current shape, and this is the
variation we want here. Set
the radius of the rounded
corners using the numerical
Radius field that appears
when this tool is chosen.
J?FIK:LKJ
MAC WIN BOTH
,/
Technical artists
have been drawing in
isometric perspective
for decades. With angles
constrained to just 30°
increments, and no real
perspective, components
of, say, an electric drill
can be combined in
one illustration and
rearranged as necessary.
The idea was copied
by the computer game
Sim City, so that parks,
streets and whole
housing complexes
could be rendered in
fake perspective. The
appearance caught the
popular imagination, and
pixel art was born. Soon,
designers were taking
the form to new levels.
Pixel art uses receding
angles of 60° in both
directions – that is,
along the X and Z axes –
with the vertical Y axis
remaining truly vertical.
Pixel art is a fiddly,
time consuming process,
so we’re only looking
at a tiny portion here.
I’ve included the final
image for you to use as a
template if you wish.
+
To draw pixel art we need to zoom right in –
500% or more is a common view. We’ll begin by
drawing the base of this building, going two pixels along
and one up: this is the standard formula for drawing at
60°. Duplicate this for the building top.
0
We can draw a single window in the same way.
Rather than drawing pixel by pixel, it’s often
easier to select a group of two pixels and ‘steer’ them
with the cursor keys – see the More Info panel for
details. Duplicate the windows, then fill with color.
.
Drawing curves is always tricky in this isometric
perspective. To make the corner of our road, start
with an ellipse (with anti-aliasing turned off – see More
Info panel) and add a stroke using the Stroke menu. Then
erase all but the bottom corner, and continue the kerb
with straight lines drawn at the usual 60° angle.
1
We can duplicate this road edge to make a thick
kerb: Select All, then hold
- as you nudge
it downwards to make the vertical edge. Recolor it
(remembering to make it darker around the turn), then
fill above and below it. The dark color of the road surface
helps to ground the image, giving it more depth.
Pixel art
,0
!
We can make the turn wall for this building by
flipping a copy of the original (and replacing that
door with another window). Remember to darken up
this side: having a single strong lighting direction is what
helps pixel art look convincing.
,
We’ve drawn a thick wall around the top of this
building, with a patch of grass in the center.
Duplicate it for the building next door, and move the
layer behind; here, I’ve selected the top half and copied it
up to make this building taller.
/
Drawing people at this size is always tricky; there
are so few pixels to play with that it’s hard to
be accurate. To create a complex object like a car, begin
with an outline drawn in perspective; then duplicate this
outline, and fill in the spaces between – being willing to
adjust the shape as you draw.
%
As always, it’s the addition of shadows that
makes all the difference. These are painted in
black on a new layer, with that layer set to 50% opacity.
The tree on the roof is drawn freehand, but with a nod
towards the isometric perspective of the scene.
Art & Design in Photoshop
Contemporary
design
FEK?<:;
DFI<@E=F
image
When drawing pixel O
art, we need to adjust our
drawing and selection tools.
First, the Brush tool needs
to be changed to the Pencil
tool – this is chosen from the
pop-up list in the Brush tool
icon. All the selection tools,
including the Marquees
and the Lasso, must have
anti-aliasing turned off:
otherwise, when you make
a selection you’ll get fuzzy
edges. The same goes for
the Paint Bucket tool, which
you’ll use to fill bounded
areas with color.
Drawing at a 60° angle O
can be tricky. One solution is
to show a background grid,
set to 1-pixel increments;
when we hold
1 and
click, the Pencil tool will
draw a straight line between
click points.
Another solution to O
drawing at 60° is to use the
Cursor keys instead. Draw a
small block two pixels wide,
and select it; then hold
- as you use the cursor
keys to nudge it one pixel up.
Release the key, then nudge
two pixels to the side, and
you’ll have made a copy in
the right position. Continue
this process, holding and
releasing the
- keys
to make a copy each time,
and you’ll find it a relatively
quick way to step your 60°
path.
J?FIK:LKJ
MAC WIN BOTH
-'
It’s rather odd, when you
think about it, that we
should accept a world
full of people with yellow
skin and an overbite
without thinking twice
about it. But that’s the
power of television – in
particular, the power
of The Simpsons: the
realism of the emotions
is so strong that we’re
prepared to overlook the
obvious strangeness of
the appearance.
Caricatures of real
people in The Simpsons
never really look that
much like the person
they’re supposed to
represent. They use as
few lines as they can
get away with, which
means a lot of detail
gets left out; and, in
common with so many
cartoons, features are
routinely exaggerated
for comic effect, often
at the expense of a more
recognizable approach.
We’ll try the treatment
on Alfred Hitchcock.
+
The nose is always a recognizable feature, so it’s
good to start with this. Use the Pen tool to draw
the shape. When drawing with the Pen tool, you can hold
*! at any time to get the Direct Selection tool, if
you need to modify the shape of the path. With this key
held down, you can drag both handles and anchor points.
0
Hold *! and click away from the path to
stop drawing it; then, when you click again, you’ll
start a new path. Draw separate paths in this way for
each of the features in turn. There’s no need to make
them all join up to form a closed perimeter. Try not to
click right on an existing point, or you’ll join the path.
.
Continue the same process to fill the rest of the
colors. Select them on the outlines layer, then
expand the selection, then switch to the fill layer to place
the color in. If you like, you could make separate layers
for each of the fill colors.
1
You may not have noticed, but characters in The
Simpsons frequently have shadows. Make a new
layer, using the fill layer as a clipping mask; then paint in
here with the darker color. Use the brush in combination
with the Eraser tool to shape the shadows.
Simpsons cartoon
-(
!
Draw the basic shape for the head, then add
in the additional features as new paths. When
you’ve finished, make a new layer and choose a hard-
edged brush of around 5 pixels in size; with the path all
visible (but none of it selected), press
# to stroke the
path with the brush, creating these solid outlines.
,
Click within the face area with the Magic Wand
tool to select it, then make a new layer and move
it behind the outlines. Use Select > Modify > Expand to
expand the selection by two pixels, then choose a bright
yellow as the foreground color, and press
- to fill with that color.
/
Add shadows to the other elements – the hair,
the suit, and so on. We can use the shadows to
produce the shape of the suit collar on the left, and to
give a suggestion of an arm on the right. The shadow
also helps give the hair shape.
%
As well as shadows, characters have highlights
– especially when they’re drawn for stills or
publicity material. Set the Brush tool to 50%, and draw
the highlights around the eyelids, the hair, and over the
nose.
Art & Design in Photoshop
Contemporary
design
FEK?<:;
DFI<@E=F
image
Drawing with the Pen O
tool is one of the hardest
techniques to master in
Photoshop. It’s beyond the
scope of this book to teach
you how to use the tool: all I
can do is urge you strongly
to take the time to learn it,
as it’s one of the most useful
tools of them all.
In step 3, we use the O
Brush tool to ‘stroke’ the
path, drawing along it
with the current brush size
and color. Make sure the
foreground color is black,
and that the tool is set to
100% opacity. I’ve also
painted in the eyes in this
step, using a larger brush
size to paint single black
dots in each eye.
In step 5, we keep going O
back and forth between
the outline layer (to select
the regions for coloring in)
and the fill layer (to add the
color). We could, of course,
fill with color directly onto
the outline layer. But we
lose editability this way;
keeping the two separate
makes it much easier for us
to control the artwork. It
also means that when we
add the shadows in step 6
and the highlights in step
8, we can do so behind the
outlines, without worrying
about overpainting them by
accident.
J?FIK:LKJ
MAC WIN BOTH
-)
You might imagine that
caricature drawings of
politicians and celebrities
is a fairly modern
phenomenon, but you’d
be far from the truth.
The image above is a
caricature of a Roman
politician, complete
with a laurel wreath
around his bald pate. It’s
scrawled on a wall in
Pompeii, and was drawn
two thousand years ago.
When creating
caricature drawings,
we exaggerate the
subject’s features. The
smallest anomaly, the
slightest feature that’s
out of the ordinary in any
way is blown out of all
proportion, to create an
image that represents
the character we’re
satirizing.
Caricatures are often
cruel, as they play on
those features about
which the subject tends
to be most sensitive.
These are, after all, their
defining characteristics.
But the format can also
be playful, as we’ll see in
the example used here.
+
The comic actor Rowan Atkinson is the perfect
candidate for caricature. He’s known for his
rubbery features, but there’s nothing that really stands
out on his face as being unusual. This photograph is by
Gerhard Heeke, and comes from Wikipedia.
0
Open the Liquify filter (*1U
!1U). The default tool is the Forward
Warp tool (
T), and that’s the one we’ll use in the main.
Choose a large brush size – around 250 pixels – and push
the corner of the mouth up to exaggerate the smile.
.
Rowan Atkinson has a small chin, so let’s take
that fact and work it into our caricature. By
pushing up the jaw on either side of the chin we make
the chin itself appear pointed and much smaller. Use a
large brush size once again, to move larger quantities of
pixels around the screen.
1
Those eyebrows are ripe for exploitation. With
a large brush size, drag them up to make huge,
larger-than-life curves. This also has the effect of making
Atkinson look surprised, and brings a strong comic
element to the image.
Caricature
-*
!
Still using the Forward Warp tool, push the other
cheek up to match the first. You’ll notice it takes
the nose with it – we can fix that in the next step. We’re
still in Liquify, but I’ve cropped it to hide the interface so
we can see the image more clearly.
,
Lower the brush size to around 100 pixels, and
move the tip of the nose back. We can reshape
the nose however we like with the Forward Warp tool;
let’s exaggerate the original by giving it a slightly bulbous
tip, and a raised nostril.
/
We can make the eyes bigger by using the Bloat
tool (
?). Click and hold within each eye: the
longer you hold, the larger the eye will get. If you go
too far, hold
-as well to reduce the eye. Use the
Forward Warp tool once more (
T) to exaggerate the
ear and the shape of the hair.
%
We could simply stop at the end of step 7, and
we’d have a photographic caricature. But we can
improve on the result by adding two filters. Here, the
unlikely choice of Film Grain removes some of the fine
detail from the face, while Poster Edges both posterizes
it and adds contours that look hand drawn.
Art & Design in Photoshop
Contemporary
design
FEK?<:;
DFI<@E=F
image
When using the Liquify O
filter, we need to use a
surprisingly large brush size
in order to create smooth
warps: too small, and
we’ll simply end up with a
wrinkly effect. The keyboard
shortcut for changing the
brush size is
; and 9,
which makes the brush
larger and smaller in 2-pixel
increments. This can take a
long time when we want big
changes, so hold
1 as
well when using these keys
to increase and decrease
the brush size by 20-pixel
increments instead.
In the final step, it takes O
two filters to achieve this
effect. Rather than applying
them one at a time, use the
Filter Gallery to add both
filters together: you can
use the New Document
icon at the bottom right
of the dialog to add a new
filter. Only by tweaking the
settings of both filters can
you produce exactly the
right results.
It’s very easy to get O
carried away when using the
Liquify filter, ending up with
an image that looks nothing
like the person you’re
attempting to satirize. It’s
better to stop earlier than
you think, rather than after
it’s too late: you can always
add more distortion later,
but it’s hard to take out once
it’s there.
J?FIK:LKJ
MAC WIN BOTH
-+
Steampunk is a design
approach that takes
contemporary or
futuristic technology and
dresses it in the style
of early 20th century
scientific equipment.
The glorious steampunk
device above is a
computer in which the
flat screen has been built
into an ornate mirror
stand, with typewriter
keys on the keyboard and
many other decorative
touches.
Inspired by the
science fiction work of
H. G. Wells and Jules
Verne, steampunk first
appeared in 1960, with
the movie The Time
Machine. The machine of
the title was beautifully
created with brass and
leather fittings, making
the machine itself into
a work of art. The
revolutionary computer
game Myst used a very
similar approach in all its
styling.
We’ll look at how to
adapt a steampunk style
to make a dull guitar into
something approaching a
work of art.
+
³ This is our starting point: a remarkably plain
wooden guitar. We first need to copy the strings
and frets to new layers, so we can place our own
elements behind them. Selecting the strings can be tricky
– see More Info for some suggestions.
0
Select the face of the guitar body, by selecting it
with the either the Pen tool or using QuickMask.
Make this into a new layer, and use Curves or Levels to
darken the wood, adding some red to it to get this strong
mahogany look.
,
Hold *! and click on the brass panel’s
thumbnail in the Layers palette to load it as a
selection, then use Select > Modify > Contract to reduce
this by, say, 16 pxels. When we now make a new layer
using
*G!G, the Layer Style will come with it.
The red panel is the same Layer Style, slightly modified.
.
The two pickup elements are drawn in the same
way as the brass plate, as flat objects; when the
layer style from the plate is copied to this layer, it turns
into polished brass. A single curved swoosh is duplicated
and scaled down to make the decoration top right. This is
where the saved Strings layer shows itself useful!
Steampunk
-,
!
The brass panel is made by drawing the design on
a new layer, complete with gasket-like holes (left).
The metal look is created entirely using Layer Styles: the
style itself is on the CD, so take a look to see how the
combination of embossing and satin works here.
1
To treat the neck (left), first copy it all to a new
layer and use Curves or Levels to darken it, to get
the deep wood effect (middle). Paint out the machine
heads on a layer mask for this layer. The mother of pearl
plate and fret markers is simply created by applying the
Clouds filter to a selection.
/
Additional elements here include the water tap
knobs, replacing the original volume and tone
knobs. I drew these in Photoshop, but it would have been
just as easy to find photographs of them using Google.
This is the kind of job where you never quite finish adding
decoration – much like the real thing, in fact.
Art & Design in Photoshop
Contemporary
design
FEK?<:;
DFI<@E=F
image
texture
Selecting the O strings
in step 1 can be fiddly –
but here’s a fairly simple
method. Use the Lasso tool,
holding
- to trace
straight lines between click
points. Zoom in to 200%
and click once on each
corner of the left-most
string, to select it. It’s easier
than you’d think. Then press
N to enter QuickMask
mode, and the selection will
be shown highlighted. Make
a rectangular selection with
the Marquee tool that just
encloses this string, then
hold
- as you drag
it to make a copy; use Free
Transform to skew and
stretch it to fit the next
string. Repeat for all the
other strings.
To draw the screw heads O
in step 4, first make a small
circular selection and, on a
new layer, fill with any color.
Copy the layer style from
the base plate to this layer,
to add the brass effect to
it. You’ll need to reduce the
Emboss amount for such
a tiny object. Using the
Rectangular Marquee tool,
make a vertical selection one
pixel wide down the middle
of the screw, and delete: this
will make the screw head.
When this screw is now
copied around the artwork,
you can rotate it to a few
different angles to give
the impression of several
separate screws.
J?FIK:LKJ
MAC WIN BOTH
Photographers love
taking pictures of
textures. Rusty metal,
worm-eaten wood,
decaying brick, all are
sought out by those keen
to capture the feel of the
surfaces for posterity.
In the 1990s, a need
arose for all those
dozens of textures that
had filled shoeboxes
and transparency
folders. A number
of Photoshop artists
began to incorporate
textures into their work,
overlaying it on top of
images to create rich,
dense imagery that
brought a new tactile
quality to photomontage
illustration.
More often than
not, these textures are
accompanied by ‘line
action’, as it’s sometimes
called: orthogonal lines
and circles that delineate
areas of the composition,
marking edges and
creating an almost
mathematical sense of
purpose and proportion.
Line action and texture
+
For our homage
to Lewis Carrol’s
Alice Through the
Looking Glass – his
sequel to Alice in
Wonderland – we’ll need
a picture of Alice. This is
taken from the excellent
photos.com library of
royalty-free images, and
has the right sense of
boredom for our purpose.
!
To make the
image darker and
more mysterious, create
a new Curves adjustment
layer from the pop-up
menu at the bottom of
the Layers palette. Drag
the center of the line
down to make a curve; as
it’s an adjustment layer,
it will darken all the
layers beneath it.
.
We need to
change the mode
of the brick layer to
make it blend in with the
underlying layers. We
could use Hard Light,
or even Multiply; after
some experimentation,
I found that Overlay
mode produced the most
pleasing results.
/
The horizontal
rules are drawn
by making a selection
2 pixels thick with the
Marquee tool, filling this
with white and then
duplicating it around the
artwork. The circles are
made by taking circular
selections and using
Edit > Stroke to apply
a 2 point white stroke
to them.
Art & Design in Photoshop
Contemporary
design
FEK?<:;
DFI<@E=F
image
texture
In step 6, we put all the O
text layers into a single
group. The easiest way to
do this is to select them
all in the Layers palette,
then choose New Group
from Layers from the pop-
up menu at the top of the
palette. This allows us to
move them as a unit, to
lower the transparency of
the whole group, and to hide
and show them. But when
we want to add a layer style,
it’s a lot easier to do to a
single layer. Duplicate the
group (so we don’t lose the
original contents), and hide
the original; then select the
new group, and use
*B
!B to merge the group
into a single layer.
When changing the O
opacity of all the lines, it
helps to place all the layers
we used to create them
into a group as well. We
can now lower the opacity
of the group as a whole. In
this way we make a uniform
opacity throughout: if we
simply lowered the opacity
of each line layer in turn,
we’d get extra bright spots
at the intersections where
the pixels doubled up. This
would be both unsightly and
distracting.
In step 4, we could simply O
erase a chunk from the layer.
But the layer mask means
we can edit it later.
J?FIK:LKJ
MAC WIN BOTH
0
The first texture
is a scan of
a piece of leather,
placed behind the Alice
character. To make her
interact with it, change
the mode of her layer
from Normal to Hard
Light: this lets the
leather show through,
creating a more unified
image.
,
Our second
texture is a
photograph of a piece
of brickwork. Make a
layer mask for it, and
use the Lasso tool to
select and hide a portion
above Alice. Then add a
drop shadow to the layer
using Layer Styles, so it
appears to stand above
the Alice layer.
1
The text here
is set in Ray
Larabie’s font Kenyan
Coffee. It’s a modern
but plain font, which
will work well with the
outline style we’ll apply
later. Place all the font
layers into a single group,
then duplicate the group
and flatten it to make a
single layer (see More
Info).
%
Reducing the
opacity of the
lines to 50% and placing
them below the brick
allows the texture to
show through, which
integrates them into the
image. The Alice lettering
is filled with orange, and
the layer mode changed
to Screen; the outline is
an Outer Glow, added
using Layer Styles.
-/