Introducing Microsoft Windows Vista phần 3 pptx
Bạn đang xem bản rút gọn của tài liệu. Xem và tải ngay bản đầy đủ của tài liệu tại đây (1016.48 KB, 10 trang )
Chapter 1: Introducing Windows Vista 13
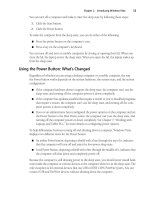
You can turn off a computer and make it enter the sleep state by following these steps:
1. Click the Start button.
2. Click the Power button.
To wake the computer from the sleep state, you can do either of the following:
■ Press the power button on the computer’s case.
■ Press a key on the computer’s keyboard.
You can turn off and turn on mobile computers by closing or opening their lid. When you
close the lid, the laptop enters the sleep state. When you open the lid, the laptop wakes up
from the sleep state.
Using the Power Button: What’s Changed
Regardless of whether you are using a desktop computer or a mobile computer, the way
the Power button works depends on the system hardware, the system state, and the system
configuration:
■ If the computer hardware doesn’t support the sleep state, the computer can’t use the
sleep state, and turning off the computer powers it down completely.
■ If the computer has updates installed that require a restart or you’ve installed programs
that require a restart, the computer can’t use the sleep state, and turning off the com-
puter powers it down completely.
■ If you or an administrator has reconfigured the power options on the computer and set
the Power button to the Shut Down action, the computer can’t use the sleep state, and
turning off the computer powers it down completely. See Chapter 7, “Working with
Laptops and Tablet PCs,” for more details on configuring power options.
To help differentiate between turning off and shutting down a computer, Windows Vista
displays two different views for the Power button:
■ An amber Power button, depicting a shield with a line through the top of it, indicates
that the computer will turn off and enter the low-power sleep state.
■ A red Power button, depicting a shield with a line through the middle of it, indicates that
the computer will shut down and completely power off.
Because the computer is still drawing power in the sleep state, you should never install hard-
ware inside the computer or connect devices to the computer when it is in the sleep state. The
only exception is for external devices that use USB or IEEE 1394 (FireWire) ports. You can
connect USB and FireWire devices without shutting down the computer.
C01622841.fm Page 13 Wednesday, May 17, 2006 8:24 AM
14 Part I: Getting to Know Windows Vista
Shutting Down and Restarting Computers: What’s Changed
As mentioned earlier, turning off a computer running Windows Vista puts the computer in a
low-power sleep state instead of completely powering down the computer. To completely
power down the computer, you must shut it down. Shutting down the computer ensures that
the power to the computer is turned off.
Because of possible confusion regarding the sleep state and the power-down state, be sure to
unplug a computer running Windows Vista before installing or connecting devices. To shut
down a computer running Windows Vista, use one of the following techniques:
■ Click Start, click the Options button to the right of the Power and Lock buttons, and
then click Shut Down.
■ Press Ctrl+Alt+Del. The red (Shut Down) Power button should be displayed in the
lower-right corner of the window. Click the Power button.
Caution
Do not install hardware inside a computer running Windows Vista or connect non-
USB/non-FireWire devices without first ensuring that the computer is completely powered
down. If the computer’s Power button is red and shows a shield with a line through the middle
of it, the Power button shuts the computer off and completely powers it down. If the com-
puter’s Power button is amber and shows a shield with a line through the top of it, the Power
button turns off the computer and puts it in the low-power sleep state.
To shut down and then restart a computer running Windows Visa, you can use either of the
following techniques:
■ Click Start, click the Options button to the right of the Power and Lock buttons, and
then click Restart.
■ Press Ctrl+Alt+Del. Click the Options button to the right of the Power button, and then
click Restart.
A restart is sometimes required to complete the installation of programs and automatic
updates. A restart might also be required to finalize a system configuration change.
C01622841.fm Page 14 Wednesday, May 17, 2006 8:24 AM
17
Chapter 2
Working with Windows Vista
In this chapter:
Getting Around in the Windows Vista Taskbar . . . . . . . . . . . . . . . . . . . . . . . . . . . . . 18
Navigating the Start Menu: What’s Changed . . . . . . . . . . . . . . . . . . . . . . . . . . . . . . 22
Using the All Programs Menu: What’s Changed. . . . . . . . . . . . . . . . . . . . . . . . . . . . 27
Navigating Control Panel: What’s Changed. . . . . . . . . . . . . . . . . . . . . . . . . . . . . . . . 28
As you learned in Chapter 1, “Introducing Windows Vista,” Microsoft Windows Vista is
different from earlier versions of Windows, especially when it comes to user accounts
and shutdown procedures. Prior to performing tasks that require administrator privi-
leges, users are prompted for a password if they are using a standard user account or
confirmation if they are using a computer administrator account. When you turn off
a computer running Windows Vista, the computer typically enters a sleep state instead
of completely powering down. You must, in fact, shut down the computer to power
down completely. Beyond these important differences, you’ll find many other interface
differences between Windows Vista and earlier versions of Windows, and examining
these differences so that you can effectively work with Windows Vista is the subject of
this chapter.
The primary means of getting around in Windows Vista are the taskbar and the menu
system. The entryway to the menu system is the Start button on the taskbar. You use the
Start button to display the Start menu, which in turn allows you to run programs, open
folders, get help, and find the items you want to work with. From the Start menu, you can
access the All Programs menu, which provides access to all the programs and tools on the
computer and to Control Panel, which provides access to utilities for working with system
settings.
With all the new taskbar and menu features, you might want to finally stop using Classic View
for Control Panel, Classic Start menu, and double-click to open an item. Why? The answer is
twofold. First, it’s so much easier to get around in Windows Vista using the standard configu-
ration, and going back to the classic configuration means losing some of the most powerful
features in Windows Vista. Second, it’s so much more intuitive to use single-clicking to open
items because Windows Vista makes extensive use of links in its consoles and dialog boxes,
and these links open items with single clicks.
C02622841.fm Page 17 Wednesday, May 17, 2006 8:40 AM
18 Part II: Essential Features in Windows Vista
Note This book was written using the Windows Vista Beta to provide an early introduction
to the operating system. More so than any other area of Windows Vista, the security features
discussed in this book are subject to change. Some of the features might not be included in the
final product, and some of the features might be changed substantially.
Getting Around in the Windows Vista Taskbar
In Windows Vista, by default, the taskbar is locked so that it is always displayed, as shown in
Figure 2-1. The Start button, shown on the far left, is one of the key features on the taskbar.
Quick Launch items are displayed to the right of the Start button, followed by buttons for run-
ning programs, and then the notification area. Each of these areas has feature enhancements,
which are discussed in the sections that follow.
Figure 2-1 The taskbar in Windows Vista
Working with the Quick Launch Toolbar
By default, the Quick Launch toolbar displays a quick access button for the desktop. A new
feature in Windows Vista is the ability to add any program directly to the Quick Launch
toolbar from the Start menu. To do this, click the Start button, navigate to the program
on the Start menu that you want to be able to access quickly, and then right-click the
program name. Last, select Add To Quick Launch to add the program to the Quick Launch
toolbar.
The Quick Launch toolbar is displayed by default. If the Quick Launch toolbar isn’t displayed
and you want to display it, right-click the Start button, and then select Properties. In the Task-
bar And Start Menu Properties dialog box, click the Taskbar tab, and then select the Show
Quick Launch check box.
Using Taskbar Thumbnails, Windows Flip, and
Windows Flip 3D
In earlier versions of Windows, the taskbar displayed a button for each running program.
Clicking the button allowed you to display the program window in front of all other
windows. Windows XP included an enhancement that grouped similar taskbar buttons.
For example, if you opened eight folders in Windows Explorer, these items would be
grouped together under one taskbar button. Clicking the taskbar button would then
display a dialog box with an entry for each folder window, allowing you to select which
folder window to display.
C02622841.fm Page 18 Wednesday, May 17, 2006 8:40 AM
Chapter 2: Working with Windows Vista 19
Windows Vista significantly enhances the taskbar by modifying taskbar grouping and also
providing the following taskbar improvements:
■ Live taskbar thumbnails
■ Windows Flip
■ Windows Flip 3D
Using Live Taskbar Thumbnails
When you move the mouse pointer over a taskbar button, Windows Vista displays a live
thumbnail of the window, showing the content of that window. The thumbnail is displayed
regardless of whether the window is minimized and regardless of the type of content. If
the content in the window is being updated, such as with a running process or a video, the
thumbnail continuously updates to reflect the live state of the window. For grouped taskbar
buttons, Windows displays a thumbnail of the most recently opened window and makes
the thumbnail appear to include a group of windows.
Using Windows Flip
When you press Alt+Tab, Windows Vista displays a flip view containing live thumbnails of all
open windows, as shown in Figure 2-2. Holding down the Alt key keeps the flip view open.
Pressing Tab while holding down the Alt key allows you to cycle through the windows.
Because the thumbnails are live views, the thumbnails continuously update to reflect their
current state regardless of the type of content. When you release the Alt key, the currently
selected window is brought to the front. You can also select a window and bring it to the front
by clicking the thumbnail.
Figure 2-2 Working with Windows Flip view
Using Windows Flip 3D
When you press the Windows logo key and Tab, Windows Vista displays a 3D flip view. As
Figure 2-3 shows, the Flip 3D view provides a skewed 3D view of all open windows. Holding
down the Windows logo key keeps the Flip 3D view open. Pressing the Tab key while holding
down the Windows logo key allows you to cycle through the windows. Because the 3D win-
dow views are live, the windows continuously update to reflect their current state regardless
C02622841.fm Page 19 Wednesday, May 17, 2006 8:40 AM
20 Part II: Essential Features in Windows Vista
of the type of content. When you release the Windows logo key, the currently selected win-
dow is brought to the front. You can also select a window and bring it to the front by clicking
the 3D window view.
Figure 2-3 Working with Windows Flip 3D view
Working with the Notification Area
The notification area is on the far right on the taskbar. By default, the notification area is
divided into two areas:
■ An area for standard notification icons, such as those used by programs you’ve
installed
■ An area for system notification icons, such as those for the clock, volume, network,
and power
Unlike earlier versions of Windows, notification area configuration in Windows Vista is con-
trolled on a separate tab in the Taskbar And Start Menu Properties dialog box. To modify the
default settings, right-click the Start button, and then select Properties. In the Taskbar And
Start Menu Properties dialog box, click the Notification Area tab. You can then manage how
notification icons are used.
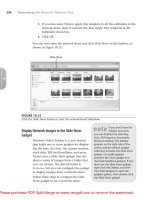
You can display the date and time by clicking the clock in the notification area. As Figure 2-4
shows, the system clock is significantly different from earlier versions of Windows. You can
use the date and time to view the current month’s calendar and browse a month-to-month
C02622841.fm Page 20 Wednesday, May 17, 2006 8:40 AM
Chapter 2: Working with Windows Vista 21
calendar. Time can be shown with a traditional clock or a digital clock, and if you click the
Date And Time Settings link, you can add up to two additional clocks for other time zones.
Figure 2-4 The system clock
From the experts
New ways to change the system time
Getting multiple clocks to display different time zones simultaneously is definitely
pretty cool, and definitely something a lot of people have asked me about. If you use
the time display as a cheap calendar—like I often do—you’ll be happy to know that
Windows Vista includes a full-blown calendaring program called Windows Calendar,
which you can start by clicking Start, pointing to All Programs, and clicking Windows
Calendar. Changing the system time is more involved than it used to be, however,
and you still need to have administrator privileges.
To change the time, you must click the clock in the notification area on the taskbar
and then click the Date And Time Settings link. In the Date And Time Properties
dialog box, click the Change Date And Time button to change the date and time, or
click Change Time Zone to change the time zone. After you change the date and
time or the time zone and click OK twice, the time is updated to reflect your
changes.
By default, Windows Vista automatically synchronizes system time with an
Internet time server once a week. The goal of synchronization is to ensure that system
time is as accurate as possible. By default, the time server used for synchronization is
time.windows.com. Although other time servers can be selected, businesses with net-
works might prefer to have computers synchronize with internal time servers. For more
information about configuring time and using Internet time servers, refer to Microsoft
Windows Vista Administrator’s Pocket Consultant (Microsoft Press, 2006).
William Stanek
Author, MVP, and series editor for the Microsoft Press Administrator’s Pocket Consultants
C02622841.fm Page 21 Wednesday, May 17, 2006 8:40 AM
22 Part II: Essential Features in Windows Vista
Navigating the Start Menu: What’s Changed
Clicking the Start button on the taskbar displays the Start menu. You can also display the
Start menu by pressing the Windows logo key. As with Windows XP, the Start menu in
Windows Vista has two views:
■ The Start menu (or Simple Start menu, as it is sometimes referred to) is the default view
which provides easy access to programs, folders, and search.
■ The Classic Start menu is an alternative view which provides the look and functionality
of the Start menu in Windows 2000 and earlier versions of Windows.
The Start menu, shown in Figure 2-5, has three key areas:
■ Programs list Displays recently used programs and programs that have been pinned to
the Start menu. By default, Internet Explorer and Windows Mail (previously called
Microsoft Outlook Express) are pinned to the Start menu, and up to eight recent pro-
grams are displayed as well.
■ Search box Allows you to search your entire computer for files, folders, or programs. To
use the Search box, open the Start menu, type your search text, and then press Enter.
The Clear button appears when you type your search text. Click the Clear button to clear
the search results and return to the normal view.
■ Right pane Provides access to commonly used folders and features. The right pane also
provides the Power button (puts the computer in sleep mode or shuts it down, depending
on the system configuration), the Lock button (locks the computer), and the Options but-
ton (displays the following options: Switch User, Log Off, Lock, Shut Down, and Restart).
Figure 2-5 The Start menu
C02622841.fm Page 22 Wednesday, May 17, 2006 8:40 AM
Chapter 2: Working with Windows Vista 23
Managing Programs List on the Start Menu
The left pane on the Start menu displays recently used programs and programs that have
been pinned to the Start menu. By default, Internet Explorer and Windows Mail (previously
called Outlook Express) are pinned to the Start menu, and up to eight recent programs are
displayed as well.
When you are working with the standard Start menu, you can modify the programs list in sev-
eral ways. To modify the default settings, right-click the Start button, and then select Proper-
ties. In the Taskbar And Start Menu Properties dialog box, the Start Menu tab is selected by
default. Click Customize, and then set the Number Of Recent Programs To Display option as
appropriate. By configuring the Show On Start Menu options, you can stop displaying links
for the Web browser and mail program or configure a different browser and mail program
to which you want to link.
Tip
If you want to provide quick access to programs, you can pin those programs to the Start
menu. To do this, click the Start button, navigate to the program you want to be able to quickly
access, and then right-click the program name. Select Pin To Start Menu to add the program
to the Start Menu.
Using the Right Pane on the Start Menu
The right pane on the Start menu provides access to commonly used folders and features. The
right pane also provides the Power button (puts the computer in sleep mode or shuts it down,
depending on the system configuration), the Lock button (locks the computer), and the
Options button (displays the following options: Switch User, Log Off, Lock, Restart, Sleep,
and Shut Down).
Important but subtle interface changes are reflected in the right pane of the Start menu. By
default, Windows XP and Windows Vista store user documents in different ways:
■ In Windows XP, user documents are stored by default in personal folders under
%SystemDrive%\Documents and Settings\%UserName%. A user’s personal folder
contains a My Documents folder, which in turn contains other folders, such as My
Pictures and My Music. Windows XP also has folders named My Computer and
My Recent Documents.
■ In Windows Vista, user documents are stored by default in personal folders under
%SystemDrive%\Users\%UserName%. A user’s personal folder contains separate
Contacts, Desktop, Documents, Pictures, Links, Downloads, and Favorites folders.
Windows Vista also has folders named Computer and Recent Documents.
Because of the different way that Windows Vista stores user documents, the My, My, My is gone,
gone, gone from the interface, which might be just as well. C:\Users\William\Documents is
C02622841.fm Page 23 Wednesday, May 17, 2006 8:40 AM
24 Part II: Essential Features in Windows Vista
much easier to use and reference than C:\Documents and Settings\William\My Documents.
That said, however, Windows XP and Windows Vista both track the location of the currently
logged on user’s profile folder by using the %UserProfile% environment variable.
From the experts
Using the command line
The Windows Vista changes to where documents, pictures, and user profiles are located
also make it easier to navigate the file system from the command line. For example,
when you open a command prompt in Windows XP, your current directory is your user
profile directory %UserProfile%, which is C:\Documents and Settings\Mitch Tulloch
on my computer. If I want to change my current directory to where my pictures are
located, I have to type the following:
cd "My Documents\My Pictures"
Note the need to enclose the path in quotes—these are needed because of the spaces
present. In Vista however, I need to type only this:
cd Pictures
Less typing means more productivity. In fact, I might need to type only cd p and press
TAB a few times until
cd Pictures appears, and then press Enter. You can do the same
for the Windows XP example, but you’d have to do it in two steps. That is, type
cd m
(TAB, TAB, TAB… and press Enter) followed by cd m (TAB and press Enter). The
bottom line, though, is that the fewer times you need to enclose paths in quotes, the
easier it becomes to navigate from the command line. Now if only they had changed
the Program Files directory into just Programs!
Mitch Tulloch
Author and MVP—For more information, see .
Within the newly reorganized structure of personal folders, a user’s document and data fold-
ers are stored as top-level folders within a personal folder. Thus rather than the Documents
folder containing a number of subfolders for pictures, music, and so on, the Documents folder
is meant to contain only documents. Reorganizing the structure of personal folders should
make it easier to manage and back up a user’s personal data.
Other important changes are reflected in the right pane as well. To understand these changes,
let’s review the option buttons provided in the right pane. From top to bottom, the option
buttons are as follows:
■ Current user The name of the currently logged on user. Clicking this option opens the
user’s personal folder in Windows Explorer.
■ Documents Opens the %UserProfile%\Documents folder in Windows Explorer.
■ Pictures Opens the %UserProfile%\Pictures folder in Windows Explorer.
C02622841.fm Page 24 Wednesday, May 17, 2006 8:40 AM
![Tài liệu Microsoft Windows Vista Tutorials [VTC] pptx](https://media.store123doc.com/images/document/13/ce/pe/medium_pew1387001705.jpg)