extremetech Hacking Firefox phần 9 doc
Bạn đang xem bản rút gọn của tài liệu. Xem và tải ngay bản đầy đủ của tài liệu tại đây (1.25 MB, 46 trang )
342
Part VI — Creating Extensions and Themes
Ⅲ javascript.options.strict: When this preference is set to true, Firefox dis-
plays JavaScript warnings in the JavaScript Console. A warning usually means that you
are doing something illegal or nonstandard in your code, and that might cause unex-
pected behavior or other problems. It is always recommended to solve all such problems
before releasing your extension. Enabling this preference causes all the warnings, not
only those originating in your extension, to be reported to the JavaScript Console. Many
extensions have warnings in their code, and having several such extensions installed
while trying to debug your own code might make finding only the relevant warnings
difficult.
Ⅲ browser.dom.window.dump.enabled: You should set this preference to true if
you want to use the
dump() function to print messages to the standard console. More
information on this appears later in this chapter.
As with other preference settings, you can type about:config in your Firefox address bar and use
the Preferences window to create new preferences and modify the existing ones. Other methods
for setting preferences, such as modifying the prefs.js file, will also work.
Logging
Logging is a simple but very efficient method for debugging your code. Printing the values of
your variables, the received messages, return codes, and so on can help you figure out where the
problem is and how it can be solved. Logging can also be used to report major events and
errors in your application, and looking at these messages can help you make sure that the appli-
cation is actually doing what you expect it to do.
There are several logging mechanisms in Mozilla:
Ⅲ Standard Console: You can use the
dump() function to print messages to the standard
console. Similar to the
alert() function, dump() expects a single string argument. By
default, the standard console is disabled in Firefox. To enable it, set the value of the
browser.dom.window.dump.enabled preference to true and start Firefox with
the
-console command-line flag.
Ⅲ JavaScript Console: This console can be opened using Tools➪ JavaScript Console. To
print a line to this console, you first obtain the
nsIConsoleService interface and
then call its
logStringMessage method:
var consoleService = Components.classes[‘@mozilla.org/consoleservice;1’]
.getService(Components.interfaces.nsIConsoleService);
consoleService.logStringMessage(“Testing 1 2 3”);
Remove the debug messages before releasing your extension to the public. Having a lot of such
messages printed can slow your code down and create an unnecessary clutter in the console
window. You can create your own wrapper function that will determine whether the debug
message should be printed:
function myPrintDebugMessage(message) {
if (gMyDebugging) {
dump(message);
}
}
25_596500 ch17.qxd 6/30/05 3:14 PM Page 342
343
Chapter 17 — Creating Extensions
If you use the preceding function to print all your debug messages, toggling the value of the
global
gMyDebugging flag turns all the messages on and off.
You can often use the alert() function for basic debugging without needing any of the pre-
ceding logging mechanisms. Temporarily inserting a call to this function in the problematic piece
of code can sometimes help you quickly figure out what the problem is.
Developer Extensions
Several extensions can be used to troubleshoot your extension. Some of these are listed here:
Ⅲ The DOM Inspector can be used to examine the DOM structure of your documents,
their styles, and much more.
Ⅲ Venkman is an advanced Mozilla-based JavaScript debugger.
Ⅲ Extension developer’s extension can be used to quickly run JavaScript code snippets,
edit XUL, HTML, and much more.
Ⅲ ColorZilla can be used to quickly get various pieces of information about XUL ele-
ments, including their colors, ids, class names, and so on. You can also use ColorZilla to
quickly launch the DOM Inspector on the selected element.
There are probably many other extensions you might find useful during the extension develop-
ment process, and many new ones are being released all the time.
Deploying Your Extension
You have created your extension, packaged it, and fixed all the bugs found. Your creation is now
ready for release to the public.
Most authors create a home page for their extension. The page typically contains some infor-
mation about the extension, its author, and the latest version of the extension available for
download. In addition, you will probably want your extension to be listed on one or more sites
that host Mozilla extensions.
The Mozdev.org site allows you to host your Mozilla extension project on their servers and pro-
vides many useful tools for managing the development process and collaborating with other
developers. Your extension must be released under an Open Source license to qualify for being
hosted at Mozdev.
Configuring Your Server
Firefox allows extensions to be installed directly from the Web without their having to be
downloaded to the local disk first. Giving your file an XPI extension and putting it on a web
server isn’t enough for it to be installable directly from your site. Your web server should send
this file using the correct MIME type,
application/x-xpinstall. With Apache, this
can be achieved by creating an
.htaccess file that has the following line:
AddType application/x-xpinstall xpi
25_596500 ch17.qxd 6/30/05 3:14 PM Page 343
344
Part VI — Creating Extensions and Themes
Inserting the preceding directive into an .htaccess file and placing this file in a directory on your
server allows you to change the MIME settings for this directory only, including all its subdirecto-
ries. Adding a similar line to the main httpd.conf file can make the setting global. Also, many
web hosting providers won’t give you access to the main http.conf file of your web server but
will allow you to place local .htaccess files in your directories.
Creating JavaScript Installer Links
You can create a direct link to your XPI file on your web page, and if the file is sent using the
application/x-xpinstall MIME type, clicking this link triggers the Firefox install
mechanism:
<a href=” />title=”Install SiteLeds (right-click to download)”>Install SiteLeds 0.1</a>
There is an alternative way of triggering the extension installation process. A global object
called
InstallTrigger is available to scripts running in web pages. You can use this object’s
methods to trigger the installation process and to verify that the extension was indeed success-
fully installed. Using this method also allows you to specify a custom icon that will appear in
the installation dialog.
An example of using
InstallTrigger follows:
<script type=”text/javascript” language=”JavaScript”>
function installCallback(name, result) {
alert(‘The installation of ‘ + name +
‘ finished with a result code of ‘ + result);
}
function installExtension(aEvent) {
var params = {
“SiteLeds”: { URL: aEvent.target.href,
IconURL: ‘ />toString: function () { return this.URL; }
}
};
// trigger the installation process:
var res = InstallTrigger.install(params, installCallback);
if (!res) {
alert(‘Error calling install’);
}
return false;
}
</script>
<a href=”
title=”Install SiteLeds (right-click to download)”
onclick=”return installExtension(event);”>Install SiteLeds 0.1</a>
25_596500 ch17.qxd 6/30/05 3:14 PM Page 344
345
Chapter 17 — Creating Extensions
Take a closer look at what we have done:
1.
Adding an onclick=”return installExtension(event) to the anchor HTML
element causes the
intallExtension function to be called when the link is clicked.
The
onclick handler returns false, preventing the default anchor click action from
being performed.
2.
Inside the installExtension function, we define the parameter object for the
install method. This object contains the URLs of the extension XPI package and its
icon.
3.
We then call the InstallTrigger.install function. The second parameter is the
name of the function that will be called when the installation completes (or in case the
user cancels the installation).
4.
If InstallTrigger.install returns a zero result, there was a problem starting the
installation process. For example, your site may not be on the user’s white list for sites
that are allowed to install extensions. In this case, the user should see a Firefox notifica-
tion, but you can further explain the situation by displaying an appropriate popup mes-
sage or redirecting the user to an explanation page, for example.
5.
When the installation process finishes or is cancelled by the user, the
installCallback function is called. This function receives two parameters: the URL
of the extension package and the installation result code. A zero result code means suc-
cessful installation.
Getting Your Extension Listed
There are several sites that list Mozilla extensions. Users often visit these sites to check out the
new extensions or when they are looking for an extension with a specific functionality. If you
want people to notice your new extension, you should have it listed on one or more of the fol-
lowing sites:
Ⅲ Mozilla Update (
addons.mozilla.org): This is the official Mozilla extensions site.
The Extension Manager dialog links to it, and this makes it the first place that the users
look for new extensions. The site contains a FAQ with information about getting your
extension listed.
Ⅲ The Extension Mirror (
www.extensionsmirror.nl): A very active site with the
largest index of the existing extensions. The site administrators actively look for new
extensions on the Web and on the MozillaZine forums and publish them on the site, so
theoretically you don’t have to do anything to get your extension listed. The Extension
Mirror has an Announcements forum where you can announce your extension to make
sure it is noticed by the administrators.
Ⅲ The Extension Room (
extensionroom.mozdev.org): A popular index of Mozilla
extensions. The site has instructions for getting your extension listed.
Ⅲ The MozillaZine Extensions Forum (
forums.mozillazine.org): Many extension
authors announce their extensions on this forum, which is read by many members of the
Mozilla community. You can start a new topic, letting people know about your new
extension and its purpose. People can comment on this post, providing valuable feed-
back, comments, and bug reports.
25_596500 ch17.qxd 6/30/05 3:14 PM Page 345
346
Part VI — Creating Extensions and Themes
Extension Programming Techniques
The previous sections have shown how you can create a simple extension. This section intro-
duces additional techniques that can be useful for creating extensions that are more elaborate.
Understanding the Browser Chrome
You saw that to extend a XUL user interface you need to know its structure: the elements you
want to overlay, their hierarchy, ids, and so on. If you want to extend the browser, it is impor-
tant to have a basic understanding of the browser chrome: its XUL windows and dialogs, style
sheets, and JavaScript code. There are several ways to learn about these components:
Ⅲ The DOM Inspector can help you navigate through the document hierarchy and exam-
ine the user interface elements, their properties, and styles.
Ⅲ You can learn a lot by looking at the browser code; just like your extension, the browser’s
chrome is composed of XUL, CSS, and JavaScript files you can examine.
Ⅲ The Web offers a lot of useful information, including documentation, references, tutori-
als, and so on. See the “Online Resources” section, later in this chapter, for some useful
links,
Ⅲ Finally, you can use the Discussion Forums and the IRC to ask for help from your fellow
community members. The “Online Resources” section lists some popular forums and
IRC channels.
Using the DOM Inspector
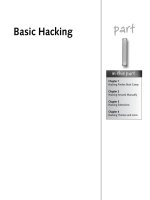
The DOM Inspector is launched by choosing Tools➪ DOM Inspector in your browser.The
main window is divided into two panes, as shown in Figure 17-8. The left pane displays the
DOM tree, a hierarchical structured view of the document elements. The right pane displays
detailed information about the selected element (its DOM attributes, style sheets, properties,
and much more).
The DOM Inspector is included in the Firefox installer, but you may need to choose the Custom
installation option and select Developer Tools to have it installed.
To start examining a XUL window, make sure it is open and then select it from the File ➪
Inspect a Window list in the DOM Inspector. Once the desired window is selected, its URL
appears on the DOM Inspector address bar, and the left pane is updated to reflect its DOM
structure. You can now explore the document tree in the left panel by expanding and collapsing
the tree elements. When you select a visible UI element in the tree, it is highlighted by a blink-
ing red border in the target window.
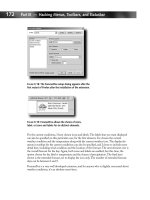
You can search for specific elements by their tag name, id, or attribute by choosing Search➪
Find Nodes . . ., as shown in Figure 17-9.
25_596500 ch17.qxd 6/30/05 3:14 PM Page 346
347
Chapter 17 — Creating Extensions
F
IGURE
17-8: The DOM Inspector window
F
IGURE
17-9: The DOM Inspector Find Nodes dialog
You can also find a visible user interface element by choosing Search ➪ Select Element By
Click and then clicking on the desired element in the window you are examining. If the DOM
Inspector successfully finds the element you clicked on, the element is highlighted by a blink-
ing red border for a few seconds and then selected in the DOM Inspector tree view.
If you want to examine a specific visible element when the DOM Inspector isn’t open, you have
to open the DOM Inspector, select the desired window, choose Select Element By Click, return to
the window, click on the wanted element, and then return to the DOM Inspector dialog. With
the ColorZilla extension, there is a faster way of achieving the same thing. Click on the ColorZilla
status bar icon, click on the desired element, and then choose DOM Inspector . . . from the
ColorZilla context menu. The DOM Inspector will be launched with the desired element selected
in the left pane.
25_596500 ch17.qxd 6/30/05 3:14 PM Page 347
348
Part VI — Creating Extensions and Themes
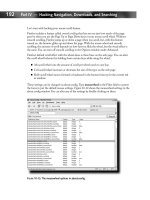
Once you have selected the element you want to inspect in the left pane, the right pane can be
used to examine it more closely. You can use the drop-down list above the right panel to select
the type of information you are interested in, as shown in Figure 17-10.
F
IGURE
17-10: The various types of information
provided by the DOM Inspector
Here’s a brief overview of the available information types:
Ⅲ DOM Node: This displays some basic information about the selected DOM node,
including its tag name, attributes with their values, and so on.
Ⅲ Box Model: Displays the element’s layout information, including its position, dimen-
sions, margins, and so on.
Ⅲ XBL Bindings: XUL elements can be extended using Extensible Binding Language
(XBL). This view displays information about the XBL definitions that were applied to
the selected element.
Ⅲ CSS Style Rules: Displays all the CSS rules that are applicable to the selected element
and information about the style sheets and the selectors that contributed these rules.
Ⅲ Computed Style: After the various CSS rules applicable to the selected element are
merged and all the conflicts are resolved according to the cascading order, an element
receives its final set of styles. This set of styles, called the computed style, is displayed in
this view.
Ⅲ JavaScript Object: Every element is an object with a set of properties and functions that
can be accessed using JavaScript. This view displays these properties and their values.
Besides allowing you to examine the selected elements, the DOM Inspector allows you to
modify them dynamically. For example, you can modify and delete the existing element’s
attributes or even add new ones by using the context menu in the DOM Node view, as shown
in Figure 17-11. By using the context menu in the left pane, you can manipulate the selected
element (delete it, duplicate it, set its pseudo-classes to hover, active, or focus, and so on).
The DOM Inspector is a very powerful tool that can be used both for learning and for trou-
bleshooting purposes. If you learn to use it, you will surely find it indispensable.
25_596500 ch17.qxd 6/30/05 3:14 PM Page 348
349
Chapter 17 — Creating Extensions
F
IGURE
17-11: Dynamically changing the node’s attributes
Examining the Source Code
One of the great things about the Mozilla platform is that it is open source. If you are not sure
about how something works, you can always take a look at the code and see exactly what is
happening behind the scenes.
Typically, you will want to understand how some part of the browser works by looking at its
XUL and JavaScript files. You can use the DOM Inspector to find out what XUL file defines a
specific part of the UI. Just open the wanted window with the DOM Inspector and look at its
address bar. For example, when examining the Options dialog you will see the following:
chrome://browser/content/pref/pref.xul. This means that this dialog is defined in
the
pref.xul file inside the browser chrome package.
There are several ways to find the needed source files and examine them, including the
following:
Ⅲ If you have Firefox installed, you already have all the browser chrome XUL, CSS,
JavaScript, and other files on your machine. They are located in the chrome subdirectory
under the main Firefox application folder. In this directory, you will find several JAR files
(browser.jar, toolkit.jar, and so on).These files are very similar to the chrome JAR file we
created for our extension in the previous sections; they contain the chrome that the
browser itself is built of. For example, if you want to look at the browser.xul file found at
chrome://browser/content/browser.xul, you should look inside the browser.
jar file that contains the browser package. Looking inside the installed-chrome.txt file in
the chrome directory can give you an idea about the installed browser chrome packages
and the JAR files that contain them.
We already mentioned that JAR files are regular ZIP archives. You can extract all the
files from a JAR archive and examine them, perform a search for specific keywords, and
so on. Also, many ZIP programs allow you to take a quick look at a file inside an archive
without needing to extract it first.
25_596500 ch17.qxd 6/30/05 3:14 PM Page 349
350
Part VI — Creating Extensions and Themes
Ⅲ The Mozilla Cross-Reference site, located at , contains
all the latest Mozilla source code. You can browse and search this code until you find the
needed information. For example, the browser.xul file can be found here:
/>The site is very useful if you want to see the file history, including when the file changed,
who changed it, and what bugs were fixed in the process. Another useful feature is that
you can easily create a link to a specific line in any file — the line numbers in the code
listing pages are actually links — and use this link elsewhere, for example, to create a
bookmark, report a problem, or ask questions about the code.
Ⅲ You can download the complete Firefox source code and extract it to a local directory.
For example, Firefox 1.0 source code is a 31MB archive that can be downloaded from
here:
/>source.tar.bz2
You can browse the Mozilla FTP site ( />mozilla.org/
) and find the source code package that is most appropriate for
your needs.
Once the code is extracted, you will get a directory tree very similar to the one found at
the Mozilla Cross-Reference site.
The Mozilla source code package is compressed using the BZIP2 format. Many compression
programs (7-Zip is one) support this format and can be used to open such archives.
Online Resources
If examining the document structure and looking at the code didn’t get you closer to under-
standing how things work, you can try finding more information on the Web or asking your
fellow Firefox hackers for help.This section lists the most useful online resources for extension
developers.
Ⅲ XULPlanet (
An excellent resource packed with
Mozilla-related guides, tutorials, and examples. The site has several reference sections
covering everything from XUL to XPCOM components.
Ⅲ Mozilla.org (
): Has a lot of useful information for devel-
opers. Most of it is linked from the documentation page at
illa
.org/docs/
, but there are many additional resources scattered around the site. You can
do a site search to try to find the needed information.
Ⅲ MozillaZine.org knowledge base (
): A user-
contributed wiki with many useful articles, guides, and links to additional resources.
The Development section has a lot of information on extension programming.
25_596500 ch17.qxd 6/30/05 3:14 PM Page 350
351
Chapter 17 — Creating Extensions
Ⅲ MozillaZine forums ( Post your questions
and comments here. The site has a Mozilla development section with a forum dedicated
to extensions.
Ⅲ netscape.public.mozilla newsgroups (
/>developer-forums.html
): You can search the newsgroups for the wanted informa-
tion or post your Mozilla development-related questions. The Mozilla.org site has a list
of the available newsgroups and their topics.
Ⅲ Internet Relay Chat (IRC) (
irc://irc.mozilla.org/): There are several IRC
channels you can visit to chat with your fellow Mozilla developers in real time. Several
developer channels, including
#developers, #mozilla, and others, can be found on
the Mozilla.org IRC server.
More XUL
This section introduces several additional XUL-related techniques you might find useful in the
process of extension development.
More XUL Elements
After reading the XUL section in Chapter 16 and going over the various examples in this
chapter, you should have a pretty good understanding of how XUL elements can be used to
create a user interface. This section provides some additional examples of the basic XUL wid-
gets and is intended to give you a taste of the most common UI elements and their XUL repre-
sentations.
If you want to test the XUL code in the following examples, you can create a file with an .xul
extension and the following contents:
<?xml version=”1.0” encoding=”UTF-8”?>
<window align=”start”
xmlns=” />.is.only.xul”>
.
.
.
[Your XUL widgets go here]
.
.
.
</window>
Once you create the file and insert some XUL elements, you can open it in Firefox using File➪
Open File. The align=”start” part makes sure your XUL widgets are shown correctly when
opened inside the browser window.
25_596500 ch17.qxd 6/30/05 3:14 PM Page 351
352
Part VI — Creating Extensions and Themes
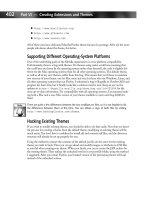
Buttons
A button element creates a button that can be pushed to trigger some action (see
Figure 17-12):
<button label=”Test” oncommand=”alert(‘Testing 1 2 3’);”/>
F
IGURE
17-12: A simple button
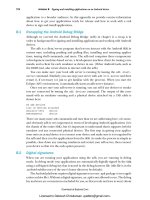
A toolbarbutton is a special button that is usually a part of a toolbar and typically has an
image (see Figure 17-13):
<toolbarbutton id=”home-button”
class=”toolbarbutton-1”
label=”Home”
onclick=”BrowserHomeClick(event);”/>
F
IGURE
17-13: A toolbarbutton XUL element
The toolbar button image is usually specified in a CSS style sheet, rather than directly in the XUL
document.
Text Labels
A label element can be used to display a short string, often used as a label for another ele-
ment (see Figure 17-14):
<label value=”Your first name:”/> <textbox id=”first-name”/>
F
IGURE
17-14: A label element next to a text box
25_596500 ch17.qxd 6/30/05 3:14 PM Page 352
353
Chapter 17 — Creating Extensions
Larger pieces of text that can optionally wrap to multiple lines should be placed inside a
description element (see Figure 17-15):
<description>
She Sells Sea Shells by the Sea Shore.
</description>
F
IGURE
17-15: A description element
The text of the description element wraps to multiple lines only when necessary—for exam-
ple, when the parent element isn’t wide enough. You can resize the window and make it narrow
to see the wrapping, as in Figure 17-15.
Text Entry Boxes
A textbox element can be used to create a text entry box like the one shown in Figure 17-14.
If you want to allow entering multiple lines of text, set the
multiline attribute to true (see
Figure 17-16):
<textbox multiline=”true” rows=”4” cols=”10”/>
F
IGURE
17-16: A multiline text entry box
Checkboxes and Radio Buttons
A checkbox is a UI element that can have either an on or an off state (see Figure 17-17):
<checkbox label=”Add sugar” checked=”false”/>
<checkbox label=”Add cream” checked=”true”/>
25_596500 ch17.qxd 6/30/05 3:14 PM Page 353
354
Part VI — Creating Extensions and Themes
F
IGURE
17-17: A couple of checkboxes
Radio buttons can also have two states, but unlike checkboxes, they usually make more sense
when grouped. When the user turns on a radio button that is a part of a group, all the other
radio buttons in that group are automatically turned off.
You can use a
radio element to create a radio button and a radiogroup element to group
several radio buttons (see Figure 17-18):
<radiogroup>
<radio label=”Jazz”/>
<radio label=”Rock” selected=”true”/>
<radio label=”Blues”/>
</radiogroup>
F
IGURE
17-18: A group of radio buttons
List Boxes
A listbox element is used to create a list of items (listitem elements) that can be selected
by the user (see Figure 17-19):
<listbox rows=”3”>
<listitem label=”Red”/>
<listitem label=”Green”/>
<listitem label=”Blue”/>
<listitem label=”White”/>
</listbox>
F
IGURE
17-19: A simple list box
25_596500 ch17.qxd 6/30/05 3:14 PM Page 354
355
Chapter 17 — Creating Extensions
You can use a menulist element to create a drop-down list (see Figure 17-20):
<menulist label=”Tuesday”>
<menupopup>
<menuitem label=”Sunday”/>
<menuitem label=”Monday”/>
<menuitem label=”Tuesday” selected=”true”/>
<menuitem label=”Wednesday”/>
<menuitem label=”Thursday”/>
<menuitem label=”Friday”/>
<menuitem label=”Saturday”/>
</menupopup>
</menulist>
F
IGURE
17-20: A drop-down list
Menus
A menu is usually created by defining a menu element that displays the menu title and a
menupopup element that defines the contents of the menu popup window.This window can
have any number of
menuitem elements, menuseparator separators, and other menus.
<menu label=”Tools” accesskey=”T”>
<menupopup>
<menuitem label=”JavaScript Console”/>
<menuitem label=”DOM Inspector”/>
<menuseparator/>
<menu label=”ColorZilla”>
<menupopup>
<menuitem label=”Eyedropper”/>
<menuitem label=”Color Picker”/>
</menupopup>
</menu>
</menupopup>
</menu>
Figure 17-21 shows a multilevel menu.
25_596500 ch17.qxd 6/30/05 3:14 PM Page 355
356
Part VI — Creating Extensions and Themes
F
IGURE
17-21: A multilevel menu
This section merely scratched the surface of what can be done with XUL. The XULPlanet site
has a complete reference of all the available elements, their attributes, and many more examples
of their usage.
Introduction to Events
The event mechanism allows your JavaScript functions to be called in response to events that
occur in the browser. For example, you can attach a script to handle a mouse click or a key-
board button press, or to have it called every time Firefox loads a web page. Events are essential
for creating dynamic user interfaces because they are the primary mechanism for adding behav-
ior to otherwise static elements. For example, it is hard to imagine a user interface having a
button that does nothing when clicked.
XUL and HTML events in Mozilla are very similar because they both use the same World
Wide Web Consortium (W3C) DOM events specification (
/>TR/DOM-Level-2-Events/
). If you have worked with dynamic HTML in the past, you
will find the concepts introduced in this section very familiar.
The simplest way to attach your script to an element is by adding an appropriate attribute to its
XUL definition:
<label value=”I’m a clickable label” onclick=”alert(‘Label clicked’);”/>
Each time the user clicks on the preceding label, the script defined by the onclick attribute is
executed. The name of the attribute is the event name (
click in our example) prefixed by on.
The JavaScript functions referenced in the event attribute should be defined when the script is
executed. For example, you can define your functions in an external JavaScript file and include
this file in the XUL document using the script tag. An explanation of how this is done is pro-
vided in previous sections.
The most common events and their attributes are listed here:
Ⅲ Mouse events
■
click: Occurs when a mouse button is clicked on an element. This is even trig-
gered when the mouse button is pressed and then released over the same screen
location. In that case, three events occur:
mousedown, mouseup, and click.
When handling a button press or selection of a menu item, you should use the
command event instead, because the user may also use the keyboard to trigger
these actions.
25_596500 ch17.qxd 6/30/05 3:14 PM Page 356
357
Chapter 17 — Creating Extensions
■
mousedown: Occurs when the mouse button is pressed on an element.
■
mouseup: Occurs when the mouse button is released over an element.
■
mouseover: Occurs when the mouse pointer is moved onto an element
(enters it).
■
mousemove: Occurs when the mouse is moved while it is over an element.
■
mouseout: Occurs when the mouse pointer is moved away from the element
(leaves it).
Ⅲ Keyboard events
■
keypress: Occurs when a keyboard key is pressed and then released.
■
keydown: Occurs when a keyboard key is pressed (before being released).
■
keyup: Occurs when a keyboard key is released.
Ⅲ Focus events
■
focus: Occurs when an element receives focus either because the user clicked on
it with a mouse or navigated to it using the keyboard.
■
blur: Occurs when an element loses focus.
Ⅲ Document events
■
load: Occurs when all content in a document (HTML page, XUL window, and
so on) is finished loading and initializing.
■
unload: Occurs when the document is unloaded or a XUL window is being
closed.
■
resize: Occurs when a document view is being resized.
■
scroll: Occurs when a document view is being scrolled.
Ⅲ General event
■
command: Occurs when an element is being activated in some way. For example,
this event is triggered whenever a button is pressed or a menu item is selected. As
previously mentioned, you should handle this event in these cases rather than the
mouse click events, because there are several alternative ways a user can activate a
button or use a menu.
When an event handling function is called, its first parameter is the event object that contains
additional information about the event that occurred. For example, the
target property of
this object contains the element that triggered the event:
<label value=”I’m a clickable label” onclick=”handleLabelClick(event);”/>
Our handleLabelClick function is defined as follows:
function handleLabelClick(event) {
alert(event.target.value);
}
25_596500 ch17.qxd 6/30/05 3:14 PM Page 357
358
Part VI — Creating Extensions and Themes
When we click on the label, our handleLabelClick function is called. We can obtain the
label element that triggered the event from the
target property of the event parameter.
When the user clicks on the label, the alert box (similar to the one shown in Figure 17-22) is
opened.
F
IGURE
17-22: An alert box displaying the value of the label element
To allow additional flexibility, several elements can receive notifications when a certain event
occurs. This notification process is called event propagation and is divided into two phases.
First, the event is sent to every ancestor element on the document hierarchy path, starting with
the top-level document and moving all the way down to the element that triggered the event
(the target). If any element above the target node has a registered capturing handler for the
event (see the Note that follows), the handler will be executed during this capturing phase.Any
event handler can prevent further event propagation by calling the
stopPropagation
method of its event parameter.
Event handlers defined using the element event attributes (such as onclick) are noncaptur-
ing. Further, as you will see in this section, you can use the addEventListener method to
dynamically define a capturing event handler.
The second part of the event propagation process is called the bubbling phase, and it is the
reverse of the capturing phase. During event bubbling, the event is sent to every ancestor of the
target element, starting with the parent of the target node and moving all the way up the ele-
ment hierarchy, ending with the top-level document node. Any event handler can prevent fur-
ther bubbling by calling the
stopPropagation method of its event parameter.
An example of the bubbling phase follows:
<box id=”top-box” onclick=”handleClick(event);”>
<box id=”inner-box” onclick=”handleClick(event);”>
<button id=”button-element”
label=”Test”
onclick=”handleClick(event);”/>
</box>
</box>
25_596500 ch17.qxd 6/30/05 3:14 PM Page 358
359
Chapter 17 — Creating Extensions
We defined the following element hierarchy:
top-box ➪ inner-box ➪ button-element
We attached the same event handler to all three elements. Let’s define our
handleClick
function:
function handleClick(event) {
dump(event.currentTarget.id + ‘\n’);
}
When the user clicks on the button, three lines will be printed on the console:
button-element
inner-box
top-box
We are witnessing the bubbling phase. First, the button’s event handler is called; then the one
attached to the inner box; and finally, the event handler defined on the top-level box.
To see the previous example in action, you can create the following XUL document and open it
in Firefox:
<?xml version=”1.0” encoding=”UTF-8”?>
<window align=”start”
xmlns=” /><script type=”application/x-javascript”>
<![CDATA[
function handleClick(event) {
dump(event.currentTarget.id + ‘\n’);
}
]]>
</script>
<box id=”top-box” onclick=”handleClick(event);”>
<box id=”inner-box” onclick=”handleClick(event);”>
<button id=”button-element”
label=”Test”
onclick=”handleClick(event);”/>
</box>
</box>
</window>
The currentTarget property contains the element that defined the executing event handler,
and the target property contains the element that triggered the event (the button, in our
example). If we used the target property in our last example, we would see the “button-
element” line printed three times.
25_596500 ch17.qxd 6/30/05 3:14 PM Page 359
360
Part VI — Creating Extensions and Themes
There is an additional way of registering event handlers. You can use the DOM
addEventListener method to attach an event handler to an element. This method is
more flexible because it allows you to attach event handlers dynamically, define more than one
handler for a given element, and define capturing events. Let’s continue our previous example
by attaching a capturing event handler to our
top-box element:
var topBoxElement = document.getElementById(‘top-box’);
topBoxElement.addEventListener(“click”, handleClick, true);
The third parameter of the addEventListener method specifies whether the attached event
handler will capture events during the capturing phase. We can attach an event handler by
using the
addEventListener function at any time — during the UI initialization, as a result
of some user action, and so on. After we attached the capturing event handler, pressing the
button produces the following output:
top-box
button-element
inner-box
top-box
As you can see, the first line is printed during the capturing phase, before the button itself
receives the event; all the other lines that are printed during the bubbling phase remained the
same, as in the previous example.
Figure 17-23 demonstrates the two phases of the event propagation process.
F
IGURE
17-23: The event propagation process
Some events have default actions associated with them. These actions, which are imple-
mented internally by the browser, can be cancelled from any event handler by calling the
preventDefault method of the event object passed to it as a parameter.
top-box
1 Capturing phase
capturing?
inner-box
button-element
2 Bubbling phase
Event target
capturing?
capturing?
25_596500 ch17.qxd 6/30/05 3:14 PM Page 360
361
Chapter 17 — Creating Extensions
Dialogs
In the previous sections, we saw a XUL document that defines an overlay, a portion of the user
interface that will be merged with another document. An overlay document has an
overlay
element at its root. Documents having a window element as their root define stand-alone, top-
level application windows, such as the Bookmarks Manager or the JavaScript Console.
Dialogs and windows have several things in common, but there are several conceptual differ-
ences between them:
Ⅲ Dialogs usually perform a temporary function, such as asking for a password, letting the
user change some aspect of the program, or displaying a message.
Ⅲ A dialog often has buttons that allow the user to close it. Many dialogs have an OK but-
ton that closes the dialog while accepting the user input and a Cancel button that closes
the dialog without performing any action.
Ⅲ Dialogs are typically smaller than the top-level application windows.
Ⅲ A dialog can be modal, meaning that the user cannot resume using the application until
the dialog is closed.
In XUL, a dialog is defined by creating a document having the
dialog element at its root.
An example of a simple dialog follows:
<?xml version=”1.0” encoding=”UTF-8”?>
<?xml-stylesheet href=”chrome://global/skin” type=”text/css”?>
<dialog xmlns=” />id=”test-dialog”
title=”Test Dialog”
buttons=”accept,cancel”
ondialogaccept=”return dialogOK();”
ondialogcancel=”return dialogCancel();”>
<script type=”application/x-javascript”><![CDATA[
function dialogOK() {
alert(“OK pressed”);
return true;
}
function dialogCancel() {
alert(“Cancel pressed”);
return true;
}
]]></script>
<label value=”Testing 1 2 3”/>
</dialog>
25_596500 ch17.qxd 6/30/05 3:14 PM Page 361
362
Part VI — Creating Extensions and Themes
Figure 17-24 shows the dialog we have created.
F
IGURE
17-24: A simple dialog
Let’s look at our dialog code more closely:
Ⅲ The
dialog element specifies that our XUL document is in fact a dialog.
■
The title attribute specifies the dialog title.
■
The buttons attribute specifies the comma-separated list of buttons that will
appear in the dialog. In our case, we want two buttons: OK and Cancel. Notice
that we specified only the wanted buttons and didn’t have to create the button ele-
ments. The buttons are created automatically, and their position and appearance
are determined by the user’s operating system conventions.
■
The ondialogaccept and ondialogcancel attributes define functions that
will be called when the user presses OK and Cancel, respectively.
Ⅲ The
script element defines our JavaScript code. Notice that while all our examples
until now demonstrated the use of external JavaScript files, you can have your scripts
embedded directly in the XUL document.
Ⅲ A single
label element is used to display a line of text. Obviously, real dialogs often
have more complex user interfaces.
Once our dialog implementation is ready, we can add it to our chrome package. Let’s name our
dialog file
testDialog.xul and add it to the siteleds package. We can now open it using the
window.openDialog method like so:
window.openDialog(“chrome://siteleds/content/testDialog.xul”,
“_blank”,
“chrome”);
The first parameter specifies the URL of the dialog XUL file; the second, the name of the
dialog. The third parameter specifies some optional flags — the
chrome flag means that the
document is a chrome window and doesn’t need to be wrapped by a browser component, like
an HTML document, for example. You can specify the
modal flag to make the opened dialog
modal.
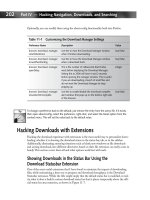
Preferences and Persistent Information
The preferences mechanism allows the browser to store user modifiable application settings.
For example, when a user changes the browser’s home page in the Options dialog, the new
value is saved as a user preference.
25_596500 ch17.qxd 6/30/05 3:14 PM Page 362
363
Chapter 17 — Creating Extensions
The preference name is typically a dot-delimited list of words. For example, the home page
user preference is
browser.startup.homepage. You can see each word in the preference
name as a branch. For example, all browsing-related preferences are located under the browser
main branch, all the preferences that are related to the browser startup are located under the
startup subbranch of the browser branch, and so on.This way, all the user preferences can be
viewed as a tree (see Figure 17-25). When a new component or an extension creates its own
preferences, it should give them a unique main branch name to avoid conflicts. For example,
our sample extension might save and use a preference named
siteleds.monitor.url.
There is a convenient user interface for examining, modifying, and creating preferences. You
can open it by typing about:config in your browser address bar.
There are three main preference data types: string, integer, and Boolean. Also, each preference
can have two optional values: default and current. When the user modifies the default preference
value or creates a new preference, the new value is saved as a current value and is highlighted in
bold in about:config. When the system tries to retrieve a preference value, it does the following:
1.
Checks whether the preference has a current value and, if so, returns it.
2.
If there is no current value, it checks whether there is a default value and, if there is, returns it.
3.
If neither current nor default value can be found, an exception is thrown.
If you are trying to retrieve a preference of a specific type, and a preference having a different
type is found, an exception is thrown. For example, if you are trying to retrieve the string value
of the user home page preference (browser.startup.homepage ) and a Boolean value is
found instead, the call will throw an exception.
There are several XPCOM components and interfaces for working with preferences. You can
specify the preference names using these interfaces in two ways. You can obtain an interface
to the root branch and specify the full preference names (such as
browser.startup.
homepage
). Alternatively, you can get an interface to a specific subbranch, which will allow
you to omit that branch prefix from the preference names. For example, if you are working with
the browser branch, you can use the
startup.homepage string to access the browser
.startup.homepage
preference.
Here’s how to get an interface to the root branch:
var prefs = Components.classes[“@mozilla.org/preferences-service;1”].
getService(Components.interfaces.nsIPrefBranch);
After we have the root branch, we can access a preference by specifying its full name:
var homePage = prefs.getCharPref(“browser.startup.homepage”);
If we want to work with a specific subbranch, we can use the getBranch method of the
nsIPrefService interface:
var prefs = Components.classes[“@mozilla.org/preferences-service;1”].
getService(Components.interfaces.nsIPrefService);
var prefsBranch = prefs.getBranch(“browser.”);
25_596500 ch17.qxd 6/30/05 3:14 PM Page 363
F
IGURE
17-25: Some of the preferences viewed as a tree
foreground-color
background-color
page
homepage
period
url
root
browser
siteleds
monitor
startup
display
25_596500 ch17.qxd 6/30/05 3:14 PM Page 364
365
Chapter 17 — Creating Extensions
Now we can omit the browser prefix from all the preference names:
var homePage = prefsBranch.getCharPref(“startup.homepage”);
To modify a preference or create a new one, you can use one of the setCharPref,
setBoolPref, or setIntPref methods (for string, Boolean, and integer preferences,
respectively). For example, the following changes the user’s home page preference
(
prefsBranch should contain a reference to the browser branch):
prefsBranch.setCharPref(“startup.homepage”, “ />To retrieve a preference value, you can use one of the getCharPref, getBoolPref,or
getIntPref methods.
As mentioned earlier, the methods that retrieve preference values can throw exceptions if the
preference is not found or has the wrong type. You can use the prefHasUserValue and
getPrefType methods of the nsIPrefBranch interface to make sure that the preference
exists and has the expected type or you can wrap your preference retrieval calls in try/catch
JavaScript blocks.
A related Mozilla mechanism allows saving the state of XUL elements across browser sessions.
For example, a dialog can remember its size, so if the user resizes it, the correct size will be
retained even after the browser is restarted. One way to accomplish this is to manually save the
current state of the various elements as user preferences. Mozilla has a persistence mechanism
that greatly simplifies this task. The following will make the size of a dialog persistent:
<dialog xmlns=” />id=”test-dialog”
title=”Test Dialog”
buttons=”accept,cancel”
ondialogaccept=”return dialogOK();”
ondialogcancel=”return dialogCancel();”
width=”400”
height=”200”
persist=”width height”>
We have added a new persist attribute to our dialog element and specified a space-
delimited list of element attributes that we want to be saved. Now, each time these attributes
change (the dialog is resized), their new values are saved by the browser. Next time the dialog
is displayed, the
width and height attributes will receive the saved values, rather than the
initial ones.
You can use the data persistence mechanism on any XUL element that has an
id attribute.
The mechanism is typically used to save element visibility, position, size, and so on, but you can
make any attribute persistent, and any number of element attributes can be saved using this
technique.
Localized Strings in JavaScript
As mentioned in the previous sections, all the strings that are displayed to the user should be
defined in a separate string table file, which will allow easy translation of the user interface. You
saw how this can be accomplished in XUL files using XML entities and DTD files.
25_596500 ch17.qxd 6/30/05 3:14 PM Page 365
366
Part VI — Creating Extensions and Themes
Often, element labels and other displayed strings aren’t static; they can change during the pro-
gram execution. For example, a status bar can display many different messages, and the text of
these messages is typically set by a JavaScript code. A mechanism similar to XML entities is
needed so the messages and strings that originate in JavaScript can be easily localized.
JavaScript isn’t an XML language. Unlike XUL, it cannot use XML entities to specify string
variables. Mozilla has an additional mechanism called property files that allows having variable
localizable strings in JavaScript. Let’s extend our SiteLeds example to include this mechanism.
First, we define a property file that is located in the same directory as our
siteledsOverlay.dtd
file and contains all the UI strings that need to be accessed from JavaScript. The contents of
the siteledsOverlay.properties file are as follows:
pageModified=The monitored page was modified.
pageError=There was an error retrieving the monitored page.
Now we include the property file we have created in our XUL document
(
siteledsOverlay.xul) using a stringbundle element:
.
.
.
<!DOCTYPE overlay SYSTEM “chrome://siteleds/locale/siteledsOverlay.dtd”>
<overlay id=”siteleds-overlay”
xmlns=” /><script type=”application/x-javascript”
src=”chrome://siteleds/content/siteledsOverlay.js”/>
<stringbundle id=”siteleds-strings”
src=”chrome://siteleds/locale/siteledsOverlay.properties”/>
.
.
.
Finally, we can get a specific string from our JavaScript code by finding the stringbundle
element and calling its getString method:
var stringBundle = document.getElementById(“siteleds-strings”);
var pageErrorString = stringBundle.getString(“pageError”);
alert(pageErrorString);
To translate the user interface, you will need to translate all the DTD and property files.
Firefox Customization Options
This section shows some additional examples of how Firefox can be customized and enhanced
using the extensions mechanism.
Adding Main Menu and Context Menu Entries
An extension can add menu entries to the main Firefox menu and to the context menu of the
browser content area (the place where the web pages are displayed).
25_596500 ch17.qxd 6/30/05 3:14 PM Page 366