Wile Adobe Creative 5 suite Design Premium aio for dummies phần 6 potx
Bạn đang xem bản rút gọn của tài liệu. Xem và tải ngay bản đầy đủ của tài liệu tại đây (2.54 MB, 110 trang )
456
Book IV: Photoshop CS5
43_607466-bk04ch06.indd 45643_607466-bk04ch06.indd 456 5/25/10 8:48 AM5/25/10 8:48 AM
Chapter 7: Creating a Good Image
In This Chapter
✓ Understanding the histogram
✓ Getting ready to correct an image
✓ Making a good tone curve
✓ Editing adjustment layers
✓ Testing your printer
C
onsidering all the incredible things you can do in Photoshop, you can
easily forget the basics. Yes, you can create incredible compositions
with special effects, but people who look greenish detract from the image.
Get in the habit of building good, clean images before heading into the artsy
filters and fun things. Color correction isn’t complicated and, if it’s done
properly, produces magical results in your images. In this chapter, you see
how to use the values you read in the Info panel and use the Curves panel to
produce quality image corrections.
Reading a Histogram
Before making adjustments, look at the image’s histogram, which displays an
image’s tonal values, to evaluate whether the image has sufficient detail to
produce a high-quality image. In Photoshop CS5, choose Window➪
Histogram to display the Histogram panel.
The greater the range of values in the histogram, the greater the detail. Poor
images without much information can be difficult, if not impossible, to cor-
rect. The Histogram panel also displays the overall distribution of shadows,
midtones, and highlights to help you determine which tonal corrections are
needed.
Figure 7-1 shows a good, full histogram that indicates a smooth transition
from one shade to another in the image. Figure 7-2 shows that when a his-
togram is spread out and has gaps in it, the image is jumping too quickly
from one shade to another, producing a posterized effect. Posterization is an
effect that reduces tonal values to a limited amount, creating a more defined
range of values from one shade to another. It’s great if you want it but yucky
if you want a smooth tonal change from one shadow to another.
44_607466-bk04ch07.indd 45744_607466-bk04ch07.indd 457 5/25/10 8:48 AM5/25/10 8:48 AM
458
Reading a Histogram
Figure 7-1:
A histogram
showing
smooth
transitions
from one
color to
another.
Figure 7-2:
A histogram
showing
a lack of
smoothness
in the
gradation of
color.
So how do you create a good histogram? If you’re scanning, make sure
that your scanner is set for the maximum number of colors. Scanning at 16
shades of gray gives you 16 lines in your histogram — not good.
If you have a bad histogram, we recommend that you rescan or reshoot
the image. If you have a good histogram to start with, keep it that way
by not messing around with multiple tone correction tools. Most pro-
fessionals use the Curves feature — and that’s it. Curves (choose Image➪
Adjustments➪Curves), if used properly, do all the adjusting of levels (bright-
ness and contrast) and color balance, all in one step. You can read more
about curves in the section “Creating a Good Tone Curve,” later in this chapter.
Figure 7-3 shows what happens to a perfectly good histogram when someone
gets too zealous and uses the entire plethora of color correction controls in
Photoshop. Just because the controls are there doesn’t mean that you have
to use them.
44_607466-bk04ch07.indd 45844_607466-bk04ch07.indd 458 5/25/10 8:48 AM5/25/10 8:48 AM
Book IV
Chapter 7
Creating a
Good Image
459
Reading a Histogram
Figure 7-3:
Tonal
information
is broken up.
If a Warning icon appears while you’re making adjustments, double-click
anywhere on the histogram to refresh the display.
Breaking into key types
Don’t panic if your histogram is smashed all the way to the left or right. The
bars of the histogram represent tonal values. You can break down the types
of images, based on their values, into three key types:
✦ High key: An extremely light-colored image, such as the image shown
in Figure 7-4. Information is pushed toward the right in the histogram.
Color correction has to be handled a little differently for these images to
keep the light appearance to them.
Figure 7-4:
A high key
image is a
light image.
✦ Low key: An extremely dark image, such as the one shown in Figure 7-5.
Information is pushed to the left in the histogram. This type of image
is difficult to scan on low-end scanners because the dark areas tend to
blend together with little definition.
44_607466-bk04ch07.indd 45944_607466-bk04ch07.indd 459 5/25/10 8:48 AM5/25/10 8:48 AM
460
Reading a Histogram
Figure 7-5:
A low key
image is a
dark image.
✦ Mid key: A typical image with a full range of shades, such as the image
shown in Figure 7-6. These images are the most common and easiest to
work with. In this chapter, we deal with images that are considered
mid key.
Figure 7-6:
A typical
image with
a full range
of values is
a mid key
image.
Setting up the correction
To produce the best possible image, try to avoid correcting in CMYK (Cyan,
Magenta, Yellow, Black) mode. If your images are typically in RGB (Red,
Green, Blue) or LAB mode (L for lightness, and A and B for the color-opponent
dimensions), keep them in that mode throughout the process. Convert them
to CMYK only when you’re finished manipulating the image.
44_607466-bk04ch07.indd 46044_607466-bk04ch07.indd 460 5/25/10 8:48 AM5/25/10 8:48 AM
Book IV
Chapter 7
Creating a
Good Image
461
Creating a Good Tone Curve
Don’t forget! Press Ctrl+Y (Windows) or Ô+Y (Mac) to toggle on and off the
CMYK preview so that you can see what your image will look like in CMYK
mode without converting it.
Set up these items before starting any color correction:
1. Select the Eyedropper tool (the keyboard shortcut is I); on the Options
bar, change the sample size from Point Sample to 3 by 3 Average in
the Sample Size drop-down list.
This setting gives you more accurate readings.
2. If the Histogram panel isn’t already visible, choose Window➪
Histogram.
3. If the Info panel isn’t already visible, choose Window➪Info to show
the Info panel so that you can check values.
4. Make sure that your color settings are correct.
If you’re not sure how to check or set up color settings, see Chapter 3 of
this minibook.
Creating a Good Tone Curve
A tone curve represents the density of an image. To produce the best image,
you must first find the highlight and shadow points in it. An image created in
less-than-perfect lighting conditions may be washed out or have odd color
casts. See Figure 7-7 for an example of an image with no set highlight and
shadow. Check out Figure 7-8 to see an image that went through the process
of setting a highlight and shadow.
Figure 7-7:
The image
is murky
before
defining a
highlight
and
shadow.
44_607466-bk04ch07.indd 46144_607466-bk04ch07.indd 461 5/25/10 8:48 AM5/25/10 8:48 AM
462
Creating a Good Tone Curve
Figure 7-8:
The tonal
values are
opened
after
highlight
and shadow
have been
set.
To make the process of creating a good tone curve more manageable, we’ve
broken the process into four parts:
✦ Find the highlight and shadow
✦ Set the highlight and shadow values
✦ Adjust the midtone
✦ Find a neutral
Even though each part has its own set of steps, you must complete all four
parts to accomplish the task of creating a good tone curve (unless you’re
working with grayscale images, in which case you can skip the neutral part).
In this example, an adjustment layer is used for the curve adjustments.
The benefit is that you can turn off the visibility of the adjustment later or
double-click the adjustment layer thumbnail to make ongoing edits without
destroying your image.
Finding the highlight and the shadow
In the noncomputer world, you’d spend a fair amount of time trying to locate
the lightest and darkest parts of an image. Fortunately, you can cheat in
Photoshop by using some features in the Curves panel. Here’s how to access
the panel:
1. With an image worthy of adjustment — one that isn’t perfect already —
choose Window➪Layer (if the Layers panel isn’t already open).
2. Click and hold the Create New Fill or Adjustment Layer button at the
bottom of the Layers panel and select Curves.
The Adjustments panel appears with the Curves panel active, as shown
in Figure 7-9.
44_607466-bk04ch07.indd 46244_607466-bk04ch07.indd 462 5/25/10 8:48 AM5/25/10 8:48 AM
Book IV
Chapter 7
Creating a
Good Image
463
Creating a Good Tone Curve
Figure 7-9:
Access
the Curves
panel with
the Create
New Fill or
Adjustment
Layer
button.
Notice the grayed-out histogram behind the image in the Curves panel. The
histogram helps you determine where you need to adjust the image’s curve.
If you’re correcting in RGB (as you should be), the tone curve may be the
opposite of what you expect. Instead of light to dark displaying as you
expect, RGB displays dark to light. Think about it: RGB is generated with
light, and no RGB means that there’s no light and you therefore have black.
Turn on all RGB full force and you create white. Try pointing three filtered
lights — one red, one green, and one blue. The three lights pointed in one
direction create white.
If working with RGB confuses you, simply select Curves Display Options
from the panel menu in the upper right corner of the Adjustments panel.
When the Curves Display dialog box appears, as shown in Figure 7-10, select
the Pigment/Ink % radio button and click OK.
Figure 7-10:
View the
curve using
light or
pigment.
If you need a little more space in the Curves panel, click the Expanded View
button at the bottom of the Curves panel. The panel enlarges.
44_607466-bk04ch07.indd 46344_607466-bk04ch07.indd 463 5/25/10 8:48 AM5/25/10 8:48 AM
464
Creating a Good Tone Curve
Note that in the Curves panel, you see a Preset drop-down list that offers
quick fixes using standard curves for certain corrections. These settings are
great for quick fixes, but for the best image, create a custom curve.
The first thing you need to do in the Curves panel is determine the lightest
and darkest parts of the image — referred to as locating the highlight and
shadow:
1. Before starting the correction, click the Set Black Point eyedropper
once (labeled in Figure 7-11).
2. Hold down the Alt (Windows) or Option (Mac) key and click the
shadow input slider (labeled in Figure 7-11).
If you did not change your Curve Display Options to display Pigment/
Ink%, your highlight and shadow sliders will be opposite of what
appears in Figure 7-11.
Figure 7-11:
The critical
tools on
the Curves
panel.
Set Black Point
Set Gray Point
Set White Point
Highlight slider Shadow slider
When you Alt-click (Windows) or Option-click (Mac), the clipping pre-
view turns on, revealing the darkest area of the image.
If you don’t immediately see a dark area in the clipping preview, you can
drag the shadow input slider to the left while holding down the Alt key
or Option key. Note where the darkest area of the image appears.
3. Hold down the Shift key and click directly on the image in that dark
region.
This step drops a color sampler on the image that helps you reference
that point later.
44_607466-bk04ch07.indd 46444_607466-bk04ch07.indd 464 5/25/10 8:48 AM5/25/10 8:48 AM
Book IV
Chapter 7
Creating a
Good Image
465
Creating a Good Tone Curve
4. Repeat Steps 1 through 3 with the highlight input slider. Select the Set
White Point eyedropper (labeled in Figure 7-11) in the Curves panel.
5. Hold down the Alt key or Option key and click the highlight input
slider.
Again, you can drag the slider toward the right if the lightest point
doesn’t immediately show up.
When you locate the lightest point, as indicated by the lightest point in
the clipping preview, you can Shift-click to drop a second color sampler,
as shown in Figure 7-12.
Figure 7-12:
You can
Alt-click or
Option+
Shift-click to
drop a color
sampler.
Setting the highlight and shadow values
After you determine the lightest and darkest points in an image, you can set
their values. Follow these steps:
1. To activate the eyedropper tools, select the Click and Drag button,
shown in Figure 7-13.
2. Double-click the Set White Point eyedropper, the white eyedropper on
the left side of the Curves panel.
When you double-click the Set White Point eyedropper, the Color Picker
dialog box appears.
3. Enter a generic value for the lightest point in your image: Type 5 in
the Cyan text box, type 3 in the Magenta text box, type 3 in the Yellow
text box, leave the Black text box at 0 (zero), and then click OK.
The Black value helps to correct most images for print and online.
44_607466-bk04ch07.indd 46544_607466-bk04ch07.indd 465 5/25/10 8:48 AM5/25/10 8:48 AM
466
Creating a Good Tone Curve
Figure 7-13:
Turn on the
Click and
Drag button.
4. When you receive an alert message asking if you want to save the new
target colors as defaults, click Yes.
5. With the Set White Point eyedropper still selected, click the color
sampler you dropped on the image, indicating the lightest point in the
image.
Now, set the shadow point.
6. Double-click the Set Black Point eyedropper.
The Color Picker dialog box appears.
7. Type 65 in the Cyan text box, type 53 in the Magenta text box, type 51
in the Yellow text box, type 95 into the Black text box, and then
click OK.
As with the highlight value, the Black value is a generic value that works
for most print and online images.
8. With the Set Black Point eyedropper still selected, click the color
sampler you dropped on the image, indicating the darkest point in the
image.
Adjusting the midtone
You may have heard the statement, “Open up the midtones.” This phrase
essentially means that you’re lightening the midtonal values of an image. In
many cases, opening up the midtones is necessary to add contrast and bring
out detail in an image.
To adjust the midtones, follow these steps:
1. In the Curves panel, click the middle of the curve ramp to create an
anchor point; drag up slightly.
44_607466-bk04ch07.indd 46644_607466-bk04ch07.indd 466 5/25/10 8:48 AM5/25/10 8:48 AM
Book IV
Chapter 7
Creating a
Good Image
467
Creating a Good Tone Curve
The image lightens. (If you’re in Pigment/Ink % mode, drag down to
lighten the image.) Move only a reasonable amount and be careful to
observe what’s happening in the Histogram panel (which you should
always have open when making color corrections).
Because you set highlight and shadow (see the preceding section) and
are now making a midtone correction, you see the bars in the histogram
spreading out.
2. To adjust the three-quarter tones (the shades around 75 percent), click
halfway between the bottom of the curve ramp and the midpoint to
set an anchor point.
Use the grid in the Curves panel to find it easily. (In Pigment/Ink %, the
three-quarter point is in the upper section of the color ramp.) Adjust the
three-quarter area of the tone curve up or down slightly to create con-
trast in the image. Again, keep an eye on your histogram!
If you’re working on a grayscale image, the tonal correction is done.
If you’re working on a color image, keep the Curves panel open for the
final steps, which are outlined in the next section.
Finding a neutral
The last steps in creating a tone curve apply only if you’re working on a
color image. The key to understanding color is knowing that equal amounts
of color create gray. By positioning the mouse cursor over gray areas in an
image and reading the values in the Info panel, you can determine which
colors you need to adjust.
1. With the Curves panel open, position it so that you can see the Info
panel.
If the Info panel is buried under another panel or a dialog box, choose
Window➪Info to bring it to the front.
2. Position the cursor over an image and, in the Info panel, look for the
RGB values in the upper left section.
You see color values and then forward slashes and more color values.
The numbers before the slash indicate the values in the image before
you opened the Curves panel; the numbers after the slash show the
values now that you’ve made changes in the Curves panel. Pay attention
to the values after the slashes.
3. Position the cursor over something gray in your image.
It can be a shadow on a white shirt, a countertop, a road — anything
that’s a shade of gray. Look at the Info panel. If your image is perfectly
color balanced, the RGB values following the forward slashes should all
be the same.
44_607466-bk04ch07.indd 46744_607466-bk04ch07.indd 467 5/25/10 8:48 AM5/25/10 8:48 AM
468
Editing an Adjustment Layer
4. If the color isn’t balanced, click the Set Gray Point eyedropper in the
Curves panel and click the neutral or gray area of the image.
The middle eyedropper (Set Gray Point) is a handy way of bringing the
location you click closer together in RGB values, thereby balancing the
colors.
Curves can be as complex or as simple as you make them. As you gain more
confidence in using them, you can check neutrals throughout an image to
ensure that all unwanted color casts are eliminated. You can even individu-
ally adjust each color’s curve by selecting it from the Channel drop-down list
in the Curves panel.
When you’re finished with color correction, using the Unsharp Mask filter on
your image is a good idea. Chapter 6 of this minibook shows you how to use
this filter.
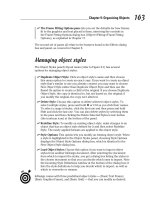
Editing an Adjustment Layer
You may make a curve adjustment only to discover that some areas of the
image are still too dark or too light. Because you used an adjustment layer,
you can turn off the correction or change it repeatedly with no degradation
to the quality of the image.
Here are the steps to take if you still have additional adjustments to make to
an image, such as lightening or darkening other parts of the image:
1. Select the area of the image that needs adjustments.
See Chapter 4 of this minibook for a refresher on how to make selections
in Photoshop.
2. Choose Select➪Modify➪Feather to soften the selection.
The Feather dialog box appears.
3. Enter a value into the Feather dialog box.
If you’re not sure what value will work best, enter 15 in the Feather
Radius text field and click OK.
You can also click the Refine Edge button in the Options panel (when
you have a selection tool active) to preview the feather amount.
4. If the Layers panel isn’t visible, choose Windows➪Layers; click and
hold the Create New Fill or Adjustment Layer icon and select Curves.
5. In the Curves panel, click the middle of the curve ramp to create an
anchor point; drag up or down to lighten or darken the selected area.
44_607466-bk04ch07.indd 46844_607466-bk04ch07.indd 468 5/25/10 8:48 AM5/25/10 8:48 AM
Book IV
Chapter 7
Creating a
Good Image
469
Testing a Printer
Notice in the Layers panel (see Figure 7-14) that the adjustment layer,
Curves 2 by default, has a mask to the right of it. This mask was auto-
matically created from your selection. The selected area is white;
unselected areas are black.
Figure 7-14:
Paint on the
adjustment
layer mask.
6. With the adjustment layer selected in the Layers panel, use the Brush
tool to paint white to apply the correction to other areas of the image;
paint with black to exclude areas from the correction.
You can even change the opacity with the Brush tool in the Options bar
at the top to apply only some of the correction!
Testing a Printer
If you go to all the trouble of making color corrections to images and you
still see printed images that look hot pink, it may not be your fault. Test your
printer by following these steps:
1. Create a neutral gray out of equal RGB values (double-click the Fill
Color swatch in the Tools panel).
2. Create a shape, using neutral gray as the fill color.
For example, you can use the Ellipse tool to create a circle or oval.
3. Choose File➪Print and click OK to print the image from a color
printer.
If you’re seeing heavy color casts, adjust the printer; cleaning or replacing
the ink cartridge may fix the problem. Check out Chapter 10 of this minibook
for more about printing Photoshop files.
44_607466-bk04ch07.indd 46944_607466-bk04ch07.indd 469 5/25/10 8:48 AM5/25/10 8:48 AM
470
Book IV: Photoshop CS5
44_607466-bk04ch07.indd 47044_607466-bk04ch07.indd 470 5/25/10 8:48 AM5/25/10 8:48 AM
Chapter 8: Working with Painting
and Retouching Tools
In This Chapter
✓ Working in the Swatches panel
✓ Getting to know foreground and background colors
✓ Introducing painting and retouching tools
✓ Using the new content-aware feature
✓ Discovering blending modes
✓ Saving presets for tools
T
his chapter shows you how to use the painting and retouching tools in
Photoshop. If you’re unsure whether the painting you’re about to create
will look good, create a new layer and paint on it. (See Chapter 9 of this mini-
book to find out how to create and use layers.) That way, you can delete the
layer by dragging it to the Trash Can (at the bottom of the Layers panel) if
you decide that you don’t like what you’ve done. Don’t forget to make the
Eraser tool your friend! You can also repair painting or retouching mistakes
by Alt+dragging (Windows) or Option+dragging (Mac) with the Eraser tool
selected to erase the last version saved or the present history state.
Have fun and be creative! Because Photoshop is pixel based, you can create
incredible imagery with the painting tools. Smooth gradations from one
color to the next, integrated with blending modes and transparency, can
lead from super-artsy to super-realistic effects. In this chapter, you discover
fundamental painting concepts, and we show you how to use retouching
tools to eliminate wrinkles, blemishes, and scratches. Don’t you wish you
could do that in real life?
Using the Swatches Panel
Use the Swatches panel to store and retrieve frequently used colors. The
Swatches panel lets you quickly select colors and gives you access to many
other color options. By using the panel menu, where you see the cursor in
Figure 8-1, you can select from a multitude of different color schemes, such
as Pantone or Web-safe color sets. These color systems are converted to
whatever color mode in which you’re working.
45_607466-bk04ch08.indd 47145_607466-bk04ch08.indd 471 5/25/10 8:49 AM5/25/10 8:49 AM
472
Choosing Foreground and Background Colors
Figure 8-1:
Click the
panel menu
to access
additional
color
options.
To sample and store a color for later use, follow these steps:
1. To sample a color from an image, select the Eyedropper tool in the
Tools panel and click a color in the image.
Alternatively, you can use any of the paint tools (the Brush tool, for
example) and Alt-click (Windows) or Option-click (Mac).
The color you click becomes the foreground color.
2. If the Swatches panel isn’t already open, choose Window➪Swatches.
3. Store the color in the Swatches panel by clicking the New Swatch
button at the bottom of the Swatches panel.
Anytime you want to use that color again, simply click it in the Swatches
panel to make it the foreground color.
Choosing Foreground and Background Colors
At the bottom of the Tools panel reside the foreground and background
color swatches. The foreground color is the color you apply when using any
of the painting tools. The background color is the color you see if you erase
or delete pixels from the image.
Choose a foreground or background color by clicking the swatch, which
opens the Color Picker dialog box, shown in Figure 8-2. To use the Color
Picker, you can either enter values in the text fields on the right or slide the
hue slider.
Pick the hue (color) you want to start with and then click in the color panel
to the left to choose the amount of light and saturation (grayness or bright-
ness) you want in the color. Select the Only Web Colors check box to choose
one of the 216 colors in the Web-safe color palette. The hexadecimal value
used in HTML documents appears in the text field in the lower right corner
of the Color Picker.
To quickly save a color, click the Add to Swatches button directly in the
Color Picker.
45_607466-bk04ch08.indd 47245_607466-bk04ch08.indd 472 5/25/10 8:49 AM5/25/10 8:49 AM
Book IV
Chapter 8
Working with
Painting and
Retouching Tools
473
The Painting and Retouching Tools
Figure 8-2:
Use the
Color Picker
or enter
numeric
values to
select color
in the color
panel.
Hue slider
The Painting and Retouching Tools
Grouped together in the Tools panel are the tools used for painting and
retouching. The arrow in the lower right area of a tool icon indicates that
the tool has more related hidden tools; simply click and hold the tool icon
to see additional painting and retouching tools. In this chapter, we show you
how to use the Brush, Clone Stamp, Eraser, Gradient, Healing Brush, History
Brush, Patch, Red Eye, and Spot Healing Brush tools. You also discover ways
to fill shapes with colors and patterns.
Changing the brush
As you click to select different painting tools, note the Brush menu (second
from the left) on the Options bar, as shown in Figure 8-3. Click the arrow
to open the Brushes Preset picker. You can use the Master Diameter slider
to make the brush size larger or smaller and to change the hardness of the
brush.
Figure 8-3:
The Brushes
Preset
picker.
45_607466-bk04ch08.indd 47345_607466-bk04ch08.indd 473 5/25/10 8:49 AM5/25/10 8:49 AM
474
The Painting and Retouching Tools
The hardness refers to the “fuzziness” of the edges; a softer brush is more
feathered and soft around the edges, whereas a harder edge is more definite
(see Figure 8-4).
Figure 8-4:
The lines on
the left have
a soft edge
(left) as
compared
to the lines
on the right,
which have
a hard-
edged brush
stroke.
If you don’t feel like accessing the Brushes Preset picker every time you
want to make a change, press the right bracket (]) several times to make the
brush diameter larger or press the left bracket ([) to make the brush diam-
eter smaller. Press Shift+] to make the brush harder or Shift+[ to make the
brush softer.
Choose Window➪Brushes to see a list of brush presets, plus more brush
options you can use to create custom brushes. You can also choose other
brush libraries from the panel menu. When you select an additional library,
a dialog box appears, asking whether you want to replace the current
brushes with the brushes in the selected library. Click the Append button to
keep existing brushes and add the library to the list, or click OK to replace
existing brushes.
Access the Brushes Preset picker while you’re painting by right-clicking
(Windows) or Control-clicking (Mac) anywhere in the image area. Double-
click a brush to select it; press Esc to hide the Brushes Preset picker.
The Spot Healing Brush tool and
Content-Aware feature
The Spot Healing Brush tool was a great tool to begin with, but now, with the
new Content-Aware feature, it’s even better. No matter what level of
Photoshop user you are, you will appreciate the magic in this tool option.
45_607466-bk04ch08.indd 47445_607466-bk04ch08.indd 474 5/25/10 8:49 AM5/25/10 8:49 AM
Book IV
Chapter 8
Working with
Painting and
Retouching Tools
475
The Painting and Retouching Tools
In its default settings, the Spot Healing Brush tool quickly removes blem-
ishes and other imperfections in images. Click a blemish and watch it paint
matching texture, lighting, transparency, and shading to the pixels being
healed. The Spot Healing Brush tool doesn’t require you to specify a sample
spot — it automatically samples from around the retouched area.
Now take this concept a step further by checking the Content-Aware option
on the Options bar. The concept is the same, but if you look at Figure 8-5,
you can see that painting with the Spot Healing Brush sets into action an
incredible number of calculations that attempt to render pixels similar in
detail to its surroundings.
Figure 8-5:
Using
the Spot
Healing
Brush tool
with the
Content-
Aware
option
enabled.
Does this work every time? Of course not. Does it work often enough to save
you hours of work? Yes!
45_607466-bk04ch08.indd 47545_607466-bk04ch08.indd 475 5/25/10 8:49 AM5/25/10 8:49 AM
476
The Painting and Retouching Tools
You can also take advantage of the Content-Aware feature by using the Fill
feature. Simply follow these steps:
1. Select the area to be replaced by the new content.
2. Choose Edit➪Fill and, in the Fill dialog box, select Content-Aware
from the Use drop-down menu, shown in Figure 8-6.
The content is replaced.
Figure 8-6:
Use the
Content-
Aware
feature
in the Fill
dialog box.
The Healing Brush tool
You can use the Healing Brush tool for repairs, such as eliminating scratches
and dust from scanned images. The difference between the Spot Healing
Brush tool and the Healing Brush tool is that a sample spot is required
before applying the Healing Brush. Follow these steps to use this tool:
1. Select the Healing Brush tool in the Tools panel (it’s a hidden tool of
the Spot Healing Brush tool).
2. Find an area in the image that looks good and then Alt-click
(Windows) or Option-click (Mac) to sample that area.
For example, if you want to eliminate wrinkles on a face, choose a wrinkle-
free area of skin near the wrinkle. (Try to choose an area relatively close
in skin tone.)
3. Position the mouse cursor over the area to be repaired and start
painting.
The Healing Brush tool goes into action, blending and softening to
create a realistic repair of the area.
4. Repeat Steps 2 and 3 as necessary to repair the blemish, wrinkles, or
scratches.
45_607466-bk04ch08.indd 47645_607466-bk04ch08.indd 476 5/25/10 8:49 AM5/25/10 8:49 AM
Book IV
Chapter 8
Working with
Painting and
Retouching Tools
477
The Painting and Retouching Tools
The Patch tool
Hidden behind the Healing Brush tool in the Tools panel is the Patch tool.
Use it to repair larger areas, such as a big scratch or a large area of skin, by
following these steps:
1. Click and hold the Healing Brush tool to select the Patch tool; on the
Options bar, select the Destination radio button.
You can patch either the source area or the destination — it’s up to
you. We recommend dragging a good source over the area that needs
repaired.
2. With the Patch tool still selected, drag to create a marquee around the
source you want to use as the patch.
The source is an unscratched or wrinkle-free area.
3. After you create the marquee, drag the selected source area to the
destination to be repaired.
The Patch tool clones the selected source area while you drag it to the
destination (the scratched area); when you release the mouse button,
the tool blends in the source selection and repairs the scratched area!
Make the patch look better by choosing Edit➪Fade Patch Selection imme-
diately after you apply the patch. Adjust the opacity until no telltale signs
show that you made a change.
The Red Eye tool
So you finally got the group together and shot the perfect image, but red eye
took over! Red eye is caused by a reflection of the camera’s flash in the
retina of your photo’s subject or subjects. You see this effect more often
when taking pictures in a dark room, because the subject’s irises are wide
open. If you can, use your camera’s red-eye-reduction feature. Or, use a sep-
arate flash unit that you can mount on the camera farther from the camera’s
lens.
You’ll love the fact that red eye is extremely easy to fix in Photoshop. Just
follow these steps:
1. Select the Red Eye tool (hidden behind the Spot Healing Brush tool).
2. Click and drag to surround the red-eye area.
You should see a change immediately, but if you need to make adjust-
ments to the size or the darkness amount, you can change options on
the Options bar.
45_607466-bk04ch08.indd 47745_607466-bk04ch08.indd 477 5/25/10 8:49 AM5/25/10 8:49 AM
478
The Painting and Retouching Tools
The Brush tool
Painting with the Brush tool in Photoshop is much like painting in the real
world. What you should know are all the nifty keyboard commands you can
use to be much more productive when painting. These shortcuts are truly
outstanding, so make sure that you try them while you read about them. By
the way, the keyboard commands you see in Table 8-1 work on all the paint-
ing tools.
Table 8-1 Brush Keyboard Shortcuts
Task Windows Mac
Choose the Brush tool B B
Increase the brush size ] ]
Decrease the brush size [ [
Harden the brush Shift+] Shift+]
Soften the brush Shift+[ Shift+[
Sample the color Alt-click Option-click
Switch the foreground and
background colors
XX
Change the opacity by a
given percentage
Type a number
between 1 and 100
Type a number between
1 and 100
If you’re really into brushes, you have lots of useful options available in the
Brushes panel (choose Window➪Brushes to open it), as shown in Figure 8-7.
Figure 8-7:
Additional
options are
available for
painting in
the Brushes
panel.
45_607466-bk04ch08.indd 47845_607466-bk04ch08.indd 478 5/25/10 8:49 AM5/25/10 8:49 AM
Book IV
Chapter 8
Working with
Painting and
Retouching Tools
479
The Painting and Retouching Tools
You have several attribute choices, most of which have dynamic controls in
the menu options that allow you to vary brush characteristics by tilting or
applying more pressure to a stylus pen (if you’re using a pressure-sensitive
drawing tablet), among other things.
A warning sign indicates that you don’t have the appropriate device
attached to use the selected feature, such as a pressure-sensitive drawing
tablet.
The following options are available in the Brushes panel:
✦ Brush Tip Shape: Select from these standard controls for determining
brush dimensions and spacing.
✦ Shape Dynamics: Change the size of the brush as you paint.
✦ Scattering: Scatter the brush strokes and control the brush tip count.
✦ Texture: Choose from preexisting patterns or your own.
Create a pattern by selecting an image area with the Rectangular
Marquee tool. Choose Edit➪Define Pattern, name the pattern, and then
click OK. The pattern is now available in the Brushes panel’s Texture
choices.
✦ Dual Brush: Use two brushes at the same time.
✦ Color Dynamics: Change the color as you paint.
✦ Transfer: Adjusts the dynamics for the build-up of the paint.
✦ Noise: Adds a grainy texture to the brush stroke.
✦ Wet Edges: Makes the brush stroke appear to be wet by creating a
heavier amount of color on the edges of the brush strokes.
✦ Airbrush: Gives airbrush features to the Brush tools. Enable the
Airbrush feature by clicking the Airbrush button and adjusting the pres-
sure and flow on the Options bar.
If you click and hold the Brush tool on the image area, the paint stops
spreading. Turn on the Airbrush feature and notice that when you click
and hold, the paint keeps spreading, just like using a can of spray paint.
You can use the Flow slider on the Options bar to control the pressure.
✦ Smoothing: Smoothes the path created with the mouse.
✦ Protect Texture: Preserves the texture pattern when applying brush
presets.
In addition to the preceding options, you can adjust the jitter of the brush.
The jitter specifies the randomness of the brush attribute. At 0 percent, an
element doesn’t change over the course of a stroke; at 100 percent, a stroke
totally varies from one attribute to another.
45_607466-bk04ch08.indd 47945_607466-bk04ch08.indd 479 5/25/10 8:49 AM5/25/10 8:49 AM
480
The Painting and Retouching Tools
After reviewing all the available brush options, you may want to start think-
ing about how you’ll apply the same attributes later. Saving the Brush tool
attributes is important as you increase your skill level.
The Clone Stamp tool
The Clone Stamp tool is used for pixel-to-pixel cloning. The Clone Stamp tool
is different from the Healing Brush tool in that it does no automatic blending
into the target area. You can use the Clone Stamp tool for removing a prod-
uct name from an image, replacing a telephone wire that’s crossing in front
of a building, or duplicating an item.
Here’s how to use the Clone Stamp tool:
1. With the Clone Stamp tool selected, position the cursor over the area
you want to clone and then Alt-click (Windows) or Option-click (Mac)
to define the clone source.
2. Position the cursor over the area where you want to paint the cloned
pixels and then start painting.
Note the cross hair at the original sampled area, as shown in Figure 8-8.
While you’re painting, the cross hair follows the pixels you’re cloning.
Figure 8-8:
A cross
hair over
the source
shows
what you’re
cloning.
When using the Clone Stamp tool for touching up images, you should resam-
ple many times so as to not leave a seam where you replaced pixels. A good
clone stamper Alt-clicks (Windows) or Option-clicks (Mac) and paints many
times over until the retouching is complete.
Choose Window➪Clone Source to open the Clone Source panel, shown in
Figure 8-9. With this handy little panel, you can save multiple clone sources
to refer to while working. Even better, you can scale, preview, and rotate
your clone source — before you start cloning.
45_607466-bk04ch08.indd 48045_607466-bk04ch08.indd 480 5/25/10 8:49 AM5/25/10 8:49 AM