visual Adobe Photoshop CS3 Top 100 Simplified Tips & and trick phần 2 pot
Bạn đang xem bản rút gọn của tài liệu. Xem và tải ngay bản đầy đủ của tài liệu tại đây (4.87 MB, 26 trang )
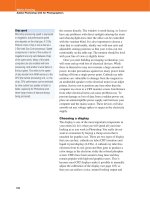
1 Open an image.
2 Click the Actions button to open
the Actions palette.
3 Click the Create New Action
button.
l
Alternatively, you can click here
and select New Action.
The New Action dialog box
appears.
CREATE A CUSTOM ACTION
to increase your efficiency
Performing repeated steps is boring and
time-consuming. That is why Adobe created actions
and the Actions palette. An
action is a series of
commands that you can apply to an image with one
click of the mouse. Unlike a keyboard shortcut, which
can only invoke a command, an action can open a
command, apply changes to an image, step through
another command, apply it, and even save a file in a
particular way. You can create your own actions for
steps that you do over and over, save the actions,
and add them to the Actions palette.
To create an action, you first record a sequence of
steps. You then name and save your new action in
the Actions palette. The next time that you need
to apply the same steps to an image, you play the
action, and Photoshop automatically applies the
series of operations to the open file or even to an
entire folder of files.
Actions are easy to create, and they can help you
automate your work for repetitive tasks, leaving you
more time to work on creative projects.
77
44
55
66
22
33
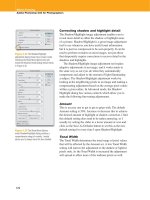
4 Type the name of your action.
5 Click here and select a keyboard
shortcut.
6 Click here and select a color for
the action.
7 Click Record.
l
The Record button in the Actions
palette turns red.
8 Perform the steps on the image
that you want to record as an
action.
Note: As an example, the following
steps show creating an action of
opening a new 7" x 5" document
at 300 pixels/inch for a greeting
card.
14
03_144763 ch01.qxp 7/18/07 10:47 PM Page 14
Press Ô+N (Ctrl+N)
to open a new file.
The New file dialog
box appears.
l
Type your specific
dimensions in the
Width and Height
fields.
l
Type 300, or your
desired resolution, in
the Resolution field.
l
Click OK.
99
15
A new untitled document appears.
9 After you perform the last step of your
action, click the Stop Recording button.
l
Your custom action is now recorded and
is listed in the Actions palette.
You can test your action by clicking the
keyboard shortcut that you assigned.
Chapter 1: Customizing Photoshop for Your Projects
More Options!
You can apply an action to
a folder of files by clicking
File
➔ Automate ➔ Batch
and selecting the action
and a source folder. Or
you can apply an action to
a group of images from
the Bridge by clicking
Tools
➔ Photoshop ➔
Batch.
Try This!
You can make the
actions easier to find by
selecting Button Mode
in the Actions palette’s
drop-down menu.
Your actions change to
color-coded buttons.
Did You Know?
You can load other
prerecorded actions
such as Frames or
Image Effects included
with Photoshop CS3
by clicking the Actions
palette’s drop-down menu
and clicking a set in the
bottom section of the
menu.
03_144763 ch01.qxp 7/18/07 10:47 PM Page 15
1 Click the Brush tool.
2 Click the Brushes button to open
the Brushes palette.
3 Click the preset brush that you
want to modify into a custom
brush.
4 Click Brush Tip Shape.
DESIGN A CUSTOMIZED BRUSH
with your settings
Whether you retouch photographs, design brochures,
or paint from scratch, you will use the Brush tools
many times and in many ways. Selecting the Brush
tool from the toolbox opens a variety of brushes in
the drop-down menu on the Options bar.
You can modify the size, roundness, or other
attributes of any of the existing brushes to suit your
drawing style or your image. You can then save the
modified brush as your own custom brush so that it
is ready to use for your next design.
A number of other tools also have modifiable brush
options, including the Pencil tool, the Eraser tool, the
Clone Stamp tool, the Pattern Stamp tool, the History
Brush, the Art History Brush, the Blur tool, the
Sharpen tool, the Smudge tool, the Dodge tool, the
Burn tool, and the Sponge tool.
Customizing Brush tools for your projects is a
timesaving technique, and it is fun. You may find
yourself experimenting with all types of brushes.
22
66
55
55
33
11
44
77
The shape choices are now
visible.
5 Click and drag any of the sliders
to change the size and look.
6 Drag the black handles and gray
arrow to alter the roundness and
brush angle.
l
Watch the Preview window to
see the brushstroke change.
7 Click another attribute that you
want to change, such as Dual
Brush.
16
03_144763 ch01.qxp 7/18/07 10:47 PM Page 16
The window changes
to display new settings.
8 Click and drag any of
the sliders to change
the size and look.
9 Click another selection
in the window.
l
Watch the Preview
window to see the
brushstroke change
more.
0 Click the New Brush
button at the bottom
of the palette.
88
@@
99
!!
00
17
The Brush Name dialog box appears.
! Type a name for your brush.
@ Click OK.
Your customized brush is stored with
the Photoshop CS3 Preferences.
Chapter 1: Customizing Photoshop for Your Projects
Caution!
Save your custom
brushes to avoid losing
them if you reset
Photoshop’s Preferences.
Click the drop-down
menu on the Brushes
palette and select Save
Brushes. Name the file
with the suffix .abr and
click Save.
Did You Know?
Photoshop CS3 includes
many different brush
files listed at the bottom
of the submenus on the
Brushes palette or Brush
options menu in the
Options bar. You can
load any set by clicking
its name.
More Options!
You can view the
brushes listed by name
rather than the stroke
thumbnail. Click the
drop-down menu on the
Brushes palette and click
Text Only or select a
different-sized thumbnail
or list view.
03_144763 ch01.qxp 7/18/07 10:47 PM Page 17
1 Click the Gradient tool.
2 Click a gradient type in the
Options bar.
3 Click inside the gradient
thumbnail in the Options bar.
MAKE A SPECIAL GRADIENT
to suit your design
The Gradient tool helps you blend multiple colors as
you fill an area in an image. You can use the
Gradient tool in many ways, such as by itself to fill
text with soft gradations of color, to fill backgrounds
with a gradient, or in combination with layers and
masks. Gradients are often used when making
composite images. Photoshop includes default
gradient color sets and has other gradient sets listed
in the drop-down menu in the Options bar. You can
also create your own gradient by sampling colors
from areas in your image or choosing different colors
altogether.
You can add intermediate colors and design a blend
among multiple colors in any order that you want.
You can even design gradients that fade from any
color to transparent.
You can also choose a style for the gradient, such as
linear, radial, angled, reflected, or diamond. You
customize the gradients from the Gradient Editor.
Start with an existing gradient and modify the colors,
the color stops, and other variations in the dialog
box. The possibilities are almost endless!
11
44
33 22
55
The Gradient Editor dialog box
appears.
4 Click the left color stop under
the gradient bar to select it.
5 Click the Color thumbnail to
choose a new color.
18
03_144763 ch01.qxp 7/18/07 10:47 PM Page 18
The Color Picker dialog
box appears.
6 Select a color from the
dialog box.
Note: If you have an
image open, you can
move the cursor over the
image to select a color.
7 Click OK.
77
66
@@
!!
88
00
19
l
The selected color fills the left color stop
in the Gradient Editor.
8 Click the right color stop under the
gradient bar to select it.
9 Repeat steps 5 to 7 to select the colors
for the right color stop.
0 Type a name for your new gradient
in the Name field.
! Click New.
l
The custom gradient appears in
the presets.
@ Click OK.
Chapter 1: Customizing Photoshop for Your Projects
Caution!
You must save your custom gradients
in a presets library to avoid losing
them when you reset Photoshop’s
Preferences. Click Save in the Gradient
Editor dialog box or choose Save
Gradients from the drop-down menu
in the Gradient Picker. Type a name for
your gradient library with the suffix
.grd. Click Save, and your gradients are
saved in Photoshop’s presets.
More Options!
You can duplicate any of the color
stops to vary your custom gradient.
Press Option (Alt) and drag the first
color stop to another location. Pressing
Option (Alt), you can even drag a
new color stop over other color stops
and drop it in a different position.
To remove a color stop, click the stop
and drag straight down.
03_144763 ch01.qxp 7/18/07 10:47 PM Page 19
Note: The following steps are
those used for either the X-Rite i1
Display LT or the X-Rite i1 Photo LT.
1 Install the X-Rite i1 Match
software included with the
device, launch it, and plug the
device into a USB port.
Note: Macintosh users should be
logged in as the Admin account.
2 Click the monitor image.
3 Click Easy.
4 Click the Forward button.
CALIBRATE AND PROFILE
your monitor for better editing
You adjust colors in Photoshop based on what you
see on the screen. Because each monitor displays
color differently and because those characteristics
change over time, you should calibrate and
profile your monitor regularly to make sure that
you are viewing the colors that are actually in
your files.
Calibration is the process of setting your monitor to
an established color standard.
Profiling is the process
of creating an International Color Consortium (ICC)
profile, a description of how your monitor reproduces
color.
Although the Macintosh System Preferences
includes a display-calibration tool and Photoshop CS3
installs the Adobe Gamma utility on Windows, these
software-only methods are very subjective. Using
a hardware-calibration device is an easier and more
accurate method of adjusting your monitor. Both
X-Rite and ColorVision make affordable devices. A
colorimeter corrects the color on your screen. A
spectrophotometer measures and adjusts color for
both your monitor and printer.
You can easily make your monitor display accurate
color using the X-Rite i1 Display LT colorimeter or the
X-Rite i1 Photo LT spectrophotometer.
22
33
44
55
66
The Monitor Type screen
appears.
5 Click to select your monitor type.
6 Click the Forward button.
7 Place your i1 Display on a black
surface or place the i1 Pro in its
cradle and click Calibrate.
8 Click the Forward button to
continue.
20
03_144763 ch01.qxp 7/18/07 10:47 PM Page 20
The Place Your Eye-One
screen appears.
9 Place the unit on the
monitor as the image
shows.
0 Click the Forward button.
The screen goes black,
and then a box appears
under the colorimeter
on the screen.
The box fills with white,
then black, and then
colors as the device
automatically measures
the color presentation
capabilities of your
monitor.
00
@@
!!
99
##
21
l
A new screen appears, showing the name
of the monitor profile created by the
device.
! Click here to select a reminder for the
next calibration.
@ Click the Forward button.
A dialog box appears, telling you where
the profile was saved on your computer’s
hard drive.
# Click OK.
$ Quit the i1 Match software application
and disconnect the i1 Colorimeter or
Spectrophotometer.
Chapter 1: Customizing Photoshop for Your Projects
Did You Know?
As monitors age, they
lose their color accuracy
more quickly. Calibrate
and profile regularly —
monthly if your monitor
is new or weekly if your
monitor is over two
years old.
Important!
Clean the monitor
screen with a soft cloth
before you start, but
never spray any cleaning
liquids on your monitor.
CRT monitors need to
warm up for 30 minutes
before you calibrate and
create a profile.
More Options!
X-Rite’s i1 Match
software keeps a Help
file open in a column
along the right side of
the screen. You can
increase your
understanding of color
calibration by reading an
explanation of each step
as you proceed.
03_144763 ch01.qxp 7/18/07 10:47 PM Page 21
1 Open the Tablet Preferences.
2 Click and drag the Tilt Sensitivity
slider to the right for greater tilt
response.
3 Drag the Tip Feel slider for a
softer or firmer touch.
l
You can click Details to test your
settings.
4 Click the arrows and select a
different keystroke for the rocker
switch.
5 Drag the Tip Double Click
Distance slider to reduce or
increase the sensitivity.
Turn on the full power of Photoshop with a
PEN TABLET
Using a mouse as an input device may work for
placing insertion points in text or dragging a
rectangular selection in Photoshop, but using a Brush
tool or selecting specific areas with a mouse is
similar to writing your name with a bar of soap —
clunky and inaccurate. Using a pressure-sensitive
tablet and pen, such as the Wacom Intuos, instead of
a mouse enables you to edit images with greater
comfort and control. Instead of scooting the mouse
around, you place the cursor exactly where you want
to be with the pen, so you become more productive.
Using a tablet and pen, you have access to many
Photoshop tools that are only available when a tablet
is connected to the computer. You can easily make
precise selections, create blended composite images,
and even paint digitally as you would with a
traditional paintbrush on paper.
The key to using a tablet and pen and turning on the
full power of Photoshop is to start by setting the
Tablet Preferences located in the System Preferences
or Control Panel.
44
22
33
55
66
77
88
6 Click the Eraser tab.
The Eraser Preferences appear.
7 Click and drag the Eraser Feel
slider for softer or firmer eraser
pressure.
l
You can click Details to test your
settings.
8 Click the Functions tool to
customize the tablet keys.
22
03_144763 ch01.qxp 7/18/07 10:47 PM Page 22
The ExpressKeys
Preferences appear.
9 Click the arrows to
change the settings
for the tablet keys.
0 Click the Touch
Strip tab.
99
00
##
@@
$$
@@
!!
23
The Touch Strip Preferences appear.
! Click here to change the scrolling speed.
@ Click the Function arrows and select
different functions.
# Click in the Click to Set boxes.
In the dialog box that appears, type
your keystroke preferences in the
Keys data field and click OK.
$ Click the Close button.
Your custom settings are saved
in the Preferences.
Chapter 1: Customizing Photoshop for Your Projects
Try This!
You can select
specific settings for each
individual application.
Click the + to the right
of the Application section
and select Photoshop CS3
or another application.
Set the options for
the keys you use most
in Photoshop.
Did You Know?
The Wacom Intuos is
considered the most
responsive pen tablet
on the market. The
Wacom pen feels
like any pen or pencil,
and the ExpressKeys
and Touch Strip can
help you become more
productive.
Did You Know?
Over 20 Photoshop
tools are specifically
designed for use with a
pressure-sensitive tablet
and pen. Without a
tablet attached to your
computer, a warning sign
appears for many of the
settings in the Brushes
palette.
03_144763 ch01.qxp 7/18/07 10:47 PM Page 23
Working with Layers,
Selections, and Masks
Unless you use Photoshop only to resize and
print photographs, you will use layers,
selections, and masks in some way for most
projects. You may duplicate a layer as a safety
step or build a complex multilayered image
file with any combination of layers, selections,
and masks.
Layers give real editing and designing power to
Photoshop. A
layer is basically a transparency
sheet with an image on it. You can edit,
transform, or add filters to a layer independently
from other layers. You can make one layer
alter the look of a layer above or below it. You
can save a file with the layers and easily
change your design later by editing one or
more of the layers. You can also drag a layer
from one document to another to copy it.
Selections enable you to isolate areas in your
image and apply different effects or filters
without affecting the rest of the image. You
can even select areas on one layer and create
a new layer with that selection. You can make
selections with many Photoshop tools
depending on the type of area that you need
to isolate. You can copy, move, paste, and
save selections.
You can use masks to block out one area of an
image or protect it from manipulations. A mask
is a selection shown as a grayscale image:
The white areas are selected; the black areas
are not. You can create bitmap layer masks
with painting tools or resolution-independent
vector masks with a shape tool.
04_144763 ch02.qxp 7/18/07 10:51 PM Page 24
Duplicate and Change the Background Layer to
Fix Problems Such As Overexposure . . . . . . . . . . . . . . . . . 26
Using an Adjustment Layer to Adjust a Photo
Nondestructively . . . . . . . . . . . . . . . . . . . . . . . . . . . . . . . . 28
Blend Two Photos Together with a Layer Mask . . . . . . . . 30
Using Custom Shape Layers to Add Designs to Photos. . . 32
Accentuate a Sky Easily with a Gradient Fill Layer . . . . . . 34
Using the Quick Selection Tool and Refine Edge
Palette for Selections . . . . . . . . . . . . . . . . . . . . . . . . . . . . . 36
Using a Quick Mask to Make a Detailed Selection . . . . . . 38
Extract the Main Subject from the Background . . . . . . . . 40
Open or Add Layers As Smart Objects for
Nondestructive Changes . . . . . . . . . . . . . . . . . . . . . . . . . . 42
Apply Filters As Smart Filters for Dynamic Adjustments. . . 44
04_144763 ch02.qxp 7/18/07 10:51 PM Page 25
Note: This task is shown in the
Maximized screen mode.
1 Open an overexposed image in
Photoshop.
2 In the Layers palette, click and
drag the Background layer
thumbnail over the New Layer
button and release the mouse
button.
DUPLICATE AND CHANGE
THE BACKGROUND LAYER
to fix problems such as overexposure
The Background layer is the bottommost image in
the Layers palette — and the only layer when you
first open a new photograph. You can duplicate the
Background layer and change the blending mode to
change the look or simply work on the duplicated
layer without altering the original.
Although it does increase the file size, working on a
duplicated layer works well for simple changes and
can be used as a safety step in various workflows.
With a duplicate Background layer, you can quickly
compare your modified image with the original by
clicking the Visibility icon, the leftmost box next to
the layer thumbnail in the Layers palette, to hide the
duplicated layer and view only the original
Background layer. Then you can click the Visibility
icon on again to see the changes you made.
Photoshop CS3 includes many different types of
layers. You can add layers above the Background
layer for various effects. You can convert this layer
and move it in the Layers palette. Layers are the key
to nondestructive image editing — working on your
images without damaging existing pixels.
44
55
22
33
Photoshop places a duplicated
Background layer above the
original.
3 Double-click the Background
copy’s name in the Layers palette
to highlight it.
4 Type a different name for the
copy.
5 Click here and change the blend
mode to Multiply.
26
04_144763 ch02.qxp 7/18/07 10:51 PM Page 26
The photo appears
darker.
Note: If the photo is still
overexposed, follow steps 6
and 7. If it appears too
dark, go directly to step 8.
6 Click and drag the copy
layer over the New Layer
button and release the
mouse button.
7 Repeat step 6 until the
photo appears slightly
dark.
66
88
88
8 Click here and drag the slider to the left
to lower the opacity of the top layer until
the photo appears properly exposed.
Note: There are many other uses for
duplicating the Background layer, such as to
protect the original image when you apply
certain filters or retouching portraits.
27
Chapter 2: Working with Layers, Selections, and Masks
Did You Know?
You can duplicate the
Background layer or any
other layer with a
keyboard shortcut. Click
the layer to be
duplicated in the Layers
palette to select it. Press
Ô+J (Ctrl+J). The layer is
quickly duplicated.
Did You Know?
The selected layer is
called the
active layer.
You can select multiple
layers by pressing
Ô
(Ctrl) and clicking them,
and then you can move
them together or apply
styles to them all at the
same time.
More Options!
To move the Background
layer, you must unlock
it by double-clicking its
name, typing a new
name in the dialog box
that appears, and
clicking OK. You can
then move that layer in
the Layers palette for
more editing options.
04_144763 ch02.qxp 7/18/07 10:51 PM Page 27
Note: This task is shown in the
Maximized screen mode.
1 Click Layer.
2 Click New Adjustment Layer.
3 Click to select the adjustment that
you want to make — for example,
Levels.
The New Layer dialog box appears.
4 Type a name for the adjustment
layer.
5 Click OK.
The dialog box for the type of
adjustment layer you selected
appears.
Using an
ADJUSTMENT LAYER
to adjust a photo nondestructively
You can make a variety of adjustments to an image
by using the Adjustments option on the Image menu.
If you made a duplicate of your Background layer,
you can adjust your photo using the duplicate and
not alter the original layer. However, each time you
change the pixels in an image, you lose some data.
If you combine adjustments, you lose even more
pixel information.
By applying an adjustment layer instead, you can
apply color and tonal changes to your image without
changing any pixel values.
With an adjustment layer, you can try various
settings and edit the adjustment at a later time. You
can reduce or vary the effect of the adjustment by
using the Opacity or Fill sliders. You can also combine
various adjustment layers. An adjustment layer
affects all the layers below it.
Photoshop includes a number of different types of
adjustment layers, which you access through the
Layer menu.
11
33
44
22
66
99
55
88 77
Note: Make sure that the Preview box
is checked.
6 For Levels, drag this slider to the
right until it is just below the rise of
the black histogram on the left side.
7 For Levels, drag this slider to the left
until it is just below the rise of the
black histogram on the right side.
8 For Levels, drag this slider slightly to
adjust the midtones if necessary.
Note: Different adjustment layers’
dialog boxes have different options.
Make the changes your adjustment
layer type requires.
9 Click OK.
28
04_144763 ch02.qxp 7/18/07 10:51 PM Page 28
The adjustment layer’s
changes are applied to
the image.
0 Repeat steps 1 and 2.
! Select a different
adjustment layer,
such as Exposure.
The dialog box for the
type of adjustment layer
you selected appears.
@ For Exposure, click here and
drag slightly to the left or
right to adjust the exposure.
Note: Make the needed
changes to the options
that are available for your
adjustment layer type.
00
$$
$$
##
@@
# Click OK.
The adjustment layer’s changes are
applied to the image.
$ Click here to turn off the Visibility icon
for each adjustment layer and hide the
adjustment.
% Compare the effect of the adjustment
layers.
Note: If you do not like the effect of an
adjustment layer, you can simply delete
that layer.
29
Chapter 2: Working with Layers, Selections, and Masks
Did You Know?
You can use an empty adjustment layer and
change the Layer blending mode to get the
same effect as duplicating a layer and
changing the blending mode. Simply click
Layer
➔ New Adjustment Layer and select
any one of the adjustments. Do not make
any changes in the dialog box and click OK.
Change the blending mode of the empty
adjustment layer as you would with any
duplicated layer.
More Options!
All adjustment layers include a layer mask,
represented by a white icon next to the
adjustment layer icon in the Layers palette.
You can click the layer mask and paint with
black to limit where the adjustment affects
the underlying image. If you accidentally
reveal too much of the underlying image,
you can change the foreground color to
white and paint in the mask to reapply more
of the adjustment.
04_144763 ch02.qxp 7/18/07 10:51 PM Page 29
1 With the two photographs you
want to blend open, click the
Move tool.
2 Click and drag the photo you
want to blend on top of the
photo you want for the base.
Optionally, you can click and
drag the top image layer to
adjust the position on the base
image if necessary.
Note: If the images are the same
size and resolution, the top image
will hide the base image.
BLEND TWO PHOTOS TOGETHER
with a layer mask
Layer masks open a world of imaging possibilities
that you just cannot create with traditional tools.
Using a layer mask to hide parts of one image and
reveal parts of another, you can design images that
are sure to grab a viewer’s attention.
You can create very dramatic effects using a layer
mask to blend one photograph into another. For
example, you can blend a photograph of a wedding
couple into a photo of the bride’s bouquet. You can
also create comical effects with this technique if, for
example, you blend a photo of a potato with a photo
of a person lying on a couch.
You can start by blending with a gradient on the
mask and touch it up with a brush or simply brush
on the mask. As you paint with black on a white
layer mask, the top image becomes visible. If you
paint away too much, simply reverse the colors and
paint with white.
This technique is especially effective using a pen
tablet. By setting the painting brush to respond to
pen pressure, you can easily control how much of the
image you reveal with each brush stroke.
22
55
33
77
11
44
66
55
Photo © 2007 www.photospin.com
3 Click here to set the default
colors so that the Foreground
color is black.
4 Click the Layer Mask button.
l
A white layer mask appears in
the Layers palette.
5 Click the Gradient tool and
select a gradient style from the
Options bar.
6 Click the layer mask to select it.
7 Click and drag in the image to
apply the gradient to the mask.
Note: You may need to click and
drag several times to get the effect
that you want.
30
04_144763 ch02.qxp 7/18/07 10:51 PM Page 30
The two images blend
together.
8 Click the Brush tool.
9 Select a large soft-edge
brush from the Brush
drop-down palette.
0 Paint in the image
using black to touch
up the mask and
reveal more of the
background photo.
!!
88
99
00
@@
! Click here to reverse the foreground and
background colors.
@ Paint with white to fill in areas where you
have painted away too much of the base
image.
The white paint strokes bring some edge
details of the base image back, making
the top image appear to blend into the
base image.
31
Chapter 2: Working with Layers, Selections, and Masks
Try This!
Using a Wacom pen
tablet, you can vary
your paint strokes with
pen pressure. Click the
Brushes icon to open
the Brushes Presets.
Click Shape Dynamics
and set Size Jitter
Control to Pen
Pressure.
More Options!
Type some text with
the Type tool and click
the Layer Mask button
in the Layers palette.
Paint over some areas
of the letters with
black to hide them to
make the text appear
from behind parts of
the image.
Customize It!
Double-click the
Foreground Color
button in the toolbox
and select a gray in
the Color Picker. Paint
some areas of the
layer mask with gray
to make them only
partially visible.
04_144763 ch02.qxp 7/18/07 10:51 PM Page 31
Note: This task is shown in the
Maximized screen mode.
1 Duplicate the Background layer of
an image.
Note: To create a duplicate of your
Background layer, see Task #11.
2 Click the Custom Shape tool.
3 Click here, double-click a shape,
and close the selection box.
4 Click here.
5 Double-click the 0 percent opacity
icon.
Using
CUSTOM SHAPE LAYERS
to add designs to photos
Photoshop CS3 includes a variety of predesigned
custom shapes you can apply using the Custom
Shape tool. You can also create your own shape with
the Pen tools. Custom shapes are resolution-
independent vector shapes, meaning that they
maintain crisp edges when resized or saved in a PDF
file. You can add shapes to any image as a design
element or to alter the shape of a photo.
You can access more custom shapes than the default
set by clicking the Custom Shape icon in the Options
bar and clicking the shape icon drop-down arrow to
open the selection menu. When you click the drop-
down arrow on that menu, you can select one of the
shape groups at the bottom of the menu or select All
to see all the installed shapes at once. Then double-
click a shape thumbnail to select it.
When using shapes, you will see two boxes in the
Layers palette: the fill layer and a linked vector
mask. The mask is the shape’s outline. You can
choose the fill layer’s color in the Options bar before
you draw the shape or set the fill color to a zero
opacity fill.
22
44
6 6
77
88
11
33
55
6 Click and drag in your image to
draw the shape.
7 Press Ô+click (Ctrl+click) the layer
thumbnail.
The shape changes to a selection.
8 Click the shape layer thumbnail in
the Layers palette and drag it to
the layer Trash.
The selection remains on the
image.
9 Press D to reset the foreground
and background colors to the
default.
0 Press X to reverse the default
colors, making white the
foreground color.
32
04_144763 ch02.qxp 7/18/07 10:51 PM Page 32
! Press Ô+J (Ctrl+J) to
duplicate the selection
onto its own layer.
l
The selection is on the
new layer and not
visible on the image.
@ Click the Background
copy layer to select it.
# Click Layer ➔ New Fill
Layer ➔ Gradient.
$ Click OK when the
New Layer dialog box
appears.
##
##
@@
##
%%
l
The base image is covered with a
white-to-transparent gradient fill.
% Click OK in the Gradient Fill dialog box
or change the attributes.
The shape highlights the subject of the
photo. Optionally, you can add type
and then flatten the layers to finish the
design for use as a greeting card or
advertising piece.
33
Chapter 2: Working with Layers, Selections, and Masks
More Options!
Create a gradient fill with
a color from your image.
Click the Foreground Color
box to open the Color
Picker. Move the cursor
outside of the Color Picker
dialog box and click a
color from your image.
Click OK to close the
dialog box.
Change It Later!
You can save the file with
all the layers so that you
can change it later.
However, if you need a
smaller file, click Layer
➔
Flatten Image and then
click File
➔ Save As and
save the file with a new
filename.
Customize It!
Click the top layer with the
shape selection. Add a
drop shadow or other
effect by clicking the Layer
Style icon in the Layers
palette (
fx). Click an effect
and click OK to close the
dialog box.
04_144763 ch02.qxp 7/18/07 10:52 PM Page 33
1 Open an image with a dull gray sky.
2 Click the Default Foreground
and Background Colors icon to set
the foreground to black.
3 Click the New Fill or Adjustment
Layer button.
4 Click Gradient.
ACCENTUATE A SKY
easily with a gradient fill layer
You may have a scenic photo in which the sky is a bit
dull. The lighting may have called for a different
exposure setting, or you may need a neutral density
filter or polarizing filter on the camera. Still, you may
want to use the photo in an album or a graphic
design project. Adding a little blue to darken the sky
or adding some black to make a gray sky more
foreboding can greatly improve an otherwise boring
tourist photo.
Adding a gradient fill layer enables you to easily
improve a washed-out blue sky or make a gray sky
look stormy. You can visually adjust the amount of
color you add, and because you are using a fill layer,
you can go back and increase or decrease the
amount of color after you apply it. You can even
change the color that you apply to get a different
effect or to create a dramatic look. This technique is
most effective on a photo with a large sky area and
an open horizon.
44
33
55
22
The Gradient Fill dialog box appears,
and a foreground-to-transparent
gradient is applied to the image.
l
Make sure that the angle is set to
90 degrees.
5 Click Reverse.
34
04_144763 ch02.qxp 7/18/07 10:52 PM Page 34
The gradient reverses
to black at the top,
changing to transparent
at the bottom of the
image.
6 Position the cursor over
the image.
7 Drag upward in
the image until the
gradient covers only
the sky and the clouds
look menacing.
8 Click OK.
66
77
88
99
!!
00
The ominous sky is applied as a layer
above the Background layer.
9 Click here and select Overlay.
0 Double-click the layer thumbnail for the
gradient fill.
The Gradient Fill dialog box reappears.
! Repeat steps 6 to 8 to increase or reduce
the effect.
Each time that you drag in the image with
the Gradient Fill layer selected, the look of
the sky changes.
35
Chapter 2: Working with Layers, Selections, and Masks
More Options!
If your image has a gray sky that
requires more drama, set the
foreground color in the toolbox to
black. If the sky in your photo is blue,
set the foreground color in the
toolbox to a dark blue before you
apply the gradient fill layer. You can
even accentuate a sunset by using
a reddish-orange color as the
foreground color.
Did You Know?
Multiple layers increase the file size
of your image. Because Photoshop
requires more memory to work on
larger files, you should merge layers
that will not be adjusted later.
Pressing
Ô+E (Ctrl+E) merges the
highlighted layer with the layer below.
Pressing
Ô+Shift+E (Ctrl+Shift+E)
merges all the visible layers.
04_144763 ch02.qxp 7/18/07 10:52 PM Page 35
1 Click the Quick Selection tool.
2 Click here.
3 Click and drag the Diameter
slider to change the brush tip
size.
l
If you have a Wacom tablet
attached, you can use the Size
drop-down list to adjust the
brush size with pen pressure.
Using the
QUICK SELECTION TOOL AND
REFINE EDGE PALETTE
for selections
Photoshop CS3 introduces a new selection tool
enabling you to quickly select broad areas of an
image by simply painting them. Using the Quick
Selection tool, you can brush over areas to select
them, varying the brush size as you work to select
difficult areas. You can also just click areas for a
more limited selection. You can add to selections
by pressing the Shift key and subtract from the
selection by holding the Option (Alt) key as you
paint.
The new Refine Edge floating palette is accessible in
the Options bar whenever any selection tool is
selected. Using Refine Edge, you can clean up
selections, soften or feather the edge outlines, remove
edge artifacts or jaggies, and expand or contract
selected areas with more control than by using any
of the selection tools alone. The palette offers various
previewing options, showing the selection on different
backgrounds to help you see the edges of the areas
you are selecting and the changes you are making.
77
22
66
33
44
55
11
Note: You can press Ô (Ctrl)+
spacebar and click to zoom in for
more accurate selections.
4 Click and drag inside the part of
the image you want to select.
5 Click and drag in another area.
l
The selection changes to the
Add To option.
6 Press Option (Alt) and click in
areas to remove them from the
selection.
Note: You can press Option (Alt)+
spacebar and click to zoom out.
7 Click Refine Edge.
36
04_144763 ch02.qxp 7/18/07 10:52 PM Page 36
The Refine Edge dialog
box appears.
8 Click and drag the
Radius slider to the
right to soften the
edge outline.
9 Click and drag the
Contrast slider to the right
to remove edge artifacts.
0 Click and drag the Smooth
slider to smooth the outline
of the selection.
! Click and drag the Feather
slider to create a softer-edged
transition from the selection
to the surrounding areas.
@@
88
99
00
!!
^^
##
@ Click and drag the Contract/Expand slider
to adjust the selection edges.
# Click a different preview icon to view the
selection on a different background.
$ Repeat step 13 to change backgrounds
for a better view.
% Repeat steps 8 to 12 to adjust the
selection.
^ Click OK the save the selection adjustments.
Your refined selection appears on the
image.
37
Chapter 2: Working with Layers, Selections, and Masks
Did You Know?
You can use the Refine Edge
palette on any active selection,
regardless of the tool used to
create the selection. Click
Select
➔ Refine Edge when
there is any selection in the
image. You can also use the
palette on any active layer
mask to adjust it as it is
applied to a layer.
Try This!
You can quickly change the
preview background of your
selection when using the
Refine Edge palette by
pressing F. The preview
changes each time you press
F, cycling through each mode.
Customize It!
When using the Quick
Selection tool, you can click
the Auto-Enhance option in
the Options bar to reduce the
roughness of the selection
boundary. Depending on the
speed of your computer,
adding the Auto-Enhance
option may slow the selection
process.
04_144763 ch02.qxp 7/18/07 10:52 PM Page 37
1 Click the Zoom tool and click to
enlarge the area you want to
select.
2 Click the Default Colors button
to set the foreground color to
black and the background to
white.
3 Click the Quick Mask mode
button.
4 Click the Brush tool.
5 Click here.
Using a
QUICK MASK
to make a detailed selection
You can make selections in many different ways in
Photoshop CS3. You can select a rectangular or oval
area with the Marquee tools, select freeform or
geometric areas with the Lasso tools, or use the
Magic Wand tool to select similarly colored areas.
You can also use the Quick Selection tool as shown in
Task #16 to select specific areas and add to or
subtract from selections; however, some images can
still require a more detailed or precise selection tool.
Using the Brush tool in the Quick Mask mode, you
can make a detailed selection or adjust any
previously selected area.
The Quick Mask mode is an editing mode in which
protected areas are covered with a translucent
colored mask. Painting with the default red color
directly on the areas you want can make selecting
detail more precise, while enabling you to see what
you are selecting. Using this masking technique, you
are actually masking the areas you paint, so you
must inverse the selection before making any
adjustments. The areas you painted in are then
selected, and the rest is now masked.
77
55
44
11
22
33
66
88
6 Select a hard-edged brush.
7 Click and drag to adjust the
Master Diameter slider.
8 Paint over the areas you want
to select.
l
The painted areas are covered
with a red translucent mask.
38
04_144763 ch02.qxp 7/18/07 10:52 PM Page 38