3D in Photoshop The Ultimate Guide for Creative Professionals PHẦN 10 doc
Bạn đang xem bản rút gọn của tài liệu. Xem và tải ngay bản đầy đủ của tài liệu tại đây (554.72 KB, 24 trang )
Step 8: Duplicate the splash to add a stronger effect. Then give it a drop
shadow underneath to show depth from the ground. Also, to further
harmonize the colors in the overall scene use a Radial gradient to add yellow
to the sunset and a bluish hue to the foreground (Figure 10.56). Now it's time
to render the car with ray tracing. In the 3D Scene panel (Window > 3D)
select the scene slot on the scene graph area, and under the Quality drop-
down menu select “Ray Traced Final.” You should see that the reflections in
the windows are now rendered.
Step 9: Duplicate the car layer and change it to a Smart Object (right-click on
layer > Convert to Smart Object). Add a Motion Blur with the Angle set to
70 degrees. Here the Distance is set to 41 but you can experiment with this
to get a look you like. This gives the car a sense of motion and up and down
movement (Figure 10.57).
FIG 10.56 Duplicate the splash layer
and add gradient to harmonize color
in the scene.
FIG 10.57 Apply Motion Blur to get
sense of bumpy up and down
movement.
Painting, Texturing and Lighting with Stephen Burns
|
185
Step 10: Edit the mask of the Smart Filter so that the Motion Blur is mostly
applied to the rear of the car instead of the front end. In addition, create an
additional layer above the car and fill it with 50% gray. Add to this gray layer
a Lens Blur (Filter Render > Lens Flair) and then change the blend mode to
Hard Light to make the gray pixels transparent e leaving only the lens flair.
Place the flare over the headlights to accentuate the glare (Figure 10.58).
With a little more enhancements to the headlights as well as a light spill onto
the street (separate layer set to Overlay with white added to the street),
Figure 10.59 shows the final render.
I really do hope that you enjoyed this chapter. For more information on
myself and my art please go to www.chromeallusion.com
FIG 10.58 Apply Lens Flare to headlights.
FIG 10.59 Final results.
|
3D in Photoshop
186
Creating Lenticulars
with Russell Brown
Ever go to a movie theater and notice a poster that changes views and/or
appears to have depth when seeing it from different angles? That is what
a lenticular image is. Lenticular images are a form of 3D stereo imagery
resulting from combining multiple views (at least two) of a single image. This
image is interlaced and matched to a lenticular lens or frame to display
the visual 3D effect. Originally used mostly in novelty items, lenticular prints
are now being used as a marketing tool to show products in motion and 3D.
It is an element that is easier to add to your creative design now that
Photoshop Extended has the ability to create and print these images.
Included in this book is an insert of a lenticular image that gives an illusion of
depth. This chapter will cover basic techniques, useful information and
best practices on how to get started with creating a lenticular image.
Note: Some of the tutorials covered in this chapter are taken directly from
Russell Brown's website on Lenticular Imaging, with a few new additions.
For a video tutorial on some of these techniques,
visit />CHAPTER 11
|
3D in Photoshop. DOI: 10.1016/B978-0-240-81377-6.10011-0
Copyright Ó 2010 Elsevier Inc. All rights reserved.
187
11.1. Getting Started
11.1.1. Equipment and Software
Creating lenticulars requires proper setup of your images, proofing (optional)
and finally printing a lenticulated file to be used with a lens or frame and/or
in some cases printed directly onto a lens. For this chapter, you will need
to have the following basic equipment to get started.
· Adobe Photoshop CS4 or CS5 Extended
· Canon, Epson, or HP desktop inkjet printer
· High gloss, quick drying printing paper
· Lamination equipment or send prints directly to ,
a lenticular printing service
· 3D red blue anaglyphic glasses (optional for proofing).
11.2. Basic Lenticular Workflow
This section will walk you through an example on how to create a lenticular
in Photoshop Extended. It is a good place to start to familiarize yourself
with best practices and new concepts in creating lenticulars. Open up the
short animation that shows the final lenticular of this Double Identity movie
poster found on the accompanying website for this book or
/>Step 1: Open the image “Double_-
Identity_Poster75dpi.psd” so we
can start to analyze how files need
to be prepared for a 40 lpi (lines per
inch) lenticular lens (Figure 11.1).
We recommend starting with a 40
lpi lenticular lens as it is the easiest
to work with. Microlens has excel-
lent information on how to choose
the right lpi for the particular project
you are interested in. Visit
for more
in depth information.
FIG 11.1 Double Identity poster split into layers where each layer will have a separate depth
assigned to it.
|
3D in Photoshop
188
Setting Up Layers for Depth
Step 2: Click through each layer and that each layer contains an element that
will have a different depth applied. Further, the layer stack is set up so
that the element that will be closest to the viewer is on top and the element
that is farthest from the viewer will be in the background. For example,
the layer “The Title” is the element that has the greatest depth from the
background and is, therefore, closest to the viewer.
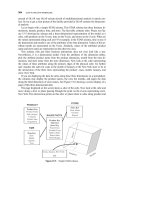
Setting up image size
Step 3: The final image of this project is on an 8” Â 10” lenticular. However,
the working file is set at 10” Â 10” (Image > Image Size to view document
dimensions). There is an additional 1” padding on each side for the width.
This is because through the process of interlacing your image for a lenticular,
you will introduce parallax in order to achieve the 3D effect (Figure 11.2).
Because of parallax, you end up viewing more of the scene than you do when
looking at it through a single lens and therefore you will need more space
to accommodate for this camera motion. Interlacing is the process of
breaking up an image into interlaced lines so that it can be aligned with
a lenticular lens to create the effect of 3D.
FIG 11.2 Interlaced layer (Double_Identity_Lenticular.psd)
Creating Lenticulars with Russell Brown
|
189
Convert to Postcard
Step 4: Select the “Poster Background” layer and convert it to a 3D postcard
(3D > New 3D Postcard From Layer). You can also run this from the 3D
Scene panel. Under the Source, select Selected Layer, check 3D Postcard
and then hit Create (Figure 11.3).
Note: If you notice a color shift at this step, make sure that the document
color profile matches that of the working space (Edit > Convert to Profile).
Step 5: Repeat Step 4 for each layer.
Setting Depth of Layers
Step 6: Double-click “Poster Background” 3D layer. Clicking on any 3D
layer will open up the 3D Scene panel (Figure 11.4). From the Scene filter
of the 3D Scene panel click on the Edit button next to the Render Settings
drop-down menu.
At the bottom of the 3D Render Settings dialog, select the last checkbox that
enables stereo rendering (Figure 11.5). Set the Parallax to 30 and the Focal
Plane to À80. Parallax is the distance between stereo cameras; a greater
value enhances the depth between each of the layers. We recommend using
a Parallax of 30 for 2D layered projects like this (optimum range of 15e30).
A Focal Plane of “0” is the point of true focus; a negative value will push the
layer back and a positive value will pull the layer forward. Here you can
visualize how your image looks with an anaglyphic (red/blue) 3D effect.
FIG 11.3 Covert each layer into a 3D postcard from the 3D Scene Panel.
FIG 11.4 3D Scene Panel invoked
from double-clicking any 3D layer
thumbnail.
|
3D in Photoshop
190
Proofing with Red/Blue Glasses (optional)
FIG 11.5 3D Render Settings dialog set to view 3D layer as a Red/Blue stereo image.
FIG 11.6 3D Render Settings dialog set to view 3D layer as a vertically interlaced lenticular image.
Step 7: With Red/Blue selected
for the Stereo Type, put on your
red/blue glasses and view the
differences in depth effect
created by altering the focal
plane value.
Creating the Lenticular e interlacing
Step 8: At the bottom of the 3D Render Settings dialog set the Stereo Type to
Vertical Interlaced (Figure 11.6). Make sure that the lenticular spacing is set to
40 lpi (default value), Parallax 30 and Focal Plane À80.
Creating Lenticulars with Russell Brown
|
191
Step 9: Select the layer “The Gun” and open up the Render Settings dialog.
Change Stereo Type to Vertical Interlaced and set all values as you did in Step
9, except change the Focal Plane to À60. This will pull this layer forward from
the background layer (plane).
Step 10: Select the layer “The Detective” and repeat the previous step but
this time set the Focal Plane to À20.
Step 11: Select the layer “The Car ” and repeat the previous step but this time
set the Focal Plane to À10.
Step 12: Select the layer “The Cast” and repeat the previous step but this
time set the Focal Plane to À5.
Step 13: Select the layer “The Spy” and repeat the previous step but this time
set the Focal Plane to 0. This will set this layer to be the sharpest layer in
focus. <OK>
Step 14: Select the layer “The Title” and repeat the previous step but this
time set Focal Plane to 60. This will bring the title layer to the front and
closest to the viewer.
Prepare the Lenticular for Print
Step 15: Select the Crop Tool and set the width to 8” and the height to 10”.
Set the resolution to the target resolution default depending on the type of
printer you are using. Set the resolution to 600 ppi for HP printers, 720 ppi for
Epson printers, and 600 ppi for Canon printers.
Step 16: Select the Crop tool and in the options bar select the option Hide.
Click and drag over the image and position the crop out the extra edges. Hit
Enter key or checkmark in options bar to crop the image.
Step 17: Check that the image is set to be at the target resolution, in this case
600ppi. Open up the Image Size dialog to verify. It is important to set up the
best resolution and quality for this project.
Print and Laminate to Lenticular Lens
Step 18: Print your file and then take your 40 lpi lens and align it until you see
the best depth effect. This might take a while to align perfectly so make sure
you slide the image horizontally until the image looks just right and then
laminate the lens onto the print.
Note: Snapily provides a great service for printing to lenticulars:
From this site, you can directly upload your
Photoshop layered files for professional quality printing of lenticulars.
|
3D in Photoshop
192
PART IV
Appendices
Appendix A File Formats 195
Appendix B Interoperability and Limitations 199
193
This page intentionally left blank
Appendix A
File Formats
Adobe Photoshop Extended allows import of OBJ, COLLADA, KMZ, 3DS, and
U3D files. It allows export of OBJ, COLLADA, KMZ and U3D files. 3DS is not
included in the export because it is not a good format to use for interchange
due to its limitations for geometry structure. In this appendix we will give
a brief overview of each format with its capabilities, and what it's future is.
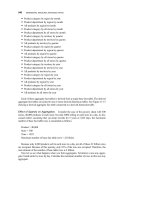
The chart below illustrates the specific differences in each of the formats.
OBJ
The OBJ file format is a text file format, so you can edit OBJ files in a text
editor. It was originated by Wavefront Technologies, which no longer exists
as a separate company. OBJ files only have geometry in them with associated
Table A.1
*
Cameras and animations are not supported on U3D export (only import)
195
|
materials. They do not have animation, lighting or cameras. It also supports
NURBS surfaces – although Photoshop does not support the loading of
NURBS. If the object has materials it will also have a .mtl file which contains
the material description. This format is in use by many companies and most
3D tools import and export OBJ files so you can use it as a geometry inter-
change format if you wish. Going forward, OBJ is not an evolving format. Its
specification is done and there is no new development being done on it.
Photoshop supports most of the OBJ format. We do not support the group
tags as many people use it to create a hierarchy in the file. We have found
through testing that the g tag is often used for naming and not grouping
so trying to support this tag is like making a guess at what the user intended
to do.
One version of the spec can be found at: />3d/OBJ.spec although there isn't really an official specification for it.
3DS
3DS is a binary format, which means you can't edit it directly. The 3DS format
is owned and developed by Autodesk. It is a proprietary format and there is
no official spec available for it. Many people over the years have deduced the
pieces of the format and have made loaders for it. Many of the blocks within
3DS are only known to Autodesk. 3DS has most of the capabilities you would
need for your 3D models including geometry, materials, cameras, lights, and
animation. It is a very popular format and since it is so old there are thou-
sands of existing models. 3DS has no new development being done on it.
Photoshop supports the major portions of a 3DS file including geometry,
instancing, animation tracks (the ones we know about), lights, cameras, and
materials. We currently do not support morph targets, 3D path and curve
objects, camera and light targets, or fog.
There are many sites on the internet that keep a library of 3DS files or just
have samples for download. Because of the sheer number of files available in
this format it is very difficult to say that they will all load properly in any 3D
program. If you have problems loading one, try loading it into another
program you might have and then try exporting it to COLLADA if you can.
This may help if you are unable to load the file in Photoshop as 3DS.
COLLADA and KMZ
COLLADA is an xml style format and you can edit it with any text editor. KMZ
is a zip file that contains a COLLADA file along with its associated texture files
and other documents meant to be used in Google Earth. Photoshop also
reads this information and stores the Google Earth geographical positioning
|
Appendix A
196
information. COLLADA is controlled by Khronos technologies and is an open
standard that many companies contribute to. It is in active development and
has been undergoing many changes in its first few versions. It contains all the
types of information you need to have a complete 3D scene including
geometry, materials, cameras, lights, animation, physics and shaders.
Therefore COLLADA is a very good format to use for 3D interchange and
many companies use it this way. A typical pipeline for game companies is to
pass around COLLADA files. Most of the major 3D tools import and export
COLLADA now with more and more smaller tools picking it up as well.
Photoshop is trying to make this the format of choice for our users because it
has so many capabilities.
Photoshop supports a good amount of what COLLADA can capture. We
currently do not support bones and skinning in Photoshop but we have
taken the time to try and preserve this information from the COLLADA file. If
you have a skinned model in COLLADA and you bring it into Photoshop you
will only see the base frame of geometry when it loads up. If you change
anything in the file and then export it back to COLLADA we will take the data
we preserved from the file and put it back. This should help minimize any
problems of losing your information coming out of Photoshop and is another
reason why we suggest you try to use COLLADA as the exchange format of
choice. COLLADA is also the only format that supports all the map types
Photoshop can use as well as user-generated ones. We also do not support
the shaders and COLLADAFX information but we try to preserve that infor-
mation as well.
COLLADA also has a Physics specification that is used in mostly gaming
applications. Photoshop does not parse any of this data or preserve it in
any way.
As of the printing of this book, COLLADA is now working on the 1.5 spec and,
as the format evolves, Photoshop will take advantage of what we think is
useful for our users.
The COLLADA spec can be found at: />U3D
U3D is a binary format. It is primarily used by CAD companies because of its
ability to compress geometry. Intel was the originator of the format and it is
now an open standard.
U3D contains most of the capabilities for a complete 3D scene but leaves out
some of the specific texture types. U3D is an ECMA standard but new
development has not taken place on it since 2007 when the last spec was
produced. U3D is the format that Adobe uses in Acrobat 3D, and many other
programs also export PDFs with U3D models as well.
Appendix A
|
197
Photoshop supports most of what U3D supports. There are a few map types
that U3D does not have that Photoshop uses. U3D only supports one
specular map whereas Photoshop supports specular intensity and specular
exponent maps. U3D also does not support normal maps.
The U3D spec can be found at:
/>|
Appendix A
198
Appendix B
Interoperability and
Limitations
In general, we advise that Photoshop be the last step, or one of the last steps,
in your production workflow since Photoshop has advanced rendering
capabilities as well as the ability to do all of your touch-up work without
having to leave the application. If you do plan on using multiple products to
accomplish your work then we would advise that you use COLLADA as your
main interchange format. Right now it is the one format we use that can
represent most of the items we need to support on import or export.
Photoshop CS5 is currently compatible with the 1.4.1 spec for COLLADA. If
you use Autodesk 3D Studio Max or Maya you should get a copy of the
ColladaMax or ColladaMaya plugins if you want to have a smooth workflow
with Photoshop. These plugins will make your output out of these programs
much more compatible than using the built in exporters. Most 3D programs
now output and input COLLADA files so programs like DAZ 3D, Poser,
SoftImage, Cinema 4D, etc. should all work well.
Note: If you are using Sketchup from Google you should be aware that the
default settings on the export to COLLADA dialog are not compatible with
Photoshop CS5. You need to make sure the checkbox named “Preserve
component hierarchies” is not checked. Otherwise, Photoshop will not be
able to parse the file. If you download any files from Google 3D warehouse
you will need to watch out for this as well. If you have a problem loading the
file in Photoshop, bring it back into Sketchup and export with that setting
turned off and this should fix the problem.
If you want to eventually include your file in an Acrobat document you
should export it as a U3D file. All you need to do is to open up Acrobat
Professional and use the Create PDF from File command and then add your
U3D file.
If you would like to import your file into Google Earth you should export it as
a KMZ file.
OBJ is useful if you are just doing model transfers as it does not contain
animation, lights or cameras. Because it is such a simple format it is usually
very reliable for model interchange.
199
|
This page intentionally left blank
Index
3D-Axis tool, 35–6, 46
3DS file format, 196
3DVIA software, 154–7
Active light source limit, 74
Adobe Ray Tracer see Ray Tracer
Adobe Repoussé feature see Repoussé feature
Anaglyphic (red/blue) effect, 190–1
Animation of stars, 97–102
Axis tool, 3D, 35–6, 46
Barker, Corey:
merging 3D objects, 32
Repoussé feature
3D and Photoshop effects, 133–43
3D product shots, 113–24
cover art breakdown, 144–51
introduction, 103–4
masking 3D shapes for effect, 125–33
text/reflections, 104–12
Blur settings, 6, 150, 181–2
Brown, Russell, creating lenticulars:
equipment/software, 188
introduction, 187
workflow, 188–92
Bump maps, 12–13, 40, 179
Burns, Stephen, painting, texturing and lighting:
depth of field, 180–6
introduction, 154–5
importing 3D using 3DVIA, 154–169
lighting the 3D model, 173–175
localized bumps, 178–180
reflective characteristics, 178–80
splash effect, 180–6
texturing walls of buildings, 170–172
wet look on streets, 175–178
Cabernet wine label:
cork, 83
glass bottle, 86–92
introduction, 81–2
lights, 84–5
opacity,
96
Ray Tracer,
86
reflections, 93–6
shadows, 91–2
Camera Zoom option, 160
Cameras:
orthographic, 5
perspective, 5
tools, 147, 150
Changing shape with Repoussé feature, 60–4
chromeallusion.com website, 186
City skyline image, 139–43
Clone Stamp tool, 46
Clouds, 162
Collada file format, 32, 196–7, 199
Color change of materials, 39–40
Colored transparent shadows, 51–4
Comparison of 3D v. 2D, 3–4
Compositing 3D (Bert Monroy):
Cabernet wine label, 80–96
introduction, 77–8
postcard, 3D feature, 78, 97, 99
simple complexity, 97–102
“Times Square”, New York, 78–80
Venice canal, 81
Cone shape, 32
Constraints:
internal, 106
Repoussé feature
active, 66
description, 64–6
holes, 65–7
inactive, 66–8
Converting to 3D, 31
Cover art breakdown, 144–51
Creating lenticulars (Russell Brown):
equipment/software, 188
introduction, 187
workflow, 188–92
Crop tool, 192
CS5 brand:
3D and Photoshop effects, 133–8, 142–3
cover art breakdown, 144–51
Eurostile font, 144
Current Time indicator, 102
Dassault Systems, 154, 156
Definition of 3D, 3–4
Depth of field:
3D scene, 150
aperture simulation, 6
splash effect, 181–2
Depth map preset, 24–5
DICOM
images,
35
Diffuse
color, 11
Diffuse map, 11, 39–40, 54
201
|
Distort tool, 90
Dog object, 4, 41, 42, 49
Double Identity movie poster, 187–92
Dropper tools, 39
Environment map, 12
Eurostile font, 144
Eyedropper tool, 114
File formats:
3DS, 196
Collada, 32, 196–7, 199
KMZ, 196-7
OBJ, 195-6
U3D, 197–8, 199
File loading, 3D, 74
Filters:
Gaussian Blur, 181
Motion Blur, 183–6
Ocean Ripple, 91
Plastic Wrap, 184
Ripple, 91
Smart, 186
Final scene rendering, 55–6
Free Transform tool, 165
Gaussian Blur filter, 181
Glossiness maps, 12, 40
Gobo light effect, 147–8
“Good lighting”,11
GPU memory (VRAM), 72
Gradient tool, 116, 129
Graphics Processing Units (GPUs), 19–20
Ground plane:
3D product shots, 123
CS5 brand, 145
Ground shadows, 50
Hard Light, 168
Image based lighting (IBL), 173
Image-based light, 9–10
Importing 3D, 31
Infinite light, 8
Interactive memory:
allow direct to screen, 73
auto-hide layers, 73
OpenGL, 73
Ray Tracer, 73
Interactive rendering, 73
Internal constraints, 106
Interoperability and limitations, 199
KMZ file format, 196–7
Lava lighting, 15
Layout, painting, texturing and lighting,
157–70
Lenticular images, 187
Light:
3D, 111
Gobo light, 147–8
Hard, 168
image-based, 9–10
infinite, 8
point, 7
spot, 8–9
types, 45
Light Rotate tool, 3D, 120
Lights:
3D, 48, 119, 173–5
Cabernet wine label, 84–5
CS5 brand, 147
editing, 46–7
introduction,
7
lava, 15
Photoshop
logo, 148
positioning, 45–6
product shots, 119–20
Repoussé feature, 111
shadow, 48
spot, 119, 148
Loader tools, 39
Localized bumps, 178–80
Magic Wand tool, 88
Maps:
bump, 12–13, 40, 179
depth, 24-5, 34
diffuse, 11, 39–40, 54
environment, 12
glossiness, 12–13, 40
normal, 14–15
opacity, 12–13, 40
reflection/refraction, 15
self T, 14
shininess, 12–13, 40
UVs, 17–18
Masking 3D shapes for effect, 125–33
Materials:
browsing, 37–8
color change, 39–40
Dropper/Loader tools, 39
editing, 39–40
introduction, 37
library, 37–8
maps and properties, 11–15
objects, 9–11
painting, 40–4
refractive index, 23
|
Index
202
Repoussé feature, 67
self-illumination, 14, 40
tools, 39–40
Mesh, 3D:
grayscale, 34
painting, texturing and lighting, 158
panel, 48
product shots, 117
quality settings, 67–9, 124, 137
Shadow Opacity, 47
shadows, 48
split Repoussé, 145
tool, 108, 120, 146
vertices, 3–4
Mesh Pan tool, 100, 118
Mesh Rotate tool, 100, 117
Mesh Scale tool, 118
MIDNIGHT MOVIES text layer, 107–12
Monroy, Bert:
3D shape from preset, 32
compositing and 3D:
Cabernet wine label, 80–96
introduction, 77–78
simple complexity, 97–102
“Times Square”, New York, 78–9
Motion Blur filter, 183–6
Navigation, 3D, 35–6
Normal maps, 14–15
Normal presets, 24–5
OBJ file format, 195–6
Object Mesh tool, 136
Object Rotate tool, 3D, 36, 100–1,
114, 120
Object Slide tool, 102
Objects, 3D:
bumps/dents, 15
CS5 brand, 134–8, 142–3
dog, 4, 41, 42, 49
materials, 9–11, 37–8
merging, 32
phone, 118–24
rendering, 37
Repoussé, 33
shadows, 160
vertices, 4
Ocean Ripple filter, 91
Opacity:
Cabernet wine label, 96
colored transparent shadows, 51–4
maps, 12–13, 40
painting, texturing and lighting, 161, 169
shadow, 47
TITAN text layer, 131
OpenGL (Open Graphics Library):
3D preferences, 71
3D-Axis tool, 36
description, 19–20
overlays, 30
painting, 40
render mode, 24
Repoussé feature, 57
Orthographic cameras, 5
Paint Falloff command, 42
Paint Mask Render Setting, 41
Paintbrush tool, 86, 97
Painting on 3D:
introduction, 40
–1
positionin
g of
3D model, 41–4
tiles, 44
unwrapped textures, 43
Painting, texturing and lighting (Stephen Burns):
3D texturing engine, 153
3DVIA, 154–7
depth of field, 181–6
introduction, 153–4
layout, 157–70
lighting the 3D model, 173–5
localized bumps, 178–80
opacity, 161, 169
reflective characteristics, 176–80, 178–80
splash, 181–6
texturing walls of buildings, 170–2
wet look for streets, 175–7
Patch tool, 165, 167
Perspective cameras, 5
Phone object, 118–24
Photoshop:
3D effects, 133–43
logo, 147–8
Pixels:
ray tracing, 21
rendering, 19
Plastic Wrap filter, 184
Point light, 7–8
Positioning of 3D model and painting, 41–4
Postcard, 3D:
conversion, 31–2
CS5 brand, 148
lenticular images, 190
Photoshop, 78–80
simple complexity, 97
star animation, 99
Preferences, 3D, 71–2, 73
Product shots, 3D:
Corey Barker, 113–24
ground plane, 123
lights, 119–20
Index
|
203
Product shots, 3D (Continued)
rendering, 124
Progressive rendering, 56
pro.snapily.com website, 192
Ray Tracer:
3D product shots, 124
Bump map, 179
Cabernet wine label, 86
CS5 brand, 149
description, 21–2
interactive rendering, 73
MIDNIGHT MOVIES layer, 112
quality threshold, 73–4
rendering, 37–8, 55–6, 73
shadows, 47
splash effect, 185
Ray tracing, 20–4
Reflections:
3D product shots, 122
maps, 15
Repoussé feature, 104–12
Reflective characteristics, 176–8, 178–80
Reflectivity materials, 40
Refraction maps, 15
Refractive index:
materials, 23
transparent sphere, 15
Rendering:
3D product shots, 124
Double Identity movie poster, 191–2
final scene, 55–6
interactive, 73
pixels, 19
progressive, 56
Ray Tracer, 37, 55–6
settings, 24
test, 56
Reparameterizing UVs, 43
Repoussé feature:
changing shape
bend and shear, 61–2
bevel, 62–3
extrusion, depth, twist and scale, 60–2
inflation, 62–4
changing shape and presets, 61
constraints
active, 66
description, 64–6
holes, 65–7
inactive, 66–8
Corey Barker
3D and Photoshop effects, 133–43
3D product shots, 113–24
cover art breakdown, 144–51
introduction, 103–
4
lights,
111
masking 3D shapes for effect, 125–32
MIDNIGHT MOVIES text layer, 107–12
reflections, 104–12
text, 104–12
TITAN text layer, 125–32
CS5 brand, 146
dialog, 58–60
introduction, 57–60
materials, 67
mesh quality, 67–9
objects, 3D, 33
speed, 68
split apart functionality, 68–9
split mesh 3D, 145
Ripple filter, 91
Rotate Camera tool, 3D, 120
russellbrown.com website, 187–8
Scene Panel, 3D:
description, 30
map selection, 40
Render Settings presets, 41–2
shadows, 47
splash effect, 185
Scenes, 3D:
depth of field, 150
description, 3
Self-Illumination materials, 14, 40
Shades, editing, 47–50
Shadow Opacity (mesh), 47
Shadows:
3D objects, 160
adding/editing, 47–50
colored transparent, 51–4
ground, 50
interaction, 55
lights, 48
mesh, 48
Venice canal, 91–2
Shape:
3D from presets, 32
Repoussé feature, 60–4
Shininess maps, 12–13, 40
Simple complexity and star fields, 97–102
Snapping object to ground plane, 50
Speed of Repoussé feature, 68
Splash effect, 181–6
Split apart functionality and Repoussé feature,
68–9
Spot lights, 8–9, 119, 148
Stamp tool, 165
Star fields animation, 97–102
Stereo imagery (3D), 187
|
Index
204
Test rendering, 56
Texturing walls of buildings, 170–2
Tiles and painting in 3D, 43
“Times Square”, New York, 78–80
TITAN text layer, 125–33
Type Mask tool, 33
U3D file format, 197–8, 199
Unwrapped textures and painting, 43
UVs:
description, 16
maps, 17–18
reparameterizing, 43
Venice canal:
Cabernet wine label, 81, 87, 93–4
shadows, 91–2
Vertices in 3D, 3–4
Volumes in 3D, 35
Warp tool, 95
Wet look for streets, 175–7
Workflows:
3D and compositing (Bert Monroy), 77–102
Adobe Repoussé (Corey Barker), 103–51
creating lenticulars (Russell Brown), 187–92
painting, texturing and lighting (Stephen Burns),
153–86
summary, 75
Workspace and 3D panel, 29–30
Zoom Camera tool, 181
Index
|
205
This page intentionally left blank
This page intentionally left blank
This page intentionally left blank