Ajax in Oracle JDeveloper phần 2 ppsx
Bạn đang xem bản rút gọn của tài liệu. Xem và tải ngay bản đầy đủ của tài liệu tại đây (3.6 MB, 23 trang )
1.7 JDeveloper Integrated JavaScript Editor 11
Creating the JavaScript file separately has an advantage as the integrated
JavaScript Editor may be availed of. Create a JavaScript file by selecting
File>New
and in the
New Gallery
window
Web
Tier>HTML>JavaScript File. Copy some JavaScript code to the
JavaScript file. Create a JSP file to add the JavaScript file to with
File>New. In the New Gallery window select Web Tier>JSP in
Categories
and select
JSP
in
Items
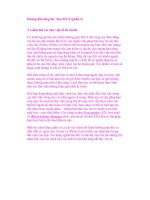
. The JavaScript file and the JSP file
are shown in Fig. 1.1.
Fig. 1.1 JavaScript File
One of the features of the JavaScript editor is syntax highlighting. To
add syntax highlighting select
Tools>Preferences
and in the
Preferences
window select Code Editor>Syntax Colors. Select JavaScript in the
Language list. The Font Style, Foreground color and Background color
may be set for the different JavaScript constructs in the Syntax Colors
window as shown in Fig. 1.2.
12 1 What is Ajax?
Fig. 1.2 Setting Syntax Highlighting
JavaScript editor also provides code completion. As the JavaScript
syntax varies in the different browsers we need to specify the browser for
which code completion is to be implemented. Select JavaScript Editor in
the Preferences window and select a Target Browser for code
completion as shown in Fig. 1.3.
Fig. 1.3 Selecting Target Browser
1.7 JDeveloper Integrated JavaScript Editor 13
In the JavaScript file right-click and select Source>Completion
Insight or Source>Smart Completion Insight for code insight as shown
in Fig. 1.4.
Fig. 1.4 Using Code Insight
Another feature of the JavaScript editor is Go To Declaration using
which a JavaScript variable or function may be navigated to from a usage
of the JavaScript variable/function. For example, select a usage of the
variable xmlHttpRequest, right-click and select Go To Declaration to
go to the declaration of the xmlHttpRequest variable as shown in Fig.
1.5.
14 1 What is Ajax?
Fig. 1.5 Go To Declaration
JavaScript editor also provide brace matching and code folding.
Another feature is error underling and error auditing. For example, add an
error by removing the ‘{‘ for a function declaration. An error analysis gets
run and the errors get underlined as shown in Fig. 1.6.
Fig. 1.6 Error Analysis
1.7 JDeveloper Integrated JavaScript Editor 15
Usages of a variable or function may be retrieved by selecting the
variable/function and selecting Find Usages. For example, select
xmlHttpRequest, right-click and select
Find Usages
. The usages of
the xmlHttpRequest variable get listed in the log window as shown in
Fig. 1.7.
Fig. 1.7 Find Usages
A JavaScript file is integrated with the Structure pane from which
different variables and functions may be navigated to as shown in Fig. 1.8.
16 1 What is Ajax?
Fig. 1.8 JavaScript File Structure
JavaScript editor also provides refactoring to rename or delete a
variable or function. To refactor, right-click and select Refactor>Rename
or Refactor>Delete Safely as shown in Fig. 1.9.
Fig. 1.9 Refactoring
1.8 Summary 17
To add the JavaScript file to a JSP drag and drop the file from the
Application navigator to the JSP. A <script/> element for the
JavaScript file gets added to the JSP as shown in Fig. 1.10.
Fig. 1.10 Adding JavaScript to JSP
1.8 Summary
In this chapter we discussed the XMLHttpRequest object, which forms
the basis of Ajax. An Ajax request is initiated from a browser by first
creating an XMLHttpRequest object and opening the
XMLHttpRequest object using the open() method. The method used
to create the XMLHttpRequest varies with the browser used. An Ajax
request is sent using the send() method of XMLHttpRequest. When
the request completes the Ajax XML response is retrieved using the
responseXML attribute of the XMLHttpRequest object. The web
page that sent the Ajax request is updated with the Ajax XML response by
retrieving the XML data and setting the data into the web page elements
using DOM functions. We also discussed the JavaScript Editor integrated
into JDeveloper 11g.
2 Developing an Ajax Web Application
2.1 Introduction
As we discussed in the previous chapter Asynchronous JavaScript for
XML (Ajax) is a web technique that combines JavaScript, Document
Object Mode (DOM) and XMLHttpRequest technologies to provide
dynamic interaction between a client and a server. Ajax is a technique, not
a technology. As an example, suppose a user fills out a form to add data to
a database table. Without Ajax, the validity of data in the form is not
checked till the form is submitted. With Ajax, the data added to the form is
dynamically validated as the data is added to form fields using business
logic in a server side application. Thus, a complete form does not have to
be posted to the server to check if data added in the form is valid. In this
chapter we shall create a web application using Ajax in JDeveloper 11g to
validate an input form.
2.2 Setting the Environment
Install JDeveloper 11g
1
if not already installed. To install JDeveloper 11g
download the zip file for JDeveloper 11g and unzip the zip file to the
C:/JDeveloper11g directory. The preconfigured paths in JDeveloper 11g
require that JDeveloper be installed in the JDeveloper11g directory. First,
create a JDeveloper application and project with File>New. In the New
Gallery window select General in Categories and Application in Items.
Click on
OK
. In the
Create Application
window specify the
Application
Name and click on OK. In the Create Project window specify the
Project Name
and click on
OK
. A JDeveloper application and project get
added to Application Navigator as shown in Fig. 2.1.
1
JDeveloper11g-
jdev/htdocs/soft11tp.html
20 2 Developing an Ajax Web Application
Fig. 2.1 JDeveloper Application and Project
In the project add a JSP file, input.jsp, with File>New. In the New
Gallery window select Web Tier>JSP in Categories and JSP in Items as
shown in Fig. 2.2. Click on OK.
Fig. 2.2 Creating a JSP
2.2 Setting the Environment 21
In the JSP File window specify a file name and click on OK. JSP
input.jsp gets added to Application Navigator as shown in Fig. 2.3.
Fig. 2.3 New JSP in Application Navigator
The input.jsp JSP provides the client side of the Ajax web application.
Similarly, add JSPs catalog.jsp and error.jsp for redirecting client
application based on if the Ajax web application generates an error in
creating a catalog entry. Next, create a JavaScript file input.js with
File>New. In the New Gallery window select Web Tier>HTML in
Categories and JavaScript File in Items and click on OK as shown in
Fig. 2.4.
22 2 Developing an Ajax Web Application
Fig. 2.4 Creating a JavaScript File
In the
Create JavaScript File
window specify
File Name
as input.js
and click on OK. JavaScript file input.js gets added to Application
Navigator
. For server side processing, add a HTTP Servlet with
File>New. In the New Gallery window select Web Tier>Servlets in
Categories and HTTP Servlet in Items and click on OK as in Fig. 2.5.
Fig. 2.5 Creating a Servlet
2.2 Setting the Environment 23
Click on Next in Create HTTP Servlet Wizard. In Servlet
Information window, specify a Servlet name,
FormValidationServlet, and click on
Next
as shown in Fig. 2.6.
Fig. 2.6 Specifying Servlet Class
In the Mapping Information window specify a servlet mapping
URL, /validateForm for example, and click on Next as shown in Fig.
2.7.
24 2 Developing an Ajax Web Application
Fig. 2.7 Specifying Servlet Mapping URL
In Servlet Parameters window, specify any servlet parameters if
required (none by default) and click on Finish. A HTTP Servlet gets added
to the Application Navigator. Ajax web application structure is shown in
Fig. 2.8.
Fig. 2.8 Ajax Web Application Directory Structure
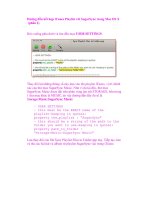
2.2 Setting the Environment 25
Next, add some required libraries to the Ajax project with
Tools>Project Properties. In the Project Properties window select
Libraries and Classpath
and click on
Add Library
. Add library
Oracle
JDBC, which is required for Oracle database access. Click on OK in
Project Properties
window as shown in Fig. 2.9.
Fig. 2.9
Adding a Library
The Ajax web application in this chapter retrieves data and updates data
in an Oracle database table. Install Oracle 10g database including the
sample schemas and a database instance ORCL. Create a database table
with SQL script listed below using SQL client SQL Plus or in command
line.
CREATE TABLE OE.Catalog(CatalogId VARCHAR(25),
Journal VARCHAR(25), Publisher Varchar(25), Edition
VARCHAR(25), Title Varchar(45), Author Varchar(25));
INSERT INTO OE.Catalog VALUES('catalog1', 'Oracle
Magazine', 'Oracle Publishing', 'Nov-Dec 2004',
'Database Resource Manager
', 'Kimberly Floss');
INSERT INTO OE.Catalog VALUES('catalog2', 'Oracle
Magazine', 'Oracle Publishing', 'Nov-Dec 2004',
'From ADF UIX to JSF', 'Jonas Jacobi');
INSERT INTO OE.Catalog VALUES('catalog3', 'Oracle
Magazine', 'Oracle Publishing', 'March-April
2005', 'Starting with Oracle ADF ', 'Steve Muench');
26 2 Developing an Ajax Web Application
Next, define a JDBC Connection with the Oracle database in the
Databases window. To create a JDBC connection, right-click on the IDE
Connections
node and select
New Connection
as shown in Fig. 2.10.
Fig. 2.10
Creating New Connection
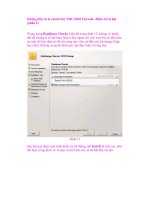
The Create Database Connection wizard gets started. Specify a
Connection Name and select the default Connection Type, Oracle
(JDBC). Specify Username as OE, because the database table was
created in OE schema, and specify the Password for OE schema. In the
Oracle JDBC Settings header, select the thin Driver, specify Host Name
as localhost, and JDBC Port as 1521. Specify the SID as ORCL.
Click on Test Connection. If a JDBC connection gets established a
“Success” message gets displayed. Click on OK as shown in Fig. 2.11.
2.2 Setting the Environment 27
Fig. 2.11 Configuring a Connection
A node for the connection gets added to IDE Connections node in
Databases window as shown in Fig. 2.12. The Catalog table may be
modified if required using the SQL Worksheet.
28 2 Developing an Ajax Web Application
Fig. 2.12 New Database Connection
Connection AjaxConnection in Databases window is available as
datasource with JNDI name jdbc/AjaxConnectionDS. To the
web.xml configuration file we need to add the following <resource-
ref/> element.
<resource-ref>
<res-ref-name>jdbc/AjaxConnectionDS</res-ref-name>
<res-type>javax.sql.DataSource</res-type>
<res-auth>Container</res-auth>
</resource-ref>
Select File>Save All to save the Ajax project. The
C:\JDeveloper\mywork\AjaxApp\AjaxApp-data-sources.xml file should
have a managed data source configured with JNDI
jdbc/AjaxConnectionDS
. A managed-data-source element gets
added to the data sources file by default when the JDBC connection is
configured in Databases window. A managed data source may also be
configured declaratively in the AjaxApp-data-sources.xml by adding the
following connection pool and managed data source definitions to the
AjaxApp-data-sources.xml file.
<connection-pool name=”AjaxConnectionPool” validate-
connection=”false”><connection-factory factory-
class=”oracle.jdbc.pool.OracleDataSource” user=”OE”
password=”->jdbc:oracle:thin:@localhost:1521:ORCL_OE”
url=”jdbc:oracle:thin:@localhost:1521:ORCL”/>
2.3 Sending an Ajax Request 29
</connection-pool><managed-data-source
name=”AjaxDataSource” connection-pool-
name=”AjaxConnectionPool” jndi-
name=”jdbc/AjaxConnectionDS” user=”OE” password=”-
>AjaxConnectionPool_OE” tx-level=”global”/>
2.3 Sending an Ajax Request
In this chapter, we shall create an Ajax web application that validates data
input in a HTML form. Data added to the HTML form is sent
asynchronously to the server. On the server side, a HTTP servlet
processes the input from the form and returns a response as an XML DOM
object. In the client application the response from the server is processed
and a message is output about the validity of the data added. In the
example application, an input form is used to create a catalog entry that is
sent to the server and updated in the database in a server side Servlet. A
developer would be interested in ascertaining if a catalog Id specified in
the input form is not already taken in the catalog database. As the client
specifies the catalog Id field, an
XMLHttpRequest
is sent to the server
with each modification in the input field. A response from the server in the
form of an XML DOM object provides information to the client about the
validity of the catalog Id value specified. Without Ajax, the complete form
would have to be posted to the server and the client JSP reloaded after a
response is received from the server. The procedure to send an
XMLHttpRequest request is as follows.
1. Create a XMLHttpRequest object.
2. Open a XMLHttpRequest request.
3. Register a callback method to be invoked when the request is
complete.
4. Send a XMLHttpRequest request.
5. Process the XML response and set HTML page content.
An
XMLHttpRequest
request is initiated from an HTML form that
has input fields for creating a catalog entry. The XMLHttpRequest is
initiated from the Catalog Id field, which is required to be validated. A
JavaScript function, validateCatalogId() is invoked with
onkeyup event. To the input.jsp add an input form with the <form>
element. The input form has an input field for creating a catalog entry in
Oracle database table CATALOG. The Catalog Id field is for specifying the
Catalog Id and is the field we need to validate.
30 2 Developing an Ajax Web Application
<form name=”validationForm” action=”validateForm”
method=”post”>
<table>
<tr><td>Catalog Id:</td><td><input type=”text”
size=”20”
id=”catalogId”
name=”catalogId”
onkeyup=”validateCatalogId()”></td>
<td><div id=”validationMessage”></div></td>
</tr>
…
….
</table></form>
In the JavaScript file input.js create a JavaScript function
validateCatalogId() in which create a new XMLHttpRequest
object.
function validateCatalogId(){
var xmlHttpRequest=init();
function init(){
if (window.XMLHttpRequest) {
return new XMLHttpRequest();
} else if (window.ActiveXObject) {
return new ActiveXObject(“Microsoft.XMLHTTP”);
}
}
}
Next, in the JavaScript file construct the URL to which the
XMLHttpRequest is to be sent. As the FormValidationServlet
is mapped to servlet URL validateForm, specify the URL as
validateForm with a catalogId parameter.
var catalogId=document.getElementById(“catalogId”);
xmlHttpRequest.open(“GET”, “validateForm?catalogId=”+
encodeURIComponent(catalogId.value), true);
Register a callback event handler for the XMLHttpRequest using the
onreadystatechange
property. In the example application, the
callback method is the processRequest function.
xmlHttpRequest.onreadystatechange=processRequest;
Send the XMLHttpRequest to the server using the send message. As
the HTTP method is GET, data sent with the send method is set to null.
xmlHttpRequest.send(null);
2.4 Processing an Ajax Request on the Server Side 31
As the callback method is processRequest, the
processRequest function is invoked when value of the readyState
property changes. In the processRequest function, the readyState
property value is retrieved to determine if request has loaded completely
and if HTTP status is “OK”.
function processRequest(){
if(xmlHttpRequest.readyState==4){
if(xmlHttpRequest.status==200){
processResponse();
}
}
}
2.4 Processing an Ajax Request on the Server Side
To the server an Ajax request is just like any other HTTP request. In this
section, the server side processing of the XMLHttpRequest request
sent to the server is discussed. The XMLHttpRequest is sent to url
validateForm?catalogId=catalogId. Variable catalogId is
the value of parameter catalogId. As the
FormValidationServlet is mapped to url validateForm, the
servlet gets invoked. As the XMLHttpRequest method is GET, the
doGet method of the servlet gets invoked. In the doGet method,
retrieve the value of the catalogId parameter.
String catalogId = request.getParameter(“catalogId”);
To obtain data from the database, create a JDBC connection from a
datasource. Create a DataSource object using an InitialContext
object lookup and from the DataSource object obtain a Connection
object.
InitialContext initialContext = new InitialContext();
javax.sql.DataSource ds = (javax.sql.DataSource)
initialContext.lookup(“java:comp/env/jdbc/AjaxConnect
ionDS”);
java.sql.Connection conn = ds.getConnection();
Create a Statement object, specify a SQL query to retrieve data
from the database for the catalogId value specified in the input form,
and obtain a ResultSet object with the executeQuery(String
query) method of the Statement object.
32 2 Developing an Ajax Web Application
Statement stmt = conn.createStatement();
String query = “SELECT * from OE.Catalog
WHERE catalogId=” + “’” +
catalogId + “’”;
ResultSet rs = stmt.executeQuery(query);
Set the content type of the HttpServletResponse to text/xml,
and set the cache-control header to no-cache.
response.setContentType(“text/xml”);
response.setHeader(“Cache-Control”, “no-cache”);
The response from the servlet is in the form of a XML DOM object.
Construct an XML DOM object that contains information about the
validity of the catalogId field value. If the ResultSet object is
empty, the catalogId field value is not defined in the database table
Catalog, therefore the catalogId field value is valid. If the
ResultSet object has data, the catalogId value is already defined in
the database, therefore, the catalogId field value is not valid. The
business logic to define a valid Catalog Id may be customized. The
Catalog Id input may be matched to a pattern using regular expressions
API available in the java.util.regex package. We have used the
business logic that if a catalog id is not defined in the database it is valid.
If a catalog entry is already defined for the catalogId value include the
field values of the different fields in the input form in the XML DOM
object. The XML DOM object is required to have a root element. In the
example application, the XML DOM object has a <valid></valid>
element that specifies the validity of the Catalog Id field value.
if (rs.next()) {
out.println(“<catalog>” + “<valid>false</valid>” +
“<journal>” +
rs.getString(2) + “</journal>” + “<publisher>” +
rs.getString(3) + “</publisher>” + “<edition>” +
rs.getString(4) + “</edition>” + “<title>” +
rs.getString(5) + “</title>” + “<author>” +
rs.getString(6) + “</author>” + “</catalog>”);
} else {
out.println(“<valid>true</valid>”);
}
If the catalogId field value is not defined in the database, a catalog
entry may be added for the catalogId value by obtaining a JDBC
connection to the database, and adding a catalog entry with an SQL
INSERT
statement. Copy the
FormValidationServlet
, which is
2.4 Processing an Ajax Request on the Server Side 33
listed below, to FormValidationServlet.java file in the Ajax
project.
package ajax;
import java.io.*;
import java.sql.*;
import javax.naming.InitialContext;
import javax.servlet.*;
import javax.servlet.http.*;
public class FormValidationServlet extends
HttpServlet {
public void doGet(HttpServletRequest request,
HttpServletResponse response)
throws ServletException, IOException {
try {
//Obtain value of Catalog Id field to ve
validated.
String catalogId =
request.getParameter(“catalogId”);
//Obtain Connection
InitialContext initialContext = new
InitialContext();
javax.sql.DataSource ds = (javax.sql.DataSource)
initialContext.lookup(
“java:comp/env/jdbc/AjaxConnectionDS”);
java.sql.Connection conn = ds.getConnection();
//Obtain result set
Statement stmt = conn.createStatement();
String query = “SELECT * from OE.Catalog WHERE
catalogId=” + “’” +catalogId + “’”;
ResultSet rs = stmt.executeQuery(query);
// set headers before accessing the
Writer
response.setContentType(“text/xml”);
response.setHeader(“Cache-Control”, “no-cache”);
PrintWriter out = response.getWriter();
// then write the response
//If result set is empty set valid element to
true
if (rs.next()) {
out.println(“<catalog>” +
“<valid>false</valid>” + “<journal>” +
rs.getString(2) + “</journal>” + “<publisher>”
+
rs.getString(3) + “</publisher>” + “<edition>”
+
34 2 Developing an Ajax Web Application
rs.getString(4) + “</edition>” + “<title>” +
rs.getString(5) + “</title>” + “<author>” +
rs.getString(6) + “</author>” + “</catalog>”);
} else {
out.println(“<valid>true</valid>”);
}
rs.close();
stmt.close();
conn.close();
} catch (javax.naming.NamingException e) {
} catch (SQLException e) {
}
}
public void doPost(HttpServletRequest request,
HttpServletResponse response)
throws ServletException, IOException {
try {
//Obtain Connection
InitialContext initialContext = new
InitialContext();
javax.sql.DataSource ds =
(javax.sql.DataSource)
initialContext.lookup(“java:comp/env/jdbc/AjaxConn
ectionDS”);
java.sql.Connection conn = ds.getConnection();
String catalogId =
request.getParameter(“catalogId”);
String journal = request.getParameter(“journal”);
String publisher =
request.getParameter(“publisher”);
String edition = request.getParameter(“edition”);
String title = request.getParameter(“title”);
String author = request.getParameter(“author”);
Statement stmt = conn.createStatement();
String sql = “INSERT INTO Catalog VALUES(“ + “\’”
+ catalogId +
“\’” + “,” + “\’” + journal + “\’” +
“,” + “\’” + publisher +
“\’” + “,” + “\’” + edition + “\’” +
“,” + “\’” + title + “\’” +
“,” + “\’” + author + “\’” + “)”;
stmt.execute(sql);
response.sendRedirect(“catalog.jsp”);
stmt.close();
conn.close();
} catch (javax.naming.NamingException e) {