Engineering Drawing for Manufacture phần 2 pps
Bạn đang xem bản rút gọn của tài liệu. Xem và tải ngay bản đầy đủ của tài liệu tại đây (1.04 MB, 17 trang )
Principles of engineering drawing 11
the only one that provides a full specificatio n which allows contracts
to be issued and has the support of the law in the 'servant-master'
sense. To put it in the words of a BSI drawing manual:
'National and
international legal requirements that may place constraints on designs and
designers should be identified These may not only be concerned with the
aspect of health and safety of material but also the avoidance of danger to
persons and property when material is being used, stored, transported or
tested'
(Parker, 1991).
1.5.2 Representation and specification
In Section 1.3, it was stated that engineering drawing was the equiv-
alent of a language. A language has to have a set of rules and regu-
lations for it to operate correctly. The same is true of engineering
drawing. In the English language, there are two basic rules. The first
is the word order that gives information on subject and object. The
second is spelling, which gives information on the words themselves
in terms of the spelling, i.e. the nouns, verbs, etc. Considering the
word order, the phrase
'the cat sat on the mat'
is very different from the
phrase
'the mat sat on the cat'.
All that has happened is that the words
'cat' and 'mat' have been swapped. Previously, the phrase described
a perfectly feasible situation whereas it now describes an impossible
situation. Thus, the word order gives information on which is the
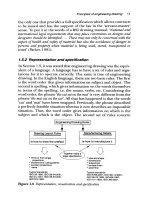
subject and which is the object. The second set of rules concern
I
Engineering Drawing Rules I
Drawing Layout Rules
ie how to draw the artefact
Manufacturing Details
ie how to manufacture it
* third (or first) angle ize and
shape
projections
* dimensions
* sections and cutting planes *
tolerances
* auxiliary projections * surface finish
* views * assembly
Typical
standards:
ISO128-1982, ISO128-34:2001,
ISO-44, 2001, ISO128-50:2001,
ISO7573:1983.
Typical
standards:
ISO15768:2001, ISO129-1.2:2001,
ISO128-22:1999, I SO406:1987,
ISO1101:1983, ISO1302:2001.
Figure
1.8
Representation, visualization and specification
12 Engineering drawing for manufacture
spelling and thus the phrase
'the cat sat on the mat'
is very different
from
'the bat sat on the mat'
and yet this difference is the result of only
one letter being changed!
In engineering drawing, there are similarly two sets of rules. The
first also concerns order but in this case the order of the different
orthographic views of an engineering artefact. The second is
concerning how the individual views are drawn using different line
thicknesses and line types, which is the equivalent of a spelling
within each individual word. These are shown in Figure 1.8. The
first set are the 'drawing layout rules', which define information
concerning the projection method used and therefore the
arrangement of the individual views and also the methodology
concerning sections. The second set of rules is the 'manufacturing
rules', which show how to produce and assemble an artefact. This
will be in terms of the size, shape, dimensions, tolerances and
surface finish. The drawing layout rules and the manufacturing
rules will together make a legal specification that is binding. Both
sets of rules are defined by ISO standards. When a contractor uses
these two sets of rules to give information to a subcontractor on how
to make something, each party is able to operate because of the
underpinning provided by ISO standards. Indeed, Chapter 4 will
give information concerning a legal argument between a contractor
and a subcontractor. The court awarded damages to the sub-
contractor because the contractor had incorrectly interpreted ISO
standards. In another dispute with which the author is familiar, the
damages awarded to a contractor because of poor design bank-
rupted a subcontractor.
1.6 Requirements of engineering drawings
Engineering drawings need to communicate information that is
legally binding by providing a specification. Engineering drawings
therefore need to met the following requirements:
Engineering drawings should be unambiguous and clear. For
any part of a component there must be only one interpretation.
If there is more than one interpretation or indeed there is doubt
or fuzziness within the one interpretation, the drawing is incom-
plete because it will not be a true specification.
Principles of engineering drawing 13
[]
The drawing must be complete. The content of an engineering
drawing must provide all the information for that stage of its
manufacture. There may be several drawings for several phases
of manufacture, e.g. raw shape, bent shape and heat-treated.
Although each drawing should be complete in its own right, it
may rely on other drawings for complete specification, e.g.
detailed drawings and assembly drawings.
9 The drawing must be suitable for duplication. A drawing is a
specification which needs to be communicated. The infor-
mation may be communicated electronically or in a hard copy
format. The drawing needs to be of a suitable scale for dupli-
cating and of a sufficient scale such that if is micro-copied it can
be suitable magnified without loss of quality.
9 Drawings must be language-independent. Engineering
drawings should not be dependent on any language. Words on a
drawing should only be used within the title block or where
information of a non-graphical form needs to be given. Thus,
there is a trend within ISO to use symbology in place of words.
m Drawings need to conform to standards. The 'highest' standards
are the ISO ones that are applicable worldwide. Alternatively
standards applicable within countries may be used. Company
standards are often produced for very specific industries.
1.6.1 Sizes and layout of drawing sheets
The standard dealing with the sizes and layout of drawing sheets is
ISO 5457"1999. If hard copies of drawings are required, the first
choice standard sizes of drawings are the conventional 'A' sizes of
drawing paper. These sizes are illustrated in Figure 1.9. Drawings
can be made in either portrait or landscape orientation but
whatever orientation is used, the ratio of the two sides is 1 :~/2,
(1:1.414). The basic 'A' size is the zero size or '0', known as 'A0'. This
has a surface area of lm 2 but follows the 1 :~/2 ratio. The relationship
is that A1 is half A0, A2 is half A1, etc.
A blank drawing sheet
should contain the following things (see
Figure 1.10). The first three are mandatory, the last four are
optional.
1. Title block.
2. Frame for limiting the drawing space.
3. Centring marks.
14 Engineering drawing for manufacture
A4 ~
A4 = 297mm x 210mm
i, .,., ~
=0,0625m
^2
A3 ,~- -,',"' =~
A3 = 420mm x 297mm
I = 0,125m ^2
A2
A2 = 594mm x 420mm
= 0,25m " 2
i
a1:~"i'" :> A,:84,mmx594mm, , :n.~m , , "_
A0
,./s
ss
A0 = 1189mm x 841 mm
~,. = 1,0m^2
Figure 1.9
The AO to A4 range of standard drawing sheets sizes
4. Orientation marks.
5. Metric reference graduation.
6. Grid reference system.
7. Trimming marks.
The
title block
is a specially designated area of the drawing sheet
containing information for identification, administration and inter-
pretation of the whole drawing. Irrespective of whether landscape
or portrait orientation is used, the title block is normally located in
the bottom right-hand corner of the drawing. The information
included in the title block can range from the very simple to the
exceedingly complex. The manual of British Standards in
Engineering Drawing and Design (Parker, 1991) recommends that
the following basic information always be included in a title block:
== Name of company or organisation, drawing number, title, date,
name of the draughtsman, scale, copyright, projection symbol,
measurement units, reference to standards, sheet number,
number of sheets and issue information.
The following supplementary information can be provided if
necessary:
9 Material and specification, heat treatment, surface finish, toler-
ances, geometrical tolerances, screw thread forms, sheet size,
equivalent part, supersedes, superseded by, tool references,
gauge references and warning notes.
Principles of engineering drawing 15
A border
should be used to define the edge of the drawing region.
It should have a minimum width of 20mm for A0 and A1 sizes and
10mm for A2, A3 and A4. The border shows the edge of the drawing
area and would therefore reveal the fact that the drawing had, say, a
torn-off corner. The drawing frame is the area within the border
(see Figure 1.10).
Trimming marks
may be added at the edge of the drawing within
the border to facilitate trimming of the paper. There should be four
trimming marks at each corner. They can be of two types. The first
type is in the form of a right-angled isosceles triangle as shown in
the top left-hand corner in Figure 1.10. The second alternative
trimming mark is an 'U shape shown on the top right-hand side of
the drawing shown in Figure 1.10.
Centring marks
should be provided on the four sides of a drawing
to facilitate positioning of the drawing. They take the form of
dashes that extend slightly beyond the border as shown in Figure
1.10. They are placed at the centre of each of the four sides.
Orientation marks
may be provided on two sides of the drawing
sheet (see Figure 1.10). These consist of arrows which coincide with
the centring marks. Two such orientation marks should be provided
Trimming marks (x4) Alternative trimming mark
\
9 ,1 I 2 n ~ I ~ I ~ 7
Drawing frame
Grid reference system
_
9 qf }.~_
Orientation marks
(x2)
I 4
Centring marks (x4)
- Title box
DIJ lo I
Border Reference graduations~
Edges of drawing sheet
Figure
1.10 A typical blank sheet used for engineering drawing
16 Engineering drawing for manufacture
on each drawing, one of which points towards the draughtsman's
viewing position.
A reference metric graduation scale
may be provided with a minimum
length of 100mm that is divided into 10mm intervals (see Figure
1.10). The reference graduations consist of 10 off 10mm gradua-
tions together making a total length of 100mm. From this gradu-
ation scale one can conclude that the drawing size is A3. This
calculation shows the usefulness of the reference graduation scale
and that it still permits scaling of a drawing when it is presented at a
different scale than the original.
An alphanumeric grid reference system
is recommended for all
drawings to permit the easy location of things like details, additions
and modifications. The number of divisions should be a multiple of
two, the number of which should be chosen with respect to the
drawings. Capital letters should be used on one edge and numerals
for the other. These should be repeated on the opposite sides of the
drawing. ISO 5457:1980 suggests that the length of any one of the
reference zones should be not less than 25mm and not more than
75mm.
1.6.2 Types of drawings
There are a number of different types of engineering drawings,
each of which meets a particular purpose. There are typically nine
types of drawing in common use, these are:
1. A design layout drawing (or design scheme) which represents
in broad principles feasible solutions which meet the design
requirements.
2. A detail drawing (or single part drawing) shows details of a
single artefact and includes all the necessary information
required for its manufacture, e.g. the form, dimensions, toler-
ances, material, finishes and treatments.
3. A tabular drawing shows an artefact or assembly typical of a
series of similar things having a common family form but
variable characteristics all of which can be presented in tabular
form, e.g. a family of bolts.
4. An assembly drawing shows how the individual parts or sub-
assemblies of an artefact are combined together to make the
assembly. An item list should be included or referred to. An
assembly drawing should not provide any manufacturing
Principles of engineering drawing 1"{
details but merely give details of how the individual parts are to
be assembled together.
5. A combined drawing is a combination of detail drawings,
assembly drawings and an item list. It represents the
constituent details of the artefact parts, how they are manufac-
tured, etc., as well as an assembly drawing and an accompa-
nying item list.
6. An arrangement drawing can be with respect to a finished
product or equipment. It shows the arrangement of assemblies
and parts. It will include important functional as well as
performance requirements features. An installation drawing is
a particular variation of an arrangement drawing which
provides the necessary details to affect installation of typically
chemical equipment.
7. A diagram is a drawing depicting the function of a system,
typically electrical, electronic, hydraulic or pneumatic that uses
symbology.
8. An item list, sometimes called a parts list, is a list of the
component parts required for an assembly. An item list will
either be included on an assembly drawing or a separate
drawing which the assembly drawing refers to.
9. A drawing list is used when a variety of parts make up an
assembly and each separate part or artefact is detailed on a
separate drawing. All the drawings and item lists will be cross-
reference on a drawing list.
Figures 1.11 and 1.12 show an assembly drawing and a detailed
drawing of a small hand vice. The assembly drawing is in ortho-
graphic third-angle projection. It shows the layout of the individual
parts constituting the assembly. There are actually 14 individual
parts in the assembly but several of these are common, such as the
four insert screws and two-off hardened inserts such that the
number of identifiable separate components numbers 10. On the
drawing each of the 10 parts is numbered by a balloon reference
system. The accompanying item list shows the part number, the
number required and its description. Separate detailed drawings
would have to be provided for non-standard parts. One such
detailed drawing is shown in Figure 1.12, which is the detailed
drawing of the movable jaw. This is shown in third-angle ortho-
graphic projection with all the dimensions sufficient for it to be
manufactured. Tolerances have been left off for convenience.
18 Engineering drawing for manufacture
,14,
,1 I 2 I'''''Y'''''I
Figure 1.11
An assembly drawing of a small hand vice
4 1
SEMBLY" D
BAIV/01
I
BEEJ Associates.
I 6 ,4
1 | 2 i 3 | 4 I
I
I_ 32 crs d
! i!
t, -f'l r
po,i,. ~]~-T
50 Position of
hardened insert
I
~,
M8
2
MOVABLE JAW.
Part
No. 3
Figure 1.12
A detailed drawing of the movable jaw of a small hand vice
1.7 Manual and machine drawing
Drawings can be produced by man or by machine. In the former, it
is the scratching of a pencil or pen across a piece of paper whereas
in the latter, it is the generation of drawing mechanically via a
printer of some type.
Principles of engineering drawing 19
In manual drawing, the various lines required to define an
artefact are drawn on paper, using draughting equipment. The
draughting equipment would typically consist of a surface to draw
on, pens or pencils to draw with and aids like set-squares and curves
to draw around. A typical drawing surface is a drawing board like
the one shown in Figure 1.13 (courtesy of Staedtler). This is a
student or lap drawing board with a horizontal ruler that can be
moved vertically up and down the board. A small tongue on the left-
hand side of the ruler runs in a channel on the side of the board.
This allows horizontal lines to be drawn. Rotating the ruler through
90 ~ can allow vertical lines to be drawn. In this position, the ruler
tongue runs in the channel running along the bottom of the board
(as shown). Alternatively, the arm can be kept in the horizontal
position and a draughting head containing an integral set square
can be used, which runs in a channel along the centre of the ruler.
Often such a drawing head is rotatable and lines can be drawn at any
angle. Such drawing boards are typically supplied in A3 and A4
sizes.
The drawing medium can either be a pencil or a pen. Black ink
drawingpens are available in a variety of sizes corresponding to the
ISO line thicknesses. If pencils are used, clutch pencils are recom-
mended corresponding to the different ISO line thicknesses. A
drawing board ruler, like the one described above, enables straight
Figure
1.13 A drawing board (courtesy of Staedtler)
20
Engineering drawing for manufacture
lines to be drawn but it cannot be used to draw circles. A pair of
compasses are used to draw circles. A typical pair of compasses are
shown in Figure 1.14 (courtesy of Staedtler). These are fairly
expensive 'spring-bow' compasses, so named because the spring
ring at the top provides tensioning and allows easy adjustment.
Adjustment is achieved by rotating the central thumb wheel. This
moves the legs further apart and allows larger diameter circles to be
drawn. The compasses shown are pencil compasses that have a
stylus point on the left and a pencil lead on the right. In the one
shown, the right-hand side pencil leg can be removed and replaced
with an ink cartridge pen. Alternative cheaper compasses are
available with a simple hinged joint at the top. These are not as
convenient to adjust but are more that adequate for everyday needs.
Other draughting equipment which is useful but not necessarily
mandatory are 'French' curves, flexi-curves, protractors, scaled
rulers, lettering stencils and of course the obligatory eraser!
Machine-generated drawings are usually produced on a CAD
system. The term 'CAD' is generally assumed to stand for
'computer
aided design'
but this is not necessarily the case in engineering
drawing. The cheapest CAD systems are really two-dimensional
'computer aided draughting'
packages used on standard PCs. Such a
Figure 1.14
Spring-bow compasses (courtesy of Staedtler)
Principles of engineering drawing
21
two-dimensional draughting package was used to produce the
drawings in this book. In this case, the lines are generated on a
computer screen using a mouse or equivalent. When the drawing is
complete, a printer produces a hard copy on paper. This can be
simply plain paper or pre-printed sheets. Systems such as this are
limited to two-dimensional drawing in which the computer screen is
the equivalent of a piece of paper. True CAD packages are ones in
which the computer assists the design process. Such packages can
be used to predict stress, strain, deflections, magnetic fields, elec-
trical fields, electrical flow, fluid flow, etc. In integrated CAD
packages, artefacts and components are represented in three-
dimensions on the two-dimensional screen (called three-dimen-
sional modelling). Parts can be assembled together and modelling
can be done to assist the design process. From these three-dimen-
sional models, two-dimensional orthographic engineering
drawings can be produced for manufacture.
Irrespective of whether an engineering drawing is produced by
manual or machined means, the output for manufacturing
purposes is a two-dimensional drawing that conforms to ISO stan-
dards. This provides a specification which has a legal status, thus
allowing unambiguous manufacture.
References and further reading
BS 308:Part 1:1984,
Engineering Drawing Practice, Part 1, Recommendations
for General Principles,
1984.
BS 308:Part 2:1985,
Engineering Drawing Practice, Part 2, Recommendations
for Dimensioning and Tolerance of Size,
1985.
BS 308:Part 3:1972,
Engineering Drawing Practice, Part 3, Geometric
Tolerancing,
1972.
BS 8888:2000,
Technical Product Documentation- Specification for Defining,
Specifying and Graphically Representing Products,
2000.
Gillam B, 'Geometrical Illusions',
Scientific American,
January 1980. Article
in the book
The Perceptual World- Readings from Scientific America
Magazine,
edited by Irvin Rock, W H Freeman & Co., 1990.
ISO 5457"1999,
Technical Product Documentation- Sizes and Layouts of
Drawing Sheets,
1999.
ISO Standards Handbook,
'Technical Drawings, Volume 1 -Technical
Drawings in General, Mechanical Engineering Drawings &
Construction Drawings', third edition, 1977.
22
Engineering drawing for manufacture
ISO Standards Handbook,
'Technical Drawings, Volume 2 -Graphical
Symbols, Technical Product Documentation and Drawing Equipment',
third edition, 1977.
Parker M (editor),
Manual of British Standards in Engineering Drawing and
Design,
second edition, British Standards Institute in association with
Stanley Thornes Ltd, 1991.
PD 7308:1986,
Engineering Drawing Practice for Schools and Colleges,
1986.
Ramachandran V S, 'Perceiving Shape from Shading',
Scientific America,
August 1988. Taken from the book
The Perceptual World- Readings from
Scientific America Magazine,
edited by Irvin Rock, W H Freeman & Co., pp
127-138, 1990.
2
Projection Methods
2.0 Introduction
In Chapter 1 it was stated that there are two sets of rules that apply
to engineering drawing. Firstly, there are the rules that apply to the
layout of a drawing and secondly the rules pertaining to the manu-
facture of the artefact. This chapter is concerned with the former set
of rules, called the 'drawing layout rules'. These define the
projection method used to describe the artefact and how the 3D
views of it can be represented on 2D paper. These will be presented
in terms of first and third angle orthographic projections, sections
and cutting planes, auxiliary projections as well as trimetric,
dimetric, isometric and oblique projections.
The chart in Figure 2.1 shows the types of drawing projections.
All engineering drawings can be divided into either pictorial projec-
tions or orthographic projections. The pictorial projections are
non-specific but provide visualisation. They can be subdivided
further into perspective, axonometric and oblique projections. In
pictorial projections, an artefact is represented as it is seen in 3D but
on 2D paper. In orthographic projections, an artefact is drawn in 2D
on 2D paper. This 2D representation, rather than a 3D represen-
tation, makes life very much simpler and reduces confusion. In this
2D case, the representation will lead to a specification that can be
defined by laws. The word
ortho
means correct and the word
graphic
means drawing. Thus,
orthographic
means a correct drawing which
prevents confusion and therefore can be a true specification which,
because orthographic projections are clearly defined by ISO stan-
dards, are legal specifications. Orthographic projections can be sub-
divided into first and third angle projections. The two projection
24
Engineering drawing for manufacture
IPROJECTIONSI
I
I
I Pictoral
!
I Perspective
I
~xonometr'i~
iVisualization I
I
I Orth~ hic I
,,I ,
I
Oblique I
I First Angle
'll
Third Angle I
/Specification I
Figure
2.1 The different types of engineering drawing projections
methods only differ in the manner in which the views are presented.
The third angle projection method is preferred.
Whichever projection method is used, the representation is
achieved by projectors which are effectively rays of light whose
sources are on one side of an artefact passing over the artefact and
projecting its image onto a 2D drawing sheet. This is similar to the
image or shadow an artefact would produce when a single light
source projects the shadow of an artefact onto, say, a wall. In this
case, the wall is the picture plane. The various types of pictorial and
orthographic projections are explained in the following sections.
2.1 Perspective projection
Perspective projection is as shown in Figure 2.2. Perspective
projection is reality in that everything we see in the world is in
perspective such that the objects always have vanishing points.
Perspective projection is thus the true view of any object. Hence, we
use expressions like 'putting something in perspective'! Projectors
radiate from a station point (i.e. the eye) past the object and onto
the 2D picture plane. The station point is the viewing point.
Although there is only one station point, there are three vanishing
points. A good example of a vanishing point is railway lines that
appear to meet in the distance. One knows in reality that they never
really meet, it is just the perspective of one's viewing point.
Although there are three vanishing points, perspective drawings
can be simplified such that only two or indeed one vanishing point
is used. The drawing in Figure 2.2 shows only two vanishing points.
Projection methods
25
ject
!
~ ~"~ ~ladiating
tors
;t~ ~e ~~ ~~~ \Obje~Vanishing
II PersPective ~"-~
~"'~Station
point
Figure 2.2
Perspective projection
Had the block shown been very tall, there would have been a need
to have three vanishing points.
Although perspective projection represents reality, it produces
complications with respect to the construction of a drawing in that
nothing is square and care needs to be taken when constructing such
drawings to ensure they are correct. There are numerous books that
give details of the methods to be employed to construct perspective
drawings. However, for conventional engineering drawing, drawing
in perspective is an unnecessary complication and is usually
ignored. Thus, perspective projection is very rarely used to draw
engineering objects. The problem in perspective projection is due
to the single station point that produces radiating projectors. Life is
made much simpler when the station point is an infinite distance
from the object so that the projectors are parallel. This is a situation
for all the axonometric and orthographic projection methods
considered below.
2.2 Axonometric projection
Axonometric projection
is shown in Figure 2.3. This is the same as
perspective projection except that the projectors are parallel. This
means that there are no vanishing points. In axonometric
projection, the object can be placed at any orientation with respect to
the viewer. For convenience, axonometric projection can be divided
into three classes depending on the orientation of the object. These
are trimetric, dimetric and isometric projections (see Figure 2.4).
26
Engineering drawing for manufacture
,raw f object
i
, Parallel
9
~ectors
"~~J Object
Axonometric ",
I
Figure
2.3
Axonometric projection
Trimetric projection
is by far the most common in that the object is
placed at any position with respect to the viewer such that the angles
c~ and [3 are unequal and the foreshortening in each of the three
axes is unequal. The three sides of the cube are of different lengths.
This is shown in the left-hand drawing in Figure 2.4. The 'tri' in
trimetric means three. In dimetric projection, the angles 0t and 13
are the same as shown in the middle drawing in Figure 2.4. This
results in equal foreshortening of the two horizontal axes. The third
vertical axis is foreshortened to a different amount. The 'di' in
dimetric means there are two 'sets' of axes. The particular class of
axonometric projection in which all the three axes are fore-
shortened to an equal amount is called isometric projection. In this
case the foreshortening is the same as seen in the right-hand
drawing in Figure 2.4. In this case, the angles a and 13 are the same
and equal to 30 ~ The foreshortening of each of the three a~:es is
identical. The term 'iso' in isometric projection means similar.
Isometric projection is the most convenient of the three types of
axonometric projection because of the convenience of using 30 ~
angles and equal foreshortening. Isometric projection will be
considered in detail in the following section.
Projection methods
27
a C
A
Note: a/=b and
ABtl~AC P-AD
A
Note: a=b and
AB=ACt,AD
I
Trimetric
Projection
! i
Dimetric
Projection
Figure 2.4
The three types of axonometric projections
F
E G
A
Note:
a=b= 30'
and
AB=AC=AD
i
Isometric
Projection I
2.3 Isometric projection
In
isometric projection,
the projection plane forms three equal angles
with the co-ordinate axis. Thus, considering the isometric cube in
Figure 2.4, the three cube axes are foreshortened to the same
amount, i.e. AB = AC = AD. Two things result from this, firstly, the
angles a = b = 30 ~ and secondly, the rear (hidden) corner of the
cube is coincident with the upper corner (corner D). Thus, if the
hidden edges of the cube had been shown, there would be dotted
lines going from D to F, D to C and D to B. The foreshortening in
the three axes is such that AB = AC = AD = (2/3) o.5 = 0.816. Since
isometric projections are pictorial projections and dimensions are
not normally taken from them, size is not really important. Hence, it
is easier to ignore the foreshortening and just draw the object full
size. This makes the drawing less complicated but it does have the
effect of apparently enlarging the object by a factor 1.22 (1 +
0.816). Bearing this in mind and the fact that both angles are 30 ~ it
is not surprising that isometric projection is the most commonly
used of the three types of axonometric projection.
The method of constructing isometric projections is shown in the
diagrams in Figures 2.5 and 2.6. An object is translated into
isometric projection by employing enclosing shapes (typically
squares and rectangles) around important features and along the
three axes. Considering the isometric cube in Figure 2.4, the three
sides are three squares that are 'distorted' into parallelograms,
aligned with the three isometric axes. Internal features can be
projected from these three parallelograms.
The method of constructing an isometric projection of a flanged
bearing block is shown in Figure 2.5. The left-hand drawing shows
