Microsoft ® Office 2010 Simply Phần 7 docx
Bạn đang xem bản rút gọn của tài liệu. Xem và tải ngay bản đầy đủ của tài liệu tại đây (4.45 MB, 42 trang )
239
Populating Presentation Slides
CHAPTER
14
POWERPOINT
55
66
44
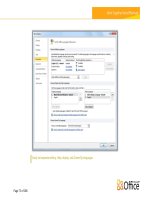
How do I add clip art to a slide?
To add clip art to a slide, follow these steps:
1 Click the Clip Art icon ( ) in your slide or click the
Clip Art Pane button on the Insert tab.
2 In the Clip Art task pane, type a keyword or phrase
for the type of clip art that you want to insert.
3 Click Go.
•
The Clip Art task pane displays any matches for the
keyword or phrase that you typed. To add a clip art
image to your slide, click the image.
•
PowerPoint updates the image
to reflect your edits.
•
PowerPoint inserts the picture
into the slide.
•
PowerPoint displays the Picture
Tools Format tab on the
Ribbon.
4 To edit the picture (in this
example, to change its color),
click the Format tab.
5 Click the Color button.
6 Choose a color option.
22
33
20_571941-ch14.indd 23920_571941-ch14.indd 239 4/9/10 7:45 PM4/9/10 7:45 PM
240
11
22
33
The Insert Video dialog box
appears.
2 Locate and select the video
you want to insert.
3 Click Insert.
1 If an Insert Media Clip icon
(
) appears in your slide,
click it.
•
If no Insert Media Clip icon
appears in your slide, click the
Video button on the Insert
tab.
Add a Video Clip to a Slide
You can add video clips to your PowerPoint
slides to play during a slide show presentation.
For example, when creating a presentation
showcasing the latest company product, you
might place a video clip of the department
head discussing the new item.
When you add a video to a slide, you can
control the placement and size of the video.
(For help moving and resizing charts and other
slide objects, see the sections “Move a Slide
Object” and “Resize a Slide Object” later in this
chapter.)
After you insert a video into a PowerPoint slide,
you can make certain edits to that video from
within PowerPoint.
Add a Video
Clip to a Slide
20_571941-ch14.indd 24020_571941-ch14.indd 240 4/9/10 7:45 PM4/9/10 7:45 PM
241
Populating Presentation Slides
CHAPTER
14
POWERPOINT
44
Can I edit my video clip in PowerPoint?
Yes. You can edit your video using the tools
in the Playback tab’s Editing group.
Specifically, you can set up the clip to fade
in and fade out using the Fade In and Fade
Out fields. You can also click the Trim
Video button to open the Trim Video dialog
box, where you can change the duration of
the video by trimming frames from the
beginning or end of the clip.
•
PowerPoint inserts the clip into
the slide.
•
PowerPoint displays the Video
Tools tabs on the Ribbon.
4 Click the Format tab.
•
You can click an option in the
Video Styles group to change
the appearance of the video.
•
You can use the options in the
Size group to adjust the size of
the clip on the slide.
•
Click the Play button ( ) to
play back the clip.
Note: You can click the
Playback tab and use the
settings in the Video Options
group to specify when the clip
should start playing, whether it
should be looped, how loudly it
should play, and so on.
20_571941-ch14.indd 24120_571941-ch14.indd 241 4/9/10 7:45 PM4/9/10 7:45 PM
242
22
11
44
3 Release the mouse button.
•
PowerPoint repositions the
object.
4 Click outside the slide object
to deselect it.
1 Click the slide object that you
want to move to select it.
The changes to .
2 Drag the object to a new
location on the slide.
Move a Slide Object
You can move any slide element, such as a text
box, table, chart, picture, video clip, or any
other element, to reposition it in the slide.
(These slide elements are often referred to as
objects.) For example, you might move a text
box to make room for a clip-art object or move
a picture to improve the overall appearance of
the slide.
One way to move a slide object is to use the
standard Office Cut and Paste buttons,
discussed in Chapter 2. Another is to drag and
drop the object, as discussed in this section.
Move a
Slide Object
20_571941-ch14.indd 24220_571941-ch14.indd 242 4/9/10 7:45 PM4/9/10 7:45 PM
243
CHAPTER
14
1 Click the slide object that you
want to resize to select it.
•
PowerPoint surrounds the
object box with handles.
2 Position your mouse pointer
over a handle.
The changes to .
3 Click and drag the handle
inward or outward to resize
the slide object.
Drag a corner handle to resize
the object’s height and width
at the same time.
Drag a side handle to resize
the object only along the
one side.
4 Release the mouse button.
•
PowerPoint resizes the object.
5 Click outside the slide object
to deselect it.
Note: To delete a slide object
that you no longer need, select
the object and press
Delete
.
Resize a Slide Object
After you insert an object, such as a text box,
table, chart, picture, video clip, or any other
element, you may find that you need to make
it larger or smaller in order to achieve the
desired effect. For example, you might want to
resize a text box to make room for more text
or resize a picture object to enlarge the
artwork. Fortunately, PowerPoint makes it easy
to change the size of a slide object. When you
select an object in a PowerPoint slide, handles
appear around that object; you can use these
handles to make the object larger or smaller.
Resize a
Slide Object
55
22
33
11
20_571941-ch14.indd 24320_571941-ch14.indd 243 4/9/10 7:46 PM4/9/10 7:46 PM
244
22
11
3 Release the mouse button.
•
PowerPoint moves the slide.
Move Slides in Normal View
1 In Normal view, click the slide
that you want to move on the
Slides tab.
Note: You can move multiple
slides at once. To do so, press
and hold
as you click each
slide, and then drag the slides
to a new location.
2 Drag the slide to a new
location on the tab.
Reorganize Slides
You can change the order of your slides. For
example, you may want to move a slide to
appear later in the presentation, or swap the
order of two side-by-side slides. PowerPoint
makes it easy to change the slide order in Slide
Sorter view or by using the Slides tab in Normal
view. (To switch to Slide Sorter view, click the
View tab and then click the Slide Sorter button.
To switch back to Normal view, click the Normal
button in the View tab.) You can move individual
slides, or move multiple slides at once.
Reorganize
Slides
21_571941-ch15.indd 24421_571941-ch15.indd 244 4/9/10 7:54 PM4/9/10 7:54 PM
245
CHAPTER
15
POWERPOINT
22
11
Assembling and Presenting a Slide Show
3 Release the mouse button.
•
PowerPoint moves the slide.
Move Slides in Slide Sorter View
1 In Slide Sorter view, click the
slide that you want to move.
Note: You can move multiple
slides at once. To do so, press
and hold
as you click each
slide, and then drag the slides
to a new location.
2 Drag the slide to a new
location in the presentation.
How do I hide a slide?
Suppose you frequently give the same presentation,
but your next audience does not require the
information in one of the presentation slides. In that
case, you can hide the slide. To do so, switch to Slide
Sorter view, click the Slide Show tab, and then click
the Hide Slide button. The Hide Slide icon (
)
appears next to the slide in Slide Sorter view. To
unhide the slide, repeat these steps.
How do I delete a
slide?
To delete a slide, right-
click it in Slide Sorter
view or in the Slides
tab and choose Delete
Slide from the menu
that appears.
21_571941-ch15.indd 24521_571941-ch15.indd 245 4/9/10 7:54 PM4/9/10 7:54 PM
246
11
22
33
44
55
66
The Reuse Slides pane opens.
5 Click the Browse button.
6 Click Browse File.
1 In Slide Sorter view, click
where you want the new slide
to appear.
2 Click the Home tab.
3 Click the bottom half of the
New Slide button.
4 Click Reuse Slides.
Reuse a Slide
Suppose you are creating a new PowerPoint
presentation, but you want to reuse a slide
from an old one. Assuming the presentation
containing the slide you want to reuse has been
saved on your hard drive or is accessible to you
via a network connection, you can easily do so.
To choose the slide you want to reuse, you use
the Reuse Slides pane.
When you reuse a slide, PowerPoint updates
the slide to match the formatting used in the
new presentation.
You can reuse a single slide from a presentation,
multiple slides from a presentation, or all the
slides in a presentation.
Reuse
a Slide
21_571941-ch15.indd 24621_571941-ch15.indd 246 4/9/10 7:54 PM4/9/10 7:54 PM
247
Assembling and Presenting a Slide Show
CHAPTER
15
POWERPOINT
77
99
88
PowerPoint populates the
Reuse Slides pane with slides
in the presentation you
selected.
9 Click the slide you want to
reuse.
•
PowerPoint adds the slide
to your presentation.
The Browse dialog box opens.
7 Locate and select the
presentation containing the
slide you want to reuse.
8 Click Open.
Can I retain the reused slide’s original
formatting?
Yes. To retain the reused slide’s original
formatting, select the Keep Source
Formatting check box in the Reuse Slides
pane. To change all the slides in the new
presentation to match the reused slide,
right-click the reused slide in the Reuse
Slides pane and choose Apply Theme to
All Slides.
How do I reuse all the slides
in a presentation?
To reuse all the slides in a
presentation, right-click any one
slide in the Reuse Slides pane
and choose Insert All Slides.
PowerPoint inserts all the slides
from the existing presentation
into the new presentation.
21_571941-ch15.indd 24721_571941-ch15.indd 247 4/9/10 7:54 PM4/9/10 7:54 PM
248
22
33
11
3 Click a transition.
•
PowerPoint displays a preview
of the transition effect.
•
PowerPoint adds an animation
icon (
) below the slide.
1 In Slide Sorter view, click the
slide to which you want to
apply a transition.
2 Click the Transitions tab on
the Ribbon.
•
You can scroll through the
available transition effects and
click the More button (
) to
view all of the transition
effects.
Define Slide Transitions
You can add transition effects, such as fades,
dissolves, and wipes, to your slides to control
how one slide segues to the next. You control
the speed of the transition to appear fast or
slow. You can also specify how PowerPoint
advances the slides, either manually or
automatically. In addition to adding transition
effects between your slides that are visual in
nature, you can add sound effects to serve as
transitions.
Take note: You must use good judgment when
assigning transitions. Using too many different
types of transitions may detract from your
presentation.
Define Slide
Transitions
21_571941-ch15.indd 24821_571941-ch15.indd 248 4/9/10 7:54 PM4/9/10 7:54 PM
249
Assembling and Presenting a Slide Show
CHAPTER
15
POWERPOINT
44
55
How do I remove a transition effect?
In Slide Sorter view, select the slide
containing the transition that you want
to remove; then click the Transitions
tab and click the None option in the
Transition to This Slide group.
PowerPoint removes the transition
that you assigned.
How do I assign a sound as a
transition effect?
To assign a sound transition, click the
Sound
in the Transitions tab’s
Timing group and select a sound.
You might assign the Applause sound
effect for the first or last slide in a
presentation, for example.
5 Under Advance Slide, click an
advance option.
To use a mouse click to move
to the next slide, select the On
Mouse Click check box.
To move to the next slide
automatically, select the After
check box and use the
to
specify a duration.
4 Click the Duration to specify
a speed setting for the
transition.
•
You can click Apply To All to
apply the same transition to
the entire slide show.
21_571941-ch15.indd 24921_571941-ch15.indd 249 4/9/10 7:54 PM4/9/10 7:54 PM
250
22
33
11
Add a Simple Animation Effect
1 In Normal view, click the slide
object to which you want to
apply an animation.
2 Click the Animations tab.
•
You can scroll through the
available animation effects
and click the More button (
)
to view all of the animation
effects.
•
You can also click the Add
Animation button and choose
More Entrance Effects, More
Emphasis Effects, More Exit
Effects, or More Motion
Paths from the menu that
appears.
3 Click an animation effect.
•
PowerPoint applies the effect
and previews the effect on
the slide.
•
You can click the Preview
button to preview the effect
again.
Add Animation Effects
You can use PowerPoint’s animation effects to
add visual interest to your presentation. For
example, if you want your audience to notice a
company logo on a slide, you might apply an
animation effect to that logo.
There are four types of animation effects:
entrance effects, emphasis effects, exit effects,
and motion paths. You can add any of these
effects to any slide element, such as a text box
or a picture. You can also edit your animations.
Take note: You must use good judgment when
adding animation effects. To avoid
overwhelming your audience, limit animations
to slides in which the effects will make the
most impact.
Add Animation
Effects
21_571941-ch15.indd 25021_571941-ch15.indd 250 4/9/10 7:54 PM4/9/10 7:54 PM
251
Assembling and Presenting a Slide Show
CHAPTER
15
POWERPOINT
33
44
22
11
Can I copy an animation effect to another slide object?
Yes. PowerPoint’s Animation Painter feature enables you to copy an animation
effect applied to one slide object to another slide object. To copy an animation
effect, select the slide object whose effect you want to copy; then, in the
Animations tab’s Advanced Animation group, click the Animation Painter
button. Next, in the Slides tab, click the slide containing the object to which you
want to apply the effect to display it; then click the object. PowerPoint copies the
animation effect to the slide object.
•
PowerPoint applies the change
and previews the effect on the
slide.
Edit an Animation
1 In Normal view, click the slide
element containing the
animation you want to edit.
2 Click the Animations tab on
the Ribbon.
3 Click the Effect Options
button.
A list of editing options for the
animation appears.
4 Select an option from the list.
21_571941-ch15.indd 25121_571941-ch15.indd 251 4/9/10 7:54 PM4/9/10 7:54 PM
252
22
33
44
11
PowerPoint displays the
Animation pane.
•
The animation you applied
appears in the pane.
1 In Normal view, click the slide
element to which you want to
apply an animation.
2 Click the Animations tab.
3 Apply an animation effect.
(This effect is the first
“building block” of your
custom animation.)
PowerPoint applies the
animation effect.
4 Click the Animation Pane
button in the Advanced
Animation group.
Create a Custom Animation
In addition to applying one of PowerPoint’s
predesigned animation effects to a slide object,
such as a text box, picture, chart, or table, you
can use these effects as building blocks to
create your own custom effects. That is, you
build a custom animation by applying two or
more of these predesigned “building block”
animations to a PowerPoint object. (Note that
when you apply multiple animation effects to a
slide object, you must use the Add Animation
button instead of choosing an effect from the
Animation group. Otherwise, the new effect
overwrites the existing one.)
Create a Custom
Animation
21_571941-ch15.indd 25221_571941-ch15.indd 252 4/9/10 7:54 PM4/9/10 7:54 PM
253
Assembling and Presenting a Slide Show
CHAPTER
15
POWERPOINT
66
55
88
00 00
99
How do I remove an animation?
Select the slide element containing the
effect, click the Animations tab, and click
No Animation. If the animation is a
custom animation, click the Animation
Pane button. Then, in the Animation
pane, click the effect that you want to
remove, click the
that appears, and
click Remove.
Can I change the duration of an
effect?
Yes. Select the slide element containing
the effect, click the Animation Pane
button, click the effect whose duration
you want to change, click the
that
appears, choose Timing, and use the
settings in the dialog box that opens to
achieve the desired effect.
7 Repeat Steps 5 and 6 to add
more building blocks.
•
PowerPoint places each effect
in the Animation pane, in the
order you added them.
8 To preview your custom effect,
click Play.
PowerPoint plays back your
custom animation.
9 To change the order in which
effects are played back, click
an effect.
0 Click the Re-Order buttons
(
or ) to move the selected
effect up or down in the list.
5 To add your next building
block, click the Add
Animation button in the
Advanced Animation group.
6 Click an effect.
PowerPoint adds the effect
to the Animation pane.
21_571941-ch15.indd 25321_571941-ch15.indd 253 4/9/10 7:55 PM4/9/10 7:55 PM
254
11
22
33
PowerPoint starts the show,
and you can begin talking into
the computer’s microphone to
record your narration.
•
Click to move to the next
slide in the show.
•
Click to pause the recording.
•
Click to start over on the
current slide.
1 Click the Slide Show tab on
the Ribbon.
2 Click Record Slide Show.
The Record Slide Show dialog
box appears.
•
Make sure the Narrations and
laser pointer check box is
selected.
3 Click Start Recording.
Record Narration
Many presentations benefit from narration. One
way to provide narration is to simply speak
during your presentation. Alternatively, you can
use PowerPoint’s Record Narration feature to
record a narration track to go along with the
show (assuming, of course, that your computer
has a microphone). That way, you need not be
present for your audience to receive the full
impact of your presentation. PowerPoint saves
the recorded narration along with the
presentation file. When you finish recording, an
audio icon appears at the bottom of each slide
for which you have recorded narration.
Record
Narration
21_571941-ch15.indd 25421_571941-ch15.indd 254 4/9/10 7:55 PM4/9/10 7:55 PM
255
CHAPTER
15
1 Click the Slide Show tab on
the Ribbon.
2 Click Set Up Slide Show.
The Set Up Show dialog box
appears.
3 Set any options that you want
to assign to the show.
•
The Show Type settings
specify how the slide show
is presented.
•
The Show Options settings
control looping, narration,
and animation.
•
The Show Slides settings
specify what slides appear in
the show.
•
The Advance Slides settings
specify how each slide
advances.
•
If your system has multiple
monitors, you can use the
Multiple Monitors settings to
specify what monitor to use
for your presentation.
4 Click OK.
PowerPoint assigns the
new settings.
Set Up a Slide Show
You can set up how you want your presentation
to run. For example, you can specify whether it
should loop continuously, be played back in
full, be shown without narration or animations,
and more. If the presentation will be presented
by a speaker (rather than, for example, run at
a kiosk), you can choose a pen color and a laser
pointer color; the speaker can then use his or
her mouse pointer to draw on or point to
slides. To set up your slide show, you use the
Set Up Show dialog box.
Set Up a
Slide Show
11
22
44
21_571941-ch15.indd 25521_571941-ch15.indd 255 4/9/10 7:55 PM4/9/10 7:55 PM
256
11
44
55
33
22
4 Click the View tab.
5 Click Notes Page.
1 In Normal view, click a slide in
the Slides tab to which you
want to add notes.
2 Click in the Notes pane.
3 Type any notes about the
current slide that you want to
include.
You can repeat Steps 1 to 3
for other slides to which you
want to add notes.
Create Speaker Notes
You can create speaker notes for your
presentation. Speaker notes, also called notes
pages, are notations that you add to a slide and
that you can print out and use to help you give
a presentation. (Be aware that in order to print
out your notes, you must change the PowerPoint
print settings. For guidance, see the tip at the
end of this section.) You can also use speaker
notes as handouts for your presentation. When
creating notes pages, PowerPoint includes any
note text that you add, as well as a small picture
of the actual slide.
Create Speaker
Notes
21_571941-ch15.indd 25621_571941-ch15.indd 256 4/9/10 7:55 PM4/9/10 7:55 PM
257
Assembling and Presenting a Slide Show
CHAPTER
15
POWERPOINT
How do I print my notes?
Before you can print your
notes, you must configure
PowerPoint to do so. Follow
these steps:
1 Click the File tab
and then click
Options.
The PowerPoint
Options dialog
box appears.
2 Click Advanced.
3 Under When Printing
This Document, click the Use the following print settings radio button.
4 Click the Print what and choose Notes.
5 Click OK.
6 Click the File tab, choose Print, and choose the desired settings.
The Notes Page view opens
and displays the first page in
your slide show.
•
You can use the scroll bars to
scroll through the notes.
•
You can drag the Zoom slider
to magnify your view of the
notes.
•
You can edit and format your
notes text.
Note: To return to Normal view,
click the View tab and click the
Normal button.
44
33
21_571941-ch15.indd 25721_571941-ch15.indd 257 4/9/10 7:55 PM4/9/10 7:55 PM
258
11
22
44
•
PowerPoint switches to Slide
Show mode and displays the
first slide.
•
PowerPoint displays the
Record Slide Show toolbar and
starts a timer.
3 Rehearse what you want to say
while the slide plays.
•
Click the Pause button ( ) to
pause the timer. To restart the
timer, you can click
again.
4 When you finish with the
first slide, click the Next
button (
).
1 Click the Slide Show tab.
2 Click the Rehearse Timings
button.
Rehearse a Slide Show
You can time exactly how long each slide
displays during a presentation using
PowerPoint’s Rehearse Timings feature. When
you use Rehearse Timings, PowerPoint switches
to Slide Show mode, displaying your slides in
order; you control when PowerPoint advances
to the next slide in the show.
When recording how long each slide is shown,
you should rehearse what you want to say
during each slide as well as allow the audience
time to read the entire content of each slide.
After you record the timings, PowerPoint saves
them for use when you present the slide show
to your audience.
Rehearse a
Slide Show
21_571941-ch15.indd 25821_571941-ch15.indd 258 4/9/10 7:55 PM4/9/10 7:55 PM
259
Assembling and Presenting a Slide Show
CHAPTER
15
POWERPOINT
66
How do I create handouts for my audience?
One way to create handouts is to send your
presentation to Microsoft Word. Follow these steps:
1 Click the File tab and then click Share.
2 Click Create Handouts.
3 Click Create Handouts.
The Send To Microsoft Word dialog box
appears.
4 Choose a page layout.
5 Click OK.
Office launches Microsoft Word, with your presentation pasted in.
6 Click the File tab, choose Print, and choose the desired settings.
PowerPoint displays the next
slide.
5 Repeat Steps 3 and 4 for each
slide in your presentation.
When the slide show is
complete, a dialog box
appears, displaying the total
time for the slide show.
6 Click Yes.
•
PowerPoint saves the timings
and displays them below each
slide.
44
55
21_571941-ch15.indd 25921_571941-ch15.indd 259 4/9/10 7:55 PM4/9/10 7:55 PM
260
11
22
33
PowerPoint switches to Slide
Show mode and displays the
first slide.
•
When you move the mouse
pointer to the bottom left
corner, faint slide show control
buttons appear.
3 Click anywhere in the slide to
advance to the next slide or
click the Next button (
).
•
To return to a previous slide,
you can click the Previous
button (
).
1 Click the Slide Show tab.
2 Click the From Beginning
button.
Run a Slide Show
You can run a slide show presentation using
PowerPoint’s Slide Show view. Slide Show view
displays full-screen images of your slides. You
can advance each slide manually by clicking
buttons that appear on-screen; alternatively,
you can instruct PowerPoint to advance the
slides for you.
To enrich the experience for your audience, you
can use PowerPoint’s pointer options to draw
directly on the screen using the mouse pointer.
(You can choose from several pen tools and
colors.) For example, you might circle an
important sales figure or underline a critical
point on a slide. You can end a slide show at
any time by pressing
.
Run a
Slide Show
21_571941-ch15.indd 26021_571941-ch15.indd 260 4/9/10 7:55 PM4/9/10 7:55 PM
261
Assembling and Presenting a Slide Show
CHAPTER
15
POWERPOINT
44
How do I draw on my slides as I present the show?
As mentioned, you can use PowerPoint’s pointer options to draw directly on the screen using the
mouse pointer. You can choose from several pen tools and colors. Follow these steps:
1 During the slide show, click the Pen button ( ).
2 Click a pen style.
•
You can click here to choose a pen color.
3 Click and drag to draw on the slide.
To erase your markings, press .
4 When the slide show is
complete, click anywhere
on the screen.
PowerPoint closes the
presentation.
•
To view a menu of slide show
commands, click
.
•
You can pause the show by
clicking the Pause command.
•
You can end the show early
by clicking the End Show
command.
22
11
21_571941-ch15.indd 26121_571941-ch15.indd 261 4/9/10 7:55 PM4/9/10 7:55 PM
262
44
33
55
66
11
22
The Package for CD dialog box
appears.
5 Type a name for the CD.
6 Click Copy to CD.
Note: If your presentation
contains linked files, PowerPoint
asks you if you want to include
those files on the CD. If you trust
the source of each linked file,
click Yes.
1 Click the File tab.
2 Click Save & Send.
3 Click Package Presentation
for CD.
4 Click Package for CD.
Package Your Presentation on a CD
You can save your PowerPoint presentation to a
CD to enable you to share your presentation
with others. With the Package for CD feature,
PowerPoint bundles the presentation along with
all of the necessary clip art, multimedia
elements, and other items needed to run your
show, including any linked files contained in
your presentation. The CD even includes a
PowerPoint Viewer with the file in case the
recipient does not have PowerPoint installed
on his or her computer.
If you prefer, you can save your presentation
as a WMV movie file that includes any narration
and timings you record.
Package Your
Presentation on a CD
21_571941-ch15.indd 26221_571941-ch15.indd 262 4/9/10 7:55 PM4/9/10 7:55 PM
263
Assembling and Presenting a Slide Show
CHAPTER
15
POWERPOINT
77
How do I save my presentation as a video?
To save your presentation as a WMV movie file, follow these steps:
1 Click the File tab and then click Save & Send.
2 Click Create a Video.
3 Choose a quality
level.
4 Specify whether
recorded narration
and timings should
be used.
5 Click Create Video.
6 In the Save As dialog
box, specify the folder
in which the video
should be saved.
7 Click the Save button.
PowerPoint saves the presentation as a movie file in the folder you specified.
•
PowerPoint copies the
presentation files.
Depending on the size of
the presentation, the copying
process can take a few
minutes.
When the copying process is
complete, a dialog box appears.
7 Click No.
If you want to continue
packing additional copies of
the presentation, you can click
Yes.
8 Click Close.
The Package for CD dialog
box closes.
55
22
33
44
21_571941-ch15.indd 26321_571941-ch15.indd 263 4/9/10 7:55 PM4/9/10 7:55 PM


![[Khoa Học Vật Liệu] Bê Tông Asphalt Phần 7 docx](https://media.store123doc.com/images/document/2014_07/27/medium_kzg1406434889.jpg)
![[Y học] Bệnh Lupus Ban Đỏ Phần 7 docx](https://media.store123doc.com/images/document/2014_07/27/medium_npi1406467215.jpg)