ECLIPSE WEB TOOLS PLATFORM developing java web applications PHẦN 10 potx
Bạn đang xem bản rút gọn của tài liệu. Xem và tải ngay bản đầy đủ của tài liệu tại đây (8.03 MB, 77 trang )
A public identifier (or publicId) provides no hint as to the actual location of
a schema or DTD but instead provides a unique identifier for the artifact that
you can use to determine the location by some other means (such as the XML
catalog). A schema’s public identifier is its namespace, such as
/>and is typically specified by declaring a namespace in an XML document (see
line 4 in Example 15.1 earlier). A DTD’s public identifier, typically specified in a
comment in the DTD, is specified in an XML file by using the
PUBLIC keyword in
a
DOCTYPE statement (see Example 15.2).
Example 15.2 J2EE 1.3 PUBLIC DOCTYPE
<!DOCTYPE web-app PUBLIC
"-//Sun Microsystems, Inc.//DTD Web Application 2.3//EN"
" />A system identifier (or systemId) provides a hint as to the actual location of
a schema or DTD. A schema system identifier, typically a URL, is specified in an
XML file using the
xsi:schemaLocation attribute. This attribute contains a list
of paired items, where the first item is the schema namespace and the second
item is the system identifier (see lines 6 and 7 in Example 15.1 earlier). A DTD
system identifier, also typically a URL, is specified in an XML file using the
SYSTEM keyword in a DOCTYPE statement (see Example 15.3).
Example 15.3 J2EE 1.3 SYSTEM DOCTYPE
<!DOCTYPE web-app SYSTEM
" />Every J2EE Web application contains the XML file web.xml, known as the
deployment descriptor (see Example 15.1), which holds configuration details for
the application, such as servlet mappings. The deployment descriptor is located
in the
web-inf folder in each application.
The deployment descriptor specifies the specific J2EE grammar it requires by
declaring a system identifier. For J2EE 1.4 the system identifier is
/>(There are different grammars for the different parts and versions of the J2EE
specification.) As mentioned earlier, having access to the file containing the J2EE
grammar will allow WTP’s tools to provide enhanced function for validation
and content assistance for
web.xml.
Contributing Resources to the XML Catalog 649
By default, WTP will attempt to retrieve remote schemas and DTDs from the
Web and cache them using a cache resource resolution strategy. In the case of
J2EE, this allows WTP users to get the enhanced function even though the J2EE
schemas and DTDs are not bundled with WTP. Although this solution generally
works well, it does have a number of drawbacks for new users.
❍ New users must use WTP while connected to the Internet in order to
download these schemas and DTDs. This adds an extra configuration step
to the WTP install process and can lead to problems if the servers are not
visible (due to server outage, proxy configuration or some other problem)
when attempting to download the files.
❍ Creation of the first Web application will take longer than subsequent Web
applications as the user has to accept license agreements and download the
schemas and DTDs.
❍ Every new user must perform this operation. This reduces the efficiency of
your organization by placing a burden on all developers that use WTP,
increases bandwidth consumption, and may lead to an increase in support
calls if there are any network difficulties.
For these reasons you will bundle the J2EE schemas and DTDs with the ver-
sion of WTP your organization distributes internally, preventing the need for
WTP to retrieve the files remotely. In the following sections you will contribute
the J2EE schemas to WTP using WTP’s XML catalog.
The XML Catalog
WTP’s XML catalog allows you to register schemas and DTDs for use in
resource resolution. (The catalog can actually register any resource that can be
specified with a URI, such as a WSDL document. See the online documentation
on the WTP Web site for more about registering any resource.) Typically the
XML catalog is used in the way you are going to make use of it, to specify the
location of local schemas and DTDs. To put this function in resource resolution
terminology, the XML catalog implements a resource resolution strategy that
retrieves a specific resource from a catalog of resources using a key. In fact, the
XML catalog is a URI resolver that has been contributed to the URI resolution
framework, which you will make direct use of later in this chapter.
The XML catalog includes a graphical user interface (see Figure 15.2) that
allows you to easily contribute resources to it. Resources can be contributed through
the XML catalog preferences page, found under Window
᭤ Preferences ᭤ Web and
XML
᭤ XML Catalog. While this preferences page is a good way for users to
650 CHAPTER 15 • Customizing Resource Resolution
Contributing Resources to the XML Catalog 651
Figure 15.2 Add XML Catalog Entry
Adding a Single Resource to the XML Catalog
As you saw earlier in Example 15.1, the J2EE deployment descriptor for a J2EE
1.4 application specifies the following location for its grammar:
/>Open this location in your Web browser. You will see that this location is
that of the J2EE schema. It is this file that you want to bundle with WTP.
The J2EE schema contains license terms in a documentation block at the top.
These are the terms that restrict WTP from bundling this schema. As long as you
accept the terms (perhaps schools should start teaching software developers
licensing law, as we frequently seem to be in positions that require us to under-
stand licensing terms), download the schema and save it in your plug-in in a
folder named
j2eeschemas.
customize their workspace, it still requires user interaction and therefore will not
completely solve your problem. To bundle the J2EE schemas with WTP, you will
need to contribute them to the XML catalog using the XML catalog’s defined
extension point.
With the J2EE schema stored locally in your plug-in, you are ready to con-
tribute it to the XML catalog. Open your plug-in manifest editor and change to
the Dependencies tab. Add a dependency on
org.eclipse.wst.xml.core
The XML core plug-in contains non-UI XML functionality, including the
non-UI components of the XML catalog.
Next change to the Extensions tab. The XML catalog defines the following
extension point that allows you to add your own entries to the catalog:
org.eclipse.wst.xml.core.catalogContributions
Add a new catalogContributions extension. Give your new extension the id
j2eecatalog and the name J2EE Catalog. This extension will house all of your
contributions to the XML catalog.
Right click on the XML catalog extension and select New
᭤
catalogContribution. This extension element allows you to specify multiple cata-
log contributions, but for now you will only specify one.
Right click on the new catalogContribution and select New
᭤ system. This will
create a new entry in the XML catalog that specifies system identifier as the key.
Set the systemId to the location of the schema specified in the J2EE deployment
descriptor:
/>Set the uri, which specifies the location of the schema that you want to use,
to the relative location of the schema in your plug-in, namely
j2eeschemas/web-app_2_4.xsd
(You can also click Browse to select the location.) The effect of adding this entry
to the XML catalog is that when the J2EE schema location is requested, it will
return the local location of the schema from your plug-in. Save your plug-in
manifest. Change to the plugin.xml source view and view the extension declara-
tion (see Example 15.4).
Example 15.4 Listing of Catalog Extension
<extension
id="org.eclipsewtp.resourceresolution.j2eecatalog"
name="J2EE Catalog"
point="org.eclipse.wst.xml.core.catalogContributions">
<catalogContribution>
<system
systemId=" />uri="j2eeschemas/web-app_2_4.xsd"/>
</catalogContribution>
</extension>
652 CHAPTER 15 • Customizing Resource Resolution
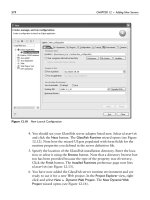
Time to try out your changes. Launch a runtime workspace. When the work-
space is open, navigate to the XML catalog preference page. The J2EE schema
should now be listed in the catalog (see Figure 15.3). So far, so good.
Contributing Resources to the XML Catalog 653
Next create a new dynamic Web project. You can name the project anything
you like. Accept all the default settings and click Finish in the New Dynamic Web
Project wizard. The license dialog does not appear (good) and your new project
shows an error (bad). What went wrong? The error has occurred because the
J2EE schema is not a stand-alone schema. It requires other schemas that cannot
be resolved by the validator now that the schema is included in the XML catalog.
In the next section you will add the rest of the J2EE schemas to the XML catalog.
Figure 15.3 J2EE Schema Entry Added to XML Catalog
Tip: In this section you added a location for a schema system identifier to the XML
catalog. There is only one step you need to change in order to add a catalog entry
specifying a location for a schema’s public identifier (its namespace). Simply use the
public element instead of the system element and the publicId attribute instead
of the
systemId attribute as follows:
Adding a Catalog of Resources to the XML Catalog
The method of adding an entry to the XML catalog that you used in the previous
section can be used to add many entries to the catalog. For each entry you simply
provide a new extension element of the appropriate type. So, you can use this
method to add the rest of the J2EE schemas and DTDs to the XML catalog.
The method for adding individual resources to the XML catalog works well
in many situations. However, one notable limitation is that it restricts the catalog
you create to Eclipse. This restricts who you can share your catalog with and
how others can make use of it.
WTP is not the only project that has an XML catalog implementation. This
type of facility is fairly common in tools that handle XML artifacts. To facilitate
sharing of catalogs among various tools, the OASIS standards body created an
XML catalog standard [XMLCatalogs], which specifies how to define an XML
catalog representation in an XML file. (See Example 15.5 for an example.) This
standard allows you to create XML catalogs that can be used in any tool that
supports the OASIS standard. As you’ve probably guessed by now, WTP sup-
ports the OASIS standard.
Example 15.5 Listing of OASIS XML Catalog File
<catalog xmlns="urn:oasis:names:tc:entity:xmlns:xml:catalog">
<system uri="web-app_2_4.xsd"
systemId=" /><system uri="j2ee_1_4.xsd"
systemId="j2ee_1_4.xsd"/>
<system uri="jsp_2_0.xsd"
systemId="jsp_2_0.xsd"/>
<system uri="j2ee_web_services_client_1_1.xsd"
systemId=
" /><public uri="web-app_2_3.dtd”
publicId="-//Sun Microsystems, Inc.//DTD Web Application 2.3//EN"/>
<public uri="web-app_2_2.dtd"
publicId="-//Sun Microsystems, Inc.//DTD Web Application 2.2//EN"/>
</catalog>
654 CHAPTER 15 • Customizing Resource Resolution
<public
publicId=" />uri="j2eeschemas/web-app_2_4.xsd"/>
You can also add entries to the catalog for DTD public and system identifiers using
the same method used for a schema by replacing the values of the
publicId and
systemId attributes with DTD public and system identifiers.
For your J2EE catalog to be reusable within your organization, you will
create the OASIS XML catalog shown in Example 15.5 and contribute it to the
WTP XML catalog.
Before you create your J2EE OASIS XML catalog, you need to download the
rest of the J2EE schemas and DTDs. The J2EE 1.4 schemas are listed at
/>You’ve already downloaded web-app_2_4.xsd, and
/>is already bundled with WTP. The rest of the schemas that you need for a
J2EE 1.4 Web application are
jsp_2_0.xsd, j2ee_1_4.xsd, and
j2ee_web_services_client_1_1.xsd, which is listed as
/>Download these schemas and place them in the j2eeschemas folder in your
plug-in.
Next you need the J2EE 1.3 DTD,
web-app_2_3.dtd, which is available from
/>Download this file and place it in the j2eeschemas folder.
The last resource you need to obtain is the J2EE 1.2 DTD,
web-app_2_2.dtd,
which is available from
/>Download this file as well and place it in the j2eeschemas folder.
Contributing Resources to the XML Catalog 655
Note: The J2EE schema and DTD pages contain listings for many other schemas
besides those that you have downloaded. These other schemas and DTDs are used
for other parts of the J2EE specification and are not needed for your immediate pur-
pose, although depending on your use you may find it beneficial to place these in your
catalog as well.
Now that you have all of your required resources you can create your
OASIS XML catalog. Create a new XML file in the
j2eeschemas folder named
j2eeschemacatalog.xml to hold your catalog entries. Add the entries in the cata-
log (see Example 15.5 previously). The OASIS XML catalog standard and the
WTP XML catalog extension point are very similar by design, so your OASIS
catalog entries will be similar to the entry that you contributed in the previous
section (although, unlike the extension point, WTP does not contain a GUI to
create OASIS XML catalogs).
With your J2EE OASIS XML catalog complete, all that’s left is to contribute
it to WTP. Contributing an OASIS XML catalog to the WTP XML catalog is
very similar to contributing an individual entry. Open your plug-in manifest to
the Extensions tab. Right click on the existing
catalogContribution and select
New
᭤ nextCatalog. Enter the location j2eeschemas/j2eeschemacatalog.xml for
the catalog or select your catalog with the Browse button. Save your plug-in
manifest and you’re done. Change to the plugin.xml source view to view your
extension (see Example 15.6).
Example 15.6 Listing of nextCatalog Extension
<extension
id="j2eeCatalog"
name="J2EE Catalog"
point="org.eclipse.wst.xml.core.catalogContributions">
<catalogContribution>
<system
systemId=" />uri="j2eeschemas/web-app_2_4.xsd"/>
<nextCatalog
catalog="j2eeschemas/j2eeschemacatalog.xml"/>
</catalogContribution>
</extension>
You’ve made it to the fun part. Try out your changes by launching a new
runtime workspace. Once the new workspace is up, open the XML Catalog pref-
erences page. The preferences page should now contain a catalog entry that you
can expand to reveal the entries contained within that catalog (see Figure 15.4).
This demonstrates another benefit of using OASIS XML catalogs. Using these
catalogs allows you to group related entries together in the WTP XML Catalog
preferences page.
Exit the preferences page and return to your dynamic Web project that dis-
played an error after you completed the previous section. Validate your project
by right clicking on it and selecting Validate. The error is removed as the required
schemas can now be resolved by the XML catalog. Try creating new J2EE 1.3
and 1.2 Web projects by changing the Dynamic Web Module facet on page two of
the New Dynamic Web Project wizard.
656 CHAPTER 15 • Customizing Resource Resolution
Note: At the time of writing this book, there was a bug in WTP that resulted in all
of the entries within an OASIS catalog being displayed with an error marker, and this
may result in those entries not being used in resource resolution.
Implementing a Custom Resource Resolution Strategy
There are many ways in which a resource can be resolved. In the previous section
you contributed resources to the XML catalog. The XML catalog is a resource
resolution strategy that allows you to contribute individual resources. In order to
customize the resource resolution employed by WTP’s tools, you need to add a
strategy to the URI resolution framework, which provides the facility to imple-
ment any strategy you need. (We’ll discuss this framework in detail in the next
section.)
The second part of your task is to include your company’s proprietary
schemas in WTP. Here’s a little more background about your task.
Your company uses schemas to define the grammar for many types of XML
documents, including those that hold employee information. An example of an
employee information document is shown in Example 15.7 and the correspon-
ding schema is shown in Example 15.8. These schemas are used by employees to
author XML documents. There is already a process in place within your com-
pany that automatically downloads the latest version of your company schemas
Implementing a Custom Resource Resolution Strategy 657
Figure 15.4 J2EE OASIS Catalog Entry Added to XML Catalog
onto all employee machines and stores them in C:\schemas. (Yes, all employees
of your company use Windows.) This process was put in place to ensure that
every employee has up-to-date copies of all of the company’s schemas.
Management wants the latest version of these schemas incorporated into
WTP. The benefits of including your company’s schemas in WTP are the same as
those of including the J2EE schemas and DTDs. Your company wants all
employees to be able to use content assistance and validation in order to mini-
mize the amount of mistakes in these important documents.
As the schemas may change and new schemas may be added to the collection,
the XML catalog is not suitable for this task. To incorporate your company’s
schemas in WTP, you will create a custom URI resolver and contribute it to the URI
resolution framework. In the next two sections we’ll start with an overview of the
URI resolution framework and then you’ll implement your custom URI resolver.
Example 15.7 Listing of a Sample Employee XML Document
<?xml version="1.0" encoding="UTF-8"?>
<tns:employee
xmlns:tns=" />xmlns:xsi=" />xsi:schemaLocation=" /><id>11111111</id>
<firstname>Lawrence</firstname>
<surname>Mandel</surname>
<busaddress>
<street>8200 Warden Ave</street>
<city>Markham</city>
<state>Ontario</state>
<zipcode>L6G1C7</zipcode>
<country>Canada</country>
</busaddress>
<position>Software Developer</position>
<department>Eclipse Web Tools</department>
<company>IBM</company>
</tns:employee>
Example 15.8 Listing of employee.xsd
<?xml version="1.0" encoding="UTF-8"?>
<schema
xmlns=" />targetNamespace=" />xmlns:tns=" /><element name="employee" type="tns:employeeInfo"/>
<complexType name="employeeInfo">
<sequence>
<element name="id" type="int"/>
<element name="firstname" type="string"/>
<element name="surname" type="string"/>
<element name="busaddress" type="tns:address"/>
<element name="position" type="string"/>
658 CHAPTER 15 • Customizing Resource Resolution
<element name="department" type="string"/>
<element name="company" type="string"/>
</sequence>
</complexType>
<complexType name="address">
<sequence>
<element name="street" type="string"/>
<element name="city" type="string"/>
<element name="state" type="string"/>
<element name="zipcode" type="string"/>
<element name="country" type="string"/>
</sequence>
</complexType>
</schema>
The URI Resolution Framework
The pluggable URI resolution framework allows custom URI resolvers that
implement specific resource resolution strategies to be inserted in the resource
resolution strategy employed by WTP’s tools. More concretely, this means that
you can insert your custom URI resolver into the URI resolution framework and
change the resource resolution employed by tools like the XML editor. In fact,
all of WTP’s tools make use of the URI resolution framework, so contributing
your own resolver will consistently change the way resource resolution is per-
formed across all of WTP. (To get the same benefit in your tools, see the Using
the URI Resolution Framework in Your Tools sidebar.)
Consistency is generally a good thing, but there are scenarios in which you do
not want every URI resolver to run. The prime reason for this is performance.
Looking up a resource from many tools may take a nontrivial amount of time. You
may therefore want to limit the instances in which your tool runs. For example, if
your URI resolver looks up the location of a schema that will only be used in the
context of Java projects, you should restrict it to being employed for Java projects.
You can customize the overall resource resolution strategy in a couple of
ways. First, you can specify the project natures for which your resolver will be
invoked. For the previous example, you would restrict your resolver to running
on projects with the nature
org.eclipse.jdt.core.javanature
Specifying no project natures implicitly means that your resolver will be
invoked for all project natures. Second, you can specify the priority of your
resolver relative to other resolvers. The URI resolution framework will run all of
the resolvers for a given scenario in a chained way (see Figure 15.5), setting the
output of the first resolver as the input to the second, and so on. If you determine
that your resolver should be run before the existing WTP resolvers—for
Implementing a Custom Resource Resolution Strategy 659
example, if you want the results of your resolver to be resolved by the XML cat-
alog resolver—you can specify a high priority to ensure that your resolver is run
before all resolvers with normal and low priorities.
660 CHAPTER 15 • Customizing Resource Resolution
Figure 15.5 URI Resolution Resolver Chaining
Custom
Resolver 1
XML Catalog
Resolver
Custom
Resolver 2
Cache
Resolver
URI to
Resolve
Resolution
Result
Taking the concept of priority a step further, there are two types of resolvers,
logical and physical, both of which implement the same interface. The difference
lies in the intended use.
Logical resolvers resolve the location of a URI, but the location does not nec-
essarily map to a physical location. Practically, this typically means that the
resolver does not check that the location exists. For example, if your resolver has
a mapping for a DTD public identifier to a URL but does not fetch the contents
of the URL, it is a logical resolver.
Physical resolvers resolve the location of a URI and ensure that the location
exists. For example, the WTP cache resolver will retrieve remote resources from
the Internet before returning their location.
The distinction between logical and physical resolvers is made as physical
resolvers are generally heavier weight than logical resolvers, meaning that they
perform a slow retrieval of a URI in order to verify the location. Therefore, for
performance reasons, client tools are given the choice of whether to run physical
resolution or not. (Physical resolution may not be necessary if your tool simply
wants to resolve an identifier and display the result.)
Using the URI Resolution Framework in Your Tools
As you read at the beginning of this chapter, using the URI resolution framework in
your tools will allow them to follow the same resource resolution strategy as the WTP
tools and any other tools that use the framework. Using it also means that your tools
provide an extensible way for others to modify their resource resolution strategy,
reducing the amount of resolution code that you have to maintain and modify.
But which of your tools should make use of the URI resolution framework? The
simple answer is any tool that needs to locate resources—files, folders, machines, or
simply identifiers—can benefit from the URI resolution framework. The tools in WTP
tend to use the framework to locate files and to resolve identifiers, and the available
WTP resolvers reflect these requirements.
Implementing a Custom Resource Resolution Strategy 661
Using the URI resolution framework in your Eclipse tools is very straightforward.To use
the URI resolution framework, follow these steps:
1. Add the following dependency to your plug-in:
org.eclipse.wst.common.uriresolver
2. Replace the custom resolution code in your plug-in with the following
for logical URI resolution:
URIResolver resolver = URIResolverPlugin.createResolver();
String logicalResult =
resolver.resolve(baseLocation, publicId, systemId);
and the following for physical URI resolution:
URIResolver resolver = URIResolverPlugin.createResolver();
String logicalResult =
resolver.resolve(baseLocation, publicId, systemId);
String physicalResult =
resolver.resolvePhysicalLocation(baseLocation,
publicId, logicalResult);
For physical resolution, it is typical to perform logical resolution first and use the result
in the physical resolution.
There is nothing more to it. The URI resolution framework is just simple and power-
ful. It automatically handles resolution based on project type, file type, and any other
resource resolution strategy determinant. Nothing else needs to be added to your
code.
Creating the Folder URI Resolver
The previous section stated the requirements of your custom URI resolver. We’ll
summarize them here so that the task is clear.
❍ The schemas must reside in C:\schemas in order to reuse the existing
distribution mechanism that is in place.
❍ The existing schemas must be able to be updated, and new schemas must
be able to be added without restarting Eclipse.
❍ No restrictions have been mentioned with respect to tools or project types,
so initially your resolver should run for all project types.
As your custom URI resolver will retrieve all of your company’s schemas
from a specific folder, we’ve dubbed this resolver the Folder URI Resolver. Now,
on with your task.
Start by declaring a dependency for your plug-in on
org.eclipse.wst.common.uriresolver
This plug-in contains the URI resolution framework. URI resolvers also require
the
org.eclipse.core.resources
plug-in, so declare a dependency on this plug-in as well.
The URI resolution framework defines the following extension point:
org.eclipse.wst.common.uriresolver.resolverExtensions
This extension point allows you to contribute your custom resolver to the
framework. Add a new extension of this type to your plug-in. Specify the id as
folderUriResolver and the name as Folder URI Resolver. At the time of writ-
ing there is no extension point schema, which specifies to the plug-in manifest
editor how to construct an extension, in place for this extension. So, to specify
the rest of your extension, you will have to manually edit the
plugin.xml file.
Change to the plugin.xml tab. This tab displays the source XML of your exten-
sion declarations. The extension you just added will be listed with no child ele-
ments. To contribute your resolver, add a child element named
resolverExtension.
There are two attributes you need to set on this element:
class and stage. The
class attribute specifies your custom URI resolver class. You will create a class
named
FolderUriResolver in the package
org.eclipsewtp.resourceresolution
so specify the class value here as
org.eclipsewtp.resourceresolution.FolderUriResolver
The basic action of your resolver will be to locate the schemas in the folder
C:\schemas and ensure that they exist. According to our previous description,
your resolver is a physical one, so specify a value of
physical for the stage
attribute (see Example 15.9). Save your plug-in manifest.
Example 15.9 Listing of Folder URI Resolver Extension
<extension
id="folderUriResolver"
name="Folder URI Resolver"
point="org.eclipse.wst.common.uriresolver.resolverExtensions">
<resolverExtension
662 CHAPTER 15 • Customizing Resource Resolution
class="org.eclipsewtp.resourceresolution.FolderUriResolver"
stage="physical"/>
</extension>
With your extension declared you now need to implement your resolver.
Create a new class with the name
FolderUriResolver in the package
org.eclipsewtp.resourceresolution
This class must implement the interface
org.eclipse.wst.common.uriresolver.internal.provisional.URIResolverExtension
The URIResolverExtension interface (see Example 15.10) specifies one
method to implement:
resolve. The resolve method provides four parameters
to your resolver.
❍ file represents the in-workspace resource that is attempting to resolve the
resource specified by the
publicId and systemId parameters, if one exists.
❍ baseLocation represents the location of the resource that is attempting to
locate the resource specified by the
publicId and systemId parameters as
an absolute URL. This value will exist if there is a base resource, regard-
less of whether or not that resource is in the workspace.
❍ publicId represents an optional public identifier of the resource to be
resolved. For a DTD, this is the PUBLIC identifier and for a schema this is
the namespace of the schema. There is not typically a value for other types
of resources.
❍ systemId represents the relative or absolute location of the resource to be
resolved if there is any hint to the location. DTDs and schemas may not
provide this information, although at least a relative location is typically
available.
Example 15.10 Listing of URIResolverExtension.java
package org.eclipse.wst.common.uriresolver.internal.provisional;
import org.eclipse.core.resources.IFile;
public interface URIResolverExtension {
public String resolve(IFile file, String baseLocation,
String publicId, String systemId);
}
The implementation of your resolver is pretty straightforward and does not
contain a lot of code. Because you’re creating a physical resolver, you will only
be concerned with the value passed in by the
systemId. The publicId should
Implementing a Custom Resource Resolution Strategy 663
already have been handled by any logical resolvers that were applicable for the
current scenario. Implement logic for your resolver as follows: Take the filename
portion of the systemId, prepend C:\schemas, and see if the file exists. If it does,
your resolver will return the properly formatted URI containing the location. If
not, your resolver will return null.
An implementation of the Folder URI Resolver can be seen in Example 15.11.
The first few lines determine the segment of the
systemId that contains the file
name based on the last ‘/’ in the string. Once the file name is obtained,
C:\schemas is prepended and the new location is checked to see if it exists.
Example 15.11 Listing of FolderUriResolver.java
package org.eclipsewtp.resourceresolution;
import java.io.File;
import org.eclipse.core.resources.IFile;
import org.eclipse.wst.common.uriresolver URIResolverExtension;
public class FolderUriResolver implements URIResolverExtension {
private static String folderLoc = "C:/schemas/";
public String resolve(IFile file, String baselocation,
String publicId, String systemId) {
String result = null;
if(systemId != null) {
String filename = systemId.replace("\\", "/");
int lastSlashLoc = systemId.lastIndexOf('/');
if(lastSlashLoc != -1) {
filename = filename.substring(lastSlashLoc+1);
}
filename = folderLoc + filename;
File localFile = new File(filename);
if(localFile.exists()) {
result = "file:///" + filename;
}
}
return result;
}
}
You’ve now completed your Folder URI Resolver. Now it’s time to try it out.
Launch a runtime workspace, create a new project, and create a file like that
shown in Example 15.7 earlier. Try changing an element name. For example,
change state to province. No errors are reported as the schema cannot be
located. Create the folder
C:\schemas and create the file employee.xsd in the
folder with the contents shown earlier in Example 15.8. (If you’re not running
Windows you can create a folder such as
/usr/schemas—or something appro-
priate for your platform—and change the
folderLoc in your implementation.)
664 CHAPTER 15 • Customizing Resource Resolution
Try changing the element names again. Notice how the file is flagged with errors
because it no longer conforms to the schema and the schema can now be located.
Your Folder URI Resolver provided the location of the schema to the XML edi-
tor and validator, allowing it to read the schema and flag the errors.
Summary
In this chapter we introduced the XML catalog and the URI resolution frame-
work. You contributed the J2EE schemas and DTDs to the XML catalog using
the individual entry and OASIS catalog approaches. You also created a custom
Folder URI Resolver to implement a resource resolution strategy that locates
resources in a specific folder. The URI resolution framework applied the results
of your changes uniformly to the WTP XML tools, removing the need for you to
modify each tool individually.
This chapter concludes the discussion of developing plug-ins for WTP. We
hope you found these examples informative. You should now have some confi-
dence about your ability to extend WTP and be ready to dive into the code to
learn more about the many available extension points. If you come up with a cool
extension, please consider contributing it to WTP or writing an article about your
experiences to help your fellow members of the WTP development community.
In Part IV, you’ll learn about other commercial and Open Source products
that are based on WTP and what’s on the horizon for the next major release,
WTP 2.0.
Summary 665
This page intentionally left blank
Products and Plans
Our goal in this final part of the book is to discuss life beyond WTP 1.5. We
begin with a discussion of the many commercial and Open Source products that
are based on WTP and that can be used in conjunction with WTP. If WTP itself
does not meet all your development tool needs, then it is very likely that one of
the products we describe here will. We conclude this part, and the book as a
whole, with our best attempt at predicting what will be included in the next
major release, WTP 2.0. Of course, it is very difficult to predict what will be
included in a future release of any software project. Watch the WTP Web site for
the latest information.
PART IV
667
This page intentionally left blank
CHAPTER 16
Other Web Tools Based on Eclipse
Whenever you are asked if you can do a job, tell ‘em, ‘Certainly, I can!’ Then get
busy and find out how to do it.
—Theodore Roosevelt
Most IDEs, even the great ones, are limited in the tools that can be reasonably
included and as such cannot solve every development tooling need of every soft-
ware developer. One of the great benefits of using Eclipse as your IDE is the
extensible nature of the platform. This benefit, while not listed in terms of tools
that you can use, provides you with the ability to customize your IDE to suit
your needs by plugging in any Eclipse tool.
WTP has currently limited its scope to a subset of Java Web application
development tools. However, because WTP is an Eclipse project, you can further
customize your Web development IDE to suit your additional Web development
needs. This chapter showcases other Eclipse-based Web tools that can help beef
up your Web development IDE. Some of the tools that we will cover in this chap-
ter extend WTP, providing additional functionality for the existing tools. Others
do not integrate with WTP directly but can be used alongside WTP in Eclipse to
create broader Web-based development coverage in your IDE.
To allow you to focus your reading on the tools that you need, we will present
the tools in this chapter by the language that they support. In the following sec-
tions we will cover Web development tools for Java, Perl, PHP, Python, and Ruby.
Java Web Tools
Given Eclipse’s Java heritage it should come as no surprise that there are a num-
ber of Java Web application development tools for Eclipse. In this section we’ll
cover nine different tools you can use to enhance your Java Web application
development IDE, many of which extend WTP.
669
BEA Workshop
Because BEA is a collaborator on WTP, it should be expected that their tools extend
WTP, and they do. BEA Workshop is available in several configurations, some free
and some commercial. Workshop adds specific support for the WebLogic Platform
and SOA as well as server support for Resin and Jetty. It also has tools for JSF,
EJB 3.0, Spring, Hibernate, Struts, and Tiles, and it includes WYSIWYG editors and
BEA AppXRay for checking and validating your Web application. For more, see
CodeGear JBuilder
CodeGear is Borland’s developer tools group. Their Java EE product, JBuilder—
which comes in Developer, Professional, and Enterprise versions—extends the
WTP toolset, adding visual tools for EJB and JPA projects. This tool focuses on
team-based development by supporting the configuration of the IDE for various
Open Source project tools, such as those for version control, bug tracking, and
builds. JBuilder also supports performance tuning via Borland Optimizeit, URL
modeling, and code quality tools. For more, see
/>Exadel Studio
Exadel Studio, built on WTP, provides enhancements and other tools to the WTP
platform. This free download adds support to WTP for JSF, Struts, Spring, and
Hibernate, and it includes visual editors such as a Struts Web application flow editor.
Exadel Studio is also available in a Pro version that adds additional support
on top of that provided by the free Studio. The Pro version will cost you, but it
includes support for MyFaces, Oracle ADF, Struts Shale, and Facelets. It also
includes a WYSIWYG JSP editor and more wizards to assist in development
tasks. For more, see
/>IBM Rational Application Developer for WebSphere Software
Much of WTP’s current code base was donated by IBM from Rational Application
Developer (RAD) for WebSphere, shown in Figure 16.1. RAD, the follow-on prod-
uct to WebSphere Studio Application Developer, contains significantly more features
than the other projects and products featured in this chapter. RAD allows developers
to—in many cases visually—design, develop, analyze, test, profile, and deploy Web,
Web services, Java, J2EE, portal, and SOA applications. Although there are too
670 CHAPTER 16 • Other Web Tools Based on Eclipse
many features to list here, some of the notable ones include XSL, EJB, JSF, Struts, and
modeling support using UML. Developers can also use RAD to improve their code
quality with tools for automated code quality reviews and build interactive reports
with Crystal Reports. RAD is optimized for WebSphere Application Server but
supports multiple vendor application runtimes. For more, see
/>Java Web Tools 671
Figure 16.1 RAD’s WYSIWYG JSP Editor
JBoss IDE for Eclipse
JBoss, best known for the Open Source JBoss Application Server, also provides the
Open Source JBoss IDE for Eclipse. The JBoss IDE extends WTP by adding tools
that support developing for the JBoss Enterprise Middleware System (JEMS),
which includes the JBoss Application Server. The added tools include tools for EJB
3.0, Hibernate, and control of the JBoss Application Server. For more, see
/>MyEclipse
MyEclipse, a commercial Web development IDE, is only one of three IDEs
discussed in this chapter that also features modeling capabilities such as UML dia-
gram editors and UML to Java code generation. MyEclipse extends WTP and
adds support for a variety of Web technologies including JSF, EJB, Hibernate,
and Struts. It also includes a WYSIWYG HTML/JSP editor, Hibernate configura-
tion tools, visual Struts and JSF designers, and support for additional server types
including Geronimo, GlassFish, Jetty, JRun, Orion, and Resin. For more, see
ObjectWeb Lomboz
The code base from the Open Source Lomboz was one of the original two used
to seed WTP. It should therefore be no surprise that recent versions of Lomboz
build on the WTP platform. Lomboz adds features for Enterprise Portals and
Service-Oriented Architectures (SOA), and supports development of Apache
Struts applications and SCA-based SOA modules that run on Apache Tuscany.
It also includes tools that simplify development for the JOnAS and JBoss
Application servers. In fact, simplifying development is a Lomboz theme that is
evident in the project workspace coming preconfigured with a runtime environ-
ment and with the additional tutorials and cheat sheets for Web, EJB, and Web
service development. For more, see
SAP NetWeaver Developer Studio
SAP NetWeaver Developer Studio is a commercial IDE that supports the develop-
ment of J2EE applications. NetWeaver includes support for Web services, J2EE,
enhanced Java debugging, and model-driven design of user interfaces. It also
includes persistence and development infrastructure perspectives. The persistence
perspective allows you to manipulate data objects such as tables and indexes. The
development infrastructure perspective allows you to manage the development of
your project, including its source code, build, and deployment. For more, see
/>W4T Eclipse
W4T Eclipse differs from the other tools presented in this section. W4T Eclipse
provides a visual development environment for Java Web applications. This
672 CHAPTER 16 • Other Web Tools Based on Eclipse
commercial product from Innoopract does not focus on the Java Web technologies
in use, but instead aims to simplify Java Web development. To that end, it provides
developers the ability to implement the Web UI by dragging and dropping Web
UI components onto a canvas, configure the properties of their application in
views, and see a real-time view of their newly constructed user interface (see
Figure 16.2). This visual creation of Web applications is accomplished by build-
ing on top of Innoopract’s W4 Toolkit, which is also part of the Eclipse Rich
Ajax Platform Project. Although the IDE’s development focus is not on specific
technologies, W4T Eclipse and the W4 Toolkit are built on Java standards such
as Java beans and servlets. W4T Eclipse also includes support for Hibernate and
EJB based applications. For more, see
/>Java Web Tools 673
Figure 16.2 The W4T Eclipse Perspective