macbook for dummies phần 7 pot
Bạn đang xem bản rút gọn của tài liệu. Xem và tải ngay bản đầy đủ của tài liệu tại đây (999.39 KB, 24 trang )
Each track can be adjusted so that you can listen to the interplay between
two or more tracks or hear how your song sounds without a specific track:
ߜ Click the tiny speaker button under the track name in the list, and the
button turns blue to indicate that the track is muted. To turn off the
mute, click the speaker icon again.
ߜ You can change the volume or balance of each individual track by using
the mixer that appears next to the track name. This comes in handy if
you want an instrument to sound louder or confine that instrument to
the left or right speaker.
A track doesn’t have to be filled for every second with one loop or another.
As you can see in Figure 15-8, my first big hit — I call it Turbo Techno — has
a number of repeating loops with empty space between them as different
instruments perform solo. Not bad for an air guitarist who can barely whistle.
Listen for it soon at a rave near you!
Figure 15-8:
The author’s
upcoming
techno
hit —
produced
on a Mac.
242
Part IV: Living the iLife
22_04859X ch15.qxp 7/20/06 10:39 PM Page 242
Tweaking the settings for a track
You don’t think that John Mayer or U2 just “play and walk away,” do you?
No, they spend hours after the recording session is over, tweaking their
music in the studio and on the mixing board until every note sounds just like
it should. You can adjust the settings for a track, too. The tweaks that you
can perform include adding effects (pull a Hendrix and add echo and reverb
to your electric guitar track) and kicking in an equalizer (for fine-tuning the
sound of your background horns).
To make adjustments to a track, follow these steps:
1. Click the desired track in the track list to select it.
2. Click the Track Info button (labeled in Figure 15-1).
3. Click the Details triangle at the bottom to expand the dialog box and
show the settings shown in Figure 15-9.
4. Select the check box of each effect you want to enable.
Each of the effects has a modifier setting. For example, you can adjust
the amount of echo to add by dragging its slider.
Figure 15-9:
Finesse your
tune by
tweaking
the sound of
a specific
track.
243
Chapter 15: GarageBand on the Go
22_04859X ch15.qxp 7/20/06 10:39 PM Page 243
5. To save the instrument as a new custom instrument — so that you can
choose it the next time you add a track — click the Save Instrument
button.
6. Click the Track Info button again to return to GarageBand.
Time for a Mark’s Maxim:
Save your work often in GarageBand, just like in the other iLife applications.
One power blackout, and you’ll never forgive yourself. Press Ô+S, and enjoy
the peace of mind.
Sharing Your Songs and Podcasts
After you finish your song, you can play it whenever you like through
GarageBand. But then again, that isn’t really what you want, is it? You want
to share your music with others with an audio CD or download it to your
iPod so that you can enjoy it yourself while walking through the mall!
iTunes to the rescue! Just like the other iLife applications that I cover in this
book, GarageBand can share the music you make through the digital hub that
is your Mac.
Setting preferences
The first step of the export process is to set the iTunes preferences in
GarageBand:
1. Choose GarageBand➪Preferences, and then click General to display
the settings you see in Figure 15-10.
2. Click in each of the three text boxes to type the playlist, composer
name, and album name for the tracks you create.
You can leave the defaults as-is, if you prefer. Each track that you export
is named after the song’s name in GarageBand.
Creating MP3 files
After you set your Export preferences, you can create an MP3 file from your
song or podcast project in just a few simple steps:
1. Open the song that you want to share.
244
Part IV: Living the iLife
22_04859X ch15.qxp 7/20/06 10:39 PM Page 244
2. Choose Share➪Send Song to iTunes.
After a second or two of hard work, your laptop opens the iTunes
window and highlights the new (or existing) playlist that contains your
new song, as shown in Figure 15-11.
Figure 15-11:
Now you
really
are
a
rock star!
Figure 15-10:
Setting
iTunes
Export pref-
erences.
245
Chapter 15: GarageBand on the Go
22_04859X ch15.qxp 7/20/06 10:39 PM Page 245
GarageBand includes an entire book’s worth of features, settings, and
other stuff, so there just isn’t enough space in a single chapter of this
laptop-driven tome to cover it all. If you’d like to dive in to everything
that GarageBand offers, I heartily recommend GarageBand For Dummies
(Wiley), written by fellow Mac guru Bob LeVitus. He can take you from
one end of GarageBand to the other in no time flat!
246
Part IV: Living the iLife
22_04859X ch15.qxp 7/20/06 10:39 PM Page 246
Part V
Sharing Access
and Information
23_04859x pt05.qxp 7/20/06 10:40 PM Page 247
In this part . . .
R
eady to share your Mac laptop among all the mem-
bers of your family? If you want to synchronize your
Bluetooth cell phone with your Mac, or you’ve decided to
build a wireless home network, you’ve come to the right
place. In this part, I show you how to provide others with
access to your documents and data — securely, mind you,
and with the least amount of hassle.
23_04859x pt05.qxp 7/20/06 10:40 PM Page 248
Chapter 16
Your Laptop Goes Multiuser
In This Chapter
ᮣ Enjoying the advantages of a multiuser Mac
ᮣ Understanding access levels
ᮣ Adding, editing, and deleting user accounts
ᮣ Restricting access for managed accounts
ᮣ Configuring your login window
ᮣ Sharing files with other users
ᮣ Securing your stuff with FileVault
E
verybody wants a piece (of your Mac laptop, that is).
Perhaps you live in a busy household with kids, significant others, grandpar-
ents, and a wide selection of friends — all clamoring for a chance to spend
time on the Internet, or take care of homework, or enjoy a good game.
On the other hand, your Mac might occupy a classroom or a break room at
your office — someplace public, yet everyone wants his or her own private
Idaho on your laptop, complete with a reserved spot on the hard drive and a
hand-picked attractive desktop background.
Before you throw your hands up in the air in defeat, read this chapter and
take heart! Here you find all the step-by-step procedures, explanations, and
tips to help you build a multiuser Mac that’s accessible to all.
Oh, and you still get to use it too. That’s not being selfish.
Doggone It, Bob’s Gotta Share My Mac!
Okay, so you don’t need Cinderella, Snow White, or that porridge-loving kid
with the trespassing problem. Instead, you have your brother Bob.
24_04859X ch16.qxp 7/20/06 10:39 PM Page 249
Every time Bob visits your place, it seems he needs to do “something” on the
Internet, or he needs a moment with your laptop to bang out a quick message
using his Web-based e-mail application. Unfortunately, Bob’s forays onto your
Mac always result in stuff getting changed, such as your desktop settings,
your Address Book, and your Safari bookmarks.
What you need, good reader, is a visit from the Account Fairy. Your problem
is that you have only a single user account on your system, and Tiger thinks
that Bob is you. By turning your laptop into a multiuser system and giving
Bob his own account, Tiger can tell the difference between the two of you,
keeping your druthers separate!
With a unique user account, Tiger can track all sorts of things for Bob, leav-
ing your computing environment blissfully pristine. A user account keeps
track of stuff such as
ߜ Address Book contacts
ߜ Safari bookmarks and settings
ߜ Desktop settings (including background images, screen resolutions, and
Finder tweaks)
ߜ iTunes libraries, just in case Bob brings his own music (sigh)
ߜ Web sites that Bob might ask you to host on your computer (resigned
sigh)
Plus, Bob gets his own reserved Home folder on your Mac’s hard drive, so
he’ll quit complaining about how he can’t find his files. Oh, and did I mention
how user accounts keep others from accessing your stuff? And how you can
lock Bob out of things such as applications, iChat, Mail, and Web sites
(including that offshore Internet casino site he’s hooked on)?
Naturally, this is only the tip of the iceberg. User accounts affect just about
everything you can do in Tiger. The moral of my little tale? A Mark’s Maxim to
the rescue:
Assign others their own user accounts, and let Tiger keep track of everything.
You can share your Mac with others and live happily ever after!
Throwing the Big Shiny Multiuser Switch
Get one thing straight right off the bat: You are the administrator of your
laptop. In network-speak, an administrator (or admin for short) is the one who
has the power to Do Unto Others — creating new accounts, deciding who gets
access to what, and generally running the multiuser show. In other words,
think of yourself as the Monarch of Mac OS X (the ruler, not the butterfly).
250
Part V: Sharing Access and Information
24_04859X ch16.qxp 7/20/06 10:39 PM Page 250
I always recommend that there should be only one or perhaps two accounts
with administrator-level access on any computer. This makes good sense
because you can be assured that no one will monkey with your Mac while
you’re away from the keyboard. Why a second admin account? You might
need to assign a second administrator account to a trusted individual who
knows as much about Tiger as you do. (Tell ’em to buy a copy of this book.)
That way, if something breaks or an account needs to be tweaked in some
way and you’re not around, the other person can take care of it whilst
you’re gone.
In this section, I explain the typical duties of a first-class Mac laptop adminis-
trator. (Yet another title for your resume!)
Assigning access levels
Tiger provides three levels of user accounts:
ߜ Admin (administrator): See the beginning of this section.
ߜ Standard: Perfect for most users, these accounts allow access to just
about everything but don’t let the user make drastic changes to Tiger or
create new accounts.
ߜ Managed: These are standard accounts with specific limits assigned by
you or by another admin account.
Another Mark’s Maxim is in order:
Assign other folks standard-level accounts, and then decide whether each new
account needs to be modified to restrict access as a managed account. Never
assign an account admin-level access unless you deem it truly necessary.
Standard accounts are quick and easy to set up, and I think they provide the
perfect compromise between access and security. You’ll find that standard
access allows your users to do just about anything they need to do, with a
minimum of hassle.
Managed accounts are highly configurable, so you can make sure that your
users don’t end up trashing the hard drive, sending junk mail, or engaging in
unmonitored chatting. (Note: Parents, teachers, and those folks designing a
single public-access account for a library or organization — this means you.)
Adding a new user account
All right, Mark, enough pregame jabbering — show this good reader how to
set up new accounts! Your Mac already has one admin-level account set up
251
Chapter 16: Your Laptop Goes Multiuser
24_04859X ch16.qxp 7/20/06 10:39 PM Page 251
for you (created during the initial Tiger set-up process). To add a new
account, follow these steps:
1. Click the System Preferences icon on the dock, and then click the
Accounts icon.
The Accounts pane shown in Figure 16-1 appears.
2. Click the New User button — the one with the plus sign at the bottom
of the accounts list.
The new user sheet shown in Figure 16-2 appears.
If your New User button appears dimmed, your Accounts pane is locked.
Remember that you can toggle the padlock icon at the lower-left corner
of most of the panes in System Preferences to turn on and off the ability
to make setting changes. To gain access, do the following:
a. Click the padlock icon to make changes to the Accounts pane.
b. When Tiger prompts you for your admin account password, enter it.
c. Click OK.
Now you can click the New User button.
Figure 16-1:
Add new
user
accounts
here.
252
Part V: Sharing Access and Information
24_04859X ch16.qxp 7/20/06 10:39 PM Page 252
3. In the Name text box, type the name that you want to display for this
account. Press Tab to move to the next field.
Tiger displays this name on the Login screen, so behave!
4. Tiger automatically generates the user’s short name (for use in iChat,
and for naming the user’s Home folder), but you can type a new one if
you want. (No spaces, please.) Then press Tab.
5. In the Password text box, type the password for the new account.
Press Tab to move to the next field.
Run out of password ideas? No problem! Click the key button to display
the new Password Assistant, from which Tiger can automatically gener-
ate password suggestions of the length you specify. After you generate
the password you want, press Ô+C to copy the password, click in the
Password text box on the new user sheet, and then press Ô+V to paste it.
6. In the Verify text box, retype the password you chose. Press Tab again
to continue your quest.
7. Tiger can provide a password hint after three unsuccessful login
attempts. To offer a hint, type a short question in the Password Hint
text box.
From a security standpoint, password hints are taboo. (I never use ’em.
If someone is having a problem logging in to a computer I administer,
you better believe I want to know why.) Therefore, I strongly recommend
that you skip this field — and if you do offer a hint, keep it vague! Avoid
hints like, “Your password is the name of the Wookie in Star Wars.” Geez.
Figure 16-2:
Fill out those
fields, and
you have a
new user.
253
Chapter 16: Your Laptop Goes Multiuser
24_04859X ch16.qxp 7/20/06 10:39 PM Page 253
8. Decide the account level status.
If you want the standard level account, do not select the Allow User to
Administer This Computer check box. If you want the administrator
level, select the check box.
You should have only one or two admin accounts, and your account is
already an admin account.
9. Click the Create Account button.
You’ll note that the new account shows up in the list at the left of the
Accounts pane.
Each user’s Home folder has the same default subfolders, including Movies,
Music, Pictures, Sites, and such. A user can create new subfolders within his
or her Home folder at any time.
Here’s one more neat fact about a user’s Home folder: No matter what the
account level, most of the contents of a Home folder can’t be viewed by other
users. (Yes, that includes admin-level users. This way, everyone using your
laptop gets his or her own little area of privacy.) Within the Home folder, only
the Sites and Public folders can be accessed by other users — and only in a
limited fashion. More on these folders later in this chapter.
Tweaking existing user accounts
Next, you consider the basic modifications you can make to a user account,
such as changing existing information or selecting a new picture to represent
that user’s unique personality.
To edit an existing account, log in with your admin account, display the
System Preferences window, and click Accounts to display the account list.
Then, follow these steps:
1. Click the account that you want to change.
Don’t forget to unlock the Accounts pane if necessary. See the earlier
section, “Adding a new user account,” to read how.
2. Edit the settings you want to change.
For example, you can reset the user’s password or (if absolutely neces-
sary) upgrade the account to Admin level.
3. Click the Picture tab, and then click a thumbnail image to represent
this user (as shown in Figure 16-3).
An easy way to get an image is to use one from your hard drive:
a. Click the Edit button and drag a new image from a Finder window
into the Images well (the sunken-looking square).
254
Part V: Sharing Access and Information
24_04859X ch16.qxp 7/20/06 10:39 PM Page 254
Alternatively, you can click the Snapshot button (which bears a
tiny camera) to grab a picture from your iSight video camera.
b. Click Set to return to the Accounts pane.
Tiger displays this image in the Login list next to the account name.
4. When everything is correct, press Ô+Q to close the System
Preferences dialog box.
Standard-level users have some control over their accounts — they’re not
helpless, y’know. Standard users can log in, open System Preferences, and
click Accounts to change the account password or picture, as well as the
card marked as theirs in the Address Book. All standard users can also set up
login items, which I cover later in this chapter. Note, however, that managed
users might not have access to System Preferences, so they can’t make
changes.
Deleting accounts
Not all user accounts last forever. Students graduate, co-workers quit, kids
move out of the house (at last!), and Bob might even find a significant other
who has a faster cable modem. We can only hope.
Figure 16-3:
Sometimes
it’s a
challenge to
choose the
image that
best
represents
a user.
255
Chapter 16: Your Laptop Goes Multiuser
24_04859X ch16.qxp 7/20/06 10:39 PM Page 255
Anyway, no matter what the reason, you can delete a user account at any
time. Log in with your admin account, display the Accounts pane in System
Preferences, and then follow these steps to eradicate an account:
1. Click the account that you want to delete.
2. Click the Delete User button (which bears the Minus Sign of Doom).
Tiger displays a confirmation sheet, as shown in Figure 16-4. By default,
the contents of the user’s Home folder are saved in a file in the Deleted
Users folder when you click OK. (This safety is a good idea if the user
might return in the future, allowing you to retrieve his or her old stuff —
however, this option is available only if you have enough space on your
hard drive to create the Home folder file.)
3. To clean up completely, click the Delete Immediately button.
Tiger wipes everything connected with the user account off your hard
drive.
4. Press Ô+Q to close the System Preferences dialog box.
Time once again for a Mark’s Maxim:
Always delete unnecessary user accounts. Otherwise, you’re leaving holes in
your Mac’s security.
Assigning login items and
parental controls
Every account on your laptop can be customized. Understandably, some set-
tings are accessible only to admin-level accounts, and others can be adjusted
by standard-level accounts. In this section, I introduce you to the things that
can be enabled (or disabled) within a user account.
Figure 16-4:
This is your
last chance
to save the
stuff from a
deleted user
account.
256
Part V: Sharing Access and Information
24_04859X ch16.qxp 7/20/06 10:39 PM Page 256
Automating with login items
Login items are applications or documents that can be set to launch or load
automatically as soon as a specific user logs in — for example, Apple Mail or
Address Book. In fact, a user must be logged in to add or remove login items.
Even an admin-level account can’t change the login items for another user.
A user must have access to the Accounts pane in the System Preferences
window to use login items. As you can read in the following section, a user
can be locked out of System Preferences, which makes it impossible for
login items to be specified for that account. (Go figure.)
To set login items for your account, follow these steps:
1. Click the System Preferences icon on the dock, and then click the
Accounts icon.
2. Click the Login Items tab to display the settings shown in Figure 16-5.
3. Click the Add button (with the plus sign) to display a file selection
sheet.
4. Navigate to the application you want to launch each time you login,
click it to select it, and then click Add.
If you’re in the mood to drag-and-drop, just drag the applications you
want to add from a Finder window and drop them directly into the list.
5. Press Ô+Q to quit System Preferences and save your changes.
Figure 16-5:
Add apps to
your login
items list.
257
Chapter 16: Your Laptop Goes Multiuser
24_04859X ch16.qxp 7/20/06 10:39 PM Page 257
Login items are launched in the order they appear in the list, so feel free to
drag the items into any order you like.
Managing access settings for an account
A standard-level account with restrictions is a managed account. (You can
read about these earlier in this chapter.) With these accounts, you can
restrict access to many different places in Tiger and your Mac’s applications
using parental controls. (Naturally, admin-level accounts don’t need parental
controls because an admin account has no restrictions.)
In short, parental controls come in handy in preventing users — family mem-
bers, students, co-workers, friends, or the public at large — from damaging
your computer, your software, or Tiger itself. If an account has been
restricted with parental controls, the account description changes from
Standard to Managed in the Accounts list.
To display the parental controls for a standard account, log in with an admin-
level account, open System Preferences, and click Accounts. Click the
Standard account in the list and then click the Parental Controls tab to dis-
play the categories you see in Figure 16-6:
ߜ Mail: From this category, you can specify “good” (read that “trusted”
and “nice”) e-mail addresses with which this user can exchange mail.
ߜ Finder & System: Choose this category to specify what operating
system features the user can access (including the System Preferences
window itself). You can also switch an account to use Simple Finder,
which I explain in a moment.
If you’re adding an account that will be shared among many people, I
especially recommend disabling the Change Password check box.
Disable this option, and your generic student or public access account
keeps the same password no matter who uses it.
ߜ iChat: Select this category to specify the admin-approved instant mes-
saging accounts with which this user can chat.
ߜ Safari: Selecting this check box simply turns on site access controls in
Safari. (To actually specify “good” sites that the user can visit, you have
to log in as the user and launch Safari.)
To restrict one or more features or functions in a category, mark the corre-
sponding check box to enable it, and then click the Configure button to select
the restrictions. (Mail displays the Configure sheet automatically. There’s
always gotta be an exception.)
For the ultimate in restrictive Tiger environments — think public access or
kiosk mode — you can assign the Simple Finder to an account, as shown in
Figure 16-7. Even the dock itself is restricted, sporting only the Finder icon,
the trash, Dashboard, and folders that allow the user to access his or her
documents and applications.
258
Part V: Sharing Access and Information
24_04859X ch16.qxp 7/20/06 10:39 PM Page 258
Figure 16-7:
The Simple
Finder is
pretty
doggone
simple.
Figure 16-6:
You don’t
have to be a
parent to
assign
Parental
Controls!
259
Chapter 16: Your Laptop Goes Multiuser
24_04859X ch16.qxp 7/20/06 10:39 PM Page 259
Mundane Chores for the
Multiuser Laptop
After you’re hip on user accounts and the changes you can make to them,
turn to a number of topics that affect all users of your laptop — things such
as how they’ll log in, how a user can share information with everyone else on
the computer, and how each user account can be protected from unscrupu-
lous outsiders with state-of-the-art encryption. (Suddenly you’re James Bond!
I told you Tiger would open new doors for you.)
Logging on and off in Tiger For Dummies
Hey, how about the login screen itself? How do your users identify them-
selves? Time for another of my “Shortest books in the For Dummies series”
special editions. (The title’s practically longer than the entire book.)
Tiger offers four methods of logging folks into your multiuser Mac laptop:
ߜ The username and password login: This is the most secure type of
login screen you’ll see in Tiger because you have to type your account
username and your password. (A typical hacker isn’t going to know all
the usernames on your Mac.) Press Return or click the Log In button to
complete the process.
When you enter your username and password, you see bullets instead of
your password to ensure security. Otherwise, someone could simply
look over your shoulder and see your password.
ߜ The list login: This login screen offers a good middle of the road
between security and convenience. Click your account username in the
list and type your password when the login screen displays the pass-
word prompt. Press Return or click the Log In button to continue.
ߜ Fast User Switching: This feature allows another user to sit down and
log in while the previous user’s applications are still running in the back-
ground. This is perfect for a fast e-mail check or a scan of your eBay bids
without forcing someone else completely off the laptop. When you turn
on Fast User Switching, Tiger displays the currently active user’s name
on the right side of the Finder menu bar (see Figure 16-8).
To switch to another account:
a. Click the current user’s name in the Finder menu.
b. Click the name of the user who wants to log in.
Tiger displays the login window, just as if the Mac had been
rebooted.
260
Part V: Sharing Access and Information
24_04859X ch16.qxp 7/20/06 10:39 PM Page 260
The previous user’s stuff is still running, so you definitely shouldn’t
reboot or shut down the laptop!
To switch back to the previous user:
a. Click the user name again in the Finder menu.
b. Click the previous user’s name.
For security, Tiger prompts you for that account’s login password.
ߜ Auto login: This is the most convenient method of logging in but offers
no security whatsoever. Tiger automatically logs in to the specified
account when you start or reboot your Mac.
I strongly recommend that you use auto login only if
• Your laptop is in a secure location (complete with a cable lock, as
covered in Chapter 1).
• You are the only one using your Mac.
• You’re setting up a public-access laptop, in which case you want
your Mac to immediately log in with the public account.
Never set an admin-level account as the auto login account. This is the
very definition of ASDI, or A Supremely Dumb Idea. Nothing quite like a
stolen laptop with no security, I always say!
Figure 16-8:
The Fast
User
Switching
menu,
unfurled for
all to see.
261
Chapter 16: Your Laptop Goes Multiuser
24_04859X ch16.qxp 7/20/06 10:39 PM Page 261
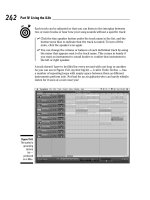
To set up a username/password or list login, open System Preferences, click
the Accounts icon, and then display the Login Options settings (see Figure
16-9). Select the List of Users radio button for a list login screen, or select the
Name and Password radio button to require your users to type their full user-
name and password.
To enable Fast User Switching, select the Enable Fast User Switching
check box.
To set Auto Login, select the Automatically Log in As check box. Click the
account name pop-up menu and choose the account that Tiger should use
(as shown by the now-legendary Figure 16-9).
Logging out of Tiger all the way (without Fast User Switching) is a cinch. Just
click the Apple menu (Ú) and then choose Log Out. (Or from the keyboard,
press Ô+Shift+Q.) A confirmation dialog box appears that will automatically
log you off in two minutes, but don’t forget that if someone walks up and
clicks Cancel, he or she will be using your laptop with your account! Your
Mac returns to the login screen, ready for its next victim. Heed this Mark’s
Maxim:
Figure 16-9:
Configure
your login
settings
from the
Login
Options
pane.
262
Part V: Sharing Access and Information
24_04859X ch16.qxp 7/20/06 10:39 PM Page 262
Always click the Log Out button on the Logout Confirmation dialog box
before you leave your Mac.
A word about what you
can (and can’t) share
You might wonder where shared documents and files reside on your Mac.
That’s a good question. Like just about everything in Tiger, there’s a simple
answer. The Users folder on your laptop contains a Shared folder. To share a
file or folder, it must be placed in the Shared folder for standard- and managed-
level users to be able to open it.
You don’t have to turn on Personal File Sharing in the Sharing pane of System
Preferences to use Shared folders on your Mac. Personal File Sharing affects
only network access to your machine by users of other computers.
Admin-level accounts have the advantage because they can access virtually
any location on the Mac’s hard drive. Therefore, if one admin-level user wants
to save a document for another admin-level user, that document can reside in
other folders on your system besides just the Shared folder. (Personally, I
don’t mind using the Shared folder because it guarantees that other users
can access it, but privacy between admin users is a closely guarded perk.)
Each user account on your laptop also has a Public folder in that user’s Home
folder. This is a read-only folder that other users of your Mac can access:
They can only open and copy the files it contains. (Sorry, no changes to exist-
ing documents from other users, or new documents from other users.) Every
user’s Public folder contains a Drop Box folder, where other users can copy
or save files (but can’t view the contents). Think of the Drop Box as a mailbox
where you drop off stuff for the other user.
Protecting your stuff with encryption
Allowing others to use your laptop always incurs a risk — especially if you
store sensitive information and documents on your computer. Although your
login password should ensure that your Home folder is off-limits to everyone
else, consider an extra level of security to prevent even a dedicated hacker
from accessing your stuff.
263
Chapter 16: Your Laptop Goes Multiuser
24_04859X ch16.qxp 7/20/06 10:39 PM Page 263
To this end, Tiger includes FileVault, which automatically encrypts the con-
tents of your Home folder. Without the proper key (in this case, either your
login password or your admin’s master password), the data contained in
your Home folder is impossible for just about anyone to read. (I guess the
FBI or NSA would be able to decrypt it, but they’re not likely a worry at your
place!)
The nice thing about FileVault is that it’s transparent to you and your users.
In other words, when you log in, Tiger automatically takes care of decrypting
and encrypting the stuff in your Home folder for you. You literally won’t know
that FileVault is working for you — which is how computers are supposed to
work.
To turn on FileVault protection for a specific account, follow these steps:
1. Click the System Preferences icon on the dock, and then click the
Security icon.
2. If necessary, click Set Master Password to create a master password.
Note that you need to be logged in with an admin-level account to set a
master password. However, you need to do this only once, no matter
how many accounts you’re hosting on your Mac. Using this master pass-
word, any Admin-level user can unlock any Home folder for any user.
Before you move to Step 3, note that you must be logged in using the
account that requires the FileVault protection. Therefore, if you had to
log in using your admin-level account to set a master password, you
have to log out and log in again using the account you want to protect.
Arrgh.
3. Click the Turn on FileVault button.
4. Enter your account’s login password when prompted (see Figure 16-10),
and click OK.
5. Click the Turn on FileVault button on the confirmation screen.
6. After Tiger encrypts your Home folder and logs you out, log in again
normally.
You’re done!
Remember those passwords. Again, do not forget your account login pass-
word, and make doggone sure that your admin user never forgets the master
password! If you forget these passwords, you can’t read anything in your
Home folder, and even the smartest Apple support technician can do nothing
to help.
264
Part V: Sharing Access and Information
24_04859X ch16.qxp 7/20/06 10:39 PM Page 264
Figure 16-10:
Your
account
password
becomes
your
FileVault
password.
265
Chapter 16: Your Laptop Goes Multiuser
24_04859X ch16.qxp 7/20/06 10:39 PM Page 265