Netframwork 2.0 (phần 10) ppt
Bạn đang xem bản rút gọn của tài liệu. Xem và tải ngay bản đầy đủ của tài liệu tại đây (444.76 KB, 50 trang )
Lesson 3: Working with the DataGridView 425
Lesson 3: Working with the DataGridView
This lesson describes how to configure and work with data in a DataGridView control.
The DataGridView can display many types of data but typically is used to display the
contents of a DataTable in a DataSet.
After this lesson, you will be able to:
■ Use the DataGridView control to display and update the tabular data contained in a
data source.
■ Bind a DataGridView control to a data source.
■ Configure a DataGridView to use multiple data sources.
■ Manage columns in a DataGridView control by using the Edit Columns dialog box.
■ Format a DataGridView control by using styles.
■ Format a DataGridView control by using custom painting.
■ Configure the column and cell types of a DataGridView control.
■ Add tables and columns to a DataGridView control.
■ Delete columns in a DataGridView control.
■ Respond to clicks in a DataGridView control.
■ Validate input with a DataGridView control.
■ Change displayed data at run time in a DataGridView control.
Estimated lesson time: 60 minutes
Displaying a Dataset in the DataGridView Control
To display a dataset in a DataGridView control or, more specifically, to display a Data-
Table in a DataGridView, set the DataSource property of the DataGridView to the
DataSet and set the DataMember property of the DataGridView to the name of the
DataTable. For example, the following code displays the Northwind Customers table
in a DataGridView:
' VB
DataGridView1.DataSource = NorthwindDataSet1
DataGridView1.DataMember = "Customers"
//C#
DataGridView1.DataSource = northwindDataSet1;
DataGridView1.DataMember = "Customers";
426 Chapter 8 Implementing Data-Bound Controls
You can also set a DataGridView control to display a dataset using the smart tag avail-
able on a DataGridView control by selecting the DataSet in the Choose Data Source
ComboBox available on the smart tag. The Choose Data Source command allows you
to select a DataSet and DataTable to display from the DataSet list already defined in
your project, or you can create a new DataSet to display by selecting Add Project Data
Source on the smart tag, which will start the Data Source Configuration Wizard.
Configuring DataGridView Columns
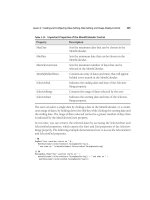
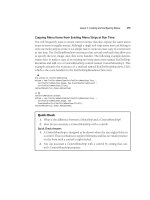
There are six built-in types of columns you can use in a DataGridView, as outlined in
Table 8-1. When adding columns to a DataGridView, select the type of column based
on the data you plan to display in it.
Table 8-1 DataGridView Column Types
Column Type Description
DataGridViewTextBoxColumn Use this column type to display text and
numeric values. A data-bound DataGridView
automatically generates this type of column
when binding to strings and numeric values.
DataGridViewCheckBoxColumn Use this column to display Boolean values. A
DataGridView automatically generates this type
of column when binding to Boolean values.
DataGridViewImageColumn Use this column to display images. A DataGrid-
View automatically generates this type of col-
umn when binding to Image and Icon objects.
You can also bind a DataGridViewImage col-
umn to a byte array.
DataGridViewButtonColumn Use this column to provide users with a button
control.
DataGridViewComboBoxColumn Use this column type to present lists of choices.
This would typically be used for lookups to
other tables.
DataGridViewLinkColumn Use this column type to display links to other
data.
Lesson 3: Working with the DataGridView 427
Table 8-1 DataGridView Column Types
Column Type Description
Custom Column If none of the preceding column types provides
the specific functionality you require, you can
always create a custom column type. To create
a custom column, define your class to inherit
from DataGridViewColumn or any class with a
base class of DataGridViewColumn. (For exam-
ple, inherit from DataGridViewTextBoxColumn
to extend the functionality of that type.)
Adding Tables and Columns to a DataGridView
To display a table in a DataGridView, you add and define the columns to the DataGrid-
View that make up the schema of the table. You can add columns to a DataGridView
with Designers using the Add Column dialog box or programmatically in code.
First, decide which type of column to use (refer to Table 8-1, shown previously), and
then use one of the following procedures to add the column to your DataGridView.
Adding Columns to a DataGridView Using the Designer
To add columns to a DataGridView in the Designer, perform the following procedures:
1. Select the DataGridView on your form.
2. Display the smart tag of the DataGridView.
3. Select Add Column.
4. In the Add Column dialog box, define the column by setting the appropriate val-
ues in the dialog box.
Adding Columns to a DataGridView Programmatically
To add columns to a DataGridView in code, create an instance of the type of DataGrid-
View column to create, define the column by setting the appropriate properties, and
then add the column to the DataGridView.Columns collection.
428 Chapter 8 Implementing Data-Bound Controls
For example, the following code sample creates a new text box column named Product-
Name:
' VB
Dim ProductNameColumn As New DataGridViewTextBoxColumn
ProductNameColumn.Name = "ProductName"
ProductNameColumn.HeaderText = "Product Name"
ProductNameColumn.ValueType = System.Type.GetType("System.String")
DataGridView1.Columns.Add(ProductNameColumn)
// C#
DataGridViewTextBoxColumn ProductNameColumn = new DataGridViewTextBoxColumn();
ProductNameColumn.Name = "ProductName";
ProductNameColumn.HeaderText = "Product Name";
ProductNameColumn.ValueType = System.Type.GetType("System.String");
DataGridView1.Columns.Add(ProductNameColumn); .
Deleting Columns in the DataGridView
Deleting columns in a DataGridView can be accomplished using the designers in
Visual Studio, or programmatically in code.
Deleting Columns in a DataGridView Using the Designer
To delete columns in a DataGridView using the Designer, perform the following pro-
cedures:
1. Select the DataGridView on your form.
2. Display the smart tag for the DataGridView.
3. Select Edit Columns.
4. In the Edit Columns dialog box, select the column you want to remove from the
DataGridView.
5. Click the Remove button.
Deleting Columns in a DataGridView Programmatically
To delete columns in a DataGridView in code, call the Remove method and provide the
name of the column you want to delete. For example, the following code example
deletes a column named ProductName from DataGridView1:
' VB
DataGridView1.Columns.Remove("ProductName")
// C#
DataGridView1.Columns.Remove["ProductName"];
Lesson 3: Working with the DataGridView 429
Determining the Clicked Cell in a DataGridView
To determine the clicked cell, use the DataGridView.CurrentCell property. The Current-
Cell provides a reference to the currently selected cell and provides properties to
access the value of the data in the cell as well as the row and column index of the cell’s
current location in the DataGridView.
' VB
Dim CurrentCellValue As String
CurrentCellValue = CustomersDataGridView.CurrentCell.Value.ToString
// C#
String CurrentCellValue;
CurrentCellValue = CustomersDataGridView.CurrentCell.Value.ToString();
Validating Input in the DataGridView
To validate input in an individual cell in a DataGridView, handle the DataGridView
.CellValidating event and cancel the edit if the value fails validation. The CellValidating
event is raised when a cell loses focus. Add code to the event handler for the CellValidat-
ing event to verify that the values in specific columns conform to your business rules and
application logic. The event arguments contain the proposed value in the cell as well as
the row and column index of the cell being edited.
For example, the following code validates that the ProductName column does not con-
tain an empty string (use this sample for a DataGridView that is not bound to data):
' VB
If DataGridView1.Columns(e.ColumnIndex).Name = "ProductName" Then
If e.FormattedValue.ToString = "" Then
dataGridView1.Rows(e.RowIndex).ErrorText = "Product Name is a required field"
e.Cancel = True
Else
dataGridView1.Rows(e.RowIndex).ErrorText = ""
End If
End If
// C#
if (DataGridView1.Columns[e.ColumnIndex].Name == "ProductName")
{
if (e.FormattedValue.ToString() == "")
{
DataGridView1.Rows[e.RowIndex].ErrorText = "Product Name is a required field";
e.Cancel = true;
}
else
{
430 Chapter 8 Implementing Data-Bound Controls
DataGridView1.Rows[e.RowIndex].ErrorText = "";
}
}
The following code validates that the ProductName column does not contain an empty
string (use this example for a DataGridView that is bound to data):
' VB
If DataGridView1.Columns(e.ColumnIndex).DataPropertyName = "ProductName" Then
If e.FormattedValue.ToString = "" Then
dataGridView1.Rows(e.RowIndex).ErrorText = "Product Name is a required field"
e.Cancel = True
Else
dataGridView1.Rows(e.RowIndex).ErrorText = ""
End If
End If
// C#
if (DataGridView1.Columns[e.ColumnIndex].DataPropertyName == "ProductName")
{
if (e.FormattedValue.ToString() == "")
{
DataGridView1.Rows[e.RowIndex].ErrorText = "Product Name is a required field";
e.Cancel = true;
}
else
{
DataGridView1.Rows[e.RowIndex].ErrorText = "";
}
}
Format a DataGridView Using Styles
Format the look of a DataGridView by setting the grid’s cell styles. Although each cell
can have a specific style applied to it, many cells typically share the same style.
The DataGridView provides several built-in default cell styles that you can customize
and use, or you can create new cell styles and apply them to your DataGridView cells.
The following example demonstrates how to apply the alternating rows style.
Format a DataGridView Control by Using Custom Painting
To format a DataGridView using custom painting, you can handle the CellPainting
event and insert your own custom painting code. When you handle the CellPainting
event, the DataGridViewCellPaintingEventArgs provide access to many properties that
simplify custom painting. When you handle the CellPainting event, be sure to set
e.Handled to True so the grid will not call its own cell painting routine.
Lesson 3: Working with the DataGridView 431
Place the following code in the CellPainting event handler to paint all cells LightSkyBlue:
' VB
' Paint the cell background color LightSkyBlue
e.Graphics.FillRectangle(Brushes.LightSkyBlue, e.CellBounds)
' Draw the contents of the cell
If Not (e.Value Is Nothing) Then
e.Graphics.DrawString(e.Value.ToString, e.CellStyle.Font, _
Brushes.Black, e.CellBounds.X, e.CellBounds.Y)
End If
e.Handled = True
// C#
// Paint the cell background color LightSkyBlue
e.Graphics.FillRectangle(Brushes.LightSkyBlue, e.CellBounds);
// Draw the contents of the cell
if (e.Value != null)
{
e.Graphics.DrawString(e.Value.ToString(), e.CellStyle.Font,
Brushes.Black, e.CellBounds.X, e.CellBounds.Y);
}
e.Handled = true;
Quick Check
1. What properties do you set on a DataGridView to display a specific DataTable?
2. How do you determine what cell is clicked in a DataGridView?
Quick Check Answers
1. Set the DataSource property to the DataSet, and the DataMember property
to the name of the DataTable.
2. Inspect the DataGridView.CurrentCell property.
Lab: Working with the DataGridView
In this lab you will work with data in a DataGridView control.
� Exercise 1: Working with the DataGridView
Now let’s create a Windows application and demonstrate how to manipulate the defini-
tion as well as the columns and data in a DataGridView control.
1. Create a Windows application and name it DataGridViewExample.
2. Open the Data Sources window (on the Data menu, select Show Data Sources).
432 Chapter 8 Implementing Data-Bound Controls
3. Click Add New Data Source to start the Data Source Configuration Wizard.
4. Leave the default of Database and click Next.
5. Select (or create) a connection to the Northwind sample database and click Next.
6. Expand the Tables node. Select the Customers table, and then click Finish.
7. Drag the Customers node from the Data Sources window onto the form.
At this point, you can actually run the application, and the form appears with the
Customers table loaded into the DataGridView.
8. Drag two buttons onto the form below the DataGridView and set the following
properties:
Button1:
❑ Name = AddColumnButton
❑ Text = Add Column
Button2:
❑ Name = DeleteColumnButton
❑ Text = Delete Column
9. Double-click the Add Column Button to create the button-click event handler
and to open the form in code view.
10. Add the following code to Form1, which adds some additional code to the
Form1_Load event that creates a new column on the DataTable and the code to
add a new column to the DataGridView in the AddColumnButton_Click event.
' VB
Private Sub Form1_Load(ByVal sender As System.Object, ByVal e As System.EventArgs) _
Handles MyBase.Load
'TODO: This line of code loads data into the 'NorthwindDataSet.Customers' table. You
can move, or remove it, As needed.
Me.CustomersTableAdapter.Fill(Me.NorthwindDataSet.Customers)
' Add a new column to the Customers DataTable
' to be used to demonstrate adding and removing
' columns in a DataGridView in the methods below
Dim Location As New DataColumn("Location")
Location.Expression = "City + ', ' + Country"
NorthwindDataSet.Customers.Columns.Add(Location)
End Sub
Private Sub AddColumnButton_Click(ByVal sender As System.Object, ByVal e As
System.EventArgs) _
Handles AddColumnButton.Click
Lesson 3: Working with the DataGridView 433
Dim LocationColumn As New DataGridViewTextBoxColumn
LocationColumn.Name = "LocationColumn"
LocationColumn.HeaderText = "Location"
LocationColumn.DataPropertyName = "Location"
CustomersDataGridView.Columns.Add(LocationColumn)
End Sub
// C#
private void Form1_Load(object sender, EventArgs e)
{
// TODO: This line of code loads data into the 'northwindDataSet.Customers' table.
You can move, or remove it, as needed.
this.customersTableAdapter.Fill(this.northwindDataSet.Customers);
// Add a new column to the Customers DataTable
// to be used to demonstrate adding and removing
// columns in a DataGridView in the methods below
DataColumn Location = new DataColumn("Location");
Location.Expression = "City + ', ' + Country";
northwindDataSet.Customers.Columns.Add(Location);
}
private void AddColumnButton_Click(object sender, EventArgs e)
{
DataGridViewTextBoxColumn LocationColumn = new DataGridViewTextBoxColumn();
LocationColumn.Name = "LocationColumn";
LocationColumn.HeaderText = "Location";
LocationColumn.DataPropertyName = "Location";
customersDataGridView.Columns.Add(LocationColumn);
}
11. Double-click the Delete Column Button to create the DeleteColumnButton_Click
event handler. Add the following code to the DeleteColumnButton_Click event
handler:
' VB
Try
CustomersDataGridView.Columns.Remove("LocationColumn")
Catch ex As Exception
MessageBox.Show(ex.Message)
End Try
// C#
try
{
customersDataGridView.Columns.Remove("LocationColumn");
}
catch (Exception ex)
{
MessageBox.Show(ex.Message);
}
12. Drag another button onto the form and set the following properties:
434 Chapter 8 Implementing Data-Bound Controls
❑ Name = GetClickedCellButton
❑ Text = Get Clicked Cell
13. Drag a label onto the form and place it next to the GetClickedCell button.
14. Double-click the GetClickedCell button and add the following code to the Get-
ClickedCellButton_Click event handler:
' VB
Dim CurrentCellInfo As String
CurrentCellInfo = CustomersDataGridView.CurrentCell.Value.ToString &
Environment.NewLine
CurrentCellInfo += "Column: " &
CustomersDataGridView.CurrentCell.OwningColumn.DataPropertyName & Environment.NewLine
CurrentCellInfo += "Column Index: " &
CustomersDataGridView.CurrentCell.ColumnIndex.ToString & Environment.NewLine
CurrentCellInfo += "Row Index: " & CustomersDataGridView.CurrentCell.RowIndex.ToString
Label1.Text = CurrentCellInfo
// C#
string CurrentCellInfo;
CurrentCellInfo = customersDataGridView.CurrentCell.Value.ToString() +
Environment.NewLine;
CurrentCellInfo += "Column: " +
customersDataGridView.CurrentCell.OwningColumn.DataPropertyName + Environment.NewLine;
CurrentCellInfo += "Column Index: " +
customersDataGridView.CurrentCell.ColumnIndex.ToString() + Environment.NewLine;
CurrentCellInfo += "Row Index: " +
customersDataGridView.CurrentCell.RowIndex.ToString();
label1.Text = CurrentCellInfo;
15. Create an event handler for the CustomersDataGridView.CellValidating event.
(Select CustomersDataGridView
on the form, click the Events button in the Prop-
erties window, and double-click the CellValidating event.)
16. Add the following code to the CellValidating event handler:
' VB
If CustomersDataGridView.Columns(e.ColumnIndex).DataPropertyName = "ContactName" Then
If e.FormattedValue.ToString = "" Then
CustomersDataGridView.Rows(e.RowIndex).ErrorText = _
"ContactName is a required field"
e.Cancel = True
Else
CustomersDataGridView.Rows(e.RowIndex).ErrorText = ""
End If
End If
// C#
if (customersDataGridView.Columns[e.ColumnIndex].DataPropertyName == "ContactName")
{
Lesson 3: Working with the DataGridView 435
if (e.FormattedValue.ToString() == "")
{
customersDataGridView.Rows[e.RowIndex].ErrorText =
"ContactName is a required field";
e.Cancel = true;
}
else
{
customersDataGridView.Rows[e.RowIndex].ErrorText = "";
{
}
17. Drag another button onto the form and set the following properties:
❑ Name = ApplyStyleButton
❑ Text = Apply Style
18. Double-click the Apply Style
button and add the following code to the Apply-
StyleButton_Click event handler:
' VB
CustomersDataGridView.AlternatingRowsDefaultCellStyle.BackColor = Color.LightGray
// C#
customersDataGridView.AlternatingRowsDefaultCellStyle.BackColor = Color.LightGray;
19. Run the application.
20. Click the Add Column button, and then scroll to the end of the columns to verify
that the new Location column is there.
21. Click the Delete Column button and verify that the Location column is deleted
from the DataGridView.
22. Select any cell in the grid and then click the Get Clicked Cell button. The Label
displays the contents of the cell, the name of the column the cell is in, and the
column and row index of the cell.
23. And, finally, click the Apply Style button, and the AlternatingRowCellStyle is set
up to display alternating rows with a light gray background.
Lesson Summary
■ The DataGridView is the preferred control for displaying tabular data such as a
DataTable.
■ You can add and remove columns to a DataGridView in the Designer, using the
Add Column and Edit Column dialog boxes available from the smart tag of the
DataGridView.
436 Chapter 8 Implementing Data-Bound Controls
■ The DataGridView.CurrentCell property provides access to the currently selected
cell in a DataGridView.
■ The DataGridView raises a CellValidating event through which you can add code
that verifies that the value in a column conforms to your business rules and
application logic.
■ You can format the look of a DataGridView using styles and custom painting.
Lesson Review
The following questions are intended to reinforce key information presented in this
lesson. The questions are also available on the companion CD if you prefer to review
them in electronic form.
NOTE Answers
Answers to these questions and explanations of why each choice is right or wrong are located in
the “Answers” section at the end of the book.
1. What is the best way to determine what cell a user clicks in a DataGridView?
A. Use the column and row index of the selected cell.
B. Use the DataGridView.CurrentCell property.
C. Use the cursor position’s x and y coordinates.
D. Use the currently selected column and row in the bound DataTable to
determine the clicked cell.
2. What is the preferred method of validating input in a DataGridView?
A. By adding validation code to the CellPainting event handler
B. By adding validation code to the DataGridView.CellClick event handler
C. By adding validation code to the DataGridView.CellValidating event handler
D. By adding code to the DataGridView partial class file
3. What is the best way to display a Boolean value in a DataGridView?
A. Configure a DataGridViewTextBoxColumn and display True or False.
B. Configure a DataGridViewCheckBoxColumn to display a check box that indi-
cates checked or unchecked.
C. Configure a DataGridViewButtonColumn to display a button that indicates
pressed or unpressed.
D. Configure a custom column to display yes or no.
Chapter 8 Review 437
Chapter Review
To further practice and reinforce the skills you learned in this chapter, you can per-
form the following tasks:
■ Review the chapter summary.
■ Complete the case scenarios. These scenarios set up real-world situations involv-
ing the topics of this chapter and ask you to create a solution.
■ Complete the additional practices.
■ Take a practice test.
Chapter Summary
■ Populate the Data Sources window by running the Data Source Configuration
Wizard.
■ Drag items from the Data Sources window to create data-bound controls on a
form.
■ Code to fill the table with data and to save changes back to the database is auto-
matically added to the form.
■ In the Data Sources window, related records are displayed as nested nodes in the
tree view.
■ Simple data binding displays a single element of data in a control.
■ Complex data binding binds multiple elements of data to multiple properties of
a control.
■ Navigate data in a DataSet using a BindingNavigator component.
■ Use BindingSource components as a way to abstract the actual data source in
code.
■ The DataGridView is the preferred control for displaying tabular data such as a
DataTable.
■ You can add and remove columns to a DataGridView in the Designer using the
Add Column and Edit Column dialog boxes available from the smart tag of the
DataGridView.
■ The DataGridView.CurrentCell property provides access to the currently selected
cell in a DataGridView.
438 Chapter 8 Review
■ The DataGridView raises a CellValidating event through which you can add code
that verifies that the value in a column conforms to your business rules and
application logic.
■ You can format the look of a DataGridView using styles and custom painting.
Key Terms
Do you know what these key terms mean? You can check your answers by looking up
the terms in the glossary at the end of the book.
■ BindingSource
■ data binding
Case Scenarios
In the following case scenarios, you will apply what you’ve learned about implement-
ing data-bound controls. You can find answers to these questions in the “Answers”
section at the end of this book.
Case Scenario 1: Upgrading an Old Application
You have been tasked with upgrading the software that keeps track of donations at
the Baldwin Museum of Science. Upon initial inspection, you see that each record is
displayed on a separate form so that you must navigate sequentially to go from one
museum record to the next. In addition to the many forms, the application has a sep-
arate component that is specifically for keeping the database and the forms in synch.
List the potential improvements you can make to the application.
Case Scenario 2: Preventing Recompilation of a Large Application
You just landed a developer’s dream job at City Power and Light. Your next big project
is writing the next-generation software that runs the power grid for the entire city!
You know you are going to be working on this application for quite some time before
it ever goes live, so the main database won’t be available until the application is actu-
ally deployed. You will to need to design this application to easily switch between the
test and production databases.
What would you do to facilitate this architecture?
Chapter 8 Review 439
Suggested Practices
To gain further knowledge on the subject of working with data in a connected envi-
ronment, complete the following practices.
■ Practice 1 Create an application that displays data from the Categories and
Products tables using the Data Sources window.
■ Practice 2 Create an application that displays data from the Customers table in a
DataGridView and then displays that customer’s orders in the same DataGridView
when a button is clicked.
■ Practice 3 Create an application that displays the data from the Products table
and format the cells that contain discontinued products with grayed-out text.
Take a Practice Test
The practice tests on this book’s companion CD offer many options. For example, you
can test yourself on just the content covered in this chapter, or you can test yourself on
all the 70-526 certification exam content. You can set up the test so that it closely sim-
ulates the experience of taking a certification exam, or you can set it up in study mode
so that you can look at the correct answers and explanations after you answer each
question.
MORE INFO Practice tests
For details about all the practice test options available, see the “How to Use the Practice Tests” sec-
tion in this book’s Introduction.
Chapter 9
Working with XML
XML is a universally used format for communication and storage of information. XML
is extensible, platform-independent, and, since it is a text-based format, can be read
and written with standard text-editing tools. This chapter describes how to use the
Microsoft .NET Framework to read and write XML.
Exam objectives in this chapter:
■ Read, write, and validate XML by using the XmlReader class and the XmlWriter
class.
❑ Read XML data by using the XmlReader.
❑ Read all XML element and attribute content.
❑ Read specific element and attribute content.
❑ Read XML data by using the XmlTextReader class.
❑ Read node trees by using the XmlNodeReader class.
❑ Validate XML data by using the XmlValidatingReader.
❑ Write XML data by using the XmlWriter class.
❑ Manage XML with the XML Document Object Model (DOM).
❑ Read XML data into the DOM.
❑ Modify an XML document by adding and removing nodes.
❑ Modify nodes within an XML document.
❑ Write data in XML format from the DOM.
❑ Work with nodes in the XML DOM.
❑ Handle DOM events.
❑ Modify the XML declaration.
Lessons in this chapter:
■ Lesson 1: Reading and Writing XML with the XmlReader and XmlWriter
Classes . . . . . . . . . . . . . . . . . . . . . . . . . . . . . . . . . . . . . . . . . . . . . . . . . . . . . . . . . . . 443
■ Lesson 2: Managing XML with the XML Document Object Model. . . . . . . . 465
441
442 Chapter 9 Working with XML
Before You Begin
To complete the lessons in this chapter, you must have:
■ A computer that meets or exceeds the minimum hardware requirements listed in
the “Introduction” at the beginning of the book.
■ Microsoft Visual Studio 2005 Professional Edition installed on your computer.
■ An understanding of Microsoft Visual Basic or C# syntax and familiarity with
the Microsoft .NET Framework.
■ An understanding of basic XML structure.
Real World
Matt Stoecker
The rise of XML use in the computing world has been meteoric. When writing
applications to parse information from a variety of sources, I invariably need to
process XML. The .NET Framework XML classes make it easy to incorporate
XML into your applications.
Lesson 1: Reading and Writing XML with the XmlReader and XmlWriter Classes 443
Lesson 1: Reading and Writing XML with the XmlReader
and XmlWriter Classes
The System.XML namespace supplies the XmlReader and XmlWriter classes for rapid
reading and writing XML. The XmlReader and XmlWriter classes are abstract classes
that provide the basic interface for parsing XML and are implemented in a variety of
classes. This lesson will discuss how to use the XmlReader and XmlWriter classes, as
well as some of their most common implementations.
After this lesson, you will be able to:
■ Read XML data by using the XmlReader.
■ Read all XML element and attribute content.
■ Read specific element and attribute content.
■ Read XML data by using the XmlTextReader class.
■ Read node trees by using the XmlNodeReader class.
■ Validate XML data by using the XmlValidatingReader.
■ Write XML data by using the XmlWriter class.
Estimated lesson time: 45 minutes
The XmlReader Class
The XmlReader class is an abstract class that provides the base implementation for the
different XML reader classes in the System.Xml namespace. XmlReader and its deriva-
tive classes provide rapid, noncached, forward-only access to an XML document. Sim-
ply put, this means that you can use an instance of a class derived from XmlReader to
start at the beginning of an XML document and read through it from start to finish.
Once content has been read, however, it cannot be returned to and is lost unless it has
been saved or otherwise used by your application. Table 9-1 describes some of the
important methods of XmlReader, and Table 9-2 explains some of the important prop-
erties of it.
Table 9-1 Important Methods of XmlReader
Method Description
Create Returns a new instance of an implementation of the Xml-
Reader class.
444 Chapter 9 Working with XML
Table 9-1 Important Methods of XmlReader
Method Description
GetAttribute Gets the value of the attribute with the specified index or
name.
IsStartElement Calls MoveToContent and tests if the current node is a
start element or an empty element tag.
MoveToAttribute Moves to the attribute with the specified index or name.
MoveToContent Checks to see if the current node is a content node; if not,
moves to the next content node or end of file.
MoveToElement Moves the reader to the element containing the current
attribute. This method can be used to move the reader
back to the node when it is positioned on an attribute.
MoveToFirstAttribute Moves the reader to the first attribute in the node.
MoveToNextAttribute Moves the reader to the next attribute in the node.
Read Reads the next node in the stream.
ReadInnerXml Returns all the XML content in the current node and all
of its children. The start and end nodes are excluded.
ReadOuterXml Returns all XML content of the current node and all of its
children.
Skip Skips the children of the current node.
Table 9-2 Important Properties of XmlReader
Property Description
AttributeCount Gets the number of attributes on a current node.
EOF Returns True if the reader is at the end of the file. Other-
wise, it returns False.
HasAttributes Determines whether the current node has attributes.
HasValue Determines whether the current node can have a value.
Lesson 1: Reading and Writing XML with the XmlReader and XmlWriter Classes 445
Table 9-2 Important Properties of XmlReader
Property Description
Item Exposes the collection of attributes for the current node.
You can get the value of an attribute by specifying the index
or name.
Name Gets the qualified name of the current node.
NodeType Gets the type of the current node.
Value Gets the value of the current node.
These members are found in all implementations of XmlReader, including XmlText-
Reader, XmlNodeReader, and the default implementations of XmlReader returned by
XmlReader.Create of XmlReader.
Creating an XmlReader Implementation
Although XmlReader is an abstract class, it exposes a static method called Create that
returns a default implementation of XmlReader that will read an existing XML stream
or an XML file. The following example demonstrates how to create a new implemen-
tation of XmlReader.
' VB
Dim aReader As XmlReader
' Creates a reader that reads a stream called XmlStream
aReader = XmlReader.Create(XmlStream)
' Creates a reader that reads a file located at C:\SampleXml.xml
aReader = XmlReader.Create("C:\SampleXml.xml")
// C#
XmlReader aReader;
// Creates a reader that reads a stream called XmlStream
aReader = XmlReader.Create(XmlStream);
// Creates a reader that reads a file located at C:\SampleXml.xml
aReader = XmlReader.Create(@"C:\SampleXml.xml");
Reading XML Content
The primary method for reading XML content in an XML file is the Read method,
which reads the current XML node and advances the reader to the next node in the
file or stream. The Read method returns a Boolean value that indicates whether the
446 Chapter 9 Working with XML
read was successful. You can use this method to read all nodes in an XML file sequen-
tially, as shown in the following example:
' VB
' Assumes an XmlReader named myReader
While myReader.Read()
' Do something with the nodes here
End While
// C#
// Assumes an XmlReader named myReader
while (myReader.Read())
{
// Do something with the nodes here
}
When a node is being read, the name and value of the current node is available via the
Name and Value properties of XmlReader. Tables 9-3 and 9-4 describe what is returned
by these properties depending on the type of node being read.
Table 9-3 Return Values of the Name Property
Node Type What Is Returned
Attribute The name of the attribute
DocumentType The document type name
Element The tag name
EntityReference The name of the entity referenced
ProcessingInstruction The target of the processing instruction
XmlDeclaration The literal string XML
All other nodes Empty string
Table 9-4 Return Values of the Value Property
Node Type What Is Returned
Attribute The value of the attribute
CDATA The content of the CDATA section
Comment The content of the comment
DocumentType The internal subset
Lesson 1: Reading and Writing XML with the XmlReader and XmlWriter Classes 447
Table 9-4 Return Values of the Value Property
Node Type What Is Returned
ProcessingInstruction The entire content, excluding the target
SignificantWhitespace The white space between markups in a mixed-
content model
Text The content of the text node
Whitespace The white space between markups
XmlDeclaration The content of the declaration
All other nodes An empty string
The following example demonstrates how these properties can be used.
' VB
While myReader.Read()
If myReader.NodeType = Xml.XmlNodeType.Element Then
MsgBox(myReader.Name)
ElseIf myReader.NodeType = Xml.XmlNodeType.Text Then
MsgBox(myReader.Value)
End If
End While
// C#
while (myReader.Read())
{
if (myReader.NodeType == Xml.XmlNodeType.Element)
MessageBox.Show(myReader.Name);
else if (myReader.NodeType == Xml.XmlNodeType.Text)
MessageBox.Show(myReader.Value);
}
Reading Attribute Content
XmlReader can also be used to read the attributes of a given node and the values of
those attributes. The MoveToAttribute, MoveToFirstAttribute and MoveToNextAttribute
methods control navigation through the attributes of a given node. When one of these
methods is called, the Name property of XmlReader exposes the name of the attribute,
and the Value property of XmlReader exposes the value of the attribute.
Moving within attributes is the only time XmlReader can move backward. You could,
for example, read the fifth attribute of a node and then move back to the first attribute.
448 Chapter 9 Working with XML
Once a new node has been visited, however, you cannot revisit the attributes of a pre-
vious node.
The MoveToAttribute Method You can use the MoveToAttribute method to move the
reader to a specific attribute in an XML node. This method allows you to specify the
name of an attribute or the index of an attribute and move directly to it, and it returns
a Boolean value that indicates whether the move is successful. If the specified
attribute or index is not found, the method returns False and the position of the
reader does not change. The following example demonstrates how to use the
MoveToAttribute method given this XML node:
<Flowers Name="Rose" Varietal="Shiraz" Color="Red" Thorns="Yes">
' VB
' Assumes an XmlReader named myReader that is positioned on the node shown above
If myReader.MoveToAttribute("Color")
MsgBox(myReader.Value)
End If
// C#
// Assumes an XmlReader named myReader that is positioned on the node shown above
if (myReader.MoveToAttribute("Color"))
MessageBox.Show(myReader.Value);
ReadInnerXml and ReadOuterXml
You can use the ReadInnerXml and ReadOuterXml methods to return portions of the
XML file as strings. The ReadInnerXml method returns the contents of the current
XML node, including child nodes but excluding the opening and closing nodes them-
selves. The ReadOuterXml method returns the contents of the current XML node,
including child nodes as well as the opening and closing nodes. For example, con-
sider the following XML fragment:
<text1>mytext<subtext1>mysubtext</subtext1></text1><text2></text2>
If XmlReader is positioned on <text1>, ReadInnerXml returns the following string:
mytext<subtext1>mysubtext</subtext1>
and moves the position of XmlReader to <text2>. Given the same XML fragment, Read-
OuterXml returns the following string:
<text1>mytext<subtext1>mysubtext</subtext1></text1>
and moves the reader position to <text2>.
Lesson 1: Reading and Writing XML with the XmlReader and XmlWriter Classes 449
Reading Attributes with ReadInnerXml and ReadOuterXml If XmlReader has been
positioned on an attribute, you can use ReadInnerXml and ReadOuterXml to return
strings based on the attribute content. For example, consider the following XML
fragment:
<text1 length="12" color="blue">moo</text1>
If the XmlReader is positioned on the length attribute, ReadInnerXml returns the fol-
lowing string:
12
and does not advance the position of the reader. Likewise, given the same fragment
and starting position, ReadOuterXml returns the following string:
length="12"
Again, the position of the reader is not changed.
MoveToContent
You can use the MoveToContent method to skip over nodes that do not contain con-
tent, such as white space, comments, or processing instructions. The MoveToContent
method checks to see if the current node is a content node. If it is, no action is taken.
If the current node is not a content node, it moves the position of the reader to the
next content-containing node. MoveToContent considers the following node types to
be content nodes: CDATA, Element, EndElement, EntityReference, EndEntity, or any
nonwhite space text. When MoveToContent is called, the reader will stop at the first
of any of these nodes that it encounters. It will skip over any of the following types
of nodes: ProcessingInstruction, DocumentType, Comment, Whitespace, or Significant-
Whitespace. The following demonstrates how to call MoveToContent:
' VB
' Assumes an XmlReader named myReader
myReader.MoveToContent()
// C#
// Assumes an XmlReader named myReader
myReader.MoveToContent();