Manning Windows Forms Programming (phần 14) ppsx
Bạn đang xem bản rút gọn của tài liệu. Xem và tải ngay bản đầy đủ của tài liệu tại đây (406.06 KB, 50 trang )
616 CHAPTER 18 ODDS AND ENDS .NET
6 Add a Paint event handler for the
PictureBox control to do the
following:
a. If the current position is out of
range, simply return.
b. Load the current
Photograph.
c. Display the caption in the title bar.
d. Preserve the aspect ratio when
drawing the image into the
window.
private void pboxSlide_Paint
(object sender,
System.Windows.Forms.PaintEventArgs e)
{
if (_albumPos >= _album.Count)
return;
Photograph photo = _album[_albumPos];
if (photo != null)
{
this.Text
= String.Format("{0} ({1:#}/{2:#})",
photo.Caption,
_albumPos + 1, _album.Count);
e.Graphics.DrawImage(photo.Image,
photo.ScaleToFit(
pboxSlide.ClientRectangle));
}
else
e.Graphics.Clear(SystemColors.Control);
}
7 Add a Tick event handler for the
slideTimer component.
How-to
This is the default event for this
component, so simply double-click
the timer in the component tray.
private void slideTimer_Tick
(object sender, System.EventArgs e)
{
8 In this handler, increment the current
album position.
_albumPos ++;
9 If the position is passed the end of
the album, reset the slide show as
follows:
a. Modify the Stop button text to be
Start.
b. Reset the track bar value to zero.
c. Invalidate the picture box to draw
the initial photograph.
d. Disable the timer.
if (_albumPos > _album.Count)
{
btnStop.Text = "&Start";
_albumPos = 0;
trackSlide.Value = 0;
pboxSlide.Invalidate();
slideTimer.Enabled = false;
}
10 If the position is at the end of the
album, set the title bar to indicate
the slide show is finished.
else if (_albumPos == _album.Count)
{
this.Text = "Finished";
}
11 Otherwise, for a valid album index:
a. Invalidate the picture box to draw
the next image.
b. Set the track bar value to the cur-
rent position.
else
{
pboxSlide.Invalidate();
trackSlide.Value = _albumPos;
}
12 Reassign the interval value to pick up
any changes made by the user.
// Reset the interval
SetInterval();
}
IMPLEMENT THE SLIDE SHOW BEHAVIOR (continued)
Action Result
TIMERS 617
13 Add a Click event handler for the
Close button to close the form.
private void btnClose_Click
(object sender, System.EventArgs e)
{
this.Close();
}
14 Add a Click event handler for the
Stop button.
private void btnStop_Click
(object sender, System.EventArgs e)
{
15 If the current Text value is Stop,
stop the timer and set the button
text to Resume.
Note: While our Stop button has
three different display strings, we
preserve the keyboard access key
of Alt+S in all three values.
if (btnStop.Text == "&Stop")
{
// Stop
slideTimer.Stop();
btnStop.Text = "Re&sume";
}
16 For other text values, start the timer
and set the button text to Stop.
else
{
// Resume or Start
slideTimer.Start();
btnStop.Text = "&Stop";
}
}
17 Add a Scroll event handler for the
TrackBar control.
Note: This is the default event for
the track bar control, and occurs
when the user manually adjusts the
slider position.
private void trackSlide_Scroll
(object sender, System.EventArgs e)
{
18 In this handler:
a. Set the album position to the new
value.
b. Invalidate the picture box to draw
the selected photo.
_albumPos = trackSlide.Value;
pboxSlide.Invalidate();
}
19 Add a Resize event handler for the
PictureBox control to invalidate the
control and redraw the image.
private void pboxSlide_Resize
(object sender, System.EventArgs e)
{
pboxSlide.Invalidate();
}
20 Back in the MainForm class, add a
Click event handler for the Slide
Show menu to create and display a
SlideShowForm dialog.
private void menuSlideShow_Click
(object sender, System.EventArgs e)
{
using (SlideShowForm f
= new SlideShowForm(_album))
{
// Display slide show as modal dialog
f.ShowDialog();
}
}
IMPLEMENT THE SLIDE SHOW BEHAVIOR (continued)
Action Result
618 CHAPTER 18 ODDS AND ENDS .NET
The slide show form is now fully integrated into our main application. Compile and
run to see this window. Load an album and select the Slide Show menu to display the
new dialog.
TRY IT!
Throughout the book we have used the photo album and photograph ab-
stractions we constructed in chapter 5 to represent and display images. In
the MyPhotos application we display photographs in a Panel control,
while in our other applications we use a
PictureBox control. In both cas-
es we were forced to override the
Paint event in order to draw a photo-
graph with the proper aspect ratio. It would be nice to have a control that
provided this functionality directly.
Try creating a new
PhotoBox class based on the Windows Forms Pic-
tureBox
control that adds a new SizeMode setting called ScaleImage
to the control. When set to this value, this new control should display the
entire image with the proper aspect ratio within the control, just as we have
done throughout the book. You can replace the existing
Picture-
Box.SizeMode
property using a new set of enumeration values by defin-
ing the property in the following manner. You will also need to override the
OnPaint and OnResize methods to properly draw an image within the
new control.
private PhotoBoxSizeMode _sizeMode;
public new PhotoBoxSizeMode SizeMode
{
get { return _sizeMode; }
set { _sizeMode = value; }
}
Use your new control in place of the PictureBox control in the Slide-
ShowForm
window. My implementation of this control is available on the
book’s web site. Also included on the site are the instructions for making
this new control, referred to as a custom control, available in the Toolbox
window of Visual Studio .NET.
18.3 DRAG AND DROP
Continuing with our whirlwind tour of topics, let’s take a quick look at drag and
drop. This refers to dragging an object from one location to another, and can occur
within an application or between applications. Typically, a drag and drop operation is
begun by clicking an object with the mouse pointer, holding down the mouse button
while moving, or dragging, the object to a new location; and dropping the object at
the new location by releasing the mouse button.
This topic can get fairly complicated, so we will show a rather basic example sup-
porting the following types of drag and drop operations.
• Dragging a file from the Windows file system into a
PhotoAlbum in a Main-
Form
window.
DRAG AND DROP 619
• Dragging a photograph file from the
MainForm window to an external Win-
dows location.
• Dragging the photograph caption from the
MainForm window to a text editor.
• Dragging a photograph file from one
PhotoAlbum to another within the
MyPhotos MDI application.
The Windows Forms
Control class provides direct support for drag and drop oper-
ations. The following table summarizes these members.
At a high level, a drag and drop operation performs the following steps. These steps
are illustrated by the code in the subsequent sections. Note that the source and target
of the operation may be within the same application or in separate applications.
1 A source control initiates drag and drop, typically within a MouseDown event
handler, using the
DoDragDrop method. One or more data objects and associ-
ated formats are provided as part of invoking this method.
2 The user drags the object to a target control that has its AllowDrop property set
to
true.
3 As the mouse enters the target control, the DragEnter event occurs to permit
the target to identify whether the data can be recognized by this control. This
permits the operating system to display an appropriate mouse cursor for the user.
4 If so, then the DragOver event occurs as the user moves the drag and drop
object within the control.
5 If the object is dragged out of the control, the DragLeave event occurs.
6 If the user releases the object within the target control, then the DragDrop event
occurs to permit the control to receive the data.
7 The result of the operation is returned by the DoDragDrop method in the origi-
nal source control.
Members of the Control class related to drag and drop
Public Properties
AllowDrop Gets or sets whether the control will permit drag and drop
operations within its boundaries. The default is
false.
Public Methods
DoDragDrop Initiates a drag and drop operation from within this control.
Typically, this is called from a
MouseDown event handler.
Public Events
DragDrop Occurs when the user completes a drag and drop operation
within this control.
DragEnter Occurs when an object is dragged into the control’s
boundaries.
DragLeave Occurs when an object formerly dragged into the control is
dragged out of the control’s boundaries.
DragOver Occurs when an object within the control is moved within
the control’s boundaries.
620 CHAPTER 18 ODDS AND ENDS .NET
We will divide our example into two sections. First, we will begin a drag and drop
operation from within the
PictureBox control of our MainForm class. Next, we
will receive external drag and drop operations within this same control.
18.3.1 I
NITIATING DRAG AND DROP
The key to beginning a drag and drop operation is the DoDragDrop method. This
method defines the data for the operation and the kind of operation permitted.
public DragDropEffects DoDragDrop(object data,
DragDropEffects allowedEffects);
While the data parameter can be any data, the DataObject class provides a stan-
dard mechanism for safely transferring data between applications. The
DragDrop-
Effects
enumeration permits different types of drag and drop operations to be
supported. For example, the
Move, Copy, and Link values permit an object to be
moved, copied, or linked from the original data source to the drop target.
The
DoDragDrop method does not return until the drag and drop operation is
completed. The return value indicates what effect was performed by the operation.
The
QueryContinueDrag event in the Control class can be used to keep tabs on
the operation. This event occurs periodically during drag and drop and can be used
to cancel the operation or to modify the application window as required.
In our application, we will simply begin the operation and let the .NET Frame-
work take care of the rest. We will provide two types of data formats using the
DataObject class. The first will be the FileDrop format recognized by the Win-
dows file system and applications such as Microsoft Paint. The second will be the
Text format recognized by most word processors.
The following table details the changes required.
Set the version number of the MyPhotos application to 18.3.
BEGIN A DRAG AND DROP OPERATION
Action Result
1 Locate the
MouseDown event
handler for the
Panel control in
the MainForm.cs code window.
private void pnlPhoto_MouseDown
(object sender,
System.Windows.Forms.MouseEventArgs e)
{
2 If the Ctrl key is not held down,
then retrieve the current
photograph for the album.
if (ctrlKeyHeld)
{
. . .
}
else
{
// Initiate drag and drop for this image
Photograph photo = _album.CurrentPhoto;
DRAG AND DROP 621
This code begins a drag and drop operation that can be received by any other applica-
tion running on the computer. Other applications look at the provided data formats
to identify whether they can accept the dragged data. We will look at how to do this
in Windows Forms in a moment.
Of course, for applications that can receive multiple formats, the result they
receive depends on which format they prefer. Most word processing applications look
for the
Text format first, and will therefore receive the Caption property of our
photo, rather than the associated file object.
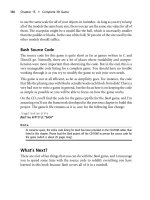
Compile and run the application. Display an album and click on the image. Hold
the mouse and drag it to a new location to perform a drag and drop operation.
Figure 18.3 shows the result of dragging one of our favorite images from the MyPhotos
application into a Microsoft Paint application. The Paint application opens the given
file and displays a copy of the image in its main window. Also try dragging an image
into WordPad or some other word processor to see how the caption string appears.
3 If this Photograph is found,
create a
FileDrop data format for
dragging the photograph to a new
location.
How-to
a. Construct a DataObject
instance to hold the data for-
mats.
b. Construct a
string array to
hold the associated file.
c. Associate the string array with
the
FileDrop format for the
data.
if (photo != null)
{
// Create object for encapsulating data
DataObject data = new DataObject();
// Construct string array for FileDrop
string[] fileArray = new string[1];
fileArray[0] = photo.FileName;
data.SetData(DataFormats.FileDrop,
fileArray);
Note: The DataFormats class encapsulates vari-
ous data formats that can be used by drag and
drop operations. The
FileDrop format used here
requires a
string array as the data type. This per-
mits multiple files to be provided at once.
4 Also assign a Text format using
the
Caption property of the
photograph as the associated
data.
// Use the caption for the text format
data.SetData(DataFormats.Text,
photo.Caption);
5 Call the DoDragDrop method with
the constructed data object to
initiate a drag and drop
Copy
operation.
// Initiate drag and drop
pnlPhoto.DoDragDrop(data,
DragDropEffects.Copy);
}
}
}
BEGIN A DRAG AND DROP OPERATION (continued)
Action Result
622 CHAPTER 18 ODDS AND ENDS .NET
This completes our example for initiating a drag and drop operation. The next topic
is to handle drag and drop operations within the
MainForm window.
18.3.2 R
ECEIVING DRAG AND DROP
Regardless of where a drag and drop operation originates, an application can elect to
handle the incoming data. The
DragEnter and DragDrop events are used to receive
such operations. Event handlers for both of these events receive a
DragEventArgs
object as their event parameter. A summary of this object appears in .NET Table 18.4.
Figure 18.3 The FileDrop format used here to drag an image into Microsoft Paint is a com-
mon method for transferring files between applications.
DRAG AND DROP 623
For our example, we will recognize the
FileDrop format in the MainForm window
to receive files dragged from the file system or from other
MainForm windows.
The steps required are detailed in the following table:
.NET Table 18.4 DragEventArgs class
The DragEventArgs class represents the event arguments required for drag and drop events, namely the
DragEnter, DragOver, and DragDrop events in the Control class. This class is part of the Sys-
tem.Windows.Forms namespace, and inherits from the System.EventArgs class.
Public Properties
AllowedEffect Gets which drag and drop operations are permitted
by the source of the drag event.
Data Gets the
IDataObject interface that holds the data
and data formats associated with the event.
Effect Gets or sets the
DragDropEffects enumeration
values indicating which drag and drop operations are
permitted in the target of the drag event.
KeyState Gets the current state of the Shift, Ctrl, and Alt
keyboard keys.
X Gets the x-coordinate of the current mouse pointer
position.
Y Gets the y-coordinate of the current mouse pointer
position.
HANDLE DRAG AND DROP IN THE MAINFORM WINDOW
Action Result
1 In the MainForm.cs [Design] window,
set the
AllowDrop property on the
Panel control to true.
Drop operations are now permitted in the panel
control.
2 Add a
DragEnter event handler for
the panel.
private void pnlPhoto_DragEnter
(object sender,
System.Windows.Forms.DragEventArgs e)
{
3 If the data associated with the event
supports the
FileDrop data format,
then indicate that this control will
support the
Copy drag and drop
effect.
How-to
Use the GetDataPresent method
from the
IDataObject interface.
if (e.Data.GetDataPresent(
DataFormats.FileDrop))
e.Effect = DragDropEffects.Copy;
624 CHAPTER 18 ODDS AND ENDS .NET
This completes our handling of drag and drop. Compile and run the program to see
this in action. Display two different albums in separate MainForm windows. You
should be able to perform the following drag and drop operations to obtain the
described results:
• Find a new image file in Windows Explorer. Drag this file into one of the album
windows. The image is added to the album and displayed in the window.
• Find an image file in Windows Explorer that is already in an album. Drag this
file into the album. The existing
Photograph object is displayed in the window.
4 Otherwise, indicate that the current
drag and drop data is not accepted by
this control.
else
e.Effect = DragDropEffects.None;
}
5 Add a DragDrop event handler for the
panel.
private void pnlPhoto_DragDrop
(object sender,
System.Windows.Forms.DragEventArgs e)
{
6 In this handler:
a. Retrieve the data in
FileDrop for-
mat associated with the event.
b. Convert this data to an
Array
instance.
c. For each
object in the array, con-
vert the
object to a string.
object obj = e.Data.GetData(
DataFormats.FileDrop);
Array files = obj as Array;
int index = -1;
foreach (object o in files)
{
string s = o as string;
7 If a string is found, then:
a. Create a new
Photograph object
using this string.
b. See if the
Photograph is already in
the current album.
c. If not, then add the new photo to
the album.
Note: Recall that the
Photograph
object will simply display a bad
image bitmap if an invalid or
non-
image file name is provided.
if (s != null)
{
Photograph photo
= new Photograph(s);
// Add the file (if not present)
index = _album.IndexOf(photo);
if (index < 0)
{
index = _album.Add(photo);
_bAlbumChanged = true;
}
}
}
8 If a Photograph was found in the
foreach loop, then
a. Adjust the current album position
to the discovered index.
b. Invalidate the form to redraw the
window.
if (index >= 0)
{
// Show the last image added
_album.CurrentPosition = index;
Invalidate();
}
}
HANDLE DRAG AND DROP IN THE MAINFORM WINDOW (continued)
Action Result
ACTIVEX CONTROLS 625
• Highlight a set of files in Windows Explorer. Drag these files into one of the
album windows. Each file is added to the window if not already present. The
last file added is displayed in the window.
• Click on an image displayed in one album window and drag it to a second
album window. The image is added to the second album, or displayed if it is
already present.
This completes our drag and drop example. We should also mention that the
List-
View
and TreeView classes support per-item dragging via the ItemDrag event. The
ItemDrag event occurs when the user begins dragging an item in the list or tree.
Typically, the event handler for the
ItemDrag event calls the DoDragDrop method
as we did in this section, with the
object associated with a specific list item or tree
node as the source of the operation. For example, we could modify our MyAlbumEx-
plorer interface to permit photographs to be reordered within the
ListView control,
or dragged into a new album in the
TreeView control.
18.4 ACTIVEX CONTROLS
Our final section will look at how to include an ActiveX control, more specifically the
Microsoft Web Browser control, within a Windows Forms application. We will avoid
a detailed discussion of ActiveX in general and the Web Browser control in particular,
and instead allow the example to speak for itself.
Our example will host a browser control within an About Box dialog for our
MyPhotos application. This may seem slightly unorthodox, but should create an inter-
esting example while still presenting the topic at hand.
The foundation of ActiveX support in Windows Forms is the
AxHost control.
This abstract class is, quite simply, a control that hosts, or displays, an ActiveX control
as a full-featured Windows Forms control. The class is based on the Windows Forms
Control class so that the standard properties, methods, and events we have discussed
throughout the book are available in hosted controls. The .NET framework provides
an ActiveX Control Importer tool to generate an
AxHost interface for a specific
ActiveX control. We will discuss this tool in a moment.
In our application, we will create an
AboutBox form to display information
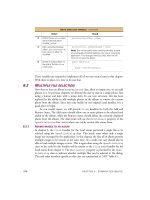
about the application. As shown in figure 18.4, this
Form will include a LinkLabel
object that will link to the web site for this book.
Figure 18.4
This form uses a Label control
to display the application Icon,
and LinkLabel controls to ini-
tiate user actions.
626 CHAPTER 18 ODDS AND ENDS .NET
We could just as easily use
Button controls rather than link labels. Since we have not
used
LinkLabel objects in a previous example, this is a good opportunity to do so
here. When the user clicks the “Click to close window” label, the window will close as
we have seen with a Close button in previous examples. When the user clicks the
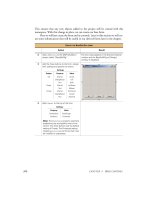
“Click for book’s web site” label, a hidden panel will appear and display the web site
for the book you are reading. This is shown in figure 18.5. Note in this figure that the
title bar of the form reflects the current web page title, and the link label text now
allows the user to hide the web browser. Of course, connecting to the web site pre-
sumes you have an active connection to the Internet available.
We will divide our discussion into three sections. First we will create the form
required; then we will wrap the Web Browser control in an
AxHost control, and
finally we will use this new control to display the web page as in figure 18.5.
18.4.1 C
REATING THE ABOUT BOX
Our first task is to create the new Form class for our new About box. The steps
required are as follows:
Figure 18.5 In the embedded web page in this window, the user can follow any links displayed
and perform other standard browser actions in the window.
ACTIVEX CONTROLS 627
Set the version number of the MyPhotos application to 18.4.
DESIGN THE ABOUT BOX FORM
Action Result
1 Add a new
Form class file to the
MyPhotos project called
AboutBox.cs.
2 Assign the following settings to the
form.
3 Drag an
ImageList onto the form
and set the following properties:
4 Add the following icons from the
common image directory to the
Images collection for this list.
• icons/Writing/BOOK02.ICO
• icons/Writing/BOOKS04.ICO
Settings
Property Value
MinimizeBox False
ShowInTaskbar False
Size 400,144
StartPosition CenterParent
Text About MyPhotos
Settings
Property Value
(Name) imageIcons
ImageSize 32, 32
628 CHAPTER 18 ODDS AND ENDS .NET
This completes the design of our
AboutBox form. We will also need a menu in the
ParentForm class to display this form.
5 Add the four labels, namely two
Label controls and two LinkLabel
controls, to the form. Size and
position them as shown in the
graphic.
6 Also add a hidden
Panel control to
the base of the form.
Note: The panel is visible in Visual Studio even
though it will be hidden when the form is actu-
ally displayed.
DESIGN THE ABOUT BOX FORM (continued)
Action Result
Settings
Control Property Value
Icon
Label
(Name) lblIcon
BorderStyle FixedSingle
ImageList imageIcons
ImageIndex 0
Tex t
Text
Label
(Name) lblAboutText
Anchor Top, Left, Right
BorderStyle Fixed3D
Text MyPhotos
Site Link (Name) linkWebSite
Text Click for book’s
web site
Close
Link
(Name) linkClose
Anchor Top, Right
Text Click to close
window
TextAlign TopRight
Settings
Property Value
(Name) pnlWebSite
Anchor Top, Bottom, Left, Right
BorderStyle Fixed3D
Visible False
ACTIVEX CONTROLS 629
Our design is ready to go. Our next topic is the generation of wrapper classes for
ActiveX controls.
18.4.2 W
RAPPING THE WEB BROWSER CONTROL
As we mentioned earlier, the .NET Framework provides a tool for creating a derived
AxHost class from an existing ActiveX control. This section will use this tool to wrap
the standard browser control for use in our application.
The Windows Forms ActiveX Control Importer program is called “aximp” and
is available as part of the Visual Studio .NET product. This program is run on the
command line and accepts an ActiveX control library.
C:\> aximp source-file
The source-file here is the DLL or OCX file containing the ActiveX control. For our
purposes, the Web Browser control is located in the file
shdocvw.dll in the Windows
“system32” directory. An
AxHost based class can be created with the following steps:
CREATE MENU IN PARENT FORM
Action Result
7 In the ParentForm.cs [Design]
window, add a new top-level
Help menu.
8 Add a single About MyPhotos
menu item under this new
menu.
Settings
Property Value
(Name) menuHelp
MergeOrder 9
Text &Help
Settings
Property Value
(Name) menuAbout
Text &About MyPhotos…
630 CHAPTER 18 ODDS AND ENDS .NET
The two generated files work together to present the ActiveX control as a Windows
Forms control in the .NET environment. The first file AxShDocVw.dll, is named by
prepending “Ax” to the given source file name. This file encapsulates the Windows
Forms proxy class for the control, derived from the
AxHost class. Each object from
the original library is defined under a namespace identical to the assembly name, in
this case the
AxShDocVw namespace.
The second file ShDocVw.dll, named identical to the given source file name, con-
tains the common language runtime proxy for the COM types from the source library.
This file is used implicitly by the Windows Forms control defined in the first file.
With a wrapper for our Web Browser control defined, we are ready to implement
the internals of our About box.
CREATE WRAPPER CLASS FOR WEB BROWSER CONTROL
Action Result
1 Display a Visual Studio .NET
Command Prompt.
How-to
This is available from the Start
menu in the Microsoft Visual
Studio .NET folder, under the
Visual Studio .NET Tools heading.
2 Create a suitable directory for
holding the generated wrapper
class.
cd Windows Forms\Projects
mkdir WebBrowser
Note: This example uses the
directory “C:\Windows
Forms\Projects\WebBrowser” for
this purpose. You should use an
appropriate directory for your
application.
3 Change the current directory to be
this new directory.
cd WebBrowser
4 Generate the wrapper class by
executing the following command:
aximp
c:\winnt\system32\shdocvw.dll
Note: Depending on your operat-
ing system, you may need to
replace “
c:\winnt” in this com-
mand with the appropriate Win-
dows directory.
Two new assemblies are generated in the current
directory. These are:
aximp c:\winnt\
system32\shdocvw.dll
ACTIVEX CONTROLS 631
18.4.3 U
SING THE WEB BROWSER CONTROL
So far we have defined a user interface and created a wrapper class for the Web
Browser ActiveX control. In this section we will implement the
AboutBox form to
work as described earlier.
The following table begins this process by describing the changes required for our
standard Windows Forms controls.
HANDLE THE STANDARD CONTROLS
Action Result
1 In the AboutBox.cs code window,
create two constants for the two
types of icons in our image list.
protected const int SDI_ICON = 0;
protected const int MDI_ICON = 1;
2 Implement an IsMdiApplication
property to define whether the
active form is a MDI application.
How-to
a. In the get accessor, return
whether the current image index
in the
lblIcon control is the
MDI icon.
b. In the
set accessor, assign the
ImageIndex for the lblIcon
control based on the assigned
value setting.
public bool IsMdiApplication
{
get { return (lblIcon.ImageIndex
== MDI_ICON); }
set
{
if (value)
lblIcon.ImageIndex = MDI_ICON;
else
lblIcon.ImageIndex = SDI_ICON;
}
}
3 Implement an AboutText property
to get or set the
Text property for
the
lblAboutText control.
public string AboutText
{
get { return lblAboutText.Text; }
set { lblAboutText.Text = value; }
}
4 In the ParentForm class, add a
Click handler for the About
MyPhotos menu to create an
AboutBox instance and assign its
settings.
How-to
a. Set IsMdiApplication to
true.
b. Set the
AboutText property to
an appropriate string.
c. Set the
Owner property to the
current
Form.
d. Set the dialog’s
Icon to use the
current form’s icon.
e. Show the dialog.
private void menuAbout_Click
(object sender, System.EventArgs e)
{
AboutBox dlg = new AboutBox();
dlg.IsMdiApplication = true;
Version ver = new
Version(Application.ProductVersion);
dlg.AboutText
= String.Format("MyPhotos (MDI) "
+ "Application, Version {0:#}.{1:#} "
+ "\nSample for /"Windows Forms "
+ "Programming with C#\"\nby "
+ "Erik Brown \nCopyright (C) 2001 "
+ "Manning Publications Co.",
ver.Major, ver.Minor);
dlg.Owner = this;
dlg.Icon = this.Icon;
dlg.Show();
}
632 CHAPTER 18 ODDS AND ENDS .NET
These changes configure the controls with the appropriate information and behavior.
Note that the LinkClicked event handler receives a LinkLabelLinkClicked-
EventArgs
object as its event parameter. The LinkLabel class provides a Links
property that defines one or more links, as a collection of LinkLabel.Link
objects, within the single link label control. The LinkLabelLinkClickedEvent-
Args
object specifies the link that was clicked by the user.
In our application, our labels use the entire text string as a link. Let’s continue
the previous steps and handle the
linkWebSite control to see how to bring up a Web
Browser.
5 Back in the AboutBox class, add a
LinkClicked handler for the
linkClose link label control to
close the form.
How-to
This is the default event for link
labels, so simply double-click the
link control in the design window.
private void linkClose_LinkClicked
(object sender, System.Windows.Forms.
LinkLabelLinkClickedEventArgs e)
{
Close();
}
HANDLE THE STANDARD CONTROLS (continued)
Action Result
HANDLE THE LINKWEBSITE CONTROL
Action Result
6 Add a reference to the
generated AxSHDocVW.dll
assemply in the MyPhotos
project.
How-to
In the Add Reference dialog,
click the Browse button to
locate and select the
generated assembly.
7 In the AboutBox.cs code
window, indicate that we will
use this library in our code.
using AxSHDocVw;
ACTIVEX CONTROLS 633
8 Define the following fields in
our
AboutBox class:
a. A browser field representing
a
WebBrowser control.
b. A constant
string contain-
ing the web site we will dis-
play.
private AxWebBrowser browser;
private const string startPage
= "www.manning.com/eebrown";
Note: The AxWebBrowser class here is based on
Microsoft’s SHDocVw.dll library from the Windows
directory. We will not cover the contents of this
library in detail, as it is beyond the scope of our cur-
rent discussion. Look up the WebBrowser Control
index entry in the online documentation provided
with Visual Studio .NET for more information on this
class.
9 Add a
LinkLabel event
handler for the
linkWebSite
control.
private void linkWebSite_LinkClicked
(object sender, System.Windows.Forms.
LinkLabelLinkClickedEventArgs e)
{
10 If the browser control already
exists, then shut down the
web site and hide the
Panel
object.
Note: This code resets the
dialog to its original state.
if (browser != null)
{
// Shut down existing browser
pnlWebSite.Visible = false;
browser.Dispose();
browser = null;
// Reset dialog settings
linkWebSite.Text
= "Click for book's web site";
this.Size = new Size(400, 140);
this.Text = "About MyPhotos";
}
11 If the browser control does not
exist, then create the browser
and define some initial
settings.
How-to
a. Create a new AxWeb-
Browser
control.
b. Set its
Dock property to
Fill.
c. Add a
TitleChange event
handler.
d. Add a
HandleCreated
event handler.
else
{
// Create web browser object
browser = new AxWebBrowser();
browser.Dock = DockStyle.Fill;
browser.TitleChange += new
DWebBrowserEvents2_TitleChangeEventHandler
(this.browser_TitleChange);
browser.HandleCreated += new
EventHandler(this.browser_HandleCreated);
Note: The HandleCreated event is inherited from
the
Control class and uses the familiar mechanism.
The
TitleChange event is part of the WebBrowser
control, and is part of the
AxSHDocVw namespace.
Details on the
DWebBrowserEvents2 interface
and the
TitleChange event are included with the
online documentation for Visual Studio .NET.
12 Make the
Panel control on the
form visible and add the
browser control to appear
within this panel.
// Show panel containing new browser
pnlWebSite.SuspendLayout();
pnlWebSite.Visible = true;
pnlWebSite.Controls.Add(browser);
pnlWebSite.ResumeLayout();
HANDLE THE LINKWEBSITE CONTROL (continued)
Action Result
634 CHAPTER 18 ODDS AND ENDS .NET
This completes our implementation. Compile and run to view the
AboutBox dialog
in all its glory. You will notice that when viewing the web page within our applica-
tion, the user cannot navigate to an arbitrary web address. This is very different than
13 Modify the text displayed for
the
linkWebSite control and
enlarge the
Form to be
600x400 pixels.
linkWebSite.Text = "Click to hide web page";
this.Size = new Size(600, 400);
}
}
14 Create the handler for the
TitleChange event to display
the new document title in the
title bar of the
AboutBox form.
private void browser_TitleChange
(object sender,
DWebBrowserEvents2_TitleChangeEvent e)
{
this.Text = e.text;
}
15 Add a DisplayPage method
to navigate to a given URL.
How-to
a. Create object instances to
represent the reference
parameters.
b. Display the wait cursor.
c. Use the
Navigate method
to display the given URL.
d. Finally, reset the current
cursor.
Note: The
Navigate method
is discussed in the online doc-
umentation.
The four
param objects are
required here to match the
signature of the
Navigate
method as defined by the
ActiveX Control Importer
(aximp.exe). A future version
of the importer may permit
these settings to be
null.
protected void DisplayPage(string url)
{
// These are required because the importer
// assumes these are in/out parameters
// and defines them as passed by reference.
object param2 = 0;
object param3 = "";
object param4 = "";
object param5 = "";
try
{
Cursor.Current = Cursors.WaitCursor;
browser.Navigate(url,
ref param2, ref param3,
ref param4, ref param5);
}
finally
{
Cursor.Current = Cursors.Default;
}
}
16 Create the handler for the
HandleCreated event to
display the start page.
How-to
a. Display the starting page
using the
DisplayPage
method.
b. Remove the
Handle-
Created
handler.
public void browser_HandleCreated
(object sender, EventArgs evArgs)
{
// The WebBrowser has been created
// Display the starting page
DisplayPage(startPage);
// Remove this handler
browser.HandleCreated -= new
EventHandler(this.browser_HandleCreated);
}
HANDLE THE LINKWEBSITE CONTROL (continued)
Action Result
RECAP 635
using a Web Browser such as Internet Explorer, where the user has more control over
which pages are displayed.
This completes our example wrapping the Web Browser ActiveX control as a
Windows Forms control. It also completes this chapter as well as the book.
In keeping with tradition, we provide a final recap of the topics covered in this
chapter.
18.5 RECAP
This chapter presented an overview of various topics in Windows Forms application
development. Each topic was discussed very briefly, and we demonstrated each feature
with an example that extended the MyPhotos MDI application built in chapter 16.
The specific topics covered included printing from an application, using Win-
dows Forms timers, dragging and dropping objects into and out of an application, and
hosting an ActiveX control within a Windows Forms program. On the final topic, we
illustrated this feature by embedding a Web Browser control within an
AboutBox
form displayed by our application.
Along the way we also illustrated some classes not previously discussed, notably the
TrackBar and LinkLabel controls. More details on these as well as the other topics
in this chapter are available in the online documentation for the .NET Framework.
If you have read this book from cover to cover, then congratulations. Regardless
of how you came to this sentence, the appendices include some reference material on
C# and .NET namespaces, as well as class hierarchy charts for the Windows Forms
namespace.
Good luck with your programming endeavors. May your code always compile
and applications never fail.
637
APPENDIX A
C# primer
A.1 C# programs 638
A.2 Types 639
A.3 Language elements 654
A.4 Special features 667
This appendix provides an introduction and reference to the C# programming lan-
guage. If you are looking for a detailed description of C#, there are a number of
resources listed in the bibliography that provide this kind of coverage. If you are
familiar with object-oriented programming or with C-based languages such as C++ or
Java, then this appendix will get you started and serve as a quick reference for terms
and keywords you encounter in this book and elsewhere.
You will also discover that many of the terms and keywords presented here are
discussed in detail in the text. A reference to one or more of these locations is provided
for many of the topics shown here. These are also indexed at the back of the book.
This appendix will approach C# in a somewhat formal manner. We will discuss
the following topics:
• The organization of a C# program.
• The types and type members available in the language.
• The formal elements of the language, including built-in types, operators, and
keywords.
• Special features of C#, such as arrays and automated documentation.
638 APPENDIX A C# PRIMER
A.1 C# PROGRAMS
A C# program consists of a collection of source files where each source file is an
ordered sequence of Unicode characters. Typically, each source file corresponds to a
single file in the file system. A program is compiled into a set of computer instructions
known as an assembly. The .NET Framework interprets or otherwise executes an
assembly to perform the instructions given in the original program.
A.1.1 A
SSEMBLIES
Assemblies are containers for types, and are used to package and deploy compiled C#
programs. An assembly may contain one or more types, the instructions to imple-
ment these types, and references to other assemblies. While not strictly required, an
assembly is normally a single file in a file system. For example, the System.Win-
dows.Forms.dll file is the assembly for the
System.Windows.Forms namespace.
There are two kinds of assemblies: Applications and libraries. An application is an
assembly that has a main entry point and usually has a “.exe” extension. Applications
are used to perform a specific task or tasks on behalf of a computer user. The main
entry point of an application is the initial instruction to execute in the program.
A library is an assembly that does not have a main entry point and usually has a
“.dll” extension. Libraries are used to encapsulate one or more types for use when
building other assemblies.
A.1.2 N
AMESPACES
Logically, the source files in a C# program contain a collection of namespaces. Each
namespace defines a scope, or declaration space, in which a set of zero or more type
declarations and zero or more nested namespaces are defined. The possible type decla-
rations are classes, structures, interfaces, enumerations, and delegates. Each type dec-
laration is assigned a name that is unique within its declaration space, in this case
within the defined namespace. It is an error for two type declarations to have the
same name within the same namespace.
All type declarations are assigned to a namespace. If a specific namespace is not
specified, then the type is assigned to the default namespace, also called the global
namespace.
A namespace is declared in the following manner:
1
namespace <name>
{
<nested-namespaces>
opt
<type-declarations>
}
1
We use the convention here and in other syntax examples where items in angle brackets < > are filled-
in by the programmer. An optional item will include an “opt” subscript following the item.
TYPES 639
The
<name> for a namespace can be a single identifier, or a series of identifiers sepa-
rated by periods. Nested namespaces are declared in the same way as non-nested
namespaces. The various kinds of type declarations each have their own syntax, and
are described next.
A.2 TYPES
All types are classified as either a value type or a reference type. These correspond to
whether the type stores the actual data, or value, for the type, or whether the type
simply stores a reference to the actual data.
Value types include simple built-in types such as
int and char, enumerations,
and structures. A value type contains its data. For example, an
int type assigned to
the number 5 stores this number directly. Thus, two different value types contain sep-
arate copies of the data and, therefore, modifying one of these types has no affect on
the other. Value types include the built-in types, structures, and enumerations.
Reference types, on the other hand, contain a reference to their data. Examples
include the
string type and all Windows Forms controls. A string type assigned
to the string “Hello” stores a reference to a section of memory where the characters
“Hello” are actually stored. The area of memory reserved for reference types is called
the heap, and is managed internally by the .NET Framework. Thus, two different ref-
erence types can point to the same physical data. As a result, the modification of one
reference type can affect another reference type. Reference types include classes, inter-
faces, delegates, and arrays.
The following table illustrates the difference between these two kinds of types.
In the value type column of the above table, the assignment of
v2 = v1 copies the
contents of
v1 into v2. As a result, changing the value of v1.vData has no effect on
the value stored by
v2. In the reference column, the assignment of r2 = r1 causes
both objects to refer to the same data. Here, changing the value of
r1.rData also
affects the value seen by
r2. Note that all value types in the .NET Framework implic-
itly inherit from the
System.ValueType class. This class overrides the methods
Comparison of value and reference types
Value type Reference type
Declaration
struct ValInt {
public int vData;
}
class RefInt {
public int rData;
}
Usage
ValInt v1, v2;
v1.vData = 5;
v2 = v1;
v1.vData = 7
RefInt r1, r2;
r1.rData = 5;
r2 = r1;
r1.rData = 7;
Result Value of v2.vData is still 5. Value of r2.rData is now 7.
640 APPENDIX A C# PRIMER
inherited from the System.Object class with more appropriate implementations
for value types.
Back to the topic at hand, a type is specified with a type declaration as part of a
namespace, or within the default namespace. The possible type declarations are classes,
structures, interfaces, enumerations, and delegates.
A.2.1 C
LASSES
A class is a reference type that defines a new data abstraction. Each class is composed
of one or more members that define the contents, operations, and behavior permitted
by instances of the class.
A
class is declared using the class keyword in the following manner:
<modifiers>
opt
class <identifier> : <base>
opt
<interfaces>
opt
{
<class-members>
}
where
•
<modifiers> is optional, and is an accessibility level as defined in the subse-
quent table or one of the keywords
new, abstract, or sealed. If unspeci-
fied, a class is assigned the default accessibility level of the containing
declarative scope. Multiple complementary modifiers may be specified.
•
<identifier> is the unique name to assign to the class.
•
<base> is optional, and defines a single base class for the new class.
•
<interfaces> is optional, and specifies one or more interface types which
this class supports. If both
<base> and <interfaces> are omitted, then the
colon ‘:’ is also omitted.
•
<class-members> are the members of the class. The possible members of a
class are constants, fields, methods, properties, events, indexers, operators, con-
structors, and nested type declarations. Nested type declarations are simply
other types defined to exist within the declarative scope defined by the class.
The other kinds of members are discussed in the subsequent sections.
Every member of a class, and in fact every member of any type, has a defined accessi-
bility associated with it. The accessibility of a member controls which regions of a
program may make use of that member. The five levels of accessibility are shown in
the following table:
Accessibility levels for C# types
Accessibility level Meaning
public Any type in any assembly can access the member.
protected Any derived type in any assembly can access the member.