Giải pháp thiết kế web động với PHP - p 40 doc
Bạn đang xem bản rút gọn của tài liệu. Xem và tải ngay bản đầy đủ của tài liệu tại đây (507.67 KB, 10 trang )
MANAGING CONTENT
371
$stmt->fetch();
}
}
// if form has been submitted, update record
if (isset($_POST ['update'])) {
// prepare update query
$sql = 'UPDATE blog SET title = ?, article = ?
WHERE article_id = ?';
if ($stmt->prepare($sql)) {
$stmt->bind_param('ssi', $_POST['title'], $_POST['article'], ➥
$_POST['article_id']);
$done = $stmt->execute();
}
}
// redirect page on success or if $_GET['article_id']) not defined
if ($done || !isset($_GET['article_id'])) {
The UPDATE query is prepared with question mark placeholders where values are to be
supplied from variables. The prepared statement has already been initialized in the code
outside the conditional statement, so you can pass the SQL to the prepare() method and
bind the variables with $stmt->bind_param(). The first two variables are strings, and the
third is an integer, so the first argument is 'ssi'.
If the UPDATE query succeeds, the execute() method returns true, resetting the value of
$done. Unlike an INSERT query, using the affected_rows property has little meaning
because it returns zero if the user decides to click the Update Entry button without making
any changes, so we wont use it here. You need to add $done || to the condition in the
redirect script. This ensures that the page is redirected either if the update succeeds or if
someone tries to access the page directly.
10. Save blog_update_mysqli.php, and test it by loading blog_list_mysqli.php, selecting
one of the EDIT links, and making changes to the record that is displayed. When you click
Update Entry, you should be taken back to blog_list_mysqli.php. You can verify that
your changes were made by clicking the same EDIT link again. Check your code, if necessary,
with blog_update_mysqli_03.php.
PHP Solution 13-5: Updating a record with PDO
This PHP solution shows how to load an existing record into the update form and then send the edited
details to the database for updating using PDO. To load the record, you need to have created the
management page that lists all records, as described in PHP Solution 13-3.
1. Copy blog_update_pdo_01.php from the ch13 folder, and save it in the admin folder as
blog_update_pdo.php.
2. The first stage involves retrieving the details of the record that you want to update. Put the
following code in a PHP block above the DOCTYPE declaration:
require_once(' /includes/connection.inc.php');
// initialize flags
CHAPTER 13
372
$OK = false;
$done = false;
// create database connection
$conn = dbConnect('write', 'pdo');
// get details of selected record
if (isset($_GET['article_id']) && !$_POST) {
// prepare SQL query
$sql = 'SELECT article_id, title, article FROM blog
WHERE article_id = ?';
$stmt = $conn->prepare($sql);
// bind the results
$stmt->bindColumn(1, $article_id);
$stmt->bindColumn(2, $title);
$stmt->bindColumn(3, $article);
// execute query by passing array of variables
$OK = $stmt->execute(array($_GET['article_id']));
$stmt->fetch();
}
// redirect if $_GET['article_id'] not defined
if (!isset($_GET['article_id'])) {
header('Location: http://localhost/phpsols/admin/blog_list_pdo.php');
exit;
}
// store error message if query fails
if (isset($stmt) && !$OK && !$done) {
$error = $stmt->errorInfo();
if (isset($error[2])) {
$error = $error[2];
}
}
Although this is very similar to the code used for the insert page, the first few lines are outside
the first conditional statement. Both stages of the update process require the database
connection, so this avoids the need to duplicate the same code later. Two flags are initialized:
$OK to check the success of retrieving the record and $done to check whether the update
succeeds.
The first conditional statement checks that $_GET ['article_id'] exists and that the
$_POST array is empty. This makes sure that the code inside is executed only when the query
string is set, but the form hasnt been submitted.
When preparing the SQL query for the insert form, you used named placeholders for the
variables. This time, lets use a question mark like this:
$sql = 'SELECT article_id, title, article FROM blog
WHERE article_id = ?';
Download from Wow! eBook <www.wowebook.com>
MANAGING CONTENT
373
The results are then bound to $article_id, $title, and $article with the bindColumn()
method. This time, I have used numbers (counting from 1) to indicate which column to bind
each variable to.
When using question marks as placeholders, you pass the variables directly as an array to
$stmt->execute() like this:
$OK = $stmt->execute(array($_GET['article_id']));
Even though there is only one variable this time, it must still be presented as an array. Theres
only one record to fetch in the result, so the fetch() method is called immediately.
The next conditional statement redirects the page to blog_list_pdo.php if
$_GET['article_id'] hasnt been defined. This prevents anyone from trying to load the
update page directly in a browser.
The final conditional statement stores an error message if the prepared statement has been
created, but both $OK and $done remain false. You havent added the update script yet, but if
the record is retrieved or updated successfully, one of them will be switched to true. So if
both remain false, you know there was something wrong with one of the SQL queries.
3. Now that you have retrieved the contents of the record, you need to display them in the update
form by using PHP to populate the value attribute of each input field. If the prepared
statement succeeded, $article_id should contain the primary key of the record to be
updated, because its one of the variables you bound to the result set with the bindColumn()
method.
However, if theres an error, you need to display the message onscreen. But if someone alters
the query string to an invalid number, $article_id will be set to 0, so there is no point in
displaying the update form. Add the following conditional statements immediately before the
opening <form> tag:
<p><a href="blog_list_pdo.php">List all entries </a></p>
<?php if (isset($error)) {
echo "<p class='warning'>Error: $error</p>";
}
if($article_id == 0) { ?>
<p class="warning">Invalid request: record does not exist.</p>
<?php } else { ?>
<form id="form1" name="form1" method="post" action="">
The first conditional statement displays any error message reported by the PDO prepared
statement. The second wraps the update form in an else clause, so the form will be hidden if
$article_id is 0.
4. Add the closing curly brace of the else clause immediately after the closing </form> tag like
this:
</form>
<?php } ?>
</body>
CHAPTER 13
374
5. If $article_id is not 0, you know that $title and $article also exist and can be displayed
in the update form without further testing. However, you need to pass text values to
htmlentities() to avoid problems with displaying quotes. Display $title in the value
attribute of the title input field like this:
<input name="title" type="text" class="widebox" id="title" ➥
value="<?php echo htmlentities($title, ENT_COMPAT, 'utf-8'); ?>">
6. Do the same for the article text area. Because text areas dont have a value attribute, the
code goes between the opening and closing <textarea> tags like this:
<textarea name="article" cols="60" rows="8" class="widebox" id="article">
<?php echo htmlentities($article, ENT_COMPAT, 'utf-8'); ?></textarea>
Make sure there is no space between the opening and closing PHP and <textarea> tags.
Otherwise, you will get unwanted spaces in your updated record.
7. The UPDATE command needs to know the primary key of the record you want to change. You
need to store the primary key in a hidden field so that it is submitted in the $_POST array with
the other details. Because hidden fields are not displayed onscreen, the following code can go
anywhere inside the form:
<input name="article_id" type="hidden" value="<?php echo $article_id; ?>">
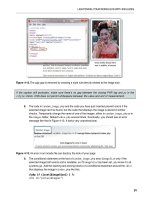
8. Save the update page, and test it by loading blog_list_pdo.php into a browser and selecting
the EDIT link for one of the records. The contents of the record should be displayed in the form
fields as shown in Figure 13-3.
The Update Entry button doesnt do anything yet. Just make sure that everything is
displayed correctly, and confirm that the primary key is registered in the hidden field. You can
check your code, if necessary, against blog_update_pdo_02.php.
9. The name attribute of the submit button is update, so all the update processing code needs to
go in a conditional statement that checks for the presence of update in the $_POST array.
Place the following code highlighted in bold immediately above the code in step 1 that redirects
the page:
$stmt->fetch();
}
// if form has been submitted, update record
if (isset($_POST['update'])) {
// prepare update query
$sql = 'UPDATE blog SET title = ?, article = ?
WHERE article_id = ?';
$stmt = $conn->prepare($sql);
// execute query by passing array of variables
$stmt->execute(array($_POST['title'], $_POST['article'],
$_POST['article_id']));
$done = $stmt->rowCount();
}
// redirect page on success or $_GET['article_id'] not defined
MANAGING CONTENT
375
if ($done || !isset($_GET['article_id'])) {
Again, the SQL query is prepared using question marks as placeholders for values to be
derived from variables. This time, there are three placeholders, so the corresponding variables
need to be passed as an array to $stmt->execute(). Needless to say, the array must be in
the same order as the placeholders.
10. If the UPDATE query succeeds, the rowCount() method sets $done to 1, which is treated as
true. Youll notice we have added $done || to the condition in the redirect script. This
ensures that the page is redirected either if the update succeeds or if someone tries to access
the page directly.
11. Save blog_update_pdo.php, and test it by loading blog_list_pdo.php, selecting one of the
EDIT links, and making changes to the record that is displayed. When you click Update
Entry, you should be taken back to blog_list_pdo.php. You can verify that your changes
were made by clicking the same EDIT link again. Check your code, if necessary, with
blog_update_pdo_03.php.
Deleting records
Deleting a record in a database is similar to updating one. The basic DELETE command looks like this:
DELETE FROM
table_name
WHERE
condition
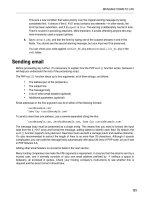
What makes the DELETE command potentially dangerous is that it is final. Once you have deleted a
record, theres no going back—its gone forever. Theres no Recycle Bin or Trash to fish it out from. Even
worse, the WHERE clause is optional. If you omit it, every single record in the table is irrevocably sent into
cyber-oblivion. Consequently, its a good idea to display details of the record to be deleted and ask the
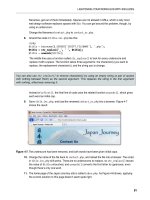
user to confirm or cancel the process (see Figure 13-4).
Figure 13-4. Deleting a record is irreversible, so get confirmation before going ahead.
Building and scripting the delete page is almost identical to the update page, so I wont give step-by-step
instructions. However, here are the main points:
• Retrieve the details of the selected record.
CHAPTER 13
376
• Display sufficient details, such as the title, for the user to confirm that the correct record has
been selected.
• Give the Confirm Deletion and Cancel buttons different name attributes, and use each name
attribute with isset() to control the action taken.
• Instead of wrapping the entire form in the else clause, use conditional statements to hide the
Confirm Deletion button and the hidden field.
The code that performs the deletion for each method follows.
For MySQLi:
if (isset($_POST['delete'])) {
$sql = 'DELETE FROM blog WHERE article_id = ?';
if ($stmt->prepare($sql)) {
$stmt->bind_param('i', $_POST['article_id']);
$stmt->execute();
if ($stmt->affected_rows > 0) {;
$deleted = true;
} else {
$error = 'There was a problem deleting the record.';
}
}
}
For PDO:
if (isset($_POST['delete'])) {
$sql = 'DELETE FROM blog WHERE article_id = ?';
$stmt = $conn->prepare($sql);
$stmt->execute(array($_POST['article_id']));
// get number of affected rows
$deleted = $stmt->rowCount();
if (!$deleted) {
$error = 'There was a problem deleting the record.';
}
}
You can find the finished code in blog_delete_mysqli.php and blog_delete_pdo.php in the ch13
folder. To test the delete script, copy the appropriate file to the admin folder.
Reviewing the four essential SQL commands
Now that you have seen SELECT, INSERT, UPDATE, and DELETE in action, lets review the basic syntax.
This is not an exhaustive listing, but it concentrates on the most important options, including some that
have not yet been covered. I have used the same typographic conventions as the MySQL online manual
at (which you may also want to consult):
• Anything in uppercase is a SQL command.
• Expressions in square brackets are optional.
MANAGING CONTENT
377
• Lowercase italics represent variable input.
• A vertical pipe (|) separates alternatives.
Although some expressions are optional, they must appear in the order listed. For example, in a SELECT
query, WHERE, ORDER BY, and LIMIT are all optional, but LIMIT can never come before WHERE or ORDER
BY.
SELECT
SELECT is used for retrieving records from one or more tables. Its basic syntax is as follows:
SELECT [DISTINCT]
select_list
FROM
table_list
[WHERE
where_expression
]
[ORDER BY
col_name
|
formula
] [ASC | DESC]
[LIMIT [
skip_count
,]
show_count
]
The DISTINCT option tells the database you want to eliminate duplicate rows from the results.
The
select_list
is a comma-separated list of columns that you want included in the result. To retrieve all
columns, use an asterisk (*). If the same column name is used in more than one table, you must use
unambiguous references by using the syntax
table_name.column_name
. Chapter 15 explains in detail
about working with multiple tables.
The
table_list
is a comma-separated list of tables from which the results are to be drawn. All tables that
you want to be included in the results must be listed.
The WHERE clause specifies search criteria, for example:
WHERE quotations.family_name = authors.family_name
WHERE article_id = 2
WHERE expressions can use comparison, arithmetic, logical, and pattern-matching operators. The most
important ones are listed in Table 13-2.
Table 13-2. The main operators used in MySQL WHERE expressions
Comparison Arithmetic
<
Less than
+
Addition
<=
Less than or equal to
-
Subtraction
=
Equal to
*
Multiplication
!=
Not equal to
/
Division
<>
Not equal to
DIV
Integer division
>
Greater than
%
Modulo
CHAPTER 13
378
Comparison Arithmetic
>=
Greater than or equal to
IN()
Included in list
BETWEEN
min
AND
max
Between (and including
two values)
Logical Pattern matching
AND
Logical and
LIKE
Case-insensitive
match
&&
Logical and
NOT LIKE
Case-insensitive
nonmatch
OR
Logical or
LIKE BINARY
Case-sensitive
match
||
Logical or (best avoided)
NOT LIKE BINARY
Case-sensitive
nonmatch
Of the two operators that mean “not equal to,” <> is standard SQL. Not all databases support !=.
DIV is the counterpart of the modulo operator. It produces the result of division as an integer with no
fractional part, whereas modulo produces only the remainder.
5 / 2 /* result 2.5 */
5 DIV 2 /* result 2 */
5 % 2 /* result 1 */
I suggest you avoid using || because its actually used as the string concatenation operator in standard
SQL. By not using it with MySQL, you avoid confusion if you ever work with a different relational database.
To join strings, MySQL uses the CONCAT() function (see
5.1/en/string-functions.html#function_concat).
IN() evaluates a comma-separated list of values inside the parentheses and returns true if one or more
of the values is found. Although BETWEEN is normally used with numbers, it also applies to strings. For
instance, BETWEEN 'a' AND 'd' returns true for a, b, c, and d (but not their uppercase equivalents).
Both IN() and BETWEEN can be preceded by NOT to perform the opposite comparison.
LIKE, NOT LIKE, and the related BINARY operators are used for text searches in combination with the
following two wildcard characters:
• %: matches any sequence of characters or none.
• _ (an underscore): matches exactly one character.
MANAGING CONTENT
379
So, the following WHERE clause matches Dennis, Denise, and so on, but not Aiden:
WHERE first_name LIKE 'den%'
To match Aiden, put % at the front of the search pattern. Because % matches any sequence of characters
or none, '%den%' still matches Dennis and Denise. To search for a literal percentage sign or underscore,
precede it with a backslash (\% or \_).
This explains why some drop-down menus in phpMyAdmin insert a backslash in names that contain
an underscore. phpMyAdmin uses the value directly in a SQL query with
LIKE
.
Conditions are evaluated from left to right but can be grouped in parentheses if you want a particular set of
conditions to be considered together.
ORDER BY specifies the sort order of the results. This can be specified as a single column, a comma-
separated list of columns, or an expression such as RAND(), which randomizes the order. The default sort
order is ascending (a–z, 0–9), but you can specify DESC (descending) to reverse the order.
LIMIT followed by one number stipulates the maximum number of records to return. If two numbers are
given separated by a comma, the first tells the database how many rows to skip (see “Selecting a subset
of records” in Chapter 12).
For more details on SELECT, see
INSERT
The INSERT command is used to add new records to a database. The general syntax is as follows:
INSERT [INTO]
table_name
(
column_names
)
VALUES (
values
)
The word INTO is optional; it simply makes the command read a little more like human language. The
column names and values are comma-delimited lists, and both must be in the same order. So, to insert the
forecast for New York (blizzard), Detroit (smog), and Honolulu (sunny) into a weather database, this is how
you would do it:
INSERT INTO forecast (new_york, detroit, honolulu)
VALUES ('blizzard', 'smog', 'sunny')
The reason for this rather strange syntax is to allow you to insert more than one record at a time. Each
subsequent record is in a separate set of parentheses, with each set separated by a comma:
INSERT numbers (x,y)
VALUES (10,20),(20,30),(30,40),(40,50)
Youll use this multiple insert syntax in Chapter 16. Any columns omitted from an INSERT query are set to
their default value. Never set an explicit value for the primary key where the column is set to
auto_increment; leave the column name out of the INSERT statement. For more details, see
CHAPTER 13
380
UPDATE
This command is used to change existing records. The basic syntax looks like this:
UPDATE
table_name
SET
col_name = value
[,
col_name = value
]
[WHERE
where_expression
]
The WHERE expression tells MySQL which record or records you want to update (or perhaps in the case of
the following example, dream about):
UPDATE sales SET q1_2011 = 25000
WHERE title = 'PHP Solutions, Second Edition'
For more details on UPDATE, see
DELETE
DELETE can be used to delete single records, multiple records, or the entire contents of a table. The
general syntax for deleting from a single table is as follows:
DELETE FROM
table_name
[WHERE
where_expression
]
Although phpMyAdmin prompts you for confirmation before deleting a record, MySQL itself takes you at
your word and performs the deletion immediately. DELETE is totally unforgiving—once the data is deleted,
it is gone forever. The following query will delete all records from a table called subscribers where the
date in expiry_date has already passed:
DELETE FROM subscribers
WHERE expiry_date < NOW()
For more details, see
Although the
WHERE
clause is optional in both
UPDATE
and
DELETE
, you should be aware that if you
leave
WHERE
out, the entire table is affected. This means that a careless slip with either of these
commands could result in every single record being identical—or wiped out.
Security and error messages
When developing a website with PHP and MySQL, its essential to display error messages so that you can
debug your code if anything goes wrong. However, raw error messages look unprofessional in a live
website. They can also reveal clues about your database structure to potential attackers. Therefore,
before deploying your scripts live on the Internet, you should go through them, removing all instances of
mysqli_error() (MySQLi) or $error = $error[2] (PDO).
The simplest way to handle this is to replace the MySQL error messages with a neutral message of your
own, such as “Sorry, the database is unavailable.” A more professional way is to replace or die()
routines with an if else conditional statement, and to use the error control operator (@) to suppress
the display of error messages. For example, you may have the following line in a current script:
$result = $conn->query($sql) or die(mysqli_error());