Phát triển web với PHP và MySQL - p 73 potx
Bạn đang xem bản rút gọn của tài liệu. Xem và tải ngay bản đầy đủ của tài liệu tại đây (693.01 KB, 10 trang )
LISTING 28.13 Continued
$query = “insert into lists values (NULL,
‘$details[name]’,
‘$details[blurb]’)”;
$result = mysql_query($query);
return $result;
}
}
This function performs a few validation checks before writing to the database: It checks that all
the details were supplied, that the current user is an administrator, and that the list name is
unique. If all goes well the list is added to the lists table in the database.
Uploading a New Newsletter
Finally we come to the main thrust of this application: uploading and sending newsletters to
mailing lists.
When an administrator clicks on the Create Mail button, it activates the create-mail action,
as follows:
case ‘create-mail’ :
{
display_mail_form(get_email());
break;
}
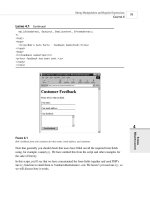
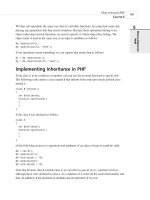
The administrator will see the form shown in Figure 28.12.
Remember that for this application we are assuming that the administrator has created a
newsletter offline in both HTML and text formats and will upload both versions before send-
ing. We chose to implement it this way so that administrators can use their favorite software to
create the newsletters. This makes the application more accessible.
You can see that this form has a number of fields for an administrator to fill out. At the top is a
drop-down box of mailing lists to choose from. The administrator must also fill in a subject for
the newsletter—this is the Subject line for the eventual email.
All the other form fields are file upload fields, which you can see from the Browse buttons
next to them. In order to send a newsletter, an administrator must list both the text and HTML
versions of this newsletter (although obviously you could change this to suit your needs).
There are also a number of optional image fields where an administrator can upload any
images that she has embedded in her HTML. Each of these files must be specified and
uploaded separately.
Building a Mailing List Manager
C
HAPTER 28
28
BUILDING A
MAILING LIST
MANAGER
695
34 7842 CH28 3/6/01 3:46 PM Page 695
FIGURE 28.12
The Create Mail option gives the administrator an interface for uploading newsletter files.
The form you see is similar to a regular file upload form except that, in this case, we are using
it to upload multiple files. This necessitates some minor differences in the form syntax, and in
the way we deal with the uploaded files at the other end.
The code for the display_mail_form() function is shown in Listing 28.14.
LISTING 28.14 display_mail_form() Function from output_fns.php—This Function
Displays the File Upload Form
function display_mail_form($email, $listid=0)
{
// display html form for uploading a new message
global $table_width;
$list = get_all_lists();
$lists = sizeof($list);
?>
<table cellpadding = 4 cellspacing = 0 border = 0 width = <?=$table_width?>>
<form enctype=’multipart/form-data’ action=’upload.php’ method=’post’>
<tr>
<td bgcolor = “#cccccc”>
List:
</td>
Building Practical PHP and MySQL Projects
P
ART V
696
34 7842 CH28 3/6/01 3:46 PM Page 696
LISTING 28.14 Continued
<td bgcolor = “#cccccc”>
<select name = list>
<?
for($i = 0; $i<$lists; $i++)
{
echo “<option value = “.$list[$i][0];
if ($listid== $list[$i][0]) echo “ selected”;
echo “>”.$list[$i][1].”</option>\n”;
}
?>
</select>
</td>
</tr>
<tr>
<td bgcolor = “#cccccc”>
Subject:
</td>
<td bgcolor = “#cccccc”>
<input type = text name = subject value = “<?=$subject?>”
size = 60 ></td>
</tr>
<tr><td bgcolor = “#cccccc”>
Text Version:
</td><td bgcolor = “#cccccc”>
<input type=file name=’userfile[0]’ size = 60>
</td></tr>
<tr><td bgcolor = “#cccccc”>
HTML Version:
</td><td bgcolor = “#cccccc”>
<input type=file name=’userfile[1]’ size = 60>
</td></tr>
<tr><td bgcolor = “#cccccc” colspan =2>Images: (optional)
<?
$max_images = 10;
for($i = 0; $i<10; $i++)
{
echo “<tr><td bgcolor = ‘#cccccc’>Image “. ($i+1) .” </td>”;
echo “<td bgcolor = ‘#cccccc’>”;
echo “<input type=file name=’userfile[“.($i+2).”]’ size = 60></td></tr>”;
}
?>
<tr><td colspan = 2 bgcolor = ‘#cccccc’ align = center>
<input type = hidden name = max_images value = <?=$max_images?>>
<input type = hidden name = listid value = <?=$listid?>>
<? display_form_button(‘upload-files’); ?>
Building a Mailing List Manager
C
HAPTER 28
28
BUILDING A
MAILING LIST
MANAGER
697
34 7842 CH28 3/6/01 3:46 PM Page 697
LISTING 28.14 Continued
</td>
</form>
</tr>
</table>
<?
}
The thing to note here is that the files we want to upload will have their names entered in a
series of inputs, each of type
file, and with names that range from userfile[0] to
userfile[n]. In essence, we are treating these form fields in the same way that we would
treat check boxes, and naming them using an array convention.
If you want to upload multiple files through a PHP script, you need to follow this convention.
In the script that processes this form, we will actually end up with three arrays. Let’s look at
that script.
Handling Multiple File Upload
You might remember that we put the file upload code in a separate file. The complete listing of
that file, upload.php, is shown in Listing 28.15.
LISTING 28.15 upload.php—This Script Uploads All the Files Needed for a Newsletter
<?
// this functionality is in a separate file to allow us to be
// more paranoid with it
// if anything goes wrong, we will exit
$max_size = 50000;
include (‘include_fns.php’);
session_start();
// only admin users can upload files
if(!check_admin_user())
{
echo “You do not seem to be authorized to use this page.”;
exit;
}
// set up the admin toolbar buttons
$buttons = array();
Building Practical PHP and MySQL Projects
P
ART V
698
34 7842 CH28 3/6/01 3:46 PM Page 698
LISTING 28.15 Continued
$buttons[0] = ‘change-password’;
$buttons[1] = ‘create-list’;
$buttons[2] = ‘create-mail’;
$buttons[3] = ‘view-mail’;
$buttons[4] = ‘log-out’;
$buttons[5] = ‘show-all-lists’;
$buttons[6] = ‘show-my-lists’;
$buttons[7] = ‘show-other-lists’;
do_html_header(“Pyramid-MLM - Upload Files”);
display_toolbar($buttons);
// check that the page is being called with the required data
if(!$userfile_name[0]||!$userfile_name[1]||!$subject||!$list)
{
echo “Problem: You did not fill out the form fully. The images are the
only optional fields. Each message needs a subject, text version
and an HTML version.”;
do_html_footer();
exit;
}
if(!db_connect())
{
echo “<p>Could not connect to db”;
do_html_footer();
exit;
}
// add mail details to the DB
$query = “insert into mail values (NULL, ‘$admin_user’,
‘$subject’,
‘$list’,
‘STORED’, NULL, NULL)”;
$result = mysql_query($query);
if(!$result)
{
do_html_footer();
exit;
}
//get the id MySQL assigned to this mail
$mailid = mysql_insert_id();
if(!$mailid)
{
Building a Mailing List Manager
C
HAPTER 28
28
BUILDING A
MAILING LIST
MANAGER
699
34 7842 CH28 3/6/01 3:46 PM Page 699
LISTING 28.15 Continued
do_html_footer();
exit;
}
// creating directory will fail if this is not the first message archived
// that’s ok
@ mkdir(“archive/$list”, 0700);
// it is a problem if creating the specific directory for this mail fails
if(!mkdir(“archive/$list/$mailid”, 0700))
{
do_html_footer();
exit;
}
// iterate through the array of uploaded files
$i = 0;
while ($userfile[$i]&&$userfile[$i]!=’none’)
{
echo “<p>Uploading “.$userfile_name[$i].” - “;
echo $userfile_size[$i].” bytes.<br>”;
if ($userfile_size[$i]==0)
{
echo “Problem: $userfile_name[$i] is zero length”;
$i++;
continue;
}
if ($userfile_size[$i]>$max_size)
{
echo “Problem: $userfile_name[$i] is over 10000 bytes”;
$i++;
continue;
}
// we would like to check that the uploaded image is an image
// if getimagesize() can work out Web size, it probably is.
if($i>1&&!getimagesize($userfile[$i]))
{
echo “Problem: $userfile_name[$i] is corrupt, or not a gif, jpeg or png”;
$i++;
continue;
}
// file 0 (the text message) and file 1 (the html message) are special
//cases
Building Practical PHP and MySQL Projects
P
ART V
700
34 7842 CH28 3/6/01 3:46 PM Page 700
LISTING 28.15 Continued
if($i==0)
$destination = “archive/$list/$mailid/text.txt”;
else if($i == 1)
$destination = “archive/$list/$mailid/index.html”;
else
{
$destination = “archive/$list/$mailid/”.$userfile_name[$i];
$query = “insert into images values ($mailid,
‘“.$userfile_name[$i].”’,
‘“.$userfile_type[$i].”’)”;
$result = mysql_query($query);
}
//if we are using PHP version >= 4.03
/*
if (!is_uploaded_file($userfile[$i]))
{
// possible file upload attack detected
echo “Something funny happening with ‘$userfile’, not uploading.”;
do_html_footer();
exit;
}
move_uploaded_file($userfile[$i], $destination);
*/
// if version <= 4.02
copy ($userfile[$i], $destination);
unlink($userfile[$i]);
$i++;
}
display_preview_button($list, $mailid, ‘preview-html’);
display_preview_button($list, $mailid, ‘preview-text’);
display_button(‘send’, “&id=$mailid”);
echo “<br><br><br><br><br>”;
do_html_footer();
?>
Let’s walk through the steps in Listing 28.15.
First, we start a session and check that the user is logged in as an administrator—we don’t
want to let anybody else upload files.
Building a Mailing List Manager
C
HAPTER 28
28
BUILDING A
MAILING LIST
MANAGER
701
34 7842 CH28 3/6/01 3:46 PM Page 701
Strictly speaking, we should probably also check the $list and $mailid variables for
unwanted characters, but we have ignored this for the sake of brevity.
Next, we set up and send the headers for the page, and validate that the form was filled in cor-
rectly. This is important here as it’s quite a complex form for the user to fill out.
Then we create an entry for this mail in the database, and set up a directory in the archive for
the mail to be stored in.
Next comes the main part of the script, which checks and moves each of the uploaded files.
This is the part that is different when uploading multiple files. We now have three arrays to
deal with. These arrays are called $userfile, $userfile_name, and $userfile_size. They corre-
spond to their similarly named equivalents in a single file upload, except that each of them is
an array. The first file in the form will be detailed in $userfile[0], $userfile_name[0], and
$userfile_size[0].
Given these three arrays, we perform the usual safety checks and move the files into the archive.
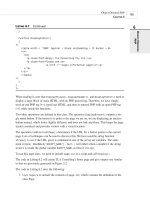
Finally, we give the administrator some buttons that they can use to preview the newsletter they
have uploaded before they send it, and a button to send it. You can see the output from
upload.php in Figure 28.13.
Building Practical PHP and MySQL Projects
P
ART V
702
FIGURE 28.13
The upload script reports the files uploaded and their sizes.
Previewing the Newsletter
There are two ways the administrator can preview a newsletter before sending. She can access
the preview functions from the upload screen if she wants to preview immediately after upload.
34 7842 CH28 3/6/01 3:46 PM Page 702
She can also click on the View Mail button, which will show her all the unsent newsletters in
the system, if she wants to preview and send mail later. The View Mail button activates the
view-mail action, which triggers the following code:
case ‘view-mail’ :
{
display_items(“Unsent Mail”, get_unsent_mail(get_email()),
‘preview-html’, ‘preview-text’, ‘send’);
break;
}
As you can see, this again uses the display_items() function with buttons for the
preview-html, preview-text, and send actions.
One interesting point to note is that the “Preview” buttons do not actually trigger an action, but
instead link directly to the newsletter in the archive. If you look back at Listings 28.6 and
28.15, you will see that we use the
display_preview_button() function to create these
buttons, instead of the usual display_button() function.
The display_button() function creates an image link to a script with GET parameters where
required; the display_preview_button() function gives a plain link into the archive. This link
will pop up in a new window, achieved using the target=new attribute of the HTML anchor
tag. You can see the result of previewing the HTML version of a newsletter in Figure 28.14.
Building a Mailing List Manager
C
HAPTER 28
28
BUILDING A
MAILING LIST
MANAGER
703
FIGURE 28.14
A preview of an HTML newsletter, complete with images.
34 7842 CH28 3/6/01 3:46 PM Page 703
Sending the Message
Clicking on the Send button for a newsletter activates the send action, which triggers the
following code:
case ‘send’ :
{
send($id, $admin_user);
break;
}
This calls the send() function, which you can find in the mlm_fns.php library. This is quite a
long function. It is also the point at which we use the HTML MIME Mail class.
The code for our function is shown in Listing 28.16.
LISTING 28.16 send() Function from mlm_fns.php—This Function Finally Sends Out a
Newsletter
// create the message from the stored DB entries and files
// send test messages to the administrator, or real messages to the whole list
function send($mailid, $admin_user)
{
if(!check_admin_user($admin_user))
return false;
if(!($info = load_mail_info($mailid)))
{
echo “Cannot load list information for message $mailid”;
return false;
}
$subject = $info[0];
$listid = $info[1];
$status = $info[2];
$sent = $info[3];
$from_name = ‘Pyramid MLM’;
$from_address = ‘return@address’;
$query = “select email from sub_lists where listid = $listid”;
$result = mysql_query($query);
if (!$result)
{
echo $query;
return false;
Building Practical PHP and MySQL Projects
P
ART V
704
34 7842 CH28 3/6/01 3:46 PM Page 704