Phát triển web với PHP và MySQL - p 66 pptx
Bạn đang xem bản rút gọn của tài liệu. Xem và tải ngay bản đầy đủ của tài liệu tại đây (620.73 KB, 10 trang )
store_account_settings($auth_user, $HTTP_POST_VARS);
break;
}
case ‘select-account’ :
{
// if have chosen a valid account, store it as a session variable
if($account&&account_exists($auth_user, $account))
{
$selected_account = $account;
session_register(‘selected_account’);
}
}
}
// set the buttons that will be on the tool bar
$buttons[0] = ‘view-mailbox’;
$buttons[1] = ‘new-message’;
$buttons[2] = ‘account-setup’;
//only offer a log out button if logged in
if(check_auth_user())
{
$buttons[4] = ‘log-out’;
}
//*****************************************************************************
// Stage 2: headers
// Send the HTML headers and menu bar appropriate to current action
//*****************************************************************************
if($action)
{
// display header with application name and description of page or action
do_html_header($auth_user, “Warm Mail - “.
format_action($action), $selected_account);
}
else
{
// display header with just application name
do_html_header($auth_user, “Warm Mail”, $selected_account);
}
display_toolbar($buttons);
//*****************************************************************************
// Stage 3: body
// Depending on action, show appropriate main body content
//*****************************************************************************
Building a Web-Based Email Service
C
HAPTER 27
27
BUILDING A
WEB-BASED
SERVICE
625
LISTING 27.2 Continued
33 7842 CH27 3/6/01 3:41 PM Page 625
//display any text generated by functions called before header
echo $status;
if(!check_auth_user())
{
echo “<P>You need to log in”;
if($action&&$action!=’log-out’)
echo “ to go to “.format_action($action);
echo “.<br><br>”;
display_login_form($action);
}
else
{
switch ( $action )
{
// if we have chosen to setup a new account, or have just added or
// deleted an account, show account setup page
case ‘store-settings’ :
case ‘account-setup’ :
case ‘delete-account’ :
{
display_account_setup($auth_user);
break;
}
case ‘send-message’ :
{
if(send_message($to, $cc, $subject, $message))
echo “<p>Message sent.<br><br><br><br><br><br>”;
else
echo “<p>Could not send message.<br><br><br><br><br><br>”;
break;
}
case ‘delete’ :
{
delete_message($auth_user, $selected_account, $messageid);
//note deliberately no ‘break’ - we will continue to the next case
}
case ‘select-account’ :
case ‘view-mailbox’ :
{
// if mailbox just chosen, or view mailbox chosen, show mailbox
display_list($auth_user, $selected_account);
break;
}
case ‘show-headers’ :
case ‘hide-headers’ :
Building Practical PHP and MySQL Projects
P
ART V
626
LISTING 27.2 Continued
33 7842 CH27 3/6/01 3:41 PM Page 626
case ‘view-message’ :
{
// if we have just picked a message from the list, or were looking at
// a message and chose to hide or view headers, load a message
$fullheaders = ($action==’show-headers’);
display_message($auth_user, $selected_account, $messageid,
$fullheaders)
;
break;
}
case ‘reply-all’ :
{
//set cc as old cc line
if(!$imap)
$imap = open_mailbox($auth_user, $selected_account);
if($imap)
{
$header = imap_header($imap, $messageid);
if($header->reply_toaddress)
$to = $header->reply_toaddress;
else
$to = $header->fromaddress;
$cc = $header->ccaddress;
$subject = ‘Re: ‘.$header->subject;
$body = add_quoting(stripslashes(imap_body($imap, $messageid)));
imap_close($imap);
display_new_message_form($auth_user, $to, $cc, $subject, $body);
}
break;
}
case ‘reply’ :
{
//set to address as reply-to or from of the current message
if(!$imap)
$imap = open_mailbox($auth_user, $selected_account);
if($imap)
{
$header = imap_header($imap, $messageid);
if($header->reply_toaddress)
$to = $header->reply_toaddress;
else
$to = $header->fromaddress;
$subject = ‘Re: ‘.$header->subject;
$body = add_quoting(stripslashes(imap_body($imap, $messageid)));
imap_close($imap);
Building a Web-Based Email Service
C
HAPTER 27
27
BUILDING A
WEB-BASED
SERVICE
627
LISTING 27.2 Continued
33 7842 CH27 3/6/01 3:41 PM Page 627
display_new_message_form($auth_user, $to, $cc, $subject, $body);
}
break;
}
case ‘forward’ :
{
//set message as quoted body of current message
if(!$imap)
$imap = open_mailbox($auth_user, $selected_account);
if($imap)
{
$header = imap_header($imap, $messageid);
$body = add_quoting(stripslashes(imap_body($imap, $messageid)));
$subject = ‘Fwd: ‘.$header->subject;
imap_close($imap);
display_new_message_form($auth_user, $to, $cc, $subject, $body);
}
break;
}
case ‘new-message’ :
{
display_new_message_form($auth_user, $to, $cc, $subject, $body);
break;
}
}
}
//*****************************************************************************
// Stage 4: footer
do_html_footer();
//*****************************************************************************
?>
This script uses an event handling approach. It contains the knowledge or logic about which
function needs to be called for each event. The events in this case are triggered by the user
clicking the various buttons in the site, each of which selects an action. Most buttons are pro-
duced by the display_button() function, but the display_form_button() function is used
if it’s a submit button. These functions are both in output_fns.php. These all jump to URLs
of the form
index.php?action=log-out
The value of the $action variable when index.php is called determines which event handler to
activate.
Building Practical PHP and MySQL Projects
P
ART V
628
LISTING 27.2 Continued
33 7842 CH27 3/6/01 3:41 PM Page 628
The four main sections to the script are as follows:
1. We do some processing that must take place before we send the page header to the
browser, such as starting the session, executing any preprocessing for the action the user
has selected, and deciding what the headers will look like.
2. We process and send the appropriate headers and menu bar for the action the user has
selected.
3. We choose which body of the script to execute, depending on the selected action. The
different actions trigger different function calls.
4. We send the page footers.
If you look briefly through the code for the script, you will see that these four sections are
marked with comments.
To understand this script fully, let’s walk through actually using the site action by action.
Logging In and Out
When a user loads the page index.php, he will see the output shown in Figure 27.2.
Building a Web-Based Email Service
C
HAPTER 27
27
BUILDING A
WEB-BASED
SERVICE
629
F
IGURE 27.2
The login screen for Warm Mail asks for your username and password.
33 7842 CH27 3/6/01 3:41 PM Page 629
This is the default behavior for the application. With no $action chosen yet, and no login
details supplied, we will execute the following parts of the code.
In the preprocessing stage, we execute the following code:
include (‘include_fns.php’);
session_start();
These lines start the session that will be used to keep track of the $auth_user and
$selected_account session variables, which we’ll come to later on.
To save work when customizing the user interface, the buttons that appear on the toolbar are
controlled by an array. We declare an empty array,
$buttons = array();
and set the buttons that we want on the page:
$buttons[0] = ‘view-mailbox’;
$buttons[1] = ‘new-message’;
$buttons[2] = ‘account-setup’;
For the header stage, we print a plain vanilla header:
do_html_header($auth_user, “Warm Mail”, $selected_account);
display_toolbar($buttons);
This code prints the title and header bar, and then the toolbar of buttons you can see in Figure
27.2. These functions can be found in the output_fns.php function library, but as you can eas-
ily see their effect in the figure, we won’t go through them here.
Now we come to the body of the code:
if(!check_auth_user())
{
echo “<P>You need to log in”;
if($action&&$action!=’log-out’)
echo “ to go to “.format_action($action);
echo “.<br><br>”;
display_login_form($action);
}
The check_auth_user() function is from the user_auth_fns.php library. We have used very
similar code in some of the previous projects—it checks if the user is logged in. If he is not,
which is the case here, we will show him a login form, which you can see in Figure 27.2. We
draw this form in the display_login_form() function from output_fns.php.
If the user fills in the form correctly and presses the Log In button, he will see the output
shown in Figure 27.3.
Building Practical PHP and MySQL Projects
P
ART V
630
33 7842 CH27 3/6/01 3:41 PM Page 630
FIGURE 27.3
After successful login, the user can begin using the application.
On this execution of the script, we will activate different sections of code. The login form has
two fields, $username and $password. If these have been filled in, the following segment of
preprocessing code will be activated:
if($username||$password)
{
if(login($username, $passwd))
{
$status .= “<p>Logged in successfully.<br><br><br><br><br><br>”;
$auth_user = $username;
session_register(“auth_user”);
}
else
{
$status .= “<p>Sorry, we could not log you in with that
username and password.<br><br><br><br><br><br>”;
}
}
As you can see, the code calls the login() function, which is similar to the one used in Chapters
24 and 25. If all goes well, we register the username in the session variable $auth_user.
Building a Web-Based Email Service
C
HAPTER 27
27
BUILDING A
WEB-BASED
SERVICE
631
33 7842 CH27 3/6/01 3:41 PM Page 631
In addition to setting up the buttons we saw while not logged in, we add another button to
allow the user to log out again, as follows:
if(check_auth_user())
{
$buttons[4] = ‘log-out’;
}
You can see this Log Out button in Figure 27.3.
In the header stage, we again display the header and the buttons. In the body, we display the
status message we set up earlier:
echo $status;
After that, it’s just a case of printing the footer and waiting to see what the user will do next.
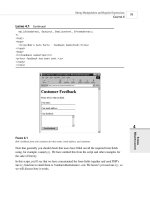
Setting Up Accounts
When a user first starts using the Warm Mail system, he will need to set up some email
accounts. If the user clicks on the Account Setup button, this will set the $action variable to
account-setup and recall the index.php script. The user will then see the output shown in
Figure 27.4.
Building Practical PHP and MySQL Projects
P
ART V
632
FIGURE 27.4
A user needs to set up his email account details before he can read his email.
33 7842 CH27 3/6/01 3:41 PM Page 632
Look back at the script in Listing 27.2. This time around because of the value of $action,we
get different behavior.
We get a slightly different header, as follows:
do_html_header($auth_user, “Warm Mail - “.
format_action($action), $selected_account);
More importantly, we get a different body, as follows:
case ‘store-settings’ :
case ‘account-setup’ :
case ‘delete-account’ :
{
display_account_setup($auth_user);
break;
}
This is the typical pattern: Each command calls a function. In this case, we call the
display_account_setup() function. The code for this function is shown in Listing 27.3.
LISTING 27.3 display_account_setup() Function from output_fns.php—Function to Get
and Display Account Details
function display_account_setup($auth_user)
{
//display empty ‘new account’ form
display_account_form($auth_user);
$list = get_accounts($auth_user);
// display each stored account
foreach($list as $key => $account)
{
// display form for each accounts details.
// note that we are going to send the password for all accounts in the HTML
// this is not really a very good idea
display_account_form($auth_user, $account[‘accountid’], $account[‘server’],
$account[‘remoteuser’],
$account[‘remotepassword’], $account[‘type’],
$account[‘port’]);
}
}
When we call this function, it displays a blank form to add a new account, followed by editable
forms containing each of the user’s current email accounts. The
display_account_form()
Building a Web-Based Email Service
C
HAPTER 27
27
BUILDING A
WEB-BASED
SERVICE
633
33 7842 CH27 3/6/01 3:41 PM Page 633
function will display the form that we can see in Figure 27.4. You can see that we use it in two
different ways here: We use it with no parameters to display an empty form, and we use it with
a full set of parameters to display an existing record. This function is in the output_fns.php
library; it simply outputs HTML so we will not go through it here.
The function that retrieves any existing accounts is get_accounts(), from the mail_fns.php
library. This function is shown in Listing 27.4.
LISTING 27.4 get_accounts() Function from mail_fns.php—Function to Retrieve All the
Account Details for a Particular User
function get_accounts($auth_user)
{
$list = array();
if(db_connect())
{
$query = “select * from accounts where username = ‘$auth_user’”;
$result = mysql_query($query);
if($result)
{
while($settings = mysql_fetch_array($result))
array_push( $list, $settings);
}
else
return false;
}
return $list;
}
As you can see, this function connects to the database, retrieves all the accounts for a particular
user, and returns them as an array.
Creating a New Account
If a user fills out the account form and clicks the Save Changes button, the store-settings
action will be activated. Let’s look at the event handling code for this from index.php. In the
preprocessing stage, we execute the following code:
case ‘store-settings’ :
{
store_account_settings($auth_user, $HTTP_POST_VARS);
break;
}
The store_account_settings() function writes the new account details into the database.
The code for this function is shown in Listing 27.5.
Building Practical PHP and MySQL Projects
P
ART V
634
33 7842 CH27 3/6/01 3:41 PM Page 634