Phát triển web với PHP và MySQL - p 45 pot
Bạn đang xem bản rút gọn của tài liệu. Xem và tải ngay bản đầy đủ của tài liệu tại đây (627.26 KB, 10 trang )
The function ImageCreateFromPNG() takes the filename of a PNG as a parameter, and returns
a new image identifier for an image containing a copy of that PNG. Note that this does not
modify the base PNG in any way. We can use the ImageCreateFromJPEG() and
ImageCreateFromGIF()functions in the same way if the appropriate support is installed.
Generating Images
C
HAPTER 19
19
G
ENERATING
IMAGES
415
The call to ImageCreateFromPNG() only creates the image in memory. To save the
image to a file or output it to the browser, we must call the
ImagePNG() function.
We’ll come to that in a minute, but we have other work to do with our image first.
NOTE
Fitting the Text onto the Button
We have some text typed in by the user stored in the $button_text variable. What we want to
do is print that on the button in the largest font size that will fit. We do this by iteration, or
strictly speaking, by iterative trial and error.
We start by setting up some relevant variables. The first two are the height and width of the
button image:
$width_image = ImageSX($im);
$height_image = ImageSY($im);
The second two represent a margin in from the edge of the button. Our button images are
beveled, so we’ll need to leave room for that around the edges of the text. If you are using dif-
ferent images, this number will be different! In our case, the margin on each side is around 18
pixels.
$width_image_wo_margins = $width_image - (2 * 18);
$height_image_wo_margins = $height_image - (2 * 18);
We also need to set up the initial font size. We start with 32 (actually 33, but we’ll decrement
that in a minute) because this is about the biggest font that will fit on the button at all:
$font_size = 33;
Now we loop, decrementing the font size at each iteration, until the submitted text will fit on
the button reasonably:
do
{
$font_size ;
24 7842 CH19 3/6/01 3:42 PM Page 415
// find out the size of the text at that font size
$bbox=imagettfbbox ($font_size, 0, “arial.ttf”, $button_text);
$right_text = $bbox[2]; // right co-ordinate
$left_text = $bbox[0]; // left co-ordinate
$width_text = $right_text - $left_text; // how wide is it?
$height_text = abs($bbox[7] - $bbox[1]); // how tall is it?
} while ( $font_size>8 &&
( $height_text>$height_image_wo_margins ||
$width_text>$width_image_wo_margins )
);
This code tests the size of the text by looking at what is called the bounding box of the text.
We do this using the
ImageGetTTFBBox() function, which is one of the TrueType font func-
tions. We will, after we have figured out the size, print on the button using a TrueType font and
the ImageTTFText() function.
The bounding box of a piece of text is the smallest box you could draw around the text. An
example of a bounding box is shown in Figure 19.6.
Advanced PHP Techniques
P
ART IV
416
FIGURE 19.6
Coordinates of the bounding box are given relative to the baseline. The origin of the coordinates is shown here
as (0,0).
To get the dimensions of the box, we call
$bbox=imagettfbbox ($font_size, 0, “arial.ttf”, $button_text);
This call says, “For given font size $font_size, with text slanted on an angle of zero degrees,
using the TrueType font Arial, tell me the dimensions of the text in $button_text.”
Note that you actually need to pass the path to the file containing the font into the function. In
this case, it’s in the same directory as the script (the default), so we haven’t specified a longer
path.
The function returns an array containing the coordinates of the corners of the bounding box.
The contents of the array are shown in Table 19.1.
24 7842 CH19 3/6/01 3:42 PM Page 416
TABLE 19.1 Contents of the Bounding Box Array
Array Index Contents
0 X coordinate, lower-left corner
1 Y coordinate, lower-left corner
2 X coordinate, lower-right corner
3 Y coordinate, lower-right corner
4 X coordinate, upper-right corner
5 Y coordinate, upper-right corner
6 X coordinate, upper-left corner
7 Y coordinate, upper-left corner
To remember what the contents of the array are, just remember that the numbering starts at the
bottom-left corner of the bounding box and works its way around counterclockwise.
There is one tricky thing about the values returned from the ImageTTFBBox() function. They
are coordinate values, specified from an origin. However, unlike coordinates for images, which
are specified relative to the top-left corner, they are specified relative to a baseline.
Look at Figure 19.6 again. You will see that we have drawn a line along the bottom of most of
the text. This is known as the baseline. Some letters hang below the baseline, such as y in this
example. These are called descenders.
The left side of the baseline is specified as the origin of measurements—that is, X coordinate 0
and Y coordinate 0. Coordinates above the baseline have a positive X coordinate and coordi-
nates below the baseline have a negative X coordinate.
In addition to this, text might actually have coordinate values that sit outside the bounding box.
For example, the text might actually start at an X coordinate of –1.
What this all adds up to is the fact that care is required when performing calculations with
these numbers.
We work out the width and height of the text as follows:
$right_text = $bbox[2]; // right co-ordinate
$left_text = $bbox[0]; // left co-ordinate
$width_text = $right_text - $left_text; // how wide is it?
$height_text = abs($bbox[7] - $bbox[1]); // how tall is it?
Generating Images
C
HAPTER 19
19
G
ENERATING
IMAGES
417
24 7842 CH19 3/6/01 3:42 PM Page 417
After we have this, we test the loop condition:
} while ( $font_size>8 &&
( $height_text>$height_image_wo_margins ||
$width_text>$width_image_wo_margins )
);
We are testing two sets of conditions here. The first is that the font is still readable—there’s no
point in making it much smaller than 8 point because the button becomes too difficult to read.
The second set of conditions tests whether the text will fit inside the drawing space we have
for it.
Next, we check to see whether our iterative calculations found an acceptable font size or not,
and report an error if not:
if ( $height_text>$height_image_wo_margins ||
$width_text>$width_image_wo_margins )
{
// no readable font size will fit on button
echo “Text given will not fit on button.<BR>”;
}
Positioning the Text
If all was okay, we next work out a base position for the start of the text. This is the midpoint
of the available space.
$text_x = $width_image/2.0 - $width_text/2.0;
$text_y = $height_image/2.0 - $height_text/2.0 ;
Because of the complications with the baseline relative co-ordinate system, we need to add
some correction factors:
if ($left_text < 0)
$text_x += abs($left_text); // add factor for left overhang
$above_line_text = abs($bbox[7]); // how far above the baseline?
$text_y += $above_line_text; // add baseline factor
$text_y -= 2; // adjustment factor for shape of our template
These correction factors allow for the baseline and a little adjustment because our image is a
bit “top heavy.”
Advanced PHP Techniques
P
ART IV
418
24 7842 CH19 3/6/01 3:42 PM Page 418
Writing the Text onto the Button
After that, it’s all smooth sailing. We set up the text color, which will be white:
$white = ImageColorAllocate ($im, 255, 255, 255);
We can then use the ImageTTFText() function to actually draw the text onto the button:
ImageTTFText ($im, $font_size, 0, $text_x, $text_y, $white, “arial.ttf”,
$button_text);
This function takes quite a lot of parameters. In order, they are the image identifier, the font
size in points, the angle we want to draw the text at, the starting X and Y coordinates of the
text, the text color, the font file, and, finally, the actual text to go on the button.
Generating Images
C
HAPTER 19
19
G
ENERATING
IMAGES
419
The font file needs to be available on the server, and is not required on the client’s
machine because she will see it as an image. By default, the function will look for the
file in the same directory that the script is running in. Alternatively, you can specify a
path to the font.
NOTE
Finishing Up
Finally, we can output the button to the browser:
Header (“Content-type: image/png”);
ImagePng ($im);
Then it’s time to clean up resources and end the script:
ImageDestroy ($im);
That’s it! If all went well, we should now have a button in the browser window that looks simi-
lar to the one you saw in Figure 19.5.
Drawing Figures and Graphing Data
In that last application, we looked at existing images and text. We haven’t yet looked at an
example with drawing, so we’ll do that now.
In this example, we’ll run a poll on our Web site to test whom users will vote for in a fictitious
election. We’ll store the results of the poll in a MySQL database, and draw a bar chart of the
results using the image functions.
24 7842 CH19 3/6/01 3:42 PM Page 419
Graphing is the other thing these functions are primarily used for. You can chart any data you
want—sales, Web hits, or whatever takes your fancy.
For this example, we have spent a few minutes setting up a MySQL database called poll. It
contains one table called poll_results, which holds the candidates’ names in the candidate col-
umn, and the number of votes they have received in the num_votes column. We have also cre-
ated a user for this database called poll, with password poll. This takes about five minutes to
set up, and you can do this by running the SQL script shown in Listing 19.3. You can do this
piping the script through a root login using
mysql -u root -p < pollsetup.sql
Of course, you could also use the login of any user with the appropriate MySQL privileges.
LISTING 19.3 pollsetup.sql —Setting Up the Poll Database
create database poll;
use poll;
create table poll_results (
candidate varchar(30),
num_votes int
);
insert into poll_results values
(‘John Smith’, 0),
(‘Mary Jones’, 0),
(‘Fred Bloggs’, 0)
;
grant all privileges
on poll.*
to poll@localhost
identified by ‘poll’;
This database contains three candidates. We provide a voting interface via a page called
vote.html. The code for this page is shown in Listing 19.4.
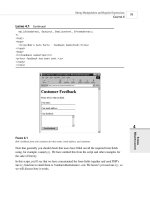
LISTING 19.4 vote.html—Users Can Cast Their Votes Here
<html>
<head>
<title>Polling</title>
<head>
<body>
<h1>Pop Poll</h1>
<p>Who will you vote for in the election?</p>
<form method=post action=”show_poll.php”>
Advanced PHP Techniques
P
ART IV
420
24 7842 CH19 3/6/01 3:42 PM Page 420
<input type=radio name=vote value=”John Smith”>John Smith<br>
<input type=radio name=vote value=”Mary Jones”>Mary Jones<br>
<input type=radio name=vote value=”Fred Bloggs”>Fred Bloggs<br><br>
<input type=submit value=”Show results”>
</form>
</body>
The output from this page is shown in Figure 19.7.
Generating Images
C
HAPTER 19
19
G
ENERATING
IMAGES
421
LISTING 19.4 Continued
FIGURE 19.7
Users can cast their votes here, and clicking the submit button will show them the current poll results.
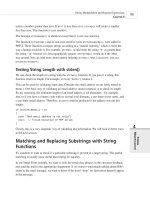
The general idea is that, when users click the button, we will add their vote to the database, get
all the votes out of the database, and draw the bar chart of the current results.
Typical output after some votes have cast is shown in Figure 19.8.
The script that generates this image is quite long. We have split it into four parts, and we’ll dis-
cuss each part separately.
Most of the script is familiar; we have looked at many MySQL examples similar to this. We
have looked at how to paint a background canvas in a solid color, and how to print text labels
on it.
24 7842 CH19 3/6/01 3:42 PM Page 421
FIGURE 19.8
Vote results are created by drawing a series of lines, rectangles, and text items onto a canvas.
The new parts of this script relate to drawing lines and rectangles. We will focus our attention
on these sections. Part 1 (of this four-part script) is shown in Listing 19.5.1.
LISTING 19.5.1 showpoll.php—Part 1 Updates the Vote Database and Retrieves the New
Results
<?
/*******************************************
Database query to get poll info
*******************************************/
// log in to database
if (!$db_conn = @mysql_connect(“localhost”, “poll”, “poll”))
{
echo “Could not connect to db<br>”;
exit;
};
@mysql_select_db(“poll”);
if (!empty($vote)) // if they filled the form out, add their vote
{
$vote = addslashes($vote);
$query = “update poll_results
set num_votes = num_votes + 1
where candidate = ‘$vote’”;
if(!($result = @mysql_query($query, $db_conn)))
{
echo “Could not connect to db<br>”;
exit;
}
};
Advanced PHP Techniques
P
ART IV
422
24 7842 CH19 3/6/01 3:42 PM Page 422
// get current results of poll, regardless of whether they voted
$query = “select * from poll_results”;
if(!($result = @mysql_query($query, $db_conn)))
{
echo “Could not connect to db<br>”;
exit;
}
$num_candidates = mysql_num_rows($result);
// calculate total number of votes so far
$total_votes=0;
while ($row = mysql_fetch_object ($result))
{
$total_votes += $row->num_votes;
}
mysql_data_seek($result, 0); // reset result pointer
Part 1, shown in Listing 19.5.1, connects to the MySQL database, updates the votes according
to what the user typed, and gets the new votes. After we have that information, we can begin
making calculations in order to draw the graph. Part 2 is shown in Listing 19.5.2.
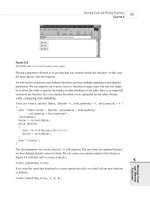
LISTING 19.5.2 showpoll.php—Part 2 Sets Up All the Variables for Drawing
/*******************************************
Initial calculations for graph
*******************************************/
// set up constants
$width=500; // width of image in pixels - this will fit in 640x480
$left_margin = 50; // space to leave on left of image
$right_margin= 50; // ditto right
$bar_height = 40;
$bar_spacing = $bar_height/2;
$font = “arial.ttf”;
$title_size= 16; // point
$main_size= 12; // point
$small_size= 12; // point
$text_indent = 10; // position for text labels on left
// set up initial point to draw from
$x = $left_margin + 60; // place to draw baseline of the graph
$y = 50; // ditto
$bar_unit = ($width-($x+$right_margin)) / 100; // one “point” on the graph
// calculate height of graph - bars plus gaps plus some margin
$height = $num_candidates * ($bar_height + $bar_spacing) + 50;
Generating Images
C
HAPTER 19
19
G
ENERATING
IMAGES
423
LISTING 19.5.1 Continued
24 7842 CH19 3/6/01 3:42 PM Page 423
Part 2 sets up some variables that we will use to actually draw the graph.
Working out the values for these sorts of variables can be tedious, but a bit of forethought
about what you want the finished image to look like will make the drawing process much eas-
ier. The values we use here were arrived at by sketching the desired effect on a piece of paper
and estimating the required proportions.
The $width variable is the total width of the canvas we will use. We also set up the left and
right margins (with $left_margin and $right_margin, respectively); the “fatness” and spacing
between the bars ($bar_height and $bar_spacing); and the font, font sizes, and label position
($font, $title_size, $main_size, $small_size, and $text_indent).
Given these base values, we can then make a few calculations. We want to draw a baseline that
all the bars stretch out from. We can work out the position for this baseline by using the left
margin plus an allowance for the text labels for the X coordinate, and again an estimate from
our sketch for the Y coordinate.
We also work out two important values: first, the distance on the graph that represents one unit:
$bar_unit = ($width-($x+$right_margin)) / 100; // one “point” on the graph
This is the maximum length of the bars—from the baseline to the right margin—divided by
100 because our graph is going to show percentage values.
The second value is the total height that we need for the canvas:
$height = $num_candidates * ($bar_height + $bar_spacing) + 50;
This is basically the height per bar times the number of bars, plus an extra amount for the title.
Part 3 is shown in Listing 19.5.3.
LISTING 19.5.3 showpoll.php—Part 3 Sets Up the Graph, Ready for the Data to Be
Added
/*******************************************
Set up base image
*******************************************/
// create a blank canvas
$im = imagecreate($width,$height);
// Allocate colors
$white=ImageColorAllocate($im,255,255,255);
$blue=ImageColorAllocate($im,0,64,128);
$black=ImageColorAllocate($im,0,0,0);
$pink = ImageColorAllocate($im,255,78,243);
Advanced PHP Techniques
P
ART IV
424
24 7842 CH19 3/6/01 3:42 PM Page 424