HTML cơ bản - p 21 pdf
Bạn đang xem bản rút gọn của tài liệu. Xem và tải ngay bản đầy đủ của tài liệu tại đây (1.37 MB, 10 trang )
ptg
184 Chapter 4: Using HTML
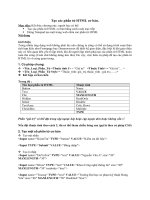
Figure 4.5: The Element Inspector in Google Chrome
As shown in Figure 4.5, the Element Inspector has many powerful features,
including the graphic display of an element’s box properties. It provides a
nicely formatted listing of the HTML source code and the CSS associated with
each document element. It is also interactive, changing the displayed proper-
ties and values as you mouse over the various page elements.
e other tools, accessible from the Element Inspector’s menu bar, oer
additional information on the resources used by the page, as well as how the
browser loaded them. e Console tool is invaluable for debugging faulty
JavaScript functions. I encourage you to become familiar with these tools even
if you do not intend to get very deep into Web programming.
Other tools are available to help you work with HTML entirely through
your browser. Firebug for the Firefox browser is one of my favorites, as is the
Web Developer tools collection. Search the Internet for add-ons and exten-
sions to your favorite browser with keywords such as “web developer,” and you
will nd several that are free and easily installed.
From the Library of Wow! eBook
ptg
Blogging 185
Blogging
Blogging has grown tremendously in recent years to become an important
channel for people to develop and share content on the Web. Modern blog-
ging soware, such as WordPress and Movable Type, go beyond the posting of
articles and comments with powerful content-management capabilities. Major
media websites are powered by blogging soware.
Blogging can be experienced in two ways. If you run your own blog, you
have complete control of a website, including its structure, appearance, and
operation. As the owner, you have administrator privileges, including the
ability to add other users to your blog in various roles. Posting privileges vary
according to the user’s role. Administrators, editors, and authors can publish
articles on a blog. Contributors can submit articles that are then approved by
an editor or administrator for publication. Blogs can also have subscribers.
ese are registered users who, depending on the soware, may be allowed to
comment on articles and see private posts.
A number of blogging services provide almost all the functionality of run-
ning your own blog, but without the monthly hosting fees and administrative
responsibility of maintaining your own website. ese services include Word-
Press.com, Blogger, TypePad, Windows Live Spaces, and others. ey make
it easy to publish content on the Web while limiting some of the functional-
ity you would have if you owned the website. WordPress.com, for example,
does not allow JavaScript and limits the content management functions. And
although you can put CSS rules into individual HTML style attributes in a
post, you must pay a small yearly fee to be able to edit the global CSS style
sheet and give the site your own look.
Whether you run your own blog, use one of the blog hosting services, or
have posting privileges on someone else’s blog, Web-based blogging soware
usually provides a post editor that accepts input in two modes: a visual, what-
you-see-is-what-you-get (WYSIWYG) mode and an HTML source edit mode.
Figure 4.6 shows the post/page editor in WordPress in the visual editing mode.
is editor is called TinyMCE. It is a free, open-source, JavaScript-based editor
for HTML from Moxiecode.com. Its extendibility and easy integration into
other web soware make it a popular editor for blogs and other content man-
agement systems.
e two tabs in the upper right of Figure 4.6 labeled Visual and HTML are
for switching between the two editing modes. Below those tabs is a double-
row toolbar with buttons for creating strong and emphasized text (the B and I
From the Library of Wow! eBook
ptg
186 Chapter 4: Using HTML
buttons), unordered and ordered lists, and block quotes (the “ button). A drop
menu labeled “Format” has options to mark up paragraphs, address blocks,
preformatted areas, and six levels of headings. ere are buttons for setting
text color, inserting images, making links, and entering character entities. In
short, TinyMCE can do a lot of HTML, but there is also a lot of HTML that it
doesn’t do. It doesn’t let you create tables, insert horizontal rules, or add ele-
ment backgrounds, borders, and oating elements other than images. If you
need any of those features in a blog post, HTML editing mode is essential.
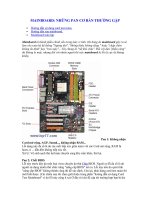
Figure 4.6: The TinyMCE editor in WordPress
To create the oating red box shown in Figure 4.6, rst I switched the edi-
tor to HTML mode. en I pasted the following HTML code into the editor
before the content I previously entered in Visual mode:
<div style="float: left; width: 25%; margin-right: 1em; padding: 0.5em;
border: solid red; font: large sans-serif; text-align: center;">Error!
No Internet Connection!</div>
In this situation, you must be careful about extra white space in the content.
WordPress assumes that any line breaks are intentional and will inserts break
and paragraph elements to preserve the lines as you see them in visual mode.
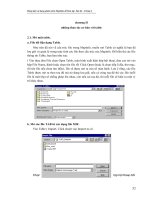
Figure 4.7 shows the same post content using the TinyMCE editor in HTML
mode. e line break aer the word “Error!” is intentional in thiscase.
From the Library of Wow! eBook
ptg
Blogging 187
Figure 4.7: The TinyMCE editor in HTML editing mode
If you can edit the CSS style sheet for the blog, the division’s style attribute
with its CSS rules can be replaced with an id and/or class attribute:
<div class="red-box" id="no-internet-error">Error!
No Internet Connection!</div>
It helps to be specic in creating names for classes and IDs. In the style sheet
for the site, the following CSS statements would reproduce the formatting:
div.red-box { padding: 0.5em; border: solid red; }
#no-internet-error {
font: large sans-serif; text-align: center;
float: left; width: 25%; margin-right: 1em;
}
When the HTML is in place, you can switch the editor back to visual mode
to continue editing the post, including the text inside the red box. If more
extensive editing in HTML is needed, there is an option in each WordPress
user’s prole settings to turn o visual editor mode and only accept input into
the post editor as is, complete with any HTML markup. I highly recommend
doing this when pasting code snippets or widget code that was copied from
other web services.
Although the TinyMCE editor has no provisions for entering table elements,
it does in fact recognize HTML tables, and outlines the table cells and lets
you edit the cells’ contents. If you are running your own blog, you can extend
TinyMCE’s functionality with plug-ins that add tools for creating tables, hori-
zontal rules, and so on.
From the Library of Wow! eBook
ptg
188 Chapter 4: Using HTML
If you nd TinyMCE too limited for your needs, there are other alternatives.
Any stand-alone editor that produces HTML markup can be used to compose
a post, and the HTML can then be copied and pasted into the blog’s post edi-
tor in HTML mode. Final editing can be done in the blog editor’s visual mode.
Searching the Web for “HTML editors” or “WYSIWYG Web editors” will
provide you with many suggestions on and reviews for such applications.
Even though it oers the option to save a document as a web page, Micro-
so Word is not a good tool for creating HTML code. A Microso Word
document that has been saved in web page format has an awesome amount of
extra markup that binds the saved HTML le to Microso Oce’s XML name
space. is extra markup ensures that you can move and copy the document
contents from Word to PowerPoint to Excel to Outlook and back, keeping
most of the typography and layout intact. For those who insist on using Micro-
so Word for everything, the TinyMCE editor used in WordPress and other
blogging soware has a toolbar button specically for entering content edited
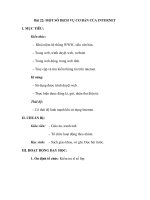
in Microso Word. Figure 4.8 shows the paste-from-Word toolbar icon circled.
When it is clicked, the input window form appears over the grayed-outpage.
1
Figure 4.8: The Paste-from-Word feature in WordPress’ TinyMCE editor
1. is eect is called exposing, and it is used to give a previously hidden element exclusive focus. A pop-
up window, on the other hand, is a new browser window, opened by a script, containing a complete HTML
document.
From the Library of Wow! eBook
ptg
Blogging 189
A far better tool for creating Web content is Microso’s Windows Live
Writer—a free Windows desktop application that can be downloaded from
Microso’s Windows Live support website. Live Writer presents much of the
same user interface as TinyMCE but has a better layout and supports editing
many of the features that TinyMCE misses.
Figure 4.9 shows the editing of a new blog post using Windows Live Writer.
e post contains an embedded map from Bing, Microso’s search portal.
It was inserted into the post by clicking the link in the right sidebar’s Insert
menu. (e arrow is pointing to it.)
Figure 4.9: Windows Live Writer post editor
To let you see and edit the HTML source code created by Windows Live
Writer, a Source tab is provided in the lower-le portion of the editing screen
(circled in Figure 4.9). What makes Windows Live Writer a great blog editor
is its capability to connect to any blog that supports the Atom Publishing Pro-
tocol. is means that Windows Live Writer can import a blog’s CSS settings
to provide a Preview mode to see what the formatted page will look like when
From the Library of Wow! eBook
ptg
190 Chapter 4: Using HTML
published. It can also import, edit, and save an existing post or dra. Win-
dows Live Writer can even publish directly to a blog, complete with categories,
tags, and publication date.
ere are several places on a blog where content with limited HTML
markup can be entered but no built-in editor is available. is includes post
excerpts, comments on posts, and category and other item descriptions. A
good example is the practice of coding an excerpt for a post. On some blogs,
excerpts can appear in post listings, search result pages, RSS feeds, and email
digests.
A common practice among bloggers is to code a post excerpt with a thumb-
nail version of the post’s principal image. You can do this by hand, of course,
but it’s easier to use a post editor’s HTML or Source option. To illustrate this,
I used Windows Live Writer to create a blog post about the America’s Cup
trophy from the content of Example 2.6 in Chapter 2, “e HTML Language.”
Aer saving the entry to my blog as a dra post, I switched to Source mode
and made a number of edits appropriate for a blog excerpt. Figure 4.10 shows
the excerpt as edited in Windows Live Writer.
Figure 4.10: Creating a blog post excerpt using Windows Live Writer
From the Library of Wow! eBook
ptg
Blogging 191
In addition to shortening the text, I made changes to the image element.
ese changes from Example 2.6 appear in bold text in the following code
snippet:
<img style="float: left; padding: 0em 0.5em 0em 0em;"
width="75" height="100"
alt="The America's Cup trophy"
src=" />Because the excerpt may appear in contexts outside of the blog, I replaced
the image element’s class attribute, which referred to a CSS statement in the
blog’s style sheet, with explicit CSS rules in a style attribute. e padding
between the oating image and the text was reduced because the image will be
scaled to a smaller size by the explicit values of the width and height attributes.
Finally, a full URL is used to reference the image, again because the excerpt
may appear on external websites. All that remains to be done is to copy the
code from Windows Live Writer and paste it into the excerpt input box on the
blog editing page.
Similar blog editors exist for Apple computer users. MarsEdit, for example,
shown in Figure 4.11, provides the same features as Windows Live Writer. It is
not free but can be purchased for a reasonable price. In contrast to Windows
Live Writer, MarsEdit’s editing window is always in HTML mode. A separate
preview window (shown under the editing window in the gure) shows how
the edited markup will appear in a browser. e preview window operates
in real time, reecting changes as they are made in the editing window. A
drop-down menu on the right provides easy access to common HTML ele-
ments and includes the capability to add your own favorites. As with Windows
Live Writer, you can publish directly to a blog from MarsEdit, complete with
categories, tags, and other options.
From the Library of Wow! eBook
ptg
192 Chapter 4: Using HTML
Figure 4.11: Editing a blog article using MarsEdit for Apple Macintosh computers
Google Docs
Google Docs is a collection of oce productivity application services acces-
sible “from the cloud.” at is, both the application soware and all created
documents exist on Google’s Internet servers and not on each individual user’s
personal computer. is allows documents to be accessed and worked on from
any browser on any computer connected to the Web. Having the documents in
the cloud also allows them to be shared and edited collaboratively.
Google Docs provides applications for the creation and editing of four types
of documents: word processing documents, spreadsheets, presentations, and
input forms. Content in any document type can be copied and placed into
other types of documents. Forms are automatically tied to spreadsheets for
storage of content entered into form elds. In this respect, an input form is just
a dierent view of a spreadsheet.
Figure 4.12 shows the management page of Google Docs. Aer logging into
a Google account, you go to . e management page,
also called the Explorer, allows the user to organize documents into folders,
create new documents, and share them. On the le side of Figure 4.12, the
Create New menu has been clicked to show the options for creating a new
document.
From the Library of Wow! eBook
ptg
Google Docs 193
Whereas popular desktop applications such as Microso Oce are focused
on creating precisely formatted printed documents, Google Docs’ approach
is Web-centric. In fact, Google Docs documents are saved as HTML les and
can be published directly to the Web. If the user wants to print a document, it
is converted to a PDF le and downloaded to the user’s personal computer for
printing locally.
Figure 4.12: Google Docs management page
Google Docs’ word processing application reects the semantic markup
approach of HTML. Its WYSIWYG user interface is quite similar to that of the
TinyMCE and Windows Live Writer editors. A Styles menu provides a choice
of formatting a paragraph, a block quote, or one of the six HTML heading
styles. e Font menu oers the most commonly available Web fonts: Arial,
Arial Black, Arial Narrow, Times New Roman, Garamond, Georgia, Tahoma,
Trebuchet MS, Verdana, Comic Sans MS, and Courier New. An Insert menu
lets you insert links, images, tables, and other HTML document objects.
Suppose we want to create a Google Docs document with two columns of
block-justied text. It might be an article for a local newsletter we are col-
laborating on. We start with a new Google Docs document and select the Edit
HTML option from the Edit menu, as shown in Figure 4.13.
From the Library of Wow! eBook