HTML cơ bản - p 14 doc
Bạn đang xem bản rút gọn của tài liệu. Xem và tải ngay bản đầy đủ của tài liệu tại đây (695.57 KB, 10 trang )
ptg
Elements
of Style
Cascading Style Sheets
CSS Selectors
Pseudo-Classes and Pseudo-Elements
Typography
Colors
Background Properties
Text Properties
Box Properties
List Styles
CSS Positioning
Other CSS Properties
From the Library of Wow! eBook
ptg
C h a p t e r
115
C
ascading Style Sheets (CSS) is a major piece of the art of web pro-
gramming. It is the technology that gives a web page its distinctive
look and feel. In this chapter you will learn how to use CSS to modify
the layout and typography of a web page to create web pages withstyle.
Cascading Style Sheets
A cascading style sheet is a set of statements that applies rules to the various
elements of a web page, specifying the layout, typography, and other proper-
ties that those elements should assume when displayed by web browsers or
by WYSIWYG editing soware. We speak of these properties as being in the
presentation layer of the web page as distinct from the semantic description
provided by the HTML markup of the page’s content. CSS allows us to create
web pages that are more visually striking. At the same time they are simpler,
easier to maintain, more accessible, and friendlier to search engine robots and
other user agents. ese entities are concerned more with the meaning and
relevance of content on the Web than with how a particular page looks. CSS
also lets you create a web page with dierent presentation rules depending on
the type of device, or medium, accessing the page, such as a text-to-speech
reader for the visually impaired.
e CSS statements associated with a web page can appear in one or more
places:
3
From the Library of Wow! eBook
ptg
116 Chapter 3: Elements of Style
.
In les referenced by link elements in HTML documents
.
In style elements in the head of an HTML document
.
In style attributes in individual markup elements
Putting CSS statements in separate CSS les allows those statements to be
used throughout the website. A CSS le is a text le containing only CSS state-
ments. (No HTML is allowed.) A link element in an HTML document’s head
section connects the CSS le to the HTML document when the relationship
attribute, rel, is set to stylesheet. For example:
<link rel="stylesheet" href="styles.css" media="screen"/>
e media attribute provides context to the browser so that it can have dierent
CSS instructions depending on the kind of device reading the web page. e
value "screen" means a general-purpose web browser running on a PC display.
e HTML4 values for the media attribute are tty, tv, projection, handheld,
print, screen, Braille, aural, and the default value all. e media attribute is
optional and could have been omitted from the link element just shown.
HTML5 extends the versatility of the media attribute by permitting “query
expressions” that can test for specic device characteristics to determine
whether the CSS rules should apply. is is a very powerful feature with syn-
tax that is a bit too complicated to go into in detail. Here is a simple example of
a media query in a link to a style sheet:
<link rel="stylesheet" media="screen and not(color)" href="bw.css"/>
CSS style sheets for complex websites can be quite long. Oen, several hun-
dred rules may be required for an entire site. Many web developers separate
the CSS styles into two les—one for the layout and positioning rules, and one
for typography and colors. Looking at the HTML source of a page on such a
site, you might see something like this:
<link rel="stylesheet" href="styles.css"/>
<link rel="stylesheet" href="layout.css"/>
As an alternative, CSS in a style element or CSS le can import other CSS
les using the import directive. An import directive begins with the “at” sign
followed by the word “import” and a URL expression. For example:
<style type="text/css">
@import url(reset.css); /* Reset CSS */
From the Library of Wow! eBook
ptg
Cascading Style Sheets 117
/* Import corporate style sheet */
@import url( />/* Local styles begin here */
body { padding: 36px; }
</style>
An import directive must appear before any other CSS statements with the
exception of comments and other import directives. Because imported les
can also contain import directives, it is possible to construct innite loops if
you are not careful.
CSS statements in a document’s
style element apply only to that document.
As a general rule, style elements in a document head should be placed aer
any style sheets referenced in link elements. All rules for a given HTML ele-
ment are combined. If the browser has more than one CSS rule to apply to a
given element property, the last one found will apply.
A CSS statement consists of a
selector expression that determines which
HTML elements the statement applies to, followed by one or more rules
enclosed in curly braces. Each rule is composed of a property name and a
value expression separated by a colon
(:). Each rule is separated from the
preceding rule by a semicolon (;). For example, the following CSS state-
ment causes all level-three headings in a document to be rendered in a bold,
redfont:
h2 { font-weight: bold; color: red; }
e actual layout of a CSS statement is exible. Blanks, carriage returns,
tabs, and other white space are ignored, allowing the author to format a style
sheet for readability. Comments can be added for even more readability. e
CSS statement just shown could be written like this without any dierence in
meaning:
1
h2 { /* multiple lines */
font-weight:bold; /* don't matter */
color:red;
}
1. e nal semicolon before the closing curly brace can be omitted. I put it there because, like many pro-
grammers, I’m always adding to my previous work, and because the extra punctuation is inconsequential.
A missing semicolon between two CSS statements will cause both statements to be ignored.
From the Library of Wow! eBook
ptg
118 Chapter 3: Elements of Style
When a CSS statement is provided as the value of an HTML element’s style
attribute, only the property names and value expressions are used; the selector
expression and curly braces are omitted. e CSS statement just shown applied
to a particular level-two heading in a document would be written like this:
<h2 style="font-weight:bold; color:red;"> </h2>
CSS rules in the value of an HTML element’s style attribute take prece-
dence over any rules previously in eect for that element’s properties. In the
following HTML, the level-two heading will be bold, italic, and blue when
viewed in a typical browser:
<!DOCTYPE html>
<html>
<head>
<title>Example 3.0</title>
<style type="text/css">
h2 { font-style: italic; color: red; }
</style>
</head>
<body>
<h2 style="color:blue; font-weight: bold">Earthquakes!</h2>
</body>
</html>
e normal order of the cascade can be overridden by adding an exclama-
tion point (!) and the important keyword aer a CSS rule. For example, chang-
ing the rule for the h2 element in the preceding code to this
h2 { font-style: italic; color: red !important; }
instructs the browser to ignore any further settings of h2 elements’ color prop-
erty, unless those settings also include the important keyword. As a result, the
level-two heading will be bold italic and red.
e important keyword becomes very useful with content management sys-
tems and blogging soware. It is oen common with such soware for plugins
and other code to dynamically insert CSS style elements and attributes
directly into the document’s head and body elements. If you only have access to
the style sheet, and your changes are blocked by the generated CSS rules aer
the style sheet is loaded, using !important can put you back in control.
From the Library of Wow! eBook
ptg
CSS Selectors 119
CSS Selectors
CSS statements, whether in a style sheet le or style element in the head sec-
tion of a document, begin with a selector expression that determines which
elements the statement’s rules apply to. e simplest case is a named HTML
element like the h2 selector in the
style element in the preceding section. e
following examples have just the selector portion highlighted in bold:
body { font-family: arial,sans-serif; }
h1 { font-size: 21pt; }
a { color: blue; text-decoration: none; }
p { line-height: 1.4em; }
Actually, the simplest case is just an asterisk, which means all elements. e
following CSS statement
* { font-family: arial,sans-serif; }
instructs the browser to use the Arial font (or a generic sans serif font if Arial
is unavailable) to render every element. is is dierent from setting the body
element’s font-family to arial,sans-serif. e body’s font family is not inher-
ited by some elements, such as the code and pre elements, which would keep
their default monospace font. e asterisk is better used as a descendent term
to select all elements that are nested within a specied element.
An individual HTML element can be selected if it has an
id attribute.
In this CSS statement, the value of the id attribute is appended to a named
HTML element with a hash sign (#)
2
in between:
h2#main-title { margin-top: 20px; }
Because the value of any element’s id attribute must be a unique name
within a document, the HTML element name can be omitted. e preceding
code is more commonly written as follows:
#main-title { margin-top: 20px; }
A selector expression can refer to elements in a given class. In other words,
the element is selected if it has a class attribute with a matching value. In the
CSS, the class name is appended to the element name with a period:
p.in-a-box { border: thin solid black; }
2. Technically, this is called the octothorpe (eight points) character.
From the Library of Wow! eBook
ptg
120 Chapter 3: Elements of Style
is code applies a thin black border to all paragraph elements in the page
with that class attribute value, as in
<p class="in-a-box"> </p>
Dierent kinds of HTML elements can be selected by their class attribute
values as well. A CSS statement beginning with a dot followed by a class name
is the same as *.classname and applies the style rule to every element that has
that class attribute value.
Any number of selector expressions can be grouped into a single expression
by separating the individual expressions with commas. For example, to style a
page so that all headings are in a dierent font family than the body text, use
CSS statements like these:
body { font-family: georgia,times,serif; }
h1,h2,h3,h4,h5,h6 { font-family: verdana,helvetica,sans-serif; }
e values for the font-family property are usually given as a list of prefer-
ences. In this code, all headings are rendered in the Verdana font if it exists
on the reader’s computer. If the Verdana font is not found, the browser uses
Helvetica. If that’s not found, the browser can use the default sans serif font to
render the headings. See the section “Typography” for more on font properties.
An element can be selected based on its status as the descendent of another
element just by separating the two element names with blanks. For example,
this code sets the color of all links inside a block quote to dark green:
blockquote a { color: darkgreen; }
Here are some more examples of descendent selectors:
table td a { text-decoration: none; } /* not underlined */
#main-title strong { font-size: 120%; }
footer address a.email { font: bold 10pt courier,monospace; }
div.aside ul { background-color: rgb(100,100,100); }
div.aside li { color: white; list-style-type: square; }
A descendent element is selected no matter how deeply it is nested inside
the parent element. To select an element that is the rst-generation child of a
parent element, the following syntax is used:
body > div { margin-top: 0px; margin-bottom: 36px; }
From the Library of Wow! eBook
ptg
CSS Selectors 121
is applies the margin settings to only the top-level divisions in the body of
the page, not to any divisions nested within other elements. Only direct child
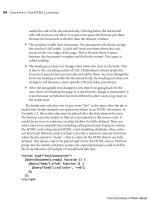
elements are selected, no grandchildren or other distant relatives. Example 3.1
shows two identical unordered lists with IDs
list1 and list2. Each has lists
nested within its list items.
Example 3.1: Selecting elements in nested lists
<!DOCTYPE html>
<html>
<head>
<title>Example 3.1</title>
<style type="text/css">
li { padding: .25em; border: thin solid black; }
li li { background-color: #ccc; width: 6em; }
#list2 > li { float: left; list-style-type: none; margin-right: 5px; }
h3 { font: 12pt verdana; }
</style>
</head>
<body style="padding: 36px;">
<h3>Planetary List 1:</h3> <! first list >
<ul id="list1">
<li>Mercury</li>
<li>Venus</li>
<li>Earth
<ul>
<li>Moon</li>
</ul>
</li>
<li>Mars
<ul>
<li>Deimos</li>
<li>Phobos</li>
</ul>
</li>
</ul>
continues
From the Library of Wow! eBook
ptg
122 Chapter 3: Elements of Style
<h3>Planetary List 2:</h3> <! second list >
<ul id="list2">
<li>Mercury</li>
<li>Venus</li>
<li>Earth
<ul>
<li>Moon</li>
</ul>
</li>
<li>Mars
<ul>
<li>Deimos</li>
<li>Phobos</li>
</ul>
</li>
</ul>
</body>
</html>
e rst CSS statement in the head section’s style element
li { padding: .25em; border: thin solid black; }
places a 1-pixel border around every list item, at every depth, and gives each
item a bit of padding to make it look nicer. e second CSS statement
li li { background-color: #ccc; width: 6em; }
selects only list items that are descendents of other list items. ose nested list
items have a gray background and a limited width. Finally, the third CSS state-
ment selects just the top-level list items of the second list, causing the items to
be oated into a horizontal bar. e list bullets are removed, and 5 pixels of
margin is added to separate the top-level items:
#list2 > li { float: left; list-style-type: none; margin-right: 5px; }
is HTML is displayed by a browser in a manner similar to Figure 3.1.
Note that the nested lists of moons are the same in both lists; only the top-level
list items are changed in the second list by the preceding CSS statement.
Example 3.1: Selecting elements in nested lists (continued)
From the Library of Wow! eBook
ptg
CSS Selectors 123
Figure 3.1: Nested horizontal and vertical lists
e use of a plus sign (+) between two element names indicates a selection
based on the status of an element as an adjacent sibling to another element.
For example, if this CSS statement
h3 + ul { margin-top: 0; }
were added to the style element in Example 3.1, it would reduce the margin of
space between level-three headings and the list items that immediately follow
them. But it would not aect the nested lists, because they are not adjacent to
the headings.
Document elements can be selected based on whether the element has a
particular attribute, or whether the element has an attribute with a particular
value. A CSS statement such as this
a[name] { color: cyan; }
selects any anchor element that has a name attribute. Such anchors are usually
the in-page destinations of hyperlinks. e preceding CSS highlights all such
elements by coloring them cyan. To select an HTML element by the value of
an attribute, follow the name with an equals sign (=) and the value in quotes:
From the Library of Wow! eBook