Adobe Flash chuyên nghiệp - p 6 ppsx
Bạn đang xem bản rút gọn của tài liệu. Xem và tải ngay bản đầy đủ của tài liệu tại đây (5.36 MB, 10 trang )
ptg
Adobe fLAsh professionAL Cs5 CLAssroom in A book 41
Review questions
1 What is the Stage?
2 What’s the difference between a frame and a keyframe?
3 What’s a hidden tool, and how can you access it?
4 Name two methods to undo steps in Flash and describe them.
5 How can you find answers to questions you have about Flash?
Review Answers
1 e Stage is the area viewers see when a movie is playing in Flash Player or a Web
browser. It contains the text, images, and video that appear on the screen. Objects that
you store on the Pasteboard outside of the Stage do not appear in the movie.
2 A frame is a measure of time on the Timeline. A keyframe is represented on the
Timeline with a circle and indicates a change in content on the Stage.
3 Because there are too many tools to display at once in the Tools panel, some tools are
grouped, and only one tool in the group is displayed. (e tool you most recently used
is the one shown.) Small triangles appear on tool icons to indicate that hidden tools
are available. To select a hidden tool, click and hold the tool icon for the tool that is
shown, and then select the hidden tool from the menu.
4 You can undo steps in Flash using the Undo command or the History panel. To undo
a single step at a time, choose Edit > Undo. To undo multiple steps at once, drag the
slider up in the History panel.
5 Choose Help > Flash Help to browse or search Flash Help for information about using
Flash CS5 and ActionScript 3.0. Choose Help > Flash Support Center or visit www.
adobe.com to see tutorials, tips, and other resources for Flash users.
Download from Library of Wow! ebook
ptg
42
2
WORKING WITH GRAPHICS
Lesson Overview
In this lesson, you’ll learn how to do the following:
• Draw rectangles, ovals, and other shapes
• Understand the difference between drawing modes
• Modify the shape, color, and size of drawn objects
• Understand fill and stroke settings
• Make symmetrical and decorative patterns
• Create and edit curves
• Apply gradients and transparencies
• Group elements
• Create and edit text
is lesson will take approximately 90 minutes to complete. If needed,
remove the previous lesson folder from your hard drive and copy the
Lesson02 folder onto it.
Download from Library of Wow! ebook
ptg
43
You can use rectangles, ovals, and lines to create
interesting, complex graphics and illustrations in
Flash. Edit their shapes and combine them with gradi-
ents, transparencies, text, and fi lters for even greater
possibilities.
Download from Library of Wow! ebook
ptg
44 LESSON 2 Working with Graphics
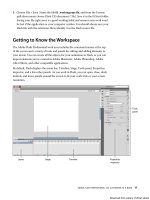
Getting Started
Start by viewing the finished movie to see the animation you’ll be creating in this
lesson.
1 Double-click the 02End.swf file in the Lesson02/02End folder to view the final
project.
e project is a simple static illustration for a banner ad. is illustration is for
Garden Court Cafe, a fictional company that’s promoting its store and coffee. In
this lesson, you’ll draw the shapes, modify them, and learn to combine simple
elements to create more complex visuals. You won’t create any animation just
yet. After all, you must learn to walk before you can run! And learning to create
and modify graphics is an important step before doing any Flash animation.
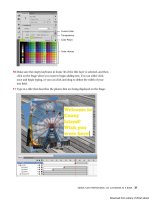
2 Choose File > New. In the New Document dialog box, choose ActionScript 3.0.
3 In the Properties inspector, make the Stage size 700 pixels by 200 pixels and
make the color of the Stage a light brown (#CC9966).
4 Choose File > Save. Name the file 02_workingcopy.fla and save it in the 02Start
folder. Saving your file right away is a good working habit and ensures that your
work won’t be lost if the application or your computer crashes.
Understanding Strokes and Fills
Every graphic in Flash starts with a shape. A shape is made of two components: the
fill, or the insides of a shape, and the stroke, or the outlines of the shape. If you can
always keep these two components in mind, you’re well on your way to creating
beautiful and complicated visuals.
e fill and the stroke are independent of each other, so you can modify or delete
either without affecting the other. For example, you can create a rectangle with a
blue fill and a red stroke, and then later change the fill to purple and delete the red
stroke entirely. All you’ll be left with is a purple rectangle without an outline. You
can also move the fill or stroke independently, so if you want to move the entire
shape, make sure that you select both its fill and stroke.
Note: Each color has
a hexadecimal value in
Flash, HTML, and many
other applications. Light
gray is #999999, white
is #FFFFFF, and black is
#000000. You may find
it handy to memorize
the values for the colors
you use most often.
Download from Library of Wow! ebook
ptg
adobe fLash professionaL Cs5 CLassroom in a book 45
Creating Shapes
Flash includes several drawing tools, which work in different drawing modes. Many
of your creations will begin with simple shapes such as rectangles and ovals, so it’s
important that you’re comfortable drawing them, modifying their appearance, and
applying fills and strokes.
You’ll begin by drawing the cup of coffee.
Using the Rectangle tool
e coffee cup is essentially a cylinder, which is a rectangle with an oval at the top
and an oval at the bottom. You’ll start by drawing the rectangular body. It’s useful
to break down complicated objects into their component parts to make drawing
them easier.
1 In the Tools panel, select the Rectangle tool
( ) . Make sure the Object
Drawing mode icon (
) is not selected.
2 Choose a stroke color (
) and a fill color( )from the bottom of the Tools
panel. Choose #663300 (dark brown) for the stroke and #CC6600 (light brown)
for the fill.
3 On the Stage, draw a rectangle that is a little taller than it is
wide. You’ll specify the exact size and position of the rectangle
in step 6.
4 Select the Selection tool (
) .
5 Drag the Selection tool around the entire rectangle to select its
stroke and its fill. When a shape is selected, Flash displays it
with white dots. You can also double-click a shape, and Flash
will select both the stroke and fill of the shape.
6 In the Properties inspector, type 130 for the
width and 150 for the height. Press Enter/
Return to apply the values.
Using the Oval tool
Now you’ll create the opening at the top and the rounded bottom.
1 In the Tools panel, click and hold your mouse
cursor over the Rectangle tool to access the
hidden tools. Choose the Oval tool.
Download from Library of Wow! ebook
ptg
46 LESSON 2 Working with Graphics
2 Make sure the Snap to Objects option ( ) is enabled. is option forces
shapes that you draw on the Stage to snap to each other to ensure lines and
corners connect to each other.
3 Click inside the rectangle and drag across it to make an oval inside the
rectangle. e Snap to Objects option makes the sides of the oval connect to the
sides of the rectangle.
4 Draw another oval near the bottom of the rectangle.
Making Selections
To modify an object, you must first be able to select different parts of it. In Flash,
you can make selections using the Selection, Subselection, or Lasso tool. Typically,
you use the Selection tool to select an entire object or a section of an object. e
Subselection tool lets you select a specific point or line in an object. With the Lasso
tool, you can make a freeform selection.
Selecting strokes and fills
Now you’ll make the rectangle and ovals look more like a coffee cup. You’ll use the
Selection tool to delete unwanted strokes and fills.
1 In the Tools panel, select the Selection tool (
).
2 Click the fill above the top oval to select it.
e shape above the top oval becomes highlighted.
3 Press the Delete key.
e shape is deleted.
Note: Flash applies
the default fill and
stroke to the rectangle
and oval, which are
determined by the
last fill and stroke you
applied.
Download from Library of Wow! ebook
ptg
adobe fLash professionaL Cs5 CLassroom in a book 47
4 Select each of the three line segments above the top oval and
press the Delete key.
e individual strokes are deleted, leaving the top oval
connected to the rectangle.
5 Now select the fill and the strokes below the bottom oval, as
well as the inside arc at the bottom of the cup, and press the
Delete key.
e remaining shape appears as a cylinder.
Editing Shapes
When drawing in Flash, you’ll often start with the Rectangle and Oval tools. But to
create more complex graphics, you’ll use other tools to modify those base shapes.
e Free Transform tool, the Copy and Paste commands, and the Selection tool can
help transform the plain cylinder into a coffee cup.
Using the Free Transform tool
e coffee cup will look more realistic if you taper the bottom rim. You’ll use the
Free Transform tool to change its overall shape. With the Free Transform tool, you
can change an object’s scale, rotation, or skew (the way it is slanted), or distort an
object by dragging control points around a bounding box.
1 In the Tools panel, select the Free Transform tool (
).
2 Drag the Free Transform tool around the cylinder on the
Stage to select it.
Transformation handles appear on the cylinder.
3 Press Ctrl/Command+Shift as you drag one of the lower
corners inward. Holding these keys while dragging lets you
move both corners the same distance simultaneously.
4 Click outside the shape to deselect it.
e bottom of the cylinder is narrow, and the top is wide. It
now looks more like a coffee cup.
Note: If you press Alt or Option while moving one of the control points, the selected object
is scaled relative to its transformation point, represented by the circle icon. You can move the
transformation point anywhere, even outside the object. Press Shift to constrain the object
proportions. Press Ctrl/Command to deform the object from a single control point.
Note: Hold down
the Shift key when
making selections to
select multiple fills or
strokes together.
Download from Library of Wow! ebook
ptg
48 LESSON 2 Working with Graphics
Using Copy and Paste
Use Copy and Paste commands to easily duplicate shapes on the Stage. You’ll make
the surface level of the coffee by copying and pasting the top rim of the coffee cup.
1 Hold down the Shift key and select the top arc and bottom
arc of the coffee cup opening.
2 Choose Edit > Copy (Ctrl/Command+C). e top strokes of
the oval are copied.
3 Choose Edit > Paste in Center (Ctrl/Command+V).
A duplicate oval appears on the Stage.
4 In the Tools panel, select the Free Transform tool.
Transformation handles appear on the oval.
5 Press the Shift and the Alt/Option key as you drag on the
corners inward. Make the oval about 10 percent smaller.
Pressing the Shift key lets you change the shape uniformly so
the oval maintains its aspect ratio. Pressing the Alt/Option
key changes the shape from its transformation point.
6 Select the Selection tool.
7 Drag the oval over the rim of the coffee cup so it overlaps the
front lip.
8 Click outside the selection to deselect the oval.
9 Select the lower part of the smaller oval and delete it.
Your coffee cup now is filled with coffee!
Changing shape contours
With the Selection tool, you can push and pull lines and corners to change the
overall contours of any shape. It’s a fast and intuitive way of working with shapes.
1 In the Tools panel, select the Selection tool.
2 Move your mouse cursor close to one of the sides of the coffee cup.
A curved line appears near your cursor, indicating that you can change the
curvature of the stroke.
3 Click and drag the stroke outward.
e sides of the coffee cup bend, giving the coffee
cup a slight bulge.
Download from Library of Wow! ebook
ptg
adobe fLash professionaL Cs5 CLassroom in a book 49
4 Click and drag the other side of the coffee cup outward slightly.
e coffee cup now has a more rounded body.
changing strokes and fills
If you want to change the properties of any stroke or fill, you can use the Ink Bottle
tool or the Paint Bucket tool.
1 In the Tools panel, select the Paint Bucket tool (
).
2 In the Properties inspector, choose a darker brown color (#663333).
3 Click the top surface of the coffee that is inside the cup.
e fill of the top oval changes to the darker brown color.
4 In the Tools panel, select the Ink Bottle tool (
) that is hidden under the Paint
Bucket tool.
5 In the Properties inspector, choose a darker brown color (#330000).
6 Click the top stroke above the surface of the coffee.
e stroke around the surface of the coffee changes to a darker brown color.
Note: You can also select a stroke or a fill and change its color in the Properties inspector
without using the Paint Bucket or Ink Bottle tool.
Note: Hold down
the Alt/Option key
while dragging the
sides of a shape to add
a new corner.
Note: If your Paint
Bucket tool changes the
fill in surrounding areas,
there may be a small
gap that allows the fill
to spill over. Close the
gap, or at the bottom of
the Tools panel, choose
to close different gap
sizes for your Paint
Bucket tool.
Download from Library of Wow! ebook
ptg
50 LESSON 2 Working with Graphics
Flash Drawing Modes
Flash provides three drawing modes that determine how objects interact with each other on the Stage and how
you can edit them. By default, Flash uses merge drawing mode, but you can enable object drawing mode or use
the Rectangle Primitive or Oval Primitive tool to use the primitive drawing mode.
Merge drawing mode
In this mode, Flash merges drawn shapes, such as rectangles and ovals, where they overlap, so that multiple
shapes appear to be a single shape. If you move or delete a shape that has been merged with another, the over-
lapping portion is permanently removed.
Object drawing mode
In this mode, Flash does not merge drawn objects; they remain distinct and separate, even when they overlap.
To enable object drawing mode, select the tool you want to use, and then click the Object Drawing icon in the
options area of the Tools panel.
To convert an object to shapes (merge drawing mode), select it and press Ctrl/Command+B. To convert a shape
to an object (object drawing mode), select it and choose Modify > Combine Objects > Union.
Primitive drawing mode
When you use the Rectangle Primitive tool or the Oval Primitive tool, Flash draws the shapes as separate objects.
Unlike regular objects, however, you can modify the corner radius of rectangle primitives as well as the start and
end angle, and the inner radius of oval primitives using the Properties inspector.
Download from Library of Wow! ebook