Tự học iLife - p 16 doc
Bạn đang xem bản rút gọn của tài liệu. Xem và tải ngay bản đầy đủ của tài liệu tại đây (3.91 MB, 10 trang )
133
2222
33
11
Importing and Organizing Movies
chapter
7
iMovie removes the selection from
view.
●
In this example, the parts of the
clip that were not rejected remain.
●
You can click Edit and then Undo
to undo the rejection.
1 Click a clip.
iMovie displays a selection box.
2 Click and drag the box edges to
select the range that you want to
reject.
To choose the whole clip, you can
-click it and select Select
Entire Clip.
3 Click or press .
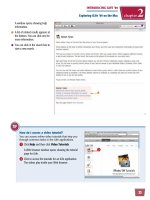
Reject a Clip
You can reject a clip that you do not want to use in your
project. Rejected clips are removed from view in the iMovie
workspace but still remain the library. You can view
rejected clips using a show setting. See “Show Different
Types of Clips” for details.
133
chapter
7
WORKING WITH iMOVIE ’09
Importing and Organizing Movies
Reject
a Clip
134
Favorites
Favorites
Only
Only
Favorites
Favorites
Only
Only
11
●
iMovie shows the selected type of
clips.
●
To revert a rejection, you can
select a rejected clip and then
click or press .
1 Click here to select a show setting.
●
You can select Favorites Only to
display only your good clips.
●
You can select Rejected Only to
view the clips you have rejected,
which are usually hidden.
Show Different Types of Clips
You can set your iMovie library to show just the clips
you have marked as favorites and want to use in your
project. You can also view your rejected clips in case you
want to revert a rejection.
Show Different
Types of Clips
135
chapter
7
11
22
33
Importing and Organizing Movies
WORKING WITH iMOVIE ’09
Importing and Organizing Movies
Delete
a Clip
You can delete a clip from your library when you are sure
you have no need for it. iMovie moves the clip to the Trash
on your Mac. If you think you may still have a need for the
clip and want to keep it accessible, you can reject it. See
“Reject a Clip” for details.
1 Click to select the clip you want to
delete.
Note: iMovie selects a four-second portion by
default. However, these steps delete the entire clip.
2 Click File.
3 Click Move Entire Clip to Trash.
You can also select a clip and
press
Delete
to move it to the
Trash.
●
You can click Move Rejected
Clips to Trash to move
everything marked as rejected.
●
The clip disappears from the
library and is moved to the Mac
Trash.
To delete the clip entirely from
your computer, empty the Trash
in the Mac Finder.
Delete a Clip
135
chapter
7
136
11
22
iMovie displays a list of your
projects.
●
Project names, lengths, and dates
are displayed.
●
Thumbnail images of frames for
each project are displayed.
You can double-click a project’s
thumbnails to open it.
2 Click .
1 Click Project Library.
Create a Project
An iMovie project is a collection of video clips
and special effects combined and edited to create
a movie. Your iMovie projects can be accessed
from the project library. To learn about
exporting and sharing finished projects as movies,
see Chapter 11.
Create a
Project
137
11
22
WORKING WITH iMOVIE ’09
Editing Movies
chapter
8
33
55
44
66
How can I preview a project in the project
library?
1 Click to select a project in the project library.
●
You can click to play the project in the viewer.
●
You can click to play the project at full screen.
2 Drag the cursor across the clip thumbnails, a technique
known as skimming.
iMovie displays the project movie in the viewer and
plays it as you drag.
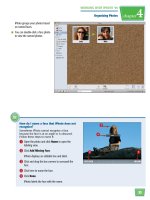
iMovie creates a new project that
opens in the project browser.
●
You can drag video clips from the
event browser to the project
browser to create a movie.
Note: For details, see “Add a Clip to a Project.”
3 Type a name for the project.
4 Select an aspect ratio based on
the type of device on which the
finished movie will be played.
5 Select a theme to add special titles
and transitions to your project.
You can always change the theme
later.
6 Click Create.
138
11
22
33
44
A box surrounds the selection.
4 Click and drag the box edges to
adjust the duration of your
selection.
●
To preview the selection, -click
it and click Play Selection in the
menu that appears.
1 Open a project. See “Create a
Project” for details.
2 Display one or more video clips.
See Chapter 7 for details about
importing and displaying clips.
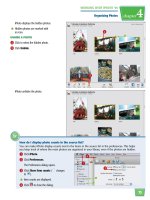
3 Click and drag to select a clip
to add.
You can drag across the entire clip
or just a portion.
You can also select the entire clip
by -clicking it and selecting
Select Entire Clip from the
menu that appears.
Add a Clip to a Project
You can add video clips to a project to create a
movie. You add clips from the event browser,
which displays the clips you have imported from
your camcorder and other sources. After you
add your clips, you can add transitions and
other special effects.
Add a Clip
to a Project
139
55
22
11
WORKING WITH iMOVIE ’09
Editing Movies
chapter
8
How do I delete a clip from a project?
1 Click and drag to select a clip in the
project browser.
A selection box appears.
2 -click the selection and click
Delete Selection.
You can also press
Delete
.
●
You can click Delete Entire Clip to
delete the whole clip.
iMovie deletes the clip from the
project. The clip remains in the event
library for you to use again.
5 Click and drag the selection to the
project panel.
You can position the clip before or
after existing clips in your project.
To insert a clip within another clip,
see “Insert a Clip.”
●
You can also click
to add the
selection to the end of the project.
●
iMovie adds an orange stripe to
clips that have been added to a
project.
140
Clip
#4
Clip
#4
1
11
22
3 Release the mouse button.
●
iMovie rearranges the clip.
●
You can click to play the
edited project.
1 Click to select a clip.
Note: If you want to rearrange part of a clip, you
can split the clip into parts before rearranging. See
“Split a Clip” for details.
2 Click and drag the clip to a
different position.
Rearrange Clips in a Project
You can rearrange clips to change the order in
which they display in your movie. You change
clip positions by clicking and dragging in the
project browser.
Rearrange Clips
in a Project
141
WORKING WITH iMOVIE ’09
Editing Movies
chapter
8
22
11
22
You can trim a clip to remove footage that you do not
want to appear in your movie. You can also trim clips if
you need to make the overall movie a shorter duration.
1 Click and drag to select the part of
the clip you want to keep.
iMovie displays a selection box.
●
You can click and drag the edges
to adjust the selection.
You can
-click the selection
and click Play Selection to
preview it.
2 -click the selection and then
click Trim to Selection.
iMovie trims the clip.
●
You can click to play the
edited project.
Trim a Clip in a Project
141
chapter
8
Trim a Clip
in a Project
142
Clip 1
Clip 1
Clip 2
Clip 2
22
11
2 Click and drag the clip inside a
clip in your project.
A red vertical line appears where
the clip will be inserted.
The scene is displayed in the
viewer.
3 Release the mouse button.
1 Click and drag to select a clip to
add in the event browser.
You can drag across the entire clip
or just a portion.
You can also select the entire clip
by -clicking it and selecting
Select Entire Clip from the
menu that appears.
Insert a Clip
You can insert a video clip within another clip in your
project. The second clip is divided in two and the first
clip is placed in between.
Insert
a Clip