Tự học iLife - p 7 docx
Bạn đang xem bản rút gọn của tài liệu. Xem và tải ngay bản đầy đủ của tài liệu tại đây (4.23 MB, 10 trang )
43
WORKING WITH iPHOTO ‘09
Importing and Viewing Photos
chapter
3
77
66
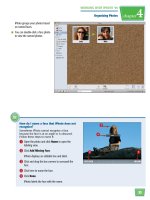
7 Type a description.
8 Position the cursor outside the
edit box.
iPhoto saves the description.
iPhoto displays map and other
information about the photo.
6 Click Enter description.
The description becomes editable.
Note: You must keep the cursor within the edit
box to edit the text.
Starry Night
How can I search
for photos by
title or
description?
Perform a search
using the search
box at the bottom
of the iPhoto
workspace. For
more information
about searching, see Chapter 4.
How can I include titles and
descriptions when I share a
photo?
When you share a photo by e-mail
in iPhoto, you have the option of
automatically adding the title and
description to the e-mail message.
Click the Titles and Descriptions
options (
changes to ) in the
Mail Photo dialog to add them.
For more details, see Chapter 6.
44
33
11
5544
22
March 18, 2009 10:15 A.M.
March 17, 2009 2:32 P.M.
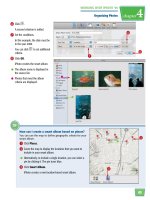
4 In the dialog that appears, click a
date or time field.
5 Click here to adjust the field.
6 Repeat steps 4 and 5 to adjust
the other fields.
1 Click to select a photo thumbnail.
You can -click to select
multiple photos to adjust their
date and time to a single setting.
2 Click Photos.
3 Click Adjust Date and Time.
Change the Date and Time of a Photo
You can edit the date and time associated
with a photo in your iPhoto library. This
can be helpful if the time on your camera
was incorrect when you took the picture.
Because iPhoto organizes photos by time in
the photo browser, this can also change
where the thumbnail displays when you
browse photos.
Change the Date
and Time of a Photo
WORKING WITH iPHOTO ‘09
Importing and Viewing Photos
chapter
3
11
44
33
22
What is another way to adjust
thedate and time of a photo?
You can adjust the date and time in
the information panel.
1 Click a photo to select it.
2 Click ( changes to )
toview the information for the photo.
3 Click to edit the date.
4 Click to edit the time.
77
iPhoto adjusts the date and time.
●
The date for the associated event
changes as well.
Note: For more about events, see Chapter 4.
●
iPhoto displays a summary of the
adjustment.
●
If you are changing the settings
ofan edited photo, you can
optionally click to modify the
original copy as well ( changes
to ).
7 Click Adjust.
45
46
33
55
11
44
11
22
4 Click here and select Title.
5 Click here and select a title type.
●
You can click to add an
incremental number to each
photo in the batch ( changes
to ).
1 -click to select the photos.
2 Click Photos.
3 Click Batch Change.
Change Settings for a Batch of Photos
You can use the batch feature to change the title,
date, or description for multiple photos all at
once. This is useful for adding common
information to photos from the same event or
place, or with the same subjects.
Change Settings for
a Batch of Photos
WORKING WITH iPHOTO ‘09
Importing and Viewing Photos
chapter
3
66
99
!!
88
00
77
9 Click here and select Description.
0 Type a description.
●
You can optionally click to keep any
existing descriptions ( changes
to ).
! Click OK.
iPhoto applies the changes to the
batch.
6 Click here and select Date.
7 Click a date or time field.
8 Click here to adjust the field.
●
You can optionally click Add to
adjust the time applied to each
photo in the batch ( changes
to ).
What are some keyboard shortcuts when
browsing the iPhoto library?
Here are some useful shortcuts. For more, see
the iPhoto help documentation.
Home
View the first photo in the library
View the last photo in the library
+
Edit next photo in library
+
Edit previous photo in library
Magnify the selected photo
Edit the selected photo
+ +
Import photos from the computer
47
48
22
11
33
C
o
v
e
r
e
d
B
r
i
d
g
e
F
e
s
t
i
v
a
l
S
e
p
t
e
m
b
e
r
1
2
,
2
0
0
9
9
-
1
2
-
0
9
,
9
:
0
5
A
.
M
.
9
-
1
2
-
0
9
,
9
:
0
2
A
.
M
.
9
-
1
2
-
0
9
,
9
:
0
3
A
.
M
.
9
-
1
2
-
0
9
,
9
:
0
5
A
.
M
.
9
-
1
2
-
0
9
,
9
:
0
4
A
.
M
.
9
-
1
2
-
0
9
,
9
:
1
0
A
.
M
.
9
-
1
2
-
0
9
,
9
:
1
5
A
.
M
.
9
-
1
2
-
0
9
,
9
:
2
0
A
.
M
.
9
-
1
2
-
0
9
,
9
:
1
3
A
.
M
.
9
-
1
2
-
0
9
,
9
:
1
6
A
.
M
.
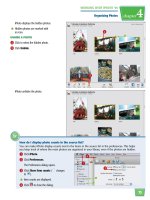
iPhoto displays the photos in the
event.
●
You can click Slideshow to
display the photos as a slideshow.
●
You can click Keepsakes to
create a project out of the event
photos.
Note: Depending on your monitor resolution, you
may see separate buttons for creating books,
calendars, and cards. See Chapter 6 for details
about creating these projects.
3 Click All Events to return to the
event thumbnails.
VIEW EVENT PHOTOS
1 Click Events.
iPhoto displays each event as a
square thumbnail.
●
You can move your cursor
horizontally across a thumbnail to
preview the event photos, a
feature known as skimming.
2 Double-click an event.
Manage Events
iPhoto can group photos into events based on
the time the photos were taken. When you
import photos, iPhoto automatically organizes
photos into events based on the day the photos
were taken. You can customize the name of the
event to describe the photos in it.
Manage
Events
49
WORKING WITH iPHOTO ‘09
Organizing Photos
chapter
4
33
22
11
22
33
How do I determine what photo iPhoto uses for
the event thumbnail?
By default, iPhoto uses the first photo as the thumbnail.
You can change it using the following steps:
1 View the photos for the event.
2 -click a photo.
3 Click Make Key Photo.
iPhoto uses that photo for the event thumbnail.
3 Type a new title.
4 Press .
iPhoto saves the new title.
NAME AN EVENT
1 Click Events.
In the Events view, untitled events
are titled with their date.
2 Click a title.
The title becomes editable.
50
44
55
22
33
11
The Anderson
Dog Show
iPhoto displays a warning about
photos being able to belong to
one event.
5 Click Create.
1 Click Photos.
iPhoto displays the photos in your
library with event labels as
headings.
2 -click to select photos to add to
your new event.
3 Click Events.
4 Click Create Event.
Create a New Event
You can create a new event to group
together photos that occur at the same
time. You might group photos from a
birthday party into one event and photos
taken during a holiday vacation into
another event.
You can group photos that were taken at different times as
an album. See “Create an Album” for details.
Create a
New Event
51
WORKING WITH iPHOTO ‘09
Organizing Photos
chapter
4
11
33
44
22
22
66
How do I merge the photos in several
events into one event?
Follow these steps:
1 Click Events.
2 -click the events you want to merge.
3 Click Events.
4 Click Merge Events.
iPhoto merges the events.
●
iPhoto displays your new event as
a thumbnail.
Note: For more about viewing events, see
“Manage Events.”
iPhoto creates a new event for the
photos.
●
You can click the event title to
edit it.
6 Click Events.
52
77
66
44
33
22
PARTY!
MATCH!
LABEL: Van Gogh
iPhoto assigns the name to the
face.
6 Repeat steps 3 to 5 to name other
faces in the photo.
7 Click Faces.
1 View a photo that includes faces.
2 Click Name.
iPhoto attempts to recognize the
faces in the photo.
3 Click a face label.
The label becomes editable.
4 Type a name for the face.
5 Press .
Name a Face
iPhoto can automatically recognize faces in your
photos based on shape and coloring. After it
recognizes the faces, you can add names to
them. Over time, iPhoto can start to match
names to faces itself by recognizing specific
faces.
Name
a Face