Exchange SQL And IIS- P164 pot
Bạn đang xem bản rút gọn của tài liệu. Xem và tải ngay bản đầy đủ của tài liệu tại đây (275.73 KB, 5 trang )
792 Chapter 15 • Get Started with IIS 7.0’s Confi guration
■
Whether the attribute is marked for automatic encryption on a disk.
■
Whether the word infi nite is allowed as a value for the attribute.
■
Timespan format in seconds, minutes, or even a formatted string for timespan attributes.
■
Validation rules for attributes.
Element Schema
All elements are defi ned in a corresponding <element> in the schema. The nesting of elements is
supported. Simply put, an element is a container for other attributes or subelements. It is required
to have a name, and it may even serve as a container of default values for collection elements.
Figure 15.9 shows the providers element and its attributes. The syntax for the element schema is:
<element name=“” [String, Required] [XML name of the element]
isCollectionDefault= [bool]>
Note, however, that isCollectionDefault would indicate whether the element schema has collection
element default values, and not all element schemas have this.
Collection Schema
The <collection> XML element defi nes every corresponding collection in the schema. This element
contains multiple elements that can be used and removed individually. Usually, its directive names are
addElement, removeElement, and clearElement. You can see this by examining Figure 15.9 and noticing
after the element providers is created below it, the collection schema is defi ned.
Enum Schema
Enum attributes must defi ne their values to a corresponding <enum> XML element in the schema.
Each value must have a friendly name and a numerical value. Remember our earlier example with
the attribute accessType, the runtime type was listed as enum. After accessType was defi ned, we needed to
defi ne the enum values, which in Figure 15.9 show as:
<enum name=“Allow” value=“0” />
<enum name=“Deny” value=“1” />
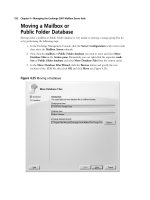
Flags Schema
Every attribute of the fl a g s type defi nes its values in corresponding <fl ags> XML element schema.
They are required to have a friendly name and a numerical value. Figure 15.10 shows an example of
the fl ags schema within the IIS_schema.xml fi le.
Get Started with IIS 7.0’s Confi guration • Chapter 15 793
Enabling Delegated Administration in IIS 7.0
A fundamental security philosophy in the software world is to grant only what is needed, give what is
necessary, and disable the rest. In IIS 7.0, the new confi guration allows administrators control of
features they never had before. An administrator of an IIS 7.0 server can leave the server as is and
know that it is securely protected; meanwhile, another administrator has quick access to unlock feature
by feature those that they deem necessary for nonadministrators.
It is important to understand which features are able to be delegated by default, but we
should further outline how an administrator can enable delegation on a per-feature level in the
confi guration. It should be clearly outlined that this functionality is performed at the fi le level, but is
also capable of being accomplished using the new IIS Manager (covered later).
Delegation Basics
You might have heard a bit about delegation prior to getting started with IIS 7.0. Delegation is a
powerful feature in IIS 7.0 and one for which usage is likely in most organizations deploying IIS
Figure 15.10 Example of Flags Schema
794 Chapter 15 • Get Started with IIS 7.0’s Confi guration
servers. However, you need careful planning to start to unlock feature by feature based on your
environment requirements and Web application needs.
In this section, we will describe the overarching design of confi guration delegation in IIS 7.0.
Furthermore, we spend a great deal of time ensuring that you understand how to unlock the various
pieces of confi guration, such as section groups, sections, and attributes.
How It Works
As we’ve already discussed, IIS 7.0 supports delegation. For delegation to take place the system
administrator must defi ne the application or virtual directory from which to unlock features within
the ApplicationHost.confi g fi le. Once this is done, developers or other administrators alike, then have
the ability to alter the confi guration of IIS for their Web sites and applications.
Figure 15.3 shows us how the hierarchy works. The system administrator creates Web sites and
virtual directories, and then unlocks section groups, sections, and attributes. Site administrators can
then distribute web.confi g fi les with whatever features they want to make available to developers of
applications. Developers can also create their own web.confi g fi les to manipulate the confi guration
of IIS 7.0 to meet their needs. For IIS 7.0 to be altered by site administrators or application
developers, the system administrator must unlock certain attributes and sections within the
ApplicationHost.confi g fi le.
Unlocking system.webServer Section Groups
In vastly disconnected Web environments, it might be useful to completely delegate entire section
groups such as security and other groups. This is useful to allow delegated management in enterprises
or shared hosting environments where system administrators prefer to stay hands-off. The best way to
do this is through the use of location tags.
Location tags specify path specifi c confi gurations and are used for locking and unlocking sections.
The location tag for a path is set in a parent level in the confi guration hierarchy, and considered to be
at that parent level. This becomes important when it comes to locking semantics and what level can
specify what sections. Unlocking can be done only at the level where the lock was defi ned.
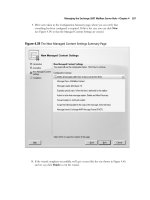
If we wanted to unlock the <security> section group, we could place underneath a location tag
similar to Figure 15.11. Just cut it from its current location in the ApplicationHost.confi g fi le and
paste it to a location tag you create and a path you specify.
BEST PRACTICES ACCORDING TO MICROSOFT
Microsoft highly recommends creating a backup of the ApplicationHost.confi g fi le
before you modify it. This can be done via the APPCMD command-line feature or
simply by going to %windir%\ system32 \ inetsrv \ confi g and copying the fi le to
another location.
Get Started with IIS 7.0’s Confi guration • Chapter 15 795
Section and Attribute locking in IIS 7.0
In more microscopic environments where system administrators desire some level of granular control,
IIS’ confi guration offers section and attribute locking. For example, it might be necessary to allow
developers to control just a simple section rather than an entire section group. Furthermore, system
administrators might wish to keep control of the actual section while allowing application owners
more control over particular settings for a section, in our case their attributes.
SOME INDEPENDENT ADVICE
Encourage the system administrator to enable VSS (volume shadowing) if they
haven’t already done so, just in case they forget to manually backup the
ApplicationHost.confi g fi le before modifying it. That way, if problems occur they can
recover quickly to a working ApplicationHost.confi g fi le by choosing the last one
that worked.
Figure 15.11 <security> and Location Tag
796 Chapter 15 • Get Started with IIS 7.0’s Confi guration
Unlocking Confi guration Sections
As the system administrator you can unlock confi guration sections for numerous situations. Here we
will go through step by step where we need to add an application to our existing Default Web Site in
IIS 7.0, and by unlocking confi guration sections for delegation, we will be able to control certain
settings via a web.confi g fi le. Before you start, do the following:
1. Back up the ApplicationHost.confi g fi le sitting in the %windir%\ system32\inetsrv\ confi g directory.
2. Create a directory to hold our web.confi g fi le that we will create later. In this example we
are storing it in the C:\Test directory.
NOTE
For the purposes of this exercise we disabled directoryBrowse in our
ApplicationHost.confi g fi le.
Now we will demonstrate how to unlock confi guration sections in IIS 7.0.
1. First, you will add an application called app to your Default Web Site. To do this pull up IIS
Manager; do not use the IIS 6.0 Manager. Open the site and highlight Default Web Site,
as shown in Figure 15.12.
Figure 15.12 Default Web Site in IIS Manager