Exchange SQL And IIS- P149 pptx
Bạn đang xem bản rút gọn của tài liệu. Xem và tải ngay bản đầy đủ của tài liệu tại đây (317.36 KB, 5 trang )
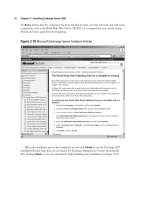
Installation of IIS 7.0 • Chapter 13 717
4. Now you should see the Add Roles Wizard in Figure 13.10. Click Next.
Figure 13.9 Selecting Add Roles in Server Manager
718 Chapter 13 • Installation of IIS 7.0
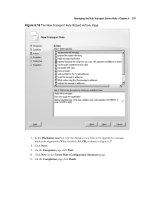
5. The Select Server Roles screen appears as shown in Figure 13.11. Choose
Web Server (IIS).
Figure 13.10 Add Roles Wizard in Longhorn Server
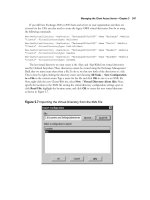
Installation of IIS 7.0 • Chapter 13 719
6. After you select Web Server (IIS), a popup screen like the one shown in Figure 13.12
will inform you that this role cannot be installed unless the Windows Process Activation
Service is also installed. If you need to know why these features are required, simply click
the Why are these features required link at the bottom of the dialog box. Now click
Add Required Features. Once that’s done, click Next back on the Select Server Roles
screen.
Figure 13.11 Selecting the Web Server Role
7. Now you will see the Web Server (IIS) screen shown in Figure 13.13, providing an
introduction to the Web Server. Click Next.
Figure 13.12 The Features Required for Web Server (IIS) Screen
Figure 13.13 Introduction to Web Server Wizard Screen
Installation of IIS 7.0 • Chapter 13 721
8. You will be allowed to select the features you want enabled in IIS 7.0, as shown in
Figure 13.14. Since we are just taking the defaults, we won’t be adding or deleting any
features, so we can now click Next. Remember that with IIS 7.0, only the modules from
the features you choose load, so the more you add, the larger the footprint becomes.
Figure 13.14 Selecting IIS 7.0 Features
9. After selecting the features you require, the installation wizard provides you a breakdown of
the roles, services, and features you are about to install, as shown in Figure 13.15. If you are
sure of what you want to install, click Install. If not, click Previous and select the features
you want.