OCA /OCP Oracle Database 11g A ll-in-One Exam Guide- P13 doc
Bạn đang xem bản rút gọn của tài liệu. Xem và tải ngay bản đầy đủ của tài liệu tại đây (287.32 KB, 10 trang )
OCA/OCP Oracle Database 11g All-in-One Exam Guide
76
3. If you are not working on the console machine, set your DISPLAY variable to
point to an X Window server on the machine on which you are working. In
the illustration, this is 10.0.0.12:0.0.
4. Launch the OUI by running the runInstaller shell script from the root of
the installation media. In the example, the installation media has been copied
into the directory /home/db11g/db11g_dvd.
5. The first OUI window will appear, as in the illustration that follows:
A. Select the Basic Installation radio button.
B. Specify the Oracle Base as the directory created in Step 2. The Oracle
Home will default to an OFA-compliant name beneath it.
C. Select the Enterprise Edition installation type.
D. Select dba as the Unix DBA group.
E. De-select the option to create a database.
F. Click NEXT.
6. If this is the first Oracle install on the machine, the next window will prompt
for the location of the OUI inventory. Be sure to specify a directory to which
the db11g user has write permission.
7. The OUI will then perform its prerequisite checks. If they pass, click NEXT to
continue. If any fail, take note and fix them if possible. Then use the RETRY
button to rerun the test. If the check really cannot be fixed, you can click NEXT
to proceed anyway at your own risk.
8. The next window will be a summary of what the OUI is going to do. Click
NEXT, and it will do it. This should take twenty minutes or so (highly variable,
depending on the machine).
Chapter 2: Installing and Creating a Database
77
PART I
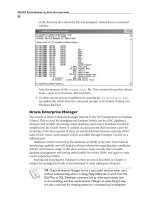
9. Toward the end of the install, the window shown in the illustration that
follows will appear. This prompts you to run two scripts as the root user: the
orainstRoot.sh script that will write the /etc/oraInst.loc file, and
the root.sh script that adjusts permissions on files in the new Oracle home.
If this is not the first time the OUI has run on the machine, there will not be
a prompt for orainstRoot.sh. Run the script(s) as root from an operating
system prompt (accept defaults for any prompts) and then click OK.
10. The installer will return a message stating that “The installation of Oracle
Database 11g was successful.” Congratulations! Click EXIT.
Create a Database by Using the Database
Configuration Assistant
This one OCP examination objective is in fact a large task, comprising several steps. It is
not large in terms of the practicalities (creating a database can be quick and simple—a
single two-word command will do it, and it may take less than ten minutes), but there
are many prerequisite concepts you should understand:
• The instance, the database, and the data dictionary
• Using the DBCA to create a database
• The instance parameter file
• The CREATE DATABASE command
• Post-creation scripts
• The DBCA’s other functions
OCA/OCP Oracle Database 11g All-in-One Exam Guide
78
The Instance, the Database, and the Data Dictionary
An Oracle server consists of an instance and a database; the two are separate, but
connected. The instance comprises memory structures and processes, stored in your
machine’s RAM and executing on its CPU(s); its existence is transient; it can be started
and stopped. The database comprises files on disk; once created, it persists until it is
deleted. Creating an instance is nothing more than building the memory structures
and starting the processes. Creating a database is done by the instance as a once-off
operation, and the instance can then open and close it many times subsequently. The
database is inaccessible without the instance.
Within the database there is a set of tables and other segments called the data
dictionary. The data dictionary describes all the logical and physical structures in the
database, including all the segments that store user data.
The process of database creation establishes the bare minimum of physical
structures needed to store the data dictionary, and then creates the data dictionary
within them.
An instance is defined by an instance parameter file. The parameter file contains
directives that define how the instance should be initialized in memory: the size of the
memory structures, and the behavior of the background processes. After building the
instance, it is said to be in no mount mode. In no mount mode, the instance exists but
has not connected to a database. Indeed, the database may not even exist at this point.
All parameters, either specified by the parameter file or implied, have default values,
except for one: the parameter DB_NAME. The DB_NAME parameter names the database
to which the instance will connect. This name is also embedded in the controlfile. The
CONTROL_FILES parameter points the instance to the location of the controlfile. This
parameter defines the connection between the instance and the database. When the
instance reads the controlfile (which it will find by reading the CONTROL_FILES
parameter) if there is a mismatch in database names, the database will not mount. In
mount mode, the instance has successfully connected to the controlfile. If the controlfile
is damaged or nonexistent, it will be impossible to mount the database. The controlfile is
small, but vital.
Within the controlfile, there are pointers to the other files (the online redo logfiles
and the datafiles) that make up the rest of the database. Having mounted the database,
the instance can open the database by locating and opening these other files. An open
database is a database where the instance has opened all the available online redo
logfiles and datafiles. Also within the controlfile, there is a mapping of datafiles to
tablespaces. This lets the instance identify the datafile(s) that make(s) up the SYSTEM
tablespace within which it will find the data dictionary. The data dictionary lets the
instance resolve references to objects referred to in SQL code to the segments in which
they reside, and work out where, physically, the objects are.
The creation of a database server must therefore involve these steps:
• Create the instance.
• Create the database.
• Create the data dictionary.
Chapter 2: Installing and Creating a Database
79
PART I
In practice, the steps are divided slightly differently:
• Create the instance.
• Create the database and the data dictionary objects.
• Create the data dictionary views.
The data dictionary as initially created with the database is fully functional but
unusable. It has the capability for defining and managing user data but cannot be
used by normal human beings because its structure is too abstruse. Before users (or
DBAs) can actually use the database, a set of views must be created on top of the data
dictionary that will render it understandable by humans.
The data dictionary itself is created by running a set of SQL scripts that exist in the
ORACLE_HOME/rdbms/admin directory. These are called by the CREATE DATABASE
command. The first is sql.bsq, which then calls several other scripts. These scripts
issue a series of commands that create all the tables and other objects that make up
the data dictionary.
The views and other objects that make the database usable are generated by
additional scripts in the ORACLE_HOME/rdbms/admin directory, prefixed with “cat”.
Examples of these are catalog.sql and catproc.sql, which should always be
run immediately after database creation. There are many other optional “cat” scripts
that will enable certain features—some of these can be run at creation time; others
might be run subsequently to install these features at a later date.
Using the DBCA to Create a Database
These are the steps to follow to create a database:
1. Create a parameter file and (optionally) a password file.
2. Use the parameter file to build an instance in memory.
3. Issue the CREATE DATABASE command. This will generate, as a minimum,
a controlfile; two online redo logfiles; two datafiles for the SYSTEM and
SYSAUX tablespaces; and a data dictionary.
4. Run SQL scripts to generate the data dictionary views and the supplied
PL/SQL packages.
5. Run SQL scripts to generate the objects used by Enterprise Manager Database
Control, and any other database options chosen to be enabled.
On Windows systems, there is an additional step because Oracle runs as a Windows
service. Oracle provides a utility, oradim.exe, to assist you in creating this service.
These steps can be executed interactively from the SQL*Plus prompt or through a
GUI tool, the Database Configuration Assistant (DBCA). Alternatively, you can automate
the process by using scripts or start the DBCA with a response file.
Whatever platform you are running on, the easiest way to create a database is
through the DBCA. You may well have run this as part of the installation: OUI can
OCA/OCP Oracle Database 11g All-in-One Exam Guide
80
launch the DBCA, which prompts you and walks you through the whole process. It
creates a parameter file and a password file and then generates scripts that will start
the instance; create the database; and generate the data dictionary, the data dictionary
views, and Enterprise Manager Database Control. Alternatively, you can create the
parameter file and password file by hand, and then do the rest from a SQL*Plus
session. Many DBAs combine the two techniques: use the DBCA to generate the files
and scripts, and then look at them and perhaps edit them before running them from
SQL*Plus.
The DBCA is written in Java—it is therefore the same on all platforms. On Unix,
you run the DBCA on the machine where you wish to create the database, but you
can launch and control it from any machine that has an X server to display the DBCA
windows. This is standard X Window System—you set an environment variable
DISPLAY to tell the program where to send the windows it opens. For example,
export DISPLAY=10.10.10.65:0.0
will redirect all X windows to the machine identified by IP address 10.10.10.65, no
matter which machine you are actually running the DBCA on.
To launch the DBCA on Windows, take the shortcut on the Start menu. The
navigation path will be
1. Start
2. Programs
3. Oracle – OraDB11g_home3
4. Configuration and Migration Tools
5. Database Configuration Assistant
Note that the third part of the path will vary, depending on the name given to the
Oracle Home at install time.
To launch the DBCA on Linux, first set the environment variables that should
always be set for any Linux DBA session: ORACLE_BASE, ORACLE_HOME, PATH,
and LD_LIBRARY_PATH. This is an example of a script that will do this:
export ORACLE_BASE=/u02/app/db11g
export ORACLE_HOME=$ORACLE_BASE/product/11.1.0/db_1
export PATH=$ORACLE_HOME/bin:$PATH
export LD_LIBRARY_PATH=$ORACLE_HOME/lib:$LD_LIBRARY_PATH
Note that the Base and Home will vary according to choices made at install time.
To launch the DBCA, run the dbca shell script, located in the $ORACLE_HOME/bin
directory.
TIP Be sure to have the $ORACLE_HOME/bin directory at the start of
your search path, in case there are any Linux executables with the same name
as Oracle executables. A well-known case in point is rman, which is both an
Oracle tool and a SUSE Linux utility.
Chapter 2: Installing and Creating a Database
81
PART I
Remember that (with one exception) every choice made at database creation time
can be changed later, but that some changes are awkward and may involve downtime.
It is not therefore vital to get everything right—but the more right it can be, the better.
If the database to be created is going to use Enterprise Manager Database Control,
there is an additional step that should be carried out before launching the DBCA:
configuring a database listener. This requirement is because Database Control always
connects to its database through a listener, and the DBCA checks whether one is
available. The configuration is a simple task, described in detail in Chapter 4. For
now, do this with the Net Configuration Assistant, accepting defaults all the way.
To launch the Net Configuration Assistant on Windows, take the shortcut on the
Start menu. The navigation path will be
1. Start
2. Programs
3. Oracle – OraDB11g_home3
4. Configuration and Migration Tools
5. Net Configuration Assistant
To launch the assistant on Linux, run the netca shell script, located in the
$ORACLE_HOME/bin directory.
Exercise 2-4: Use the DBCA to Create a Database In this exercise
you will create a database listener (if one does not exist already) and then create a
database to be called ocp11g using the DBCA, on either Windows or Linux. There is
no significant difference between platforms. The illustrations that follow happen to
be from Windows.
1. Launch the Net Configuration Assistant. The radio button for Listener
Configuration will be selected.
2. Click NEXT three times. If there is a message stating that a listener already exists,
you can exit the tool immediately by clicking CANCEL and FINISH, and proceed to
Step 3. Otherwise, click NEXT another four times to define the default listener,
and then FINISH to exit the tool.
3. Launch the Database Configuration Assistant.
4. On the DBCA Welcome dialog box, click NEXT.
5. The next dialog box has radio buttons for
• Create a Database
• Configure Database Options
• Delete a Database
• Manage Templates
• Configure Automatic Storage
OCA/OCP Oracle Database 11g All-in-One Exam Guide
82
The second and third options will be grayed out, unless the DBCA detects an
existing database running off this Oracle Home. Select the Create A Database
radio button, and click NEXT.
6. The Database Templates dialog box has radio buttons for selecting a template
on which to base the new database. Select the Custom Database radio button,
as this will present all possible options. Click NEXT.
7. In the Database Identification dialog box, enter a global database name, and
a System Identifier (a SID), which will be used as the instance name. These
will default to the same thing, which is often what is wanted. For this exercise,
enter ocp11g for both names. Click NEXT.
8. The Management Options dialog box has a check box for configuring the
database with Enterprise Manager. Select this. Then there are radio buttons for
either Grid Control or Database Control. The Grid Control radio button will
be grayed out if the DBCA does not detect a Grid Control agent running on
the machine. Select Database Control. There are check boxes for Enable Email
Notifications and Enable Daily Backup; do not select these. Click NEXT. It is at
this point that the DBCA will give an error if there is no listener available.
9. The Database Credentials dialog box prompts for passwords for four users in
the database: SYS (who owns the data dictionary), SYSTEM (used for most
DBA work), DBSNMP (used for external monitoring), and SYSMAN (used by
Enterprise Manager). Select the radio button for Use The Same Password For
All Accounts. Enter oracle as the password, twice, and click NEXT.
10. In the Security Settings dialog box, accept the default, which is 11g security,
and click NEXT.
11. The Storage Options dialog box offers a choice between file system, ASM, or
raw devices. Select File System, and click NEXT.
12. The Database File Locations dialog box prompts for a root directory for the
database. Select Use Database File Locations From Template. Click the FILE
LOCATION VARIABLES button to see where the database will be created. It will be
the OFA location ORACLE_BASE/oradata/DB_NAME. Click NEXT.
13. In the Recovery Configuration dialog box, accept the default configuration
for the flash recovery area (which will be 2GB in ORACLE_BASE/flash_
recovery_area) and do not enable archiving. Click NEXT.
14. In the Database Content dialog box, deselect all options except Enterprise
Manager Repository. The others are not needed for this database and will
increase the creation time. Some options will be grayed out; this will be
because they have not been installed into the Oracle Home. Click the STANDARD
DATABASE COMPONENTS button, and deselect these as well. Don’t worry about a
warning that the XML DB is used by other components. Click NEXT.
Chapter 2: Installing and Creating a Database
83
PART I
15. The Initialization Parameters dialog box has four tabs. Leave the default
values, but examine all the tabs. The Memory tab shows the memory that
will be allocated to the instance, based on a percentage of the main memory
detected. The Sizing tab shows the database block size, defaulting to 8KB. This
is the one thing that can never be changed after creation. The Character Sets
tab shows the character set to be used within the database, which will have
a default value based on the operating system. This can be very awkward to
change afterward. The Connection Mode tab determines how user sessions
will be managed. Click NEXT.
16. The Database Storage dialog box shows, via a navigation tree on the left, the
files that will be created. Navigate around this, and see the names and sizes of
the files. These are usually nowhere near adequate for a production system but
will be fine for now. Click NEXT.
17. In the Creation Options dialog box, select the check boxes for Create
Database and Generate Database Creation Scripts. Note the path for the
scripts; it will be ORACLE_BASE/admin/ocp11g/scripts. Click FINISH.
18. The Confirmation dialog box shows what the DBCA is about to do. Click OK.
19. The DBCA will generate the creation scripts (which should only take a few
minutes). Click OK, and the DBCA will create the database. The illustration
that follows shows the progress dialog box. Note the location of the DBCA
logs—ORACLE_BASE/cfgtoollogs/dbca/ocp11g—it may be necessary
to look at the logs if anything fails. The creation will typically take fifteen to
forty minutes, depending on the machine.
OCA/OCP Oracle Database 11g All-in-One Exam Guide
84
20. When the DBCA completes, it will present the dialog box shown in the
illustration that follows. Take note of all the information given, in particular
the URL given for database control:
:1158/em
The Scripts and Other Files Created by the DBCA
While the DBCA is creating the database, inspect the scripts generated. They will be
in the directory ORACLE_BASE/admin/DB_NAME/scripts. In the example that
follow, which is from a Windows installation, the ORACLE_BASE is d:\oracle\app
and the database name (the global name, without the domain suffix) is ocp11g, so the
scripts are therefore in d:\oracle\app\admin\ocp11g\scripts. Navigate to
the appropriate directory, and study the files therein.
The Instance Parameter File
The first file to consider is the instance parameter file, named init.ora. This is a
print of a typical init.ora file, as generated by the DBCA:
######################################################################
# Copyright (c) 1991, 2001, 2002 by Oracle Corporation
######################################################################
###########################################
# Cache and I/O
###########################################
db_block_size=8192
###########################################
# Cursors and Library Cache
###########################################
open_cursors=300
###########################################
# Database Identification
###########################################
db_domain=""
db_name=ocp11g
Chapter 2: Installing and Creating a Database
85
PART I
###########################################
# File Configuration
###########################################
control_files=("D:\oracle\app\oradata\ocp11g\control01.ctl",
"D:\oracle\app\oradata\ocp11g\control02.ctl",
"D:\oracle\app\oradata\ocp11g\control03.ctl")
db_recovery_file_dest=D:\oracle\app\flash_recovery_area
db_recovery_file_dest_size=2147483648
###########################################
# Job Queues
###########################################
job_queue_processes=10
###########################################
# Miscellaneous
###########################################
compatible=11.1.0.0.0
diagnostic_dest=D:\oracle\app
###########################################
# NLS
###########################################
nls_language="ENGLISH"
nls_territory="UNITED KINGDOM"
###########################################
# Processes and Sessions
###########################################
processes=150
###########################################
# SGA Memory
###########################################
sga_target=318767104
###########################################
# Security and Auditing
###########################################
audit_file_dest=D:\oracle\app\admin\ocp11g\adump
audit_trail=db
remote_login_passwordfile=EXCLUSIVE
###########################################
# Shared Server
###########################################
dispatchers="(PROTOCOL=TCP) (SERVICE=ocp11gXDB)"
###########################################
# Sort, Hash Joins, Bitmap Indexes
###########################################
pga_aggregate_target=105906176
###########################################
# System Managed Undo and Rollback Segments
###########################################
undo_management=AUTO
undo_tablespace=UNDOTBS1
Any line beginning with a # symbol is a comment and can be ignored. There are
about 300 parameters, but the file generated by the DBCA sets only a few. Most of
these are covered in detail in later chapters. Two parameters to emphasize at this point
are DB_BLOCK_SIZE and CONTROL_FILES. DB_BLOCK_SIZE determines the size of
the buffers in the database buffer cache. When the instance is instructed to create a
database, this size will also be used to format the datafiles that make up the SYSTEM
and SYSAUX tablespaces. It can never be changed after database creation. CONTROL_
FILES is the pointer that allows the instance to find all the multiplexed copies of the