Tự học HTML và CSS trong 1 giờ - part 38 ppsx
Bạn đang xem bản rút gọn của tài liệu. Xem và tải ngay bản đầy đủ của tài liệu tại đây (505.79 KB, 10 trang )
ptg
These styles set up the basic form layout that I’m using in both exercises. Next, I tweak
the appearance of my input fields:
input[type=”text”], select, textarea {
width: 300px;
font: 18px Verdana;
border: solid 2px #666;
background-color: #ada;
}
The rule above applies to three different selectors: select, textarea, and
input[type=”text”]. The third selector is a bit different than the ones you’ve seen thus
far. It is what’s known as an attribute selector, and matches only input tags with the
value of text for the type attribute. This sort of selector can be used for any attribute. In
this case, I’m using it to avoid applying this rule to Submit buttons, radio buttons, and
check boxes. One catch is that the attribute has to exist, so I had to add type=”text” to
my <input> tag. The selector won’t match if you leave out the attribute and go with the
default value.
Next, I add more styles that are related to the required fields. In the previous exercise, I
applied the required class to the labels but I’ve moved it out to the <div>s this time
around, so that I can apply it to my labels and to my form fields. The labels are still
bolded, but now I use the nested rule shown next. Also note that I apply the style only to
label.required rather than to label. That’s so that the other labels (used for radio but-
tons and check boxes) aren’t bolded.
div.required label.field {
font-weight: bold;
}
div.required input, div.required select {
background-color: #6a6;
border: solid 2px #000;
font-weight: bold;
}
Finally, I have made some enhancements that make it clearer which fields are required.
In the original form the labels for required fields were displayed in boldface. In this
example, that remains the case. However, I moved the required class to the enclosing
div so that I can also use it in selectors that match the form fields themselves. I also
styled required input fields and select fields with a dark green background color, bold
type, and a different color border than optional fields have. After the style sheet is set up,
all we have to do is make sure that the class attributes of our tags are correct. The full
source code for the page, including the form updated with classes, follows:
346
LESSON 10: Designing Forms
, ,
Download from www.wowebook.com
ptg
Input ▼
<!DOCTYPE html>
<html>
<head>
<title>Registration Form</title>
<style type=”text/css” media=”screen”>
form div {
margin-bottom: 1em;
}
div.submit input {
margin-left: 165px;
}
label.field {
display: block;
float: left;
margin-right: 15px;
width: 150px;
text-align: right;
}
input[type=”text”], select, textarea {
width: 300px;
font: 18px Verdana;
border: solid 2px #666;
background-color: #ada;
}
div.required label.field {
font-weight: bold;
}
div.required input, div.required select {
background-color: #6a6;
border: solid 2px #000;
font-weight: bold;
}
</style>
</head>
<body>
<h1>Registration Form</h1>
<p>Please fill out the form below to register for our site. Fields
with bold labels are required.</p>
<form action=”/register” method=”post” enctype=”multipart/form-data”>
<div class=”required”>
Applying Cascading Style Sheet Properties to Form Elements
347
11
, ,
Download from www.wowebook.com
ptg
<label class=”field” for=”name”>Name</label>
<input name=”name” type=”text” />
</div>
<div class=”required”>
<label class=”field”>Gender</label>
<label><input type=”radio” name=”gender” value=”male” />
male</label>
<label><input type=”radio” name=”gender” value=”female” />
female</label>
</div>
<div class=”required”>
<label class=”field”>Operating System</label>
<select name=”os”>
<option value=”windows”>Windows</option>
<option value=”macos”>Mac OS</option>
<option value=”linux”>Linux</option>
<option value=”other”>Other </option>
</select>
</div>
<div>
<label class=”field”>Toys</label>
<label><input type=”checkbox” name=”toy” value=”digicam” />
Digital Camera</label>
<label><input type=”checkbox” name=”toy” value=”mp3” /> MP3
Player</label>
<label><input type=”checkbox” name=”toy” value=”wlan” />
Wireless LAN</label>
</div>
<div>
<label class=”field”>Portrait</label>
<input type=”file” name=”portrait” />
</div>
<div>
<label class=”field”>Mini Biography</label>
<textarea name=”bio” rows=”6” cols=”40”></textarea>
</div>
<div class=”submit”>
<input type=”submit” value=”register” />
</div>
</form>
</body>
</html>
348
LESSON 10: Designing Forms
, ,
Download from www.wowebook.com
ptg
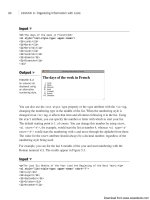
Figure 11.21 shows the page containing this form.
Planning Your Forms
349
11
Output .
FIGURE 11.21
A form with styled
input fields.
▲
Planning Your Forms
Before you start creating complex forms for your web pages, you should do some plan-
ning that will save you time and trouble in the long run.
First, decide what information you need to collect. That might sound obvious, but you
need to think about this before you start worrying about the mechanics of creating the
form.
Next, review this information and match each item with a type of form control. Ask
yourself which type of control is most suited to the type of questions you’re asking. If
you need a yes or no answer, radio buttons or check boxes work great, but the textarea
element is overkill. Try to make life easier for the users by making the type of control fit
the question. This way, analyzing the information using a script, if necessary, will be
much easier.
You also need to coordinate with the person writing the CGI script to match variables in
the script with the names you’re assigning to each control. There isn’t much point in
naming every control before collaborating with the script author—after all, you’ll need
all the names to match. You also can create lookup tables that contain expansive descrip-
tions and allowable values of each form control.
Download from www.wowebook.com
ptg
Finally, you might want to consider validating form input through scripting. Using
JavaScript, you can embed small programs in your web pages. One common use for
JavaScript is writing programs that verify a user’s input is correct before she submits a
form. I discuss JavaScript in more detail in Lesson 14.
Summary
As you can see, the wonderful world of forms is full of different types of form controls
for your visitors. This truly is a way to make your web pages interactive.
Be cautious, however. Web surfers who are constantly bombarded with forms are likely
to get tired of all that typing and move on to another site. You need to give them a reason
for playing!
Table 11.1 summarizes the HTML tags used today. Remember these points and you can’t
go wrong:
n
Use the form element to create your forms.
n
Always assign an action to a form.
n
Create form controls with the input element or the other form control elements.
n
Test your forms extensively.
TABLE 11.1 HTML Tags Used in this Lesson
Tag Use
<form> Creates an HTML form. You can have multiple forms within a docu-
ment, but you cannot nest the forms.
action An attribute of <form> that indicates the server-side script (with a
URL path) that processes the form data.
enctype An attribute of the <form> tag that specifies how form data is
encoded before being sent to the server.
method An attribute of <form> that defines how the form data is sent to the
server. Possible values are
get and post.
<input> A <form> element that creates controls for user input.
type An attribute of <input> that indicates the type of form control.
Possible values are shown in the following list:
text Creates a single-line text entry field.
password Creates a single-line text entry field that masks user input.
submit Creates a Submit button that sends the form data to a server-side
script.
350
LESSON 10: Designing Forms
Download from www.wowebook.com
ptg
TABLE 11.1 Continued
Tag Use
reset Creates a Reset button that resets all form controls to their initial
values.
checkbox Creates a check box.
radio Creates a radio button.
image Creates a button from an image.
button Creates a pushbutton. The three types are Submit, Reset, and Push,
with no default.
hidden Creates a hidden form control that cannot be seen by the user.
file Creates a file upload control that enables users to select a file with
the form data to upload to the server.
<button> Creates a button that can have HTML content.
<textarea> A text-entry field with multiple lines.
<select> A menu or scrolling list of items. Individual items are indicated by the
<option> tag.
<option> Individual items within a <select> element.
<label> Creates a label associated with a form control.
<fieldset> Organizes form controls into groups.
<legend> Displays a caption for a <fieldset> element.
Workshop
If you’ve made it this far, I’m sure that you still have a few questions. I’ve included a
few that I think are interesting. Afterward, test your retention by taking the quiz, and
then expand your knowledge by tackling the exercises.
Q&A
Q Are there security issues associated with including forms on my website?
A Yes and no. The forms themselves are not a security risk, but the scripts that
process the form input can expose your site to security problems. Using scripts that
you can download and use on your own site can be particularly risky, because
malicious people will already know how to exploit any of their bugs. If you are
going to use publicly available scripts, make sure they are approved by your host-
ing provider and that you are using the latest release.
Summary
351
11
Download from www.wowebook.com
ptg
Q I want to create a form and test it, but I don’t have the script ready. Is there
any way I can make sure that the form is sending the right information with a
working script?
A I run into this situation all the time! Fortunately, getting around it is very easy.
Within the opening <form> tag, modify the action attribute and make it a mailto
link to your email address, as in the following:
<form action=“mailto:” method=“post">
Now you can complete your test form and submit it without having a script ready.
When you submit your form, it will be emailed to you as an attachment. Just open
the attachment in a text editor, and presto! Your form data is present.
Quiz
1. How many forms can you have on a web page?
2. How do you create form controls such as radio buttons and check boxes?
3. Are passwords sent using a password control secure?
4. Explain the benefit of using hidden form controls.
5. What other technology do forms rely on?
Quiz Answers
1. You can have any number of forms on a web page.
2. These form controls are created with the input element. Radio buttons have the
type attribute set to radio, and check boxes are created using the type checkbox.
3. No! Passwords sent using a password control are not secure.
4. Hidden form controls are intended more for you than for the person filling out the
form. By using unique value attributes, you can distinguish between different
forms that may be sent to the same script or sent at different times.
5. For you to process the data submitted via forms, they must be paired with a server-
side script through the action attribute.
352
LESSON 10: Designing Forms
Download from www.wowebook.com
ptg
Exercises
1. Ask your hosting provider for scripts that you can use to process your forms. If
you can use them, ask how the data is processed and which names you should use
in your form controls. If you need to use forms and your hosting provider won’t
allow you to use its scripts, start looking elsewhere for a place to host your web-
site.
2. Visit some sites that might use forms, such as . Look at
which form controls they use and how they arrange them, and peek at the source to
see the HTML code.
Workshop
353
11
Download from www.wowebook.com
ptg
This page intentionally left blank
Download from www.wowebook.com
ptg
LESSON 12
Integrating
Multimedia: Sound,
Video, and More
Video and sound are a core part of the modern Web. You can watch tele-
vision online at sites like Hulu, watch movies on demand through Netflix
and Amazon.com, and watch videos uploaded by anyone at sites like
Vimeo and YouTube. Sites that sell downloadable music provide audio
previews of the music they sell. Pandora and Last.fm enable their users
to create their own radio stations starting with the name of a single song.
Understanding how to incorporate video, audio, and Flash into your own
Web pages is an important part of building modern websites. In this les-
son you’ll learn how to:
n
Embed videos hosted at Vimeo and YouTube in your pages
n
Convert video files to common Web formats
n
Use the HTML5 <video> and <audio> tags
n
Embed Flash movies in Web pages using the <object> tag
n
Use Flash audio and video players
Download from www.wowebook.com