Tự học HTML và CSS trong 1 giờ - part 30 potx
Bạn đang xem bản rút gọn của tài liệu. Xem và tải ngay bản đầy đủ của tài liệu tại đây (798.65 KB, 10 trang )
ptg
▼
Task: Exercise 10.1: Creating a Simple Table
Now that you know the basics of how to create a table, try a simple example. You’ll cre-
ate a table that indicates the colors you get when you mix the three primary colors
together. Figure 10.4 shows the table you’re going to re-create in this example.
266
LESSON 10: Building Tables
FIGURE 10.4
A simple color
table.
Here’s a quick hint for laying out tables: Because HTML defines tables on a row-by-row
basis, sometimes it can be difficult to keep track of the columns, particularly with com-
plex tables. Before you start actually writing HTML code, it’s useful to make a sketch of
your table so that you know the heads and the values of each cell. You might even find
that it’s easiest to use a word processor with a table editor (such as Microsoft Word) or a
spreadsheet to lay out your tables. Then, when you have the layout and the cell values,
you can write the HTML code for that table. Eventually, if you do this enough, you’ll
think of these things in terms of HTML tags, whether you want.
Start with a simple HTML framework for a page that contains a table. As with all HTML
files, you can create this file in any text editor:
<!DOCTYPE html>
<html>
<head>
<title>Colors</title>
</head>
<body>
<table>
add table rows and cells here
</table>
</body>
</html>
Now start adding table rows inside the opening and closing <table> tags (where the line
add table rows and cells here is). The first row is the three headings along the top
of the table. The table row is indicated by <tr> and each cell by a <th> tag:
,
Download from www.wowebook.com
ptg
<tr>
<th>Red</th>
<th>Yellow</th>
<th>Blue</th>
</tr>
Table Parts
267
10
You can format the HTML code any way you want. As with all
HTML, the browser ignores most extra spaces and returns. I like
to format it like this, with the contents of the individual rows
indented and the cell elements on separate lines so that I can
pick out the rows and columns more easily.
Now add the second row. The first cell in the second row is the Red heading on the left
side of the table, so it will be the first cell in this row, followed by the cells for the table
data:
<tr>
<th>Red</th>
<td>Red</td>
<td>Orange</td>
<td>Purple</td>
</tr>
Continue by adding the remaining two rows in the table, with the Yellow and Blue head-
ings. Here’s what you have so far for the entire table:
Input ▼
<table border=“1” summary=“color combinations”>
<tr>
<th>Red</th>
<th>Yellow</th>
<th>Blue</th>
</tr>
<tr>
<th>Red</th>
<td>Red</td>
<td>Orange</td>
<td>Purple</td>
</tr>
<tr>
<th>Yellow</th>
<td>Orange</td>
<td>Yellow</td>
<td>Green</td>
NOTE
, ,
Download from www.wowebook.com
ptg
</tr>
<tr>
<th>Blue</th>
<td>Purple</td>
<td>Green</td>
<td>Blue</td>
</tr>
</table>
Finally, add a simple caption. The <caption> element goes just after the <table> tag and
just before the first <tr> tag:
<table border=“1”>
<caption>Mixing the Primary Colors</caption>
<tr>
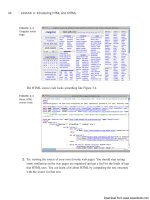
With a first draft of the code in place, test the HTML file in your favorite browser that
supports tables. Figure 10.5 shows how it looks.
268
LESSON 10: Building Tables
,
Output .
FIGURE 10.5
The not-quite-
perfect color
table.
Oops! What happened with that top row? The headings are all messed up. The answer, of
course, is that you need an empty cell at the beginning of that first row to space the head-
ings out over the proper columns. HTML isn’t smart enough to match it all up for you.
(This is exactly the sort of error you’re going to find the first time you test your tables.)
Add an empty table heading cell to that first row. (Here, it’s the line <th><br /></th>.)
Input ▼
<tr>
<th><br /></th>
<th>Red</th>
<th>Yellow</th>
<th>Blue</th>
</tr>
,
Download from www.wowebook.com
ptg
Sizing Tables, Borders, and Cells
269
10
I used <th> here, but it could be <td> just as easily. Because
there’s nothing in the cell, its formatting doesn’t matter.
If you try it again, you should get the right result with all the headings over the right
columns, as the original example in Figure 10.4 shows.
Sizing Tables, Borders, and Cells
With the basics out of the way, now you’ll look at some of the attributes that can change
the overall appearance of your tables. The attributes you’ll learn about in this section
control the width of your tables and cells, the amount of spacing between cell content
and rows and columns, and the width of the borders. As is the case with most attributes
relating to formatting, you can also use some CSS properties with the same effect.
Setting Table Widths
The table in the preceding example relied on the browser itself to decide how wide the
table and column widths were going to be. In many cases, this is the best way to make
sure that your tables are viewable on different browsers with different screen sizes and
widths. Just let the browser decide.
In other cases, however, you might want more control over how wide your tables and
columns are, particularly if the defaults the browser comes up with are strange. In this
section, you’ll learn a couple of ways to do just this.
The width attribute of the <table> element defines how wide the table will be on the
page. width can have a value that is either the exact width of the table (in pixels) or a
percentage (such as 50% or 75%) of the current browser width, which can therefore
change if the window is resized. If width is specified, the width of the columns within
the table can be compressed or expanded to fit the required size.
To make a table as wide as the browser window, you add the width attribute to the table,
as shown in the following line of code:
Input ▼
<table border=“1” width=“100%”>
Figure 10.6 shows the result.
NOTE
▲
Download from www.wowebook.com
ptg
Output .
FIGURE 10.6
A table set to
100% width.
270
LESSON 10: Building Tables
If you make your table too narrow for whatever you put in it, the
browser will ignore your settings and makes the table as wide as
it needs to be to display the content, unless you use the CSS
overflow property to specify otherwise. The overflow property was
discussed in Lesson 8, “Using CSS to Style a Site.”
It’s nearly always a better idea to specify your table widths as percentages rather than as
specific pixel widths. Because you don’t know how wide the browser window will be,
using percentages allows your table to be reformatted to whatever width the browser is.
Using specific pixel widths might cause your table to run off the page. Also, if you make
your tables too wide using a pixel width, your pages might not print properly.
CAUTION
Specifying column widths in percentages is illegal under the
XHTML 1.0 Strict specification. If you want to specify your column
widths in that manner, use Transitional DTD or specify the widths
in a style sheet. I discuss using style sheets in this manner fur-
ther along in this lesson.
Changing Table Borders
The border attribute, which appears immediately inside the opening <table> tag, is the
most common attribute of the <table> element. With it, you specify whether border lines
are displayed around the table and if so, how wide the borders should be.
The border attribute has undergone some changes since it first appeared in HTML:
n
In HTML 2.0, you used <table border> to draw a border around the table. The
border could be rendered as fancy in a graphical browser or just a series of dashes
and pipes (|) in a text-based browser.
NOTE
Download from www.wowebook.com
ptg
n
Starting with HTML 3.2 and later, the correct usage of the border attribute was a
little different: It indicates the width of a border in pixels. <table border=“1”>
creates a 1-pixel wide border, <table border=“2”> a 2-pixel wide border, and so
on. HTML 3.2 and later browsers are expected to display the old HTML 2.0 form
of <table border>, with no value, with a 2-pixel border (as if you specified
<table border=“1”>).
n
To create a border that has no width and isn’t displayed, you specify <table
border=“0”>. Borderless tables are useful when you want to use the table structure
for layout purposes, but you don’t necessarily want the outline of an actual table on
the page. Browsers that support HTML 3.2 and later are expected not to display a
border (the same as <table border=“0”>) if you leave out the border attribute
entirely.
You can change the width of the border drawn around the table. If border has a numeric
value, the border around the outside of the table is drawn with that pixel width. The
default is border=“1”. border=“0” suppresses the border, just as if you had omitted the
border attribute altogether.
Figure 10.7 shows a table that has a border width of 10 pixels. The table and border defi-
nition looks like this:
Input ▼
<table border=“10” width=“100%”>
Sizing Tables, Borders, and Cells
271
10
Output .
FIGURE 10.7
A table with the
border width set to
10 pixels.
You can also adjust the borders around your tables using CSS, with much finer control
than the border attribute provides.
You learned about borders in Lesson 8, but there’s more to them when it comes to tables.
For example, if you write a table like the one that follows, it will have a border around
the outside but no borders around the cells:
Download from www.wowebook.com
ptg
<table style=”border: 1px solid red”>
<!— Table rows and cells go here. —>
</table>
To draw borders around all the cells in a table (the way the border attribute does), the
easiest way is to use a style sheet like this:
<style type=”text/css”>
table { border: 1px solid black; }
td, th { border: 1px solid black; }
</style>
If I applied that style sheet to the color table used in the previous example, it would
appear as it does in Figure 10.8.
272
LESSON 10: Building Tables
FIGURE 10.8
A table with cell
borders applied
using CSS.
As you can see, there are gaps between the borders on each cell for this table. To fix this,
we need to use the CSS border-collapse property on the table element. It has two pos-
sible values, separate and collapse. The default is separate, it produces the result you
see in Figure 10.8. The style sheet that follows shows how to apply it:
<style type=”text/css”>
table {
border: 1px solid black;
border-collapse: collapse;
}
td, th {
border: 1px solid black;
}
</style>
Figure 10.9 shows the results.
Download from www.wowebook.com
ptg
FIGURE 10.9
A table that uses
the border-col-
lapse property to
eliminate space
between cells.
Sizing Tables, Borders, and Cells
273
10
The table that I used for this example included the border
attribute to create a border. If you apply table borders using CSS,
they will override the
border attribute, so you don’t need to
remove it. This can be helpful because primitive browsers (includ-
ing the browsers on some mobile phones) don’t offer CSS sup-
port, and including the
border attribute will ensure that borders
are still displayed.
Cell Padding
The cell padding attribute defines the amount of space between the edges of the cells and
the content inside a cell. By default, many browsers draw tables with a cell padding of
two pixels. You can add more space by adding the cellpadding attribute to the <table>
element, with a value in pixels for the amount of cell padding you want.
Here’s the revised code for your <table> element, which increases the cell padding to
10 pixels. The result is shown in Figure 10.10.
Input ▼
<table cellpadding=“10” border=“1”>
NOTE
Output .
FIGURE 10.10
A table with the
cell padding set to
10 pixels.
Download from www.wowebook.com
ptg
A cellpadding attribute with a value of 0 causes the edges of the cells to touch the
edges of the cell’s contents. This doesn’t look good when you’re presenting text, but it
can prove useful in other situations.
You can also specify the padding of a table cell using the padding property in CSS. The
advantages of doing so are that you can specify the padding for the top, left, right, and
bottom separately, and that you can specify different padding amounts for different cells
of the table if you choose to do so. For example, you can set the padding of header cells
to 10 pixels on the top and 5 pixels on the sides and bottom, and then set the padding to
four pixels on all for sides for regular table cells.
Cell Spacing
Cell spacing is similar to cell padding except that it affects the amount of space between
cells—that is, the width of the space between the inner and outer lines that make up the
table border. The cellspacing attribute of the <table> element affects the spacing for
the table. Cell spacing is two pixels by default.
Cell spacing also includes the outline around the table, which is just inside the table’s
border (as set by the border attribute). Experiment with it, and you can see the differ-
ence. For example, Figure 10.11 shows our table with cell spacing of 8 and a border of 4,
as shown in the following code:
Input ▼
<table cellpadding=“10” border=“4” cellspacing=“8”>
274
LESSON 10: Building Tables
Output .
FIGURE 10.11
How increased cell
spacing looks.
Download from www.wowebook.com
ptg
FIGURE 10.12
Using CSS to
specify cell spac-
ing and cell
padding.
Sizing Tables, Borders, and Cells
275
10
If you want to completely eliminate any whitespace separating con-
tent in table cells, you must set the table’s border, cell padding,
and cell spacing to
0. Laying out your tables this way is unusual,
but it can be useful if you’ve sliced up an image and you want to
reassemble it properly on a web page.
The CSS equivalent of the cellspacing attribute is the border-spacing property, which
must be applied to the table. To use it, the border-collapse property must not be set to
collapse, as it eliminates cell spacing. border-spacing is slightly different than padding.
With padding, you can specify the padding for all four sides of an element. border-
spacing takes one or two values. If one value is specified, it is used for all four sides of
each cell. If two are specified, the first sets the horizontal spacing and the second sets the
vertical spacing. The table in Figure 10.12 uses the following style sheet, which sets the
cell padding for each cell to 5 pixels, and sets the cell spacing for the table to 10 pixels
horizontally and 5 pixels vertically:
<style type=”text/css”>
table {
border-collapse: separate;
border-spacing: 10px 5px;
}
td, th {
border: 1px solid black;
padding: 5px;
}
</style>
NOTE
Column Widths
You also can apply the width attribute to individual cells (<th> or <td>) to indicate the
width of columns in a table. As with table widths, discussed earlier, you can make the
width attribute in cells an exact pixel width or a percentage (which is taken as a
Download from www.wowebook.com