Tự học HTML và CSS trong 1 giờ - part 10 ppsx
Bạn đang xem bản rút gọn của tài liệu. Xem và tải ngay bản đầy đủ của tài liệu tại đây (1 MB, 10 trang )
ptg
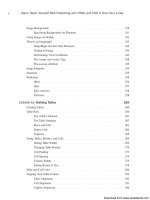
FIGURE 3.3
Craigslist home
page.
66
LESSON 3: Introducing HTML and XHTML
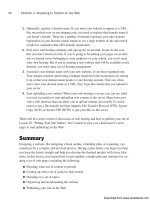
The HTML source code looks something like Figure 3.4.
FIGURE 3.4
Some HTML
source code.
2. Try viewing the source of your own favorite web pages. You should start seeing
some similarities in the way pages are organized and get a feel for the kinds of tags
that HTML uses. You can learn a lot about HTML by comparing the text onscreen
with the source for that text.
Download from www.wowebook.com
ptg
LESSON 4
Learning the Basics of
HTML
In the first three lessons, you learned about the World Wide Web, how to
organize and plan your websites, and why you need to use HTML to cre-
ate a web page. In Lesson 3, “Introducing HTML and XHTML,” you even
created your first simple web page. In this lesson, you learn about each
of the basic HTML tags in more depth and begin writing web pages with
headings, paragraphs, and several different types of lists. We focus on
the following topics and HTML tags:
n
Tags for overall page structure: <html>, <head>, and <body>
n
Tags for titles, headings, and paragraphs: <title>, <h1> through
<h6>, and <p>
n
Tags for comments: <! >
Download from www.wowebook.com
ptg
Structuring Your HTML
HTML defines three tags that describe the page’s overall structure and provide some
simple header information. These three tags—
<html>, <head>, and <body>—make up the
basic skeleton of every web page. They also provide simple information about the page
(such as its title or its author) before loading the entire thing. The page structure tags
don’t affect what the page looks like when it displays; they’re only there to help tools
that interpret or filter HTML files.
At one time, these tags were optional. Even today, if you leave them out of your markup,
browsers usually can read the page anyway. These tags, however, are required elements
in HTML 4/XHTML 1.1 and HTML5, the standards supported by current browsers.
68
LESSON 4: Learning the Basics of HTML
The DOCTYPE Identifier
Although it’s not a page structure tag, the XHTML 1.0 and HTML5 standards include
an additional requirement for your web pages. The first line of each page must
include a DOCTYPE identifier that defines the XHTML 1.0 version to which your page
conforms, and the Document Type Definition (DTD) that defines the specification.
This is followed by the
<html>, <head>, and <body> tags. In the following example,
the HTML5 document type appears before the page structure tags:
<!DOCTYPE html><html>
<head>
<title>Page Title</title>
</head>
<body>
your page content
</body>
</html>
Refer to Lesson 18, “Writing Good Web Pages: Do’s and Don’ts,” for more informa-
tion about the
DOCTYPE tag, and more information about the differences between the
various document types.
The <html> Tag
The first page structure tag in every HTML page is the <html> tag. It indicates that the
content of this file is in the HTML language. In the XHTML 1.0 recommendation, the
<html> tag should follow the DOCTYPE identifier (as mentioned in the previous note) as
shown in the following example.
Download from www.wowebook.com
ptg
All the text and HTML elements in your web page should be placed within the beginning
and ending HTML tags, like this:
<!DOCTYPE html><html>
your page
</html>
The <html> tag serves as a container for all the tags that make up the page. It is required
because both XML and SGML specify that every document have a root element. Were
you to leave it out, which you shouldn’t do because it would make your page invalid, the
browser would make up an <html> tag for you so that the page would make sense to its
HTML processor.
The <head> Tag
The <head> tag is a container for the tags that contain information about the page, rather
than information that will be displayed on the page. Generally, only a few tags are used
in the <head> portion of the page (most notably, the page title, described later). You
should never put any of the text of your page into the header (between <head> tags).
Here’s a typical example of how you properly use the <head> tag. (You’ll learn about
<title> later.)
<!DOCTYPE html><html>
<head>
<title>This is the Title. It will be explained later on</title>
</head>
your page
</html>
The <body> Tag
The content of your HTML page (represented in the following example as your
page ) resides within the <body> tag. This includes all the text and other content
(links, pictures, and so on). In combination with the <html> and <head> tags, your page
will look something like this:
<!DOCTYPE html><html>
<head>
<title>This is the Title. It will be explained later on</title>
</head>
<body>
your page
</body>
</html>
Structuring Your HTML
69
4
Download from www.wowebook.com
ptg
You might notice here that the tags are nested. That is, both <body> and </body> tags go
inside both <html> tags; the same with both <head> tags. All HTML tags work this way,
forming individual nested sections of text. You should be careful never to overlap tags.
That is, never do something like the following:
<!DOCTYPE html><html>
<head>
<body>
</head>
</body>
</html>
Whenever you close an HTML tag, make sure that you close the most recent unclosed
tag. (You learn more about closing tags as you go on.)
70
LESSON 4: Learning the Basics of HTML
In HTML, closing some tags is optional. In HTML 4.0 and earlier,
closing tags were forbidden in some cases. HTML standards that
require your markup to be well-formed XML (like XHTML 1.0)
require that all tags be closed. If you’re just learning HTML, this
won’t be a big deal. If you already have a passing familiarity with
the language, however, this might surprise you. The examples
shown in this book display the proper way to close tags so that
older browsers will interpret XHTML 1.0 closures correctly.
The Title
Each HTML page needs a title to indicate what the page describes. It appears in the title
bar of the browser when people view the web page. The title is stored in your browser’s
favorites (or bookmarks) and also in search engines when they index your pages. Use the
<title> tag to give a page a title.
<title> tags are placed within the <head> tag and normally describe the contents of the
page, as follows:
<!DOCTYPE html><html>
<head>
<title>The Lion, The Witch, and the Wardrobe</title>
</head>
<body>
your page
</body>
</html>
NOTE
Download from www.wowebook.com
ptg
Each page can have only one title, and that title can contain only plain text; that is, no
other tags should appear inside the title.
Try to choose a title that’s both short and descriptive of the content. Your title should be
relevant even out of context. If someone browsing on the Web follows a random link and
ends up on this page, or if a person finds your title in a friend’s browser history list,
would he have any idea what this page is about? You might not intend the page to be
used independently of the pages you specifically linked to it, but because anyone can link
to any page at any time, be prepared for that consequence and pick a helpful title.
The Title
71
4
When search engines index your pages, each page title is cap-
tured and listed in the search results. The more descriptive your
page title, the more likely it is that someone will choose your page
from all the search results.
Also, because browsers put the title in the title bar of the window, you might have a lim-
ited amount of space. (Although the text within the <title> tag can be of any length, it
might be cut off by the browser when it displays.) Here are some other examples of good
titles:
<title>Poisonous Plants of North America</title>
<title>Image Editing: A Tutorial</title>
<title>Upcoming Cemetery Tours, Summer 1999</title>
<title>Installing the Software: Opening the CD Case</title>
<title>Laura Lemay’s Awesome Home Page</title>
Here are some not-so-good titles:
<title>Part Two</title>
<title>An Example</title>
<title>Nigel Franklin Hobbes</title>
<title>Minutes of the Second Meeting of the Fourth Conference of the
Committee for the Preservation of English Roses, Day Four, After Lunch</title>
Figure 4.1 shows how the following title looks in a browser:
<title>Poisonous Plants of North America</title>
NOTE
Download from www.wowebook.com
ptg
FIGURE 4.1
A page containing
only header
elements.
72
LESSON 4: Learning the Basics of HTML
Headings
Headings add titles to sections of a page. HTML defines six levels of headings. Heading
tags look like the following:
<h1>Installing Your Safetee Lock</h1>
The numbers indicate heading levels (h1 through h6). The headings, when they display,
aren’t numbered. They display in larger or bolder text, centered or underlined, or
capitalized—so that they stand out from regular text.
Think of the headings as items in an outline. If the text you write is structured, use the
headings to express that structure, as shown in the following code:
<h1>Movies</h1>
<h2>Action/Adventure</h2>
<h3>Caper</h3>
<h3>Sports</h3>
<h3>Thriller</h3>
<h3>War</h3>
<h2>Comedy</h2>
<h3>Romantic Comedy</h3>
<h3>Slapstick</h3>
<h2>Drama</h2>
<h3>Buddy Movies</h3>
<h3>Mystery</h3>
<h3>Romance</h3>
<h2>Horror</h2>
Download from www.wowebook.com
ptg
Notice that I indented the headings in this example to better show the hierarchy. They
don’t have to be indented in your page; in fact, the browser ignores the indenting.
Headings
73
4
Even though the browser ignores any indenting you include in your
code, you will probably find it useful to indent your code so that
it’s easier to read. You’ll find that any lengthy examples in this
book are indented for that reason, and you’ll probably want to
carry that convention over to your own HTML code.
Unlike titles, headings can be any length, spanning many lines of text. Because headings
are emphasized, however, having many lines of emphasized text might be tiring to read.
A common practice is to use a first-level heading at the top of your page to either dupli-
cate the title (which usually is displayed elsewhere), or to provide a shorter or less con-
text-specific form of the title. If you have a page that shows several examples of folding
bed sheets—for example, part of a long presentation on how to fold bed sheets—the title
might look something like the following:
<title>How to Fold Sheets: Some Examples</title>
The topmost heading, however, might just be as follows:
<h1>Examples</h1>
TIP
Don’t use headings to display text in boldface type or to make cer-
tain parts of your page stand out more. Although the result might
look cool in your browser, you don’t know what it’ll look like when
other people use their browsers to read your page. Other browsers
might number headings or format them in a manner that you don’t
expect.
Tools to create searchable indexes of web pages might extract your headings to indicate
the important parts of a page. By using headings for something other than an actual
heading, you might be foiling those search programs and creating strange results.
CAUTION
Download from www.wowebook.com
ptg
Figure 4.2 shows the following headings as they appear in a browser:
Input ▼
<h1>Mythology Through the Ages</h1>
<h2>Common Mythological Themes</h2>
<h2>Earliest Known Myths</h2>
<h2>Origins of Mythology</h2>
<h3>Mesopotamian Mythology</h3>
<h3>Egyptian Mythology</h3>
<h4>The Story of Isis and Osiris</h4>
<h4>Horus and Set: The Battle of Good vs. Evil</h4>
<h4>The Twelve Hours of the Underworld</h4>
<h4>The River Styx</h4>
<h2>History in Myth</h2>
74
LESSON 4: Learning the Basics of HTML
Output ▼
FIGURE 4.2
HTML heading
elements.
From a visual perspective, headings 4 through 6 aren’t visually
interesting, but they do have meaning in terms of the document’s
structure. If using more than three levels of headings makes
sense for the document you’re creating, you can use those tags
and then use CSS to make them appear as you intend.
TIP
Download from www.wowebook.com
ptg
Paragraphs
Now that you have a page title and several headings, you can add some ordinary para-
graphs to the page.
Paragraphs are created using the
<p> tag. The Enigern story should look like this:
<p>Slowly and deliberately, Enigern approached the mighty dragon.
A rustle in the trees of the nearby forest distracted his attention
for a brief moment, a near fatal mistake for the brave knight.</p>
<p>The dragon lunged at him, searing Enigern’s armor with a rapid
blast of fiery breath. Enigern fell to the ground as the dragon
hovered over him. He quickly drew his sword and thrust it into the
dragon’s chest.</p>
What if you want more (or less) space between your paragraphs than the browser pro-
vides by default? The answer is to use CSS. As you’ll see, it provides fine control over
the spacing of elements on the page, among other things. Figure 4.3 shows what happens
when I add another paragraph about Enigern and the dragon to the page. The paragraph
breaks are added between the closing and opening <p> tags in the text.
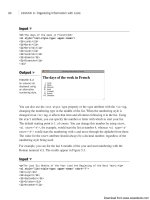
Input ▼
<p>The dragon fell to the ground, releasing an anguished cry and
seething in pain. The thrust of Enigern’s sword proved fatal as
the dragon breathed its last breath. Now Enigern was free to
release Lady Aelfleada from her imprisonment in the dragon’s lair. </p>
Comments
75
4
Output ▼
FIGURE 4.3
An HTML
paragraph.
Comments
You can put comments into HTML pages to describe the page itself or to provide some
kind of indication of the status of the page. Some source code control programs store the
page status in comments, for example. Text in comments is ignored when the HTML file
Download from www.wowebook.com