lập trình android (phần 8) doc
Bạn đang xem bản rút gọn của tài liệu. Xem và tải ngay bản đầy đủ của tài liệu tại đây (2.14 MB, 50 trang )
326 CHAPTER 12 Putting it all together–the Field Service Application
capable device and toolbox. To help in the discus-
sion of the different features available to the user
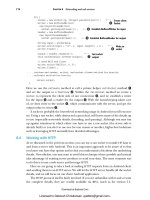
on this screen, take a look at figure 12.10.
The layout is very straightforward but this
time we have some
Button
s and we will be
changing the textual description depending on
the condition of a particular job’s status. A
Text-
View
is used to present job details such as
address, product requiring service, and com-
ments. The third
Button
will have the
text
property changed, depending on the status of
the job. If the job’s status is marked as
CLOSED,
the functionality of the third button will change.
To support the functionality of this
Activity
,
first the code needs to launch a new
Activity
to
show a map of the job’s address, as shown in fig-
ure 12.11.
The second button, Get Product Info,
launches a browser window to assist the user in
learning more about the product he is being
called upon to work with. Figure 12.12 shows this in action.
The third requirement is to allow the user to close the job or to view the signature
if it is already closed, the details of which are covered in the next section on the
CloseJob Activity
.
More on Bundles
We need to pass the selected job to the
ShowJob Activity
, but we cannot casually
pass an object from one
Activity
to another. We don’t want the
ShowJob Activity
to have to parse the list of jobs again; otherwise we could simply pass back an index
to the selected job by using the integer storage methods of a
Bundle
. Perhaps we
could store the currently selected
JobEntry
(and
JobList
for that matter) in a global
data member of the
Application
object, should we have chosen to implement one.
If you recall in chapter 1 when we discussed the ability of Android to dispatch
In-
tent
s to any
Activity
registered on the device, we want to keep the ability open to
an application other than our own to perhaps pass a job to us. If that were the case,
using a global data member of an
Application
object would never work! Never mind
for the moment the likelihood of such a step being low, particularly considering how
the data is stored in this application. This chapter’s sample application is an exercise
of evaluating some different mechanisms one might employ to solve data movement
around Android. The chosen solution is to package the data fields of the
JobEntry
in a
Bundle
F
(in listing 12.15) to move a
JobEntry
from one
Activity
to another.
In the strictest sense, we are moving not a real
JobEntry
object but a representation
of a
JobEntry
’s data members. The net of this long discussion is that this method
creates a new
Bundle
by using the
toBundle()
method of the
JobEntry
.
Figure 12.10 An example of a job
shown in the
ShowJob Activity
Licensed to Deborah Christiansen <>
Download at Boykma.Com
327Digging deeper into the code
Fortunately, the steps required for the first two operations are quite simple with
Android—thanks to the
Intent
. Listing 12.16 and the accompanying descriptions
show you how.
package com.msi.manning.UnlockingAndroid;
// multiple imports omitted for brevity, see full source
public class ShowJob extends Activity {
Prefs myprefs = null;
JobEntry je = null;
final int CLOSEJOBTASK = 1;
public void onCreate(Bundle icicle) {
super.onCreate(icicle);
setContentView(R.layout.showjob);
myprefs = new Prefs(this.getApplicationContext());
StringBuilder sb = new StringBuilder();
String details = null;
Intent startingIntent = getIntent();
if (startingIntent != null) {
Bundle b = startingIntent.getExtas();
if (b == null) {
details = "bad bundle?";
} else {
je = JobEntry.fromBundle(b);
sb.append("Job Id: " + je.get_jobid() + " (" + je.get_status()+
➥
")\n\n");
sb.append(je.get_customer() + "\n\n");
sb.append(je.get_address() + "\n" + je.get_city() + "," +
➥
je.get_state() + "\n" );
sb.append("Product : "+ je.get_product() + "\n\n");
Listing 12.16 ShowJob.java
Figure 12.11 Viewing a job
address in the Maps application
Figure 12.12 Get Product Info takes the
user to a web page specific to this job.
Get Intent
Extract the Bundle
from the Intent
Licensed to Deborah Christiansen <>
Download at Boykma.Com
328 CHAPTER 12 Putting it all together–the Field Service Application
sb.append("Comments: " + je.get_comments() + "\n\n");
details = sb.toString();
}
} else {
details = "Job Information Not Found.";
TextView tv = (TextView) findViewById(R.id.details);
tv.setText(details);
return;
}
TextView tv = (TextView) findViewById(R.id.details);
tv.setText(details);
Button bmap = (Button) findViewById(R.id.mapjob);
bmap.setOnClickListener(new Button.OnClickListener() {
public void onClick(View v) {
// clean up data for use in GEO query
String address = je.get_address() + " " + je.get_city() + " " +
➥
je.get_zip();
String cleanAddress = address.replace(",", "");
cleanAddress = cleanAddress.replace(' ','+');
try {
Intent geoIntent = new
Intent("android.intent.action.VIEW",android.net.Uri.parse("geo:0,0?q=" +
➥
cleanAddress));
startActivity(geoIntent);
} catch (Exception ee) {
}
}
});
Button bproductinfo = (Button) findViewById(R.id.productinfo);
bproductinfo.setOnClickListener(new Button.OnClickListener() {
public void onClick(View v) {
try {
Intent productInfoIntent = new Intent("android.intent.action.VIEW",
➥
android.net.Uri.parse(je.get_producturl()));
startActivity(productInfoIntent);
} catch (Exception ee) {
}
}
} ) ;
Button bclose = (Button) findViewById(R.id.closejob);
if (je.get_status().equals("CLOSED")) {
bclose.setText("Job is Closed. View Signature");
}
bclose.setOnClickListener(new Button.OnClickListener() {
public void onClick(View v) {
if (je.get_status().equals("CLOSED")) {
Intent signatureIntent = new Intent("android.intent.action.VIEW",
➥
android.net.Uri.parse(myprefs.getServer() + "sigs/" +
➥
je.get_jobid() + ".jpg"));
startActivity(signatureIntent);
} else {
Intent closeJobIntent = new Intent(ShowJob.this,CloseJob.class);
Bundle b = je.toBundle();
closeJobIntent.putExtras(b);
startActivityForResult(closeJobIntent,CLOSEJOBTASK);
Update UI upon
error and return
Build and launch
a geo query
Obtain product
information via
URL
Selectively update
Button label
Show Signature
for CLOSED
JobEntrys
Initiate CloseJob Activity
Licensed to Deborah Christiansen <>
Download at Boykma.Com
329Digging deeper into the code
}
}
} ) ;
Log.d("CH12","Job status is :" + je.get_status());
}
@Override
protected void onActivityResult(int requestCode, int resultCode, Intent
data) {
switch (requestCode) {
case CLOSEJOBTASK:
if (resultCode == 1) {
this.setResult(1, "", data.getExtras());
finish();
}
break;
}
}
}
Upon completion of the
CloseJob Activity
, the
onActivityResult
callback is
invoked. When this situation occurs, this method receives a
Bundle
containing the
data elements for the recently closed
JobEntry
B
. If you recall, the
ShowJob Activ-
ity
was launched “for result.” The requirement is to propagate this
JobEntry
data
back up to the calling
Activity
,
ManageJobs
. Calling
setResult()
and passing the
Bundle
(obtained with
getExtras()
) fulfills this requirement.
Despite the simple appearance of some text and a few easy-to-hit buttons, the
ShowJob Activity
provides a significant amount of functionality to the user. All that
remains is to capture the signature to close out the job. To do this requires an exami-
nation of the
CloseJob Activity
.
12.4.4 CloseJob
Our faithful mobile technician has just completed the maintenance operation on the
part and is ready to head off to lunch before stopping for another job on the way
home, but first he must close out this job with a signature from the customer. To
accomplish this, the Field Service Application presents a blank screen, and the cus-
tomer uses a stylus (or a mouse in the case of the Android Emulator) to sign the
device, acknowledging that the work has been completed. Once the signature has
been captured, the data is submitted to the server. The proof of job completion has
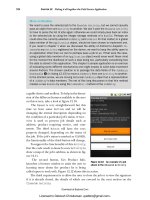
been captured, and the job can now be billed. Figure 12.13 demonstrates this
sequence of events.
This
Activity
can be broken down into two basic functions. The first is the capture
of a signature. The second is transmittal of job data to the server. Of interest is that this
Activity
’s UI has no layout resource. All of the UI elements in this
Activity
are gen-
erated dynamically, as shown in listing 12.17. In addition, the
ProgressDialog
intro-
duced in the
RefreshJobs
Activity
is brought back for an encore, to let our mobile
technician know that the captured signature is being sent when the Sign & Close menu
Handle newly
closed JobEntry
B
Licensed to Deborah Christiansen <>
Download at Boykma.Com
330 CHAPTER 12 Putting it all together–the Field Service Application
option is selected. If the user selects Cancel, the
ShowJob
Activity
resumes control.
Note that the signature should be made prior to selecting the menu option.
package com.msi.manning.UnlockingAndroid;
// multiple imports omitted for brevity, see full source
public class CloseJob extends Activity {
ProgressDialog myprogress;
Handler progresshandler;
Message msg;
JobEntry je = null;
private closejobView sc = null;
@Override
public void onCreate(Bundle icicle) {
Listing 12.17 CloseJob.java—GUI setup
Figure 12.13 The CloseJob Activity capturing a signature and sending data to the server
Local queuing
One element not found in this sample application is the local queuing of the signa-
ture. Ideally this would be done in the event that data coverage is not available. The
storage of the image is actually quite simple; the perhaps more challenging piece is
the logic on when to attempt to send the data again. Considering all of the develop-
ment of this sample application is done on the Android Emulator with near-perfect
connectivity, it is of little concern here. However, in the interest of best preparing you
to write real-world applications, it is worth the reminder of local queuing in the event
of communications trouble in the field.
Licensed to Deborah Christiansen <>
Download at Boykma.Com
331Digging deeper into the code
super.onCreate(icicle);
Intent startingIntent = getIntent();
if (startingIntent != null) {
Bundle b = startingIntent.getExtras()
if (b != null) {
je = JobEntry.fromBundle(b);
}
}
sc = new closejobView(this);
setContentView(sc);
if (je == null) {
finish();
}
}
@Override
public boolean onCreateOptionsMenu(Menu menu) {
super.onCreateOptionsMenu(menu);
menu.add(0,0,"Sign & Close");
menu.add(0,1,"Cancel");
return true;
}
public boolean onOptionsItemSelected(Menu.Item item) {
Prefs myprefs = new Prefs(CloseJob.this.getApplicationContext());
switch (item.getId()) {
case 0:
try {
myprogress = ProgressDialog.show(this, "Closing Job ",
➥
"Saving Signature to Network",true,false);
progresshandler = new Handler() {
@Override
public void handleMessage(Message msg) {
switch (msg.what) {
case 0:
myprogress.setMessage("" + (String) msg.obj);
b r e a k ;
case 1:
myprogress.cancel();
finish();
b r e a k ;
}
super.handleMessage(msg);
}
} ;
Thread workthread = new Thread(new DoCloseJob(myprefs));
workthread.start();
} catch (Exception e) {
Log.d("closejob",e.getMessage());
msg = new Message();
msg.what = 1;
progresshandler.sendMessage(msg);
}
return true;
case 1:
finish();
return true;
Instantiate instance
of closejobView
B
Define available
menus
C
Handle selected
menu
D
Start Thread
to CloseJob
E
Licensed to Deborah Christiansen <>
Download at Boykma.Com
332 CHAPTER 12 Putting it all together–the Field Service Application
}
return false;
}
Unlike previous activities in this chapter, the UI does not come from a design
time–defined layout, but rather an instance of a
closejobView
B
is the primary UI.
The
closejobView
is defined in listing 12.18.
The
onCreateOptionsMenu
method
C
is an override of the base
View
’s method,
allowing a convenient way to add menus to this screen. Note that two menus are
added, one for Sign & Close and one for Cancel. The
onOptionsItemSelected
method
D
is invoked when the user selects a menu item. A
ProgressDialog
and
accompanying
Handler
are instantiated when the menu to close a job is selected.
Once the progress-reporting mechanism is in place, a new
Thread
is created and
started in order to process the steps required to actually close the job
E
. Note that an
instance of
Prefs
is passed in as an argument to the constructor, as that will be needed
to store a signature, as we’ll show in listing 12.19.
The
UI at this point is only partially set up; we need a means to capture a signature
on the screen of our Android device. Listing 12.18 implements the class
closejob-
View
, which is an extension of the
View
class.
public class closejobView extends View {
Bitmap _bitmap;
Canvas _canvas;
final Paint _paint;
int lastX;
int lastY;
public closejobView(Context c) {
super(c);
_paint = new Paint();
_paint.setColor(Color.BLACK);
lastX = -1;
}
public boolean Save(OutputStream os){
try {
_canvas.drawText("Unlocking Android", 10, 10, _paint);
_canvas.drawText(" 10, 25, _paint);
_canvas.drawText("", 10, 40, _paint);
_bitmap.compress(Bitmap.CompressFormat.JPEG, 100, os);
invalidate();
return true;
} catch (Exception e) {
return false;
}
}
@Override
protected void onSizeChanged(int w, int h, int oldw, int oldh) {
Bitmap img =
Bitmap.createBitmap(w, h,Bitmap.Config.ARGB_8888);
Canvas canvas = new Canvas();
Listing 12.18 CloseJob.java—closejobView class
B
closejobView extends
the base class View
Required classes
for drawing
C
Initialize drawing
classes
Save method
persists
signature
D
E
Add
contextual
data to image
Convert
image to
JPEG
Bitmap initialization code
Licensed to Deborah Christiansen <>
Download at Boykma.Com
333Digging deeper into the code
canvas.setBitmap(img);
if (_bitmap != null) {
canvas.drawBitmap(img, 0, 0, null);
}
_bitmap = img;
_canvas = canvas;
_canvas.drawColor(Color.WHITE);
}
@Override
protected void onDraw(Canvas canvas) {
if (_bitmap != null) {
canvas.drawBitmap(_bitmap, 0, 0, null);
}
}
@Override
public boolean onTouchEvent(MotionEvent event) {
int action = event.getAction();
int X = (int)event.getX();
int Y = (int)event.getY();
switch (action ) {
case MotionEvent.ACTION_UP:
// reset location
lastX = -1;
break;
case MotionEvent.ACTION_DOWN:
if (lastX != -1){
if ((int) event.getX() != lastX) {
_canvas.drawLine(lastX, lastY, X, Y, _paint);
}
}
lastX = (int)event.getX();
lastY = (int)event.getY();
break;
case MotionEvent.ACTION_MOVE:
if (lastX != -1){
_canvas.drawLine(lastX, lastY, X, Y, _paint);
}
lastX = (int)event.getX();
lastY = (int)event.getY();
break;
}
invalidate();
return true;
}
}
}
The
closejobView
extends the base
View
class
B
. The
Bitmap
and
Canvas
classes
C
work together to form the drawing surface for this
Activity
. Note the call to the
Canvas.drawColor
method, which sets the background color to WHITE. When the
onDraw()
method is invoked, the canvas draws its associated bitmap with a call to
drawBitmap()
F
.
The logic for where to draw relies on the
onTouchEvent
method
G
, which receives
an instance of the
MotionEvent
class. The
MotionEvent
class tells what happened and
Draw image
on screen
F
Handle Touch
Events
(i.e., capture signature!)
G
Licensed to Deborah Christiansen <>
Download at Boykma.Com
334 CHAPTER 12 Putting it all together–the Field Service Application
where.
ACTION_UP
,
ACTION_DOWN
, and
ACTION_MOVE
are the events captured, with some
logic to guide when and where to draw. Once the signature is complete, the
Save
method
D
is responsible for converting the contents of the image to a form usable for
submission to the server. Note that additional text is drawn on the signature
E
. In this
case, it is little more than a shameless plug for this book’s webpage; however, this
could also be location-based data. Why is this important? Imagine someone forging a
signature. Could happen, but it would be more challenging and of less value to a
rogue mobile technician if the
GPS/location data were actually stamped on the job,
along with the date and time. When converting the image to our desired
JPEG format,
there is an additional input argument to this method—an
OutputStream
, used to
store the image data. This
OutputStream
reference was actually an input argument to
the
Save
method.
Now that the
UI has been created and a signature drawn on the screen, let’s look at
the code used to close the job. Closing the job involves capturing the signature and send-
ing it to the server via an
HTTP
POST
. The class
DoCloseJob
is shown in listing 12.19.
class DoCloseJob implements Runnable {
Prefs _myprefs;
DoCloseJob(Prefs p) {
_myprefs = p;
}
public void run() {
try {
FileOutputStream os =
getApplication().openFileOutput("sig.jpg", 0);
sc.Save(os);
os.flush();
os.close();
// reopen to so we can send this data to server
File f = new
File(getApplication().getFileStreamPath("sig.jpg").toString());
long flength = f.length();
FileInputStream is = getApplication().openFileInput("sig.jpg");
byte data[] = new byte[(int) flength];
int count = is.read(data);
if (count != (int) flength) {
// bad read?
}
msg = new Message();
msg.what = 0;
msg.obj = (Object)("Connecting to Server");
progresshandler.sendMessage(msg);
URL url = new URL(_myprefs.getServer() +
"/closejob.php?jobid=" + je.get_jobid());
URLConnection conn = url.openConnection();
conn.setDoOutput(true);
BufferedOutputStream wr = new
BufferedOutputStream(conn.getOutputStream());
Listing 12.19 CloseJob.java—DoCloseJob class
Constructor uses
Prefs instance
Open a file for
storing signature
B
Construct
storage URL
C
Write data
to server
D
Licensed to Deborah Christiansen <>
Download at Boykma.Com
335Digging deeper into the code
wr.write(data);
wr.flush();
wr.close();
msg = new Message();
msg.what = 0;
msg.obj = (Object)("Data Sent");
progresshandler.sendMessage(msg);
BufferedReader rd = new BufferedReader(new
➥
InputStreamReader(conn.getInputStream()));
String line = "";
Boolean bSuccess = false;
while ((line = rd.readLine()) != null) {
if (line.indexOf("SUCCESS") != -1) {
bSuccess = true;
}
}
wr.close();
rd.close();
if (bSuccess) {
msg = new Message();
msg.what = 0;
msg.obj = (Object)("Job Closed Successfully");
progresshandler.sendMessage(msg);
je.set_status("CLOSED");
CloseJob.this.setResult(1,"",je.toBundle());
} else {
msg = new Message();
msg.what = 0;
msg.obj = (Object)("Failed to Close Job");
progresshandler.sendMessage(msg);
CloseJob.this.setResult(0);
}
} catch (Exception e) {
Log.d("CH12","Failed to submit job close signature: " + e.getMessage());
}
msg = new Message();
msg.what = 1;
progresshandler.sendMessage(msg);
}
}
At this point, we have a signature on the screen and need to capture it. A new
File-
OutputStream
B
is obtained for a file on the local filesystem, and the signature is writ-
ten to this file. We are now ready to transmit this file to the server—remember, we
want to bill the client as soon as possible for work completed!
In preparation for sending the signature to the server, the signature file contents
are read into a byte array via an instance of a
FileInputStream
. Using the
Prefs
instance to get specific configuration information, a URL
C
is constructed in order to
POST
data to the server. The query
String
of the URL contains the
jobid
and the
POST
data contains the image itself. A
BufferedOutputStream
D
is employed to
POST
data,
which consists of the captured signature in
JPEG format.
Read server
response
E
Check for successful
processing
F
Update local
JobEntry status
G
H
Set result and
store updated
JobEntry
Licensed to Deborah Christiansen <>
Download at Boykma.Com
336 CHAPTER 12 Putting it all together–the Field Service Application
Once the job data and signature have been sent to the server, the response data is
read back from the server
E
. A specific string indicates a successful transmission
F
.
Upon successful closing, the
JobEntry
status member is marked as CLOSED
G
,
and this
JobEntry
is converted to a
Bundle
so that it may be communicated to the
caller by invoking the
setResult()
method
H
. Once the
Handler
receives the “I’m
done” message and the
Activity
finishes, this data is propagated back to the
ShowJob
and all the way back to the
ManageJob Activity
.
And that thankfully wraps up the source code review for the Android side of
things! There were some methods omitted from this text to limit this already very long
chapter, so please be sure to examine the full source code. Now it’s time to look at the
server application.
12.5 Server code
A mobile application often relies on server-side resources, and our Field Service Appli-
cation is no exception. Since this is not a book on server-side development tech-
niques, server-related code, and discussion, things will be presented briefly and matter
of factly. We will introduce the
UI and the accompanying database structure that
makes up our list of job entries, and then we’ll review the two server-side transactions
that concern the Android application.
12.5.1 Dispatcher user interface
Before jumping into any server code–specific items, it is important to understand how
the application is organized. All jobs entered by a dispatcher are assigned to a particu-
lar mobile technician. That identifier is interpreted as an email address, as seen in the
Android example where the user
ID was used throughout the application. Once the
user
ID is specified, all of the records revolve around that data element. For example,
figure 12.14 demonstrates this by showing the jobs assigned to the author, fable-
Figure 12.14 The server-side dispatcher screen
Licensed to Deborah Christiansen <>
Download at Boykma.Com
337Server code
NOTE This application is available for testing the sample application yourself. It
is located at . Simply sign on and add
jobs for your email address.
Let’s now turn our attention to the underlying data structure, which contains the list
of jobs.
12.5.2 Database
As mentioned earlier in the architecture section, the database in use in this applica-
tion is
MySQL, with a single database table called tbl_jobs. The SQL to create this table
is provided in listing 12.20.
CREATE TABLE IF NOT EXISTS 'tbl_jobs' (
'jobid' int(11) NOT NULL auto_increment,
'status' varchar(10) NOT NULL default 'OPEN',
'identifier' varchar(50) NOT NULL,
'address' varchar(50) NOT NULL,
'city' varchar(30) NOT NULL,
'state' varchar(2) NOT NULL,
'zip' varchar(10) NOT NULL,
'customer' varchar(50) NOT NULL,
'product' varchar(50) NOT NULL,
'producturl' varchar(100) NOT NULL,
'comments' varchar(100) NOT NULL,
UNIQUE KEY 'jobid' ('jobid')
) ENGINE=MyISAM DEFAULT CHARSET=ascii AUTO_INCREMENT=25 ;
Each row in this table is uniquely identified by the
jobid
B
, which is an auto-incre-
menting integer field. The
identifier
field
C
corresponds to the user ID/email of
the assigned mobile technician. The
producturl
field
D
is designed to be a specific
URL to assist the mobile technician in the field to quickly gain access to helpful infor-
mation to assist in completing the assigned job.
The next section provides a road map to the server code.
12.5.3 PHP dispatcher code
The server-side dispatcher system is written in PHP and contains a number of files
working together to create the application. Table 12.3 presents a brief synopsis of each
source file to help you navigate the application should you choose to host a version of
this application yourself.
Listing 12.20 Data definition for tbl_jobs
Table 12.3 Server-side source code
Source File Description
addjob.php Form for entering new job information
closejob.php Used by Android application to submit signature
db.php Database connection info
Unique record id
B
User identification
C
Product URL
D
Licensed to Deborah Christiansen <>
Download at Boykma.Com
338 CHAPTER 12 Putting it all together–the Field Service Application
Of all of these files, only two actually concern the Android application. These are dis-
cussed in the next section.
12.5.4 PHP mobile integration code
When the Android application runs the
RefreshJobs Activity
, the server side gener-
ates an
XML stream. Without going into excessive detail on the server-side code, the
getjoblist.php file is explained in listing 12.21.
<?
require('db.php');
require('utils.php');
$theuser = $_GET['identifier'];
print (getJobsXML($theuser));
?>
The
getJobsXML
B
function retrieves data from the database and formats each row
into an
XML representation. It wraps the list of XML-wrapped job records in the
<job-
list>
tags along with the
<?xml
>
header declaration to generate the expected
XML structure used by the Android application. Remember, this is the data ultimately
parsed by the
SAX-based
JobListHandler
class, as shown in listing 12.12.
The other transaction that is important to our Android Field Service Application is
the closejob.php file, examined in listing 12.22.
<?
require('db.php');
export.php Used to export list of jobs to a csv file
footer.php Used to create a consistent look and feel for the footer of each page
getjoblist.php Used by Android application to request job XML stream
header.php Used to create a consistent look and feel for the header of each page
index.php Home page, including search form
manage.php Used to delete jobs on the web application
savejob.php Used to save a new job (called from addjob.php)
showjob.php Used to display job details and load into a form for updating
showjobs.php Displays all jobs for a particular user
updatejob.php Used to save updates to a job
utils.php Contains various routines for interacting with the database
Listing 12.21 getjoblist.php
Listing 12.22 closejob.php
Table 12.3 Server-side source code (continued)
Source File Description
Database routines
Helper routines
Extract the
user identifier
B
Build list of jobs
for this user
Licensed to Deborah Christiansen <>
Download at Boykma.Com
339Summary
require('utils.php');
$data = file_get_contents('php://input');
$jobid = $_GET['jobid'];
$f = fopen("~/pathtofiles/sigs/".$jobid.".jpg","w");
fwrite($f,$data);
fclose($f);
print(closeJob($_GET['jobid']));
?>
The
POST
-ed image data is read via the
file_get_contents()
function
B
. The secret
is the special identifier of
php://input
. This is the equivalent of a binary read. This
data is read into a variable named
$data
. The
jobid
is extracted from the query
String
C
. The image file is written out to a directory that contains signatures as JPEG
files, keyed by the
jobid
as part of the filename
D
. When a job has been closed and
the signature is requested by the Android application, it is this file that is requested in
the Android browser. The
closeJob
function
E
(implemented in utils.php) updates
the database to mark the selected job as
CLOSED.
That wraps up the review of the source code for this chapter’s sample application.
12.6 Summary
This chapter certainly was not short, but hopefully it was worth the read. The intent of
the sample application was to tie together many things learned in previous chapters
into a composite application that has real-world applicability to the kind of uses an
Android device is capable of bringing to fruition. Is this sample application produc-
tion ready? Of course not, but almost! That is, as they say, an exercise for the reader.
Starting with a simple splash screen, this application demonstrated the use of
Han-
dler
s and displaying images stored in the resources section of an Android project.
Moving along to the main screen, a simple
UI led to different activities useful for
launching various aspects of the realistic application.
Communications with the server downloaded
XML data, while showing the user a
ProgressDialog
along the way. Once the data stream commenced, the data was parsed
by the
SAX XML parser, using a custom
Handler
to navigate the XML document.
Managing jobs in a
ListView
was demonstrated to be as easy as tapping on the
desired job in the list. The next screen, the
ShowJobs Activity
, allowed even more
functionality with the ability to jump to a
Map
showing the location of the job and even
a specific product information page customized to this job. Both of those functions
were as simple as preparing an
Intent
and a call to
startActivity()
.
Once the mobile technician completed the job in the field, the
CloseJob
Activ-
ity
brought the touch-screen elements into play by allowing the user to capture a sig-
nature from his customer. That digital signature was then stamped with additional,
contextual information and transmitted over the internet to prove the job was done!
Jumping back to what you learned earlier, it would be straightforward to add location-
based data to further authenticate the captured signature.
The chapter wrapped up with a quick survey of the server-side components to
demonstrate some of the steps necessary to tie the mobile and the server sides
together.
Read in image data
B
Get the job ID
C
Write out the
image data
D
Close the job
E
Licensed to Deborah Christiansen <>
Download at Boykma.Com
340 CHAPTER 12 Putting it all together–the Field Service Application
The sample application is hosted on the internet and is free for you to test out with
your own Android application, and of course the full source code is provided for the
Android and server applications discussed in this chapter.
Now that we have shown what can be accomplished when exercising a broad range
of the Android
SDK, the next chapter takes a decidedly different turn as we explore
the underpinnings of Android a little deeper and look at building native C applica-
tions for the Android platform.
Licensed to Deborah Christiansen <>
Download at Boykma.Com
341
Hacking Android
This book has presented a cross section of development topics in an effort to
unlock the potential of the Android platform for the purpose of delivering useful,
and perhaps even fun, mobile applications. In chapter 12 we built a more compre-
hensive application, building on what was introduced in the prior chapters. As we
embark on this final chapter, we are leaving behind the comforts of working strictly
in the Android
SDK, Java, and Eclipse.
The Android
SDK is quite comprehensive and capable, as this book has
attempted to convey, but there may be times when your application requires some-
thing more. This chapter explores the steps required to build applications that run
in the Linux foundation layer of Android. To accomplish this, we are going to use
the C programming language. In this chapter we use the term Android/Linux to
refer to the Linux underpinnings of the Android platform. We also use the term
Android/Java to refer to a Java application built using the Android
SDK and Eclipse.
This chapter covers:
■
Android’s Linux foundation
■
Building a C application
■
Using the SQLite database from C
■
Bridging the gap with a Java client application
Licensed to Deborah Christiansen <>
Download at Boykma.Com
342 CHAPTER 13 Hacking Android
We demonstrate the steps of building an Android/Linux application commencing
with a description of the environment and the required tool chain. After an obligatory
Hello World–caliber application, we construct a more sophisticated application that
implements a daytime server. Ultimately any application built for Android/Linux
needs to bring value to the user in some form. In an effort to meet this objective, it is
desirable that Android/Java be able to interact in a meaningful manner with our
Android/Linux application. To that end we will build a traditional Android applica-
tion using Java in Eclipse to interact with the Android/Linux server application.
Let’s get started with an examination of the requirements of building our first C
application for Android.
13.1 The Android/Linux:junction
Applications for Android/Linux are markedly different from applications con-
structed with the Android
SDK. Applications built with Eclipse and the context-sensitive
Java syntax tools make for a comfortable learning environment. In line with the spirit
of Linux development, from here on out all development takes place with command-
line tools and nothing more sophisticated than a text editor. While the Eclipse environ-
ment could certainly be leveraged for non-Java development, the focus of this chapter
is on core C language coding for Android/Linux. The first place to start is with the cross-
compiling tool chain required to build Android/Linux applications.
13.1.1 Tool chain
Building applications for Android/Linux requires the use of a cross-compiler tool
chain from CodeSourcery. The specific version required is the Sourcery G++ Lite Edi-
tion for
ARM, found at />package2548?@template=release. Once installed, the Sourcery G++ tool chain con-
tributes a number of useful tools to assist in the creation of applications targeting
Linux on
ARM, which is the architecture of the Android platform. The ARM platform
is a 32-bit reduced instruction set computer (
RISC) processor, used in numerous
devices including smartphones,
PDAs, and technology appliances such as low-end
routers and disk drive controllers. The CodeSourcery installation comes with a fairly
comprehensive set of
PDF documents describing the main components of the tool
chain, including the C compiler, the assembler, the linker, and many more tools. A full
discussion of these versatile tools is well beyond the scope of this chapter; however,
three tools in particular are demonstrated in the construction of this chapter’s sample
applications. We will be using these tools right away, so we briefly introduce them in
this section.
The first and most important tool introduced is gcc. This tool is the compiler
responsible for turning C source files into object files and optionally initiating the link
process to build an executable suitable for the Android/Linux target platform. The
full name of the gcc compiler for our cross-compilation environment is arm-none-
linux-gnueabi-gcc. This tool is invoked from the command line of the development
Licensed to Deborah Christiansen <>
Download at Boykma.Com
343The Android/Linux:junction
machine. The tool takes command-line arguments of one or more source files along
with zero or more of the numerous available switches.
The linker, arm-none-linux-gnueabi-ld, is responsible for producing an executable
application for our target platform. When performing the link step, object code along
with routines from one or more library files are combined into a relocatable, execut-
able binary file, compatible with the Android Emulator’s Linux environment. While a
simple application may be compiled and linked directly with gcc, the linker is used
when creating applications with more than one source file and/or more complex
application requirements.
If the linker is responsible for constructing applications from more than one con-
tributing component, the object dump utility is useful for dissecting, or disassembling,
an application. We introduce the objdump, or arm-none-linux-gnueabi-objdump, tool
presently; its usefulness becomes more apparent later in the chapter. This utility
examines an executable application—a binary file—and turns the machine instruc-
tions found there into an assembly language listing file, suitable for analysis.
NOTE: All of the examples in this chapter take place on a Windows XP worksta-
tion. It is also possible to use this tool chain on a Linux development
machine.
With this brief introduction behind us, let’s build the obligatory Hello Android appli-
cation to run in the Linux foundation of the Android Emulator.
13.1.2 Building an application
The first thing we want to accomplish with our journey into Android/Linux develop-
ment is to print something to the screen of the emulator to demonstrate that we are
running something on the platform outside the Android
SDK and its Java application
environment. There is no better way to accomplish this feat than by writing a variant
of the Hello World application. At this point, there will be little talk of Android activi-
ties, views, or resource layouts. Most code samples in this chapter are in the C lan-
guage. Listing 13.1 shows the code listing for our first Hello Android application.
#include <stdio.h>
int main(int argc,char * argv[])
{
printf("Hello, Android!\n");
return 0;
}
Virtually all C language applications require a
#include
header file containing func-
tion definitions, commonly referred to as prototypes. In this case, the application
includes the header file
B
for the standard input and output routines, stdio.h. The
standard C language entry point for user code
C
is the function named
main
. The
Listing 13.1 Hello.c
Standard include file
B
Application entry point
C
Display a string
D
Licensed to Deborah Christiansen <>
Download at Boykma.Com
344 CHAPTER 13 Hacking Android
function returns an integer return code (a value of zero is returned in this simple
example) and takes two arguments. The first,
argc
, is an integer indicating the num-
ber of command-line arguments passed in to the program when invoked. The second,
argv
, is an array of pointers to null-terminated strings representing each of the com-
mand-line arguments. The first argument,
argv[0]
, is always the name of the program
executing. This application has but a single useful instruction,
printf
, which is to
write to standard output (the screen) a textual string
D
. The
printf
function is
declared in the header file, stdio.h.
To build this application, we employ the gcc tool:
arm-none-linux-gnueabi-gcc hello.c -static -o hellostatic
There are a few items to note about this command-line instruction:
■
The compiler is invoked with the full name arm-none-linux-gnueabi-gcc.
■
The source file is named hello.c.
■
The
–static
command-line switch is used to instruct gcc to fully link all
required routines and data into the resulting binary application file. In essence,
the application is fully standalone and ready to be run on the target Android
Emulator without any additional components. An application that’s statically
linked tends to be rather large because so much code and data are included in
the executable file. For example, this statically linked application with basically
a single line of code weighs in at 568,231 bytes. Ouch! If this
-static
switch is
omitted, the application is built without any extra routines linked in. In this
case the application will be much smaller; however, it will rely on finding com-
patible routines on the target system in order to run. For now, we are keeping
things simple and building our sample application in such a manner that all
support routines are linked statically.
■
The output switch,
-o
, is used to request the name of the executable applica-
tion to be hellostatic. If this switch is not provided, the default application name
is a.out.
Now that the application is built, it’s time to try it out on
the Android Emulator. In order to do this we will rely on
the adb tool introduced in chapter 2.
13.1.3 Installing and running the application
In preparation to install and run the Hello Android
application, let’s take a tour of our build and testing envi-
ronment. We need to identify four distinct environ-
ments/tools and clearly understand them when building
applications for Android/Linux. The first environment
to grasp is the big-picture architecture of the Android
Emulator running essentially on top of Linux, as shown
in figure 13.1.
Figure 13.1 Android runs
atop a Linux kernel.
Licensed to Deborah Christiansen <>
Download at Boykma.Com
345The Android/Linux:junction
As presented in the early chapters of this book, there is a Linux kernel running
underneath the pretty, graphical face of Android. There exist device drivers, process
lists, and memory management, among other elements of a sophisticated operat-
ing system.
As shown in the previous section, we need an environment in which to compile our
C code. This is most likely to be a command-prompt window on a Windows machine,
or a shell window on a Linux desktop machine, exercising the CodeSourcery tool
chain. This is the second environment to be comfortable operating within.
NOTE The CodeSourcery tool chain is not designed to run on the Android/Linux
environment itself, so the development work being done here is consid-
ered to be cross compiling. The figures and example code presented in this
chapter were taken from a Windows development environment used by the
author. There are a number of long path and directory structures in the
Android
SDK and the CodeSourcery tools. In order to help simplify some
of the examples and keep certain command line entries from running over
multiple lines some drive mappings were set up. For example a drive letter
of “m:” seen in scripts and figures corresponds to the root location of
source code examples on the author’s development machine. Likewise the
“g:” drive points to the currently installed Android
SDK on the author’s
development machine. Note that this technique may also be used in Linux
of Mac
OSX environments with a “soft link” (ln) command.
The next requirement is to copy our newly constructed binary executable application
to the Android Emulator. This can be done with a call to the adb utility or by using the
DDMS view in Eclipse. Both of these tools were demonstrated in chapter 2. Here is the
syntax for copying the executable file to the Android Emulator:
adb push hellostatic /data/ch13
Note a few items about this command:
■
The command name is
adb
. This command takes a number of arguments that
guide its behavior. In this case, the subcommand is
push
, which means to copy a
file to the Android Emulator. There is also a
pull
option for moving files from
the Android Emulator file system to the local development machine’s hard drive.
■
After the
push
option, the next argument,
hellostatic
in this case, represents
the local file, stored on the development machine’s hard drive.
■
The last argument is the destination directory (and/or filename) for the trans-
ferred file. In this sample, we are copying the hellostatic file from the current
working directory to the /data/ch13 directory on the Android Emulator.
Be sure that the desired target directory exists first! You can accomplish this with a
mkdir
command on the adb shell, described next.
The final tool to become familiar with is the
shell
option of the adb shell. Using this
command, we can interact directly on the Android Emulator’s file system with a limited
shell environment. To enter this environment (and assuming the Android Emulator is
Licensed to Deborah Christiansen <>
Download at Boykma.Com
346 CHAPTER 13 Hacking Android
already running), execute
adb shell
from the command line. When invoked, the shell
displays the
#
prompt, just as if you had made a secure shell (ssh) or telnet connection
to a remote Unix-based machine. Figure 13.2 shows these steps in action.
Note the sequence shown in figure 13.2. First the application is built with a call to gcc.
Next we push the file over to the Android Emulator. We then connect to the Android
emulator via the
adb shell
command, which gives us the
#
prompt, indicating that we
are now on the shell. Next we change directory (
cd
) to /data/ch13. Remember that
this is Linux, so the application by default may not be executable. A call to chmod sets
the file’s attributes, turning on the executable bits and allowing the application to be
invoked. Lastly, we invoke the application with a call to ./hellostatic. The search path
for executable applications does not by default include the current directory on a
Linux system, so we must provide a more properly qualified path, which explains the
./ prefix. Of course, we can see that our application has run successfully because we
see the “Hello, Android!” text displayed on the screen.
Congratulations! We have a successful, albeit simple, Android/Linux application
running on the Android Emulator. In the next section, we take a quick look at stream-
lining this build process.
13.1.4 Build script
In the last section we reviewed each step in building and preparing to test our applica-
tion. Due to the rather tedious nature of executing each of these steps, we have a
strong desire to utilize command-line tools when building C applications, as it greatly
speeds up the edit, compile, copy, debug cycle. This example with only a single C
source file is rather simplistic; however, when multiple source files must be linked
together, the thought of having a build script is very appealing. The need for a build
Figure 13.2 The build, copy, run cycle
Licensed to Deborah Christiansen <>
Download at Boykma.Com
347A better way
script is particularly evident where there are numerous source files to compile and
link, as we will encounter later in this chapter.
Listing 13.2 shows the build script for our Hello Android application.
arm-none-linux-gnueabi-gcc hello.c -static -o hellostatic
g:\tools\adb push hellostatic /data/ch13
g:\tools\adb shell "chmod 777 /data/ch13/hellostatic"
A call to arm-none-linux-gnueabi-gcc
B
compiles the source file, hello.c. The file is stat-
ically linked against the standard C libraries, and the resulting binary executable file is
written out as hellostatic. The file hellostatic is copied to the Android Emulator
C
and
placed in the directory /data/ch13. The permissions for this file are changed
D
,
permitting execution. Note the use of the adb shell with a quote-delimited command.
Once this command executes, the adb application exits and returns to the Windows
command prompt.
This example can be extended to perform other build steps or cleanup proce-
dures such as removing temporary test data files on the Android Emulator or any sim-
ilarly helpful tasks. As you progress, it will become clear what commands to put into
your build script to make the testing process more efficient.
Now that the pressure is off—we have successfully written, built, and executed an
application in the Android/Linux environment—it is time to deal with the problem-
atic issue of a simple application requiring a file size of half a megabyte.
13.2 A better way
That was fun, but who wants a 500+ KB file that only displays something to the screen?
Recall that the
–static
flag links in the essentials for running the application, includ-
ing the input/output routines required for actually printing a message to the screen.
If you are thinking there must be a better way, you are correct; we need to link our
application to existing system libraries rather than including all of that code in our
application’s executable file.
13.2.1 The static flag, revisited
When an application is built with the
–static
flag, it is entirely self-contained, mean-
ing that all of the routines it requires are linked directly into the application. This is
not new information; we have already discussed this. It has another important implica-
tion beyond just the size of the code: it also means that using Android resident code
libraries is a bigger challenge. Let’s dig deeper to understand why. In order to do this,
we have to look at the filesystem of Android/Linux.
System libraries in Android/Linux are stored in the directory /system/lib. This
directory contains important functionality, such as Open
GL, SQLite, C standard rou-
tines, Android runtime,
UI routines, and much more. Figure 13.3 shows a list of the
available libraries in the Android Emulator. In short, everything that is specific to the
Listing 13.2 Build script for Hello Android, buildhello.bat
B
Compile and link
Copy file
C
Change permissions
D
Licensed to Deborah Christiansen <>
Download at Boykma.Com
348 CHAPTER 13 Hacking Android
Android platform is found in /system/lib, so if we
are going to build an application that has any signif-
icant functionality, we cannot rely on the libraries
that ship with CodeSourcery alone. We have to write
an application that can interact with the Android
system libraries. This calls for a side trip to discuss
the functionality of the linker application.
When building an application that requires the
use of the linker, a few things change. First, the
gcc
command is no longer responsible for invoking the
linker. Instead, the
–c
option is used to inform the
tool to simply compile the application and leave
the link step to a subsequent build step. Here is
an example:
arm-none-linux-gnueabi-gcc –c hello.c -o hello.o
This command tells the compiler to compile the file
hello.c and place the resulting object code into the
file hello.o.
This process is repeated for as many source files
as necessary for a particular application. For our
sample application, we have only this single source
file. However, in order to get an executable applica-
tion, we must employ the services of the linker.
Another important change in the build environ-
ment is that we need to get a copy of the Android/
Linux libraries. We are compiling on the Windows platform (or Linux if you prefer),
so we need to get access to the Android Emulator’s /system/lib contents in order to
properly link against the library files. Just how do we go about this? We use the adb
utility, of course! Listing 13.3 shows a Windows batch file used to extract the system
libraries from a running instance of the Android Emulator. A few of the libraries are
pointed out.
adb pull /system/lib/libdl.so m:\android\system\lib
adb pull /system/lib/libthread_db.so m:\android\system\lib
adb pull /system/lib/libc.so m:\android\system\lib
adb pull /system/lib/libm.so m:\android\system\lib
adb pull /system/lib/libGLES_CM.so m:\android\system\lib
adb pull /system/lib/libssl.so m:\android\system\lib
adb pull /system/lib/libhardware.so m:\android\system\lib
adb pull /system/lib/libsqlite.so m:\android\system\lib
many entries omitted for brevity
Figure 13.4 shows these files now copied over to the development machine.
Listing 13.3 pullandroid.bat
libdl.so, dynamic loading
libc.so, C runtime
libm.so, math library
libGLES_CM.so,
OpenGL
libsqlite.so,
SQLite database
Figure 13.3 Available libraries in /
system/lib
Licensed to Deborah Christiansen <>
Download at Boykma.Com
349A better way
Once these files are available on the development machine, we can proceed with the
build step using the linker.
13.2.2 Linking
The name for the linker is arm-none-linux-gnueabi-ld. In most Linux environments the
linker is named simply ld. When using the linker, many command-line options are
available for controlling the output. There are so many options that an entire book
could be written covering no other topic. Our interest in this chapter is writing appli-
cations, and we are taking as streamlined an approach as possible. So while there may
be other options available to get the job done, the aim here is to learn how to build an
application that enables us as much flexibility as possible to employ the Android system
Figure 13.4 Android
libraries pulled to the
development machine
Licensed to Deborah Christiansen <>
Download at Boykma.Com
350 CHAPTER 13 Hacking Android
libraries. To that end, listing 13.4 shows the build script for building a dynamic version
of Hello Android.
arm-none-linux-gnueabi-gcc -c hello.c -o hello.o
arm-none-linux-gnueabi-ld -entry=main -dynamic-linker /system/bin/linker
-nostdlib -rpath /system/lib -rpath-link /android/system/lib -L
/android/system/lib -l android_runtime -l c -o
hellodynamic hello.o
g:\tools\adb push hellodynamic /data/ch13
g:\tools\adb shell "chmod 777 /data/ch13/hellodynamic"
This build script passes the
–c
compiler option
B
when compiling the source file,
hello.c. This way gcc does not attempt to link the application. The link command,
arm-none-linux-gnueeabi-ld
, has a number of options
C
. These options are more
fully described in table 13.1. As in the previous example, adb is used to push the exe-
cutable file
D
over to the Android Emulator. The permissions are also modified to
mark the application as executable.
Listing 13.4 Build script for dynamically linked Android application
Table 13.1 Linker options
Linker option Description
-entry=main
Indicates the entry point for the application, in this
case, the function named
main.
-dynamic-linker /system/bin/linker
Tells the application where the dynamic linker appli-
cation may be found at runtime. The /system/bin/
linker path is found on the Android Emulator, not the
development environment.
-nostdlib
Tells linker to not include standard C libraries when
attempting to resolve code during the link process.
-rpath /system/lib
Tells the executable where libraries can be found at
runtime. This works in a manner similar to the envi-
ronment variable
LD_LIBRARY_PATH.
-rpath-link /android/system/lib
Tells the linker where libraries can be found when
linking.
-L /android/system/lib
Tells the linker where libraries can be found. This is
the linker import directory.
-l android_runtime
Tells the linker that this application requires rou-
tines found in the library file libandroid_runtime.so.
-l c
Tells the linker that this application requires rou-
tines found in the library file libc.so.
-o hellodynamic
Requests an output filename of hellodynamic.
hello.o
Includes hello.o as an input to the link process.
Compile only
Link
C
Copy and change
permissions
D
B
Licensed to Deborah Christiansen <>
Download at Boykma.Com