SAS Data Integration Studio 3.3- P37 doc
Bạn đang xem bản rút gọn của tài liệu. Xem và tải ngay bản đầy đủ của tài liệu tại đây (525.95 KB, 5 trang )
Example Process Flows Create and Populate the New Job 175
Metadata for the source table, a SAS data set called TigersHitting2002, is
available in a current metadata repository.
Output for the report will be sent to the
Output
tab in the Process Designer
window. The appropriate option must be set so that the
Output tab appears in the
Process Designer window. For details, see “Process Designer Window” on page 20.
The main metadata repository is under change-management control. You do not
have to check out the metadata for the TigersHitting2002 table. (The metadata for
this table will not be updated.)
You have selected a default SAS application server for SAS Data Integration
Studio, as described in “Selecting a Default SAS Application Server” on page 96.
This server can access the TigersHitting2002 table that are used in the job.
It is assumed that you have started SAS Data Integration Studio and have opened
the appropriate metadata profile. For this example, the appropriate metadata
profile would specify the repository that will enable you to access the
PrintHittingStatistics transformation and the metadata for the source table, which
is TigersHitting2002.
Create and Populate the New Job
Follow these steps to create a complete process flow diagram, from sources, through
transformations, to targets:
1 From the SAS Data Integration Studio menu bar, select Tools Process
Designer. The New Job wizard displays.
2
Enter PrintHittingStats Job in the
Name field. Then enter a description for the job
in the
Description
field.
3 Click Finish. An empty job will open in the Process Designer window. The job has
now been created and is ready to be populated with the PrintHittingStatistics
transformation template and the source table, TigersHitting2002.
4
On the SAS Data Integration Studio desktop, click the
Process
tab to display the
Process Library.
5 In the Process Library, open the
UserDefined
folder and the Reports
subfolder.
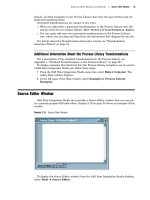
6 Click, hold, and drag the
PrintHittingStatistics transformation into the
empty Process Designer window. Release the mouse button to display the template
in the Process Designer window for the new job, as shown in the following display.
Display 10.26 PrintHittingStatistics Template, Unpopulated
7 On the desktop, click the Inventory tab to display the Inventory tree.
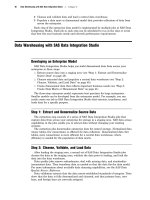
8 In the Inventory tree, click and drag the TigersHitting2002 table into the drop
zone (dashed-line box) in the Process Designer window, then release the mouse
176 Configure the PrintHittingStatistics Transformation Chapter 10
button. The TigersHitting2002
table appears as a source in the new job, as
shown in the following display.
Display 10.27 PrintHittingStatistics Template, Populated
The job now contains a complete process flow diagram, from the source through the
transformation. No target is required in the process flow diagram because output for
the job will be sent to the Output
tab in the Process Designer window.
The next task is to specify options in the PrintHittingStatistics transformation.
Configure the PrintHittingStatistics Transformation
The example job now contains a complete process flow diagram. The job is not ready
to run, however. In order to produce the report that is shown in Display 10.24 on page
174, a title must be specified, and a set of columns must be selected from the source.
Then, the sum of the values in the
HR column must be calculated. Assume that the
steps for doing these tasks have been documented by the person who created the
PrintHittingStatistics transformation.
Follow these steps to specify options for the PrintHittingStatistics transformation:
1 In the Process Designer window, select the PrintHittingStatistics
transformation. Then select File
Properties from the menu bar. A properties
window displays.
Example Process Flows Configure the PrintHittingStatistics Transformation 177
2 Click the Options
tab. The default options for the
PrintHittingStatistics
transformation are shown in the following display.
Display 10.28 Transformation Options Window
Using these settings, the following %LET statements are generated when you
run the job:
%let HomeRuns = %nrquote(HR);
%let ReportTitle = %nrquote(2002 Power Hitting Statistics);
3 In the Home runs field, enter the name of the source table column that contains
home run values. In Display 10.25 on page 174, this is the
HR column.
4 In the Report title field, enter a name for the report, such as Tigers Hitting
Statistics 2002
.
178 Run the Job and Check the Log Chapter 10
5 Click the Column Options
tab. Use this tab to select columns from the source
table that should appear in the report. For the report that is shown in Display
10.24 on page 174, select the columns
Name, G, AB,
HR, and
RBI. When you are
finished, the
Column Options
tab should resemble the following display.
Display 10.29 Column Options Window
Using these settings, the following %LET statement is generated when you run
the job:
%let ColumnsToPrint = "Name"n "G"n "AB"n "HR"n "RBI"n;
6 When you are finished entering metadata, click OK to save your changes.
The job is now ready to run.
Run the Job and Check the Log
After the metadata for a job is complete, you must submit the job for execution in
order to create targets on the file system.
1 With the job displayed in the Process Designer window, select Process Submit
from the menu bar. SAS Data Integration Studio generates code for the job and
submits the code to a SAS application server.
2 If a pop-up error message appears, or if you want to look at the log for the
completed job, click the
Log tab in the Process Designer window.
3 On the Log tab, scroll through the SAS log information that was generated during
the execution of the job, as shown in the following display.
Example Process Flows Check In the Metadata 179
Display 10.30 Log Tab with Text from the PrintHittingStats Job
The code that was executed for the job is available in the Source Editor
tab in
the Process Designer window.
4
If you find errors in the source code for a step, select the corresponding
transformation in the process flow diagram. Then select
File
Properties from
the menu bar. A properties window displays.
5 Correct the metadata and resubmit the job until there are no more errors.
6 After the job runs without error, save the job. Select File
Save from the menu
bar.
The next task is to verify that the job created the correct output.
Verify Job Outputs
After the job runs without error and has been saved, you should confirm that the
target table(s) contain the data you need, in the format that best communicates the
purpose of the targets. In the current example, the output is sent to the
Output tab in
the Process Designer window. When you click that tab, a report similar to the one
shown in Display 10.24 on page 174 should display.
If the report needs to be improved, change the properties of the transformation that
feeds data to the report. If the outputs are correct, you can check in the job.
Check In the Metadata
Check in all objects in the Project tree as follows:
1 In the Project tree, select the repository icon.
2 From the SAS Data Integration Studio menu bar, select Project Check In
Repository. All of the objects in the project repository are checked into the
change-managed repository.