SAS Data Integration Studio 3.3- P34 docx
Bạn đang xem bản rút gọn của tài liệu. Xem và tải ngay bản đầy đủ của tài liệu tại đây (553.76 KB, 5 trang )
160 Configure the SQL Join Transformation Chapter 10
Specify GROUP BY Options for the Join
In the previous section, the Total_Retail_Price column in the join result table was
changed to a calculated column that sums all of its values. All retail transactions for all
employees would be added together. However, the report that you want to create
summarizes the retail transactions for each employee.
To limit the scope of the Total_Retail_Price column to each employee, add a GROUP
BY option that applies to all of the other mapped columns in the join. That is, you
would specify the following columns in the
Group By
tab of the SQL Join
transformation: Employee_Name, Employee_ID, Job_Title, Company, Department,
Section, and Org_Group.
Follow these steps to specify GROUP BY options in the SQL Join transformation:
1
In the properties window for the SQL Join transformation, click the
Group By
tab.
2
In the
Columns pane, select all columns except the Total_Retail_Price column.
Then click the right arrow to move the columns into the
Group by columns
pane.
The
Group By
tab should resemble the following display.
Display 10.9 Columns Specified on the Group By Tab
3 Click Apply to save your changes without closing the properties window.
4 (Optional) To see how the SQL code is changed by the expression that you just
defined, click the
SQL tab. The code on the SQL tab should resemble the following
sample:
SELECT ’ORGANIZATION_DIM’n.’Employee_ID’n,
’ORGANIZATION_DIM’n.’Company’n, ’ORGANIZATION_DIM’n.’Department’n,
’ORGANIZATION_DIM’n.’Section’n, ’ORGANIZATION_DIM’n.’Org_Group’n,
’ORGANIZATION_DIM’n.’Job_Title’n, ’ORGANIZATION_DIM’n.’Employee_Name’n,
SUM(’ORDER_FACT’n.’Total_Retail_Price’n) format=8. AS
’Total_Retail_Price’n
FROM ’orstar’n.’ORGANIZATION_DIM’n
INNER JOIN ’orstar’n.’ORDER_FACT’n
ON (’ORDER_FACT’n.’Employee_ID’n = ’ORGANIZATION_DIM’n.’Employee_ID’n)
Example Process Flows Configure the Loader Transformation 161
GROUP BY ’ORGANIZATION_DIM’n.’Employee_ID’n,
’ORGANIZATION_DIM’n.’Company’n, ’ORGANIZATION_DIM’n.’Department’n,
’ORGANIZATION_DIM’n.’Section’n, ’ORGANIZATION_DIM’n.’Org_Group’n,
’ORGANIZATION_DIM’n.’Job_Title’n, ’ORGANIZATION_DIM’n.’Employee_Name’n
5 The updates to the SQL Join transformation are complete. Click OK
to save your
changes and close the properties window for the transformation.
Update the Metadata for the Total Sales By Employee Table
When the metadata for the Total Sales By Employee table was created, it was not
fully optimized for the report shown in Display 10.1 on page 150. In order to produce
the report, you must make the following changes to the column metadata for the
Total_Sales_By_Employee table:
Rename the
Total_Retail_Price
column to
Total_Revenue to better match the
summarized data that you specified in “Change One Column to a Calculated
Column” on page 157.
Specify formatting for the
Total_Revenue
column so that its contents will display
properly in the report.
Follow these steps to update column metadata for Total Sales By Employee table:
1
In the Process Designer window, select
Total_Sales_By_Employee, then select
File
Properties from the menu bar. A properties window displays.
2 In the properties window, click the
Columns
tab.
3 Click the
Total_Retail_Price column. Change the name to
Total_Revenue.
4 In the
Total_Revenue column, scroll right to display the
Format column. Enter
the format
DOLLAR13.2
to specify the appearance of this column in the HTML
output file.
5 In the
Total_Revenue column, click twice in the
Sort
column to display a
pull-down icon. Click the icon and select the DSCFORMATTED option. This
option sorts the rows in descending order, based on the formatted value of the
Total_Revenue column.
6 Click
OK to save your changes and close the properties window for the table.
Configure the Loader Transformation
You must make two updates to the Loader transformation for the Total Sales By
Employee table:
On the Mapping tab in the transformation properties window, map the source
table column
Total_Retail_Price to the target table column
Total_Revenue.
The individual sales figures in the
Total_Retail_Price column are summarized
in the
Total_Revenue column., so these two columns must be mapped to each
other. The Loader transformation will automatically map source and target
columns with the same name, but not map columns with different names.
On the Load Techniques tab, select the Drop Table option. For SAS tables such
as Total Sales By Employee, the
Drop Table option conserves disk space.
Follow these steps to update the Loader transformation for the Total Sales By
Employee table:
1 In the Process Designer window, select the Loader transformation. Then select
File
Properties from the menu bar. A properties window displays.
162 Run the Job and Check the Log Chapter 10
2 In the properties window, click the Mapping
tab.
3 On the
Mapping
tab, position the cursor on the name of the source column
Total_Retail_Price, then click and drag the mapping arrow to the target
column
Total_Revenue. These two columns are now mapped. The
Mapping tab
should resemble the following display.
Display 10.10 Column Mapping in the Loader
4 In the properties window, click the Load Technique tab. Select the Drop Target
radio button to replace the physical table each time the job is run.
The Loader is now configured and is ready to run.
Run the Job and Check the Log
At this point, you have a process flow that will join two source tables, extract
information from columns, calculate total sales revenue for each employee, and write
the results to the Total_Sales_By_Employee table. Before you add a transformation that
will produce the desired report, you might want to verify that the current process flow
will produce the information that is required in the report.
1 With the job displayed in the Process Designer window, select Process Submit
from the menu bar. SAS Data Integration Studio generates code for the job and
submits the code to a SAS application server. The server executes the code. A
pop-up window displays to indicate that the job is running.
2 If a pop-up error message appears, or if you want to look at the log for the
completed job, click the
Log tab in the Process Designer window.
3 On the Log tab, scroll through the SAS log information that was generated during
the execution of the job.
The code that was executed for the job is available on the
Source Code tab in
the Process Designer window.
4 If you find errors in the source code for a step, select the corresponding
transformation in the process flow diagram, then select File
Properties from
the menu bar. A properties window displays.
Example Process Flows Add the Publish to Archive Transformation to the Process Flow 163
5 Correct the metadata and resubmit the job until there are no more errors.
6 After the job runs without error, save the job. Select File
Save from the menu
bar.
The next task is to verify that the job created the correct output.
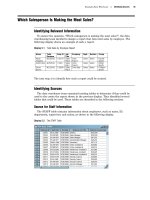
Verify the Contents of the Total_Sales_By_Employee Table
The data that was loaded into the Total_Sales_By_Employee table should be
appropriate for the report that you want to create (Display 10.1 on page 150). To view
data in the Total_Sales_By_Employee table, select the table, then select View
View
Data from the menu bar. The View Data window opens, as shown in the following
display.
Display 10.11 Contents of the Total_Sales_By_Employee Table
The data in the Total_Sales_By_Employee table appears to be appropriate for the
report. The next task is to add a report transformation to the end of the process flow.
Add the Publish to Archive Transformation to the Process Flow
The Publish to Archive transformation generates a SAS package file and an optional
HTML report. The package file can be published by SAS programs that use the
publishing functions in SAS Integration Technologies software.
Follow these steps to add the Publish to Archive transformation to the process flow:
1 From the SAS Data Integration Studio desktop, click the Process tab to display
the Process Library.
164 Add the Publish to Archive Transformation to the Process Flow Chapter 10
2 In the Process Library, open the Publish
folder. Click and drag the
Publish to
Archive
transformation into any location in the Process Designer and release the
mouse button. As shown in the following display, an icon and an input drop zone
appear in the Process Designer.
Display 10.12 Example Job with Publish to Archive