SAS Data Integration Studio 3.3- P31 doc
Bạn đang xem bản rút gọn của tài liệu. Xem và tải ngay bản đầy đủ của tài liệu tại đây (655.46 KB, 5 trang )
Registering Data Targets Specify Physical Storage Information for the New Table 145
Specify Physical Storage Information for the New Table
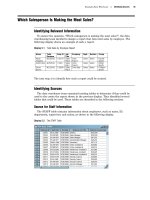
Use the physical storage window to specify the format and location of the table that
you are registering, as shown in the following display.
Display 9.6 Physical Storage Window
In this window you specify the database management system that is used to create
the target, the library where the target is to be stored, and a valid name for the target.
Follow these steps:
1 Because the target is a SAS data set, in the DBMS field, accept the default value of
SAS.
2 In the Library field, use the selection arrow to select Report Table Lib.
3 In the Name field, enter a valid SAS name for the target. (For details about SAS
names, see the SAS Data Integration Studio Help.) For this example, accept the
default: Total_Sales_By_Employee.
4 When you are finished specifying physical storage information, click Next. The
Custom tree group selection window displays.
Usage Hints for the Physical Storage Window
Remember the following as you use the physical storage window:
The name that you specify in the Name field must follow the rules for table names
in the format that you select in the
DBMS field. For example, if SAS is the selected
DBMS, the name must follow the rules for SAS data sets. If you select another
DBMS, the name must follow the rules for tables in that DBMS.
For a SAS table or a table in a database management system, you can enable the
use of mixed-case names or special characters in names. See “Setting Name
Options for Individual Tables” on page 109.
You can specify new libraries or edit the metadata definitions of existing libraries
using the
New and Edit buttons.
146 Specify a Custom Tree Group for the Current Metadata Chapter 9
You can use the Table Option
button to specify options for SAS tables and tables
in a DBMS.
Specify a Custom Tree Group for the Current Metadata
Use the Select Group window to specify a Custom tree group for the table that you
are registering. A Custom tree group is a folder that you can use to keep similar kinds
of metadata together in the Custom tree on the SAS Data Integration Studio desktop.
Display 9.7 Select Group Window
For this example, assume that you do not want to specify a Custom tree group for
the table. Select
Foundation and click Next. The finish window displays.
Registering Data Targets Check In the Metadata 147
Save Metadata for the Table
Use the finish window to review the metadata that you entered.
Display 9.8 Finish Window
If the metadata is correct, click Finish. The metadata for the table is written to a
current metadata repository.
Note: The table does not yet exist on the file system. You have only specified the
metadata that is used to create the table.
At this point, you could add the metadata that you just created to a job, or you could
check in the metadata.
Check In the Metadata
Follow these steps to check in the metadata for the target table:
1 In the Project tree, select the repository icon.
2
From the SAS Data Integration Studio menu bar, select Project
Check In
Repository. All objects in the project repository are checked into the
change-managed repository.
The new table is now ready to be used in a job, as described in “Example: Creating a
Job That Joins Two Tables and Generates a Report” on page 150.
148 Next Tasks Chapter 9
Next Tasks
After you have specified the metadata for one or more targets, you can specify
metadata for the job that will read the appropriate sources and create the desired
targets on a file system.
149
CHAPTER
10
Example Process Flows
Using Jobs to Create Process Flows
149
Example: Creating a Job That Joins Two Tables and Generates a Report
150
Preparation
150
Check Out Existing Metadata That Must Be Updated
151
Create the New Job and Specify the Main Process Flow
151
(Optional) Reduce the Amount of Data Processed by the Job 153
Configure the SQL Join Transformation
155
Specify Column Mappings
155
Change One Column to a Calculated Column
157
Specify GROUP BY Options for the Join
160
Update the Metadata for the Total Sales By Employee Table
161
Configure the Loader Transformation
161
Run the Job and Check the Log 162
Verify the Contents of the Total_Sales_By_Employee Table 163
Add the Publish to Archive Transformation to the Process Flow 163
Configure the Publish to Archive Transformation 166
Run the Job and Check the Log 166
Check the HTML Report 167
Check In the Metadata 167
Example: Creating a Data Validation Job 167
Preparation 167
Create and Populate the New Job 168
Configure the Data Validation Transformation 170
Run the Job and Check the Log 172
Verify Job Outputs 173
Example: Using a Generated Transformation in a Job 174
Preparation 174
Create and Populate the New Job 175
Configure the PrintHittingStatistics Transformation 176
Run the Job and Check the Log 178
Verify Job Outputs 179
Check In the Metadata 179
Using Jobs to Create Process Flows
After you have specified the metadata for one or more sources and targets, you can
specify metadata for the job that will read the appropriate sources and create the
desired targets in physical storage. Use the examples in this chapter, together with the
general steps that are described in “Creating, Running, and Verifying Jobs” on page 99,
to specify jobs that will create and load the desired targets.