SAS Data Integration Studio 3.3- P28 docx
Bạn đang xem bản rút gọn của tài liệu. Xem và tải ngay bản đầy đủ của tài liệu tại đây (788.25 KB, 5 trang )
130 Set Delimiters and Parameters Chapter 8
Set Delimiters and Parameters
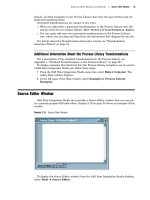
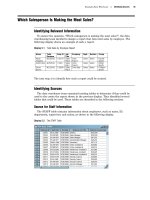
Follow these steps to set delimiters and parameters for the external file:
1
Deselect the
Blank
check box in the
Delimiters group box. Then, select the
Comma check box, as shown in the following display. This step is necessary because
the
Blank check box is selected by default. However, the employeeFlatFile.csv file
is comma-delimited. This change ensures that the wizard parameters match the
incoming data.
Display 8.9 Delimiters and Parameters Window
2 Accept the remaining defaults and click Next. The Column Definitions window
displays.
Registering Data Sources Define the Columns for the External File Metadata 131
Define the Columns for the External File Metadata
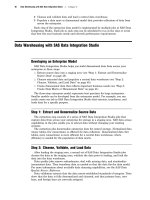
Follow these steps to create column definitions for the external file:
1
Click
Refresh
to view the data from employeeFlatFile.csv on the
File
tab in the
view pane at the bottom of the window, as shown in the following display.
Display 8.10 Delimited Data in the Column Definitions Window
132 Define the Columns for the External File Metadata Chapter 8
2 The next step populates preliminary data into the columns component of the
Columns Definitions window. To begin, click
Auto Fill
. The Auto Fill Columns
window displays, as shown in the following display.
Display 8.11 Auto Fill Columns Window
3 Change the value that was entered in the Start record field in the Guessing
records
group box to 2. This setting ensures that the guessing algorithm begins
with the second data record in the external file. The first data record in the file is
unique because it holds the column names for the file. Thus, all data that it
contains uses the character data type. The other rows in the file begin with a
character-based name, but the remaining values are numeric. Therefore, excluding
the first data from the guessing process yields more accurate preliminary data.
4 Accept all of the remaining default settings. Then, click OK to return to the
Column Definitions window.
Registering Data Sources Define the Columns for the External File Metadata 133
5 Use the Import function to simplify the task of entering column names. After you
use the Auto Fill function to fill in the preliminary data, click
Import. The Import
Column Definitions window displays, as shown below.
Display 8.12 Import Column Definitions Window
6 Select the
Get the column names from column headings in this file
radio
button and keep the default settings for the fields underneath it. Click
OK to save
the settings and return to the Column Definitions window. The names from the
first record in the external file are populated in the
Name column. You now can edit
them as needed. The preliminary metadata is shown in the following display.
Note: If you use the get column names from column headings function, the
value in the
Starting record field on the Data tab in the view pane in the
Column Definitions window is automatically changed. The new value is 1 greater
than the value in the
The column headings are in file record field in the
Import Column Definitions window.
134 Define the Columns for the External File Metadata Chapter 8
Display 8.13 Preliminary Column Metadata
The columns component at the top of the window is populated with preliminary
metadata.
7 The preliminary metadata that is populated into the columns component typically
includes column names and descriptions that are too generic to be useful for SAS
Data Integration Studio jobs. Fortunately, you can modify the columns component
by clicking in the cells that you need to change and entering the correct data.
Enter the values that are in the following table into the component:
Name Description Length Type Informat Format
Name Name 8 Char.
$15. $15.
DOB Date of birth 8 Num. 6. 6.
State State 20 Char.
$20. $20.
City City 20 Char.
$20. $20.
Relation Relation
ship to employee
20 Char.
$20. $20.
Age Age 8 Num. 3. 3.
You need to change only a few values. First, use the values that are shown in
the first record of the data that is shown in the view pane at the bottom of the
Column Definitions window as a guide when you fill in the values for the
Name
column in the column component section of the screen. These values served as the
column names in the employeeFlatFile.csv external file. Also, the
Informat and
Format columns for the numeric values are based on the values included in the