SAS Data Integration Studio 3.3- P27 ppsx
Bạn đang xem bản rút gọn của tài liệu. Xem và tải ngay bản đầy đủ của tài liệu tại đây (638.35 KB, 5 trang )
Registering Data Sources Save the Metadata for the Tables 125
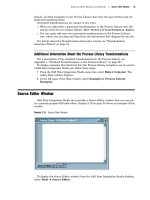
Save the Metadata for the Tables
After you specify a group for storing the source tables, use the Wizard Finish window
to review the metadata that you entered.
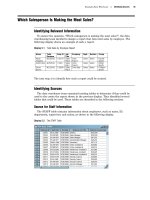
Display 8.5 Wizard Finish Window
Review the text in the metadata pane on the Wizard Finish window. Shown
previously is the metadata for the CUSTOMER, ORDERS, and ORDER_ITEM source
tables. If the metadata is correct, click
Finish. The metadata for the tables is written
to the current metadata repository.
At this point, you could add the metadata that you just created to a job, or you could
check in the metadata.
126 Check In the Metadata Chapter 8
Check In the Metadata
Under change management, new metadata objects are added to the Project tree on
the SAS Data Integration Studio desktop, as shown in the following display.
Display 8.6 Project Tree with Metadata Objects for Three Tables
You must check in the new table metadata in order to save it to the change-managed
repository.
1
In the Project tree, select the repository icon (Project: etlDev4).
2 From the SAS Data Integration Studio menu bar, select Project
Check In
Repository.
All metadata objects in the project repository will be checked into the
change-managed repository. The new objects will be visible in the Inventory tree.
Example: Using a Source Designer to Register an External File
Preparation
An external file is a file that is created and maintained by a host operating system or
by another vendor’s software application. SAS can read data from and route output to
external files.
Suppose that you wanted to create a report that requires information from a
comma-delimited external file. Your first task would be to register this file so that it an
be included in a job that creates the report. Because the file is in comma-delimited
format, you would use the Delimited External File source designer wizard to register
the file.
Assume that the following preparations have been made:
The comma-delimited external file is called employeeFlatFile.csv . It contains
information about dependents of Orion Star Sports employees.
You have selected a default SAS application server for SAS Data Integration
Studio, as described in “Selecting a Default SAS Application Server” on page 96.
This server can access the employeeFlatFile.csv file.
Registering Data Sources Start SAS Data Integration Studio and Open the Appropriate Metadata Profile 127
The main metadata repository is under change-management control. In the
current example, after you register the file, you must check in its metadata. For
details about change management, see “Working with Change Management” on
page 113.
About External File Source Designers
External file source designers enable you to do the following tasks:
Register delimited, fixed-width, and user-defined external files. The supported file
types are TXT, DAT, and CSV.
Process variable-length records and fixed-length records.
Process character, numeric and nonstandard numeric data (such as currency data
or signed numbers).
Specify how missing values should be treated.
Process data in which one record is spanned over multiple lines, as well as data in
which multiple records are included in a single data line.
Remove columns, arrange the order of the columns, change attributes of any
column, and add new columns in the metadata.
The external file source designers use a sample of data from the external file,
together with metadata that you enter, to estimate the length and data type of the
columns. You can specify the rows used in sampling of data by specifying the start
record and how many records should be included in the sample. To find additional
information about all of the external file source designers, see the relevant topics in the
SAS Data Integration Studio Help. From the SAS Data Integration Studio desktop,
follow these steps to display the relevant topics:
1 From the menu bar, select Help Contents to open the "Introduction to SAS
Data Integration Studio” topic.
2
Select Examples
Source Designer Examples to open the “Source Designer
Examples” topic.
3 Select the topic for the type of external file that you need to process.
Note: For information about using external files in SAS Data Integration
Studio, follow the reference to the “Managing External Files in SAS Data
Integration Studio” topic found at the end of the “Overview” section in each of the
external file examples.
Start SAS Data Integration Studio and Open the Appropriate Metadata
Profile
Follow these steps to begin work in SAS Data Integration Studio:
1 Start SAS Data Integration Studio as described in “Starting SAS Data Integration
Studio” on page 93.
2 Open the appropriate metadata profile as described in “Opening a Metadata
Profile” on page 95.
The next task is to select an external file source designer.
128 Select an External File Source Designer Chapter 8
Select an External File Source Designer
To select an external file source designer, from the SAS Data Integration Studio
menu bar, select Tools
Source Designer.
The Source Designer selection window displays, as shown in the following display.
Display 8.7 Source Designer Selection Window
From this window, take the following actions:
1 Open External Files.
2 Click Delimited External File.
3 Click Next.
The wizard attempts to open a connection to the default SAS application server. If
there is a valid connection to this server, you might be prompted for a user name and a
password. After you provide that information, the External File Location window
displays.
Registering Data Sources Specify Location of the External File 129
Specify Location of the External File
Follow these steps to specify the location of the external file:
1
Specify a physical path to the external file in the
File name
field, as follows:
\\d1234\sources_external\employeeFlatFile.csv. The following display shows the
completed External File Location window with the path specified to the external
file.
Display 8.8 External File Location Window
2 When you have set the correct path to the physical file, click Next. The Delimiters
and Parameters window displays.