SAS Data Integration Studio 3.3- P22 pot
Bạn đang xem bản rút gọn của tài liệu. Xem và tải ngay bản đầy đủ của tài liệu tại đây (507.71 KB, 5 trang )
100 Creating, Running, and Verifying Jobs Chapter 7
and creates targets in physical storage. After you have entered metadata for sources
and targets, you are ready to create jobs.
Prerequisites
It is easier to create a job if metadata for the tables in the job are created first. For
details about these tasks, see Chapter 8, “Registering Data Sources,” on page 119 and
Chapter 9, “Registering Data Targets,” on page 139.
Check Out Existing Metadata That Must Be Updated
As you work on the current job, will you update the metadata for any registered
tables? If so, you must check out the metadata for that table.
For example, suppose that you want to create a job in which data is extracted from a
registered table and then is written to a report. In this case, the metadata for the table
is not changed, so you would not have to check out the metadata. However, suppose
that you want to create a job that require you to add three new columns to the
metadata for a registered table. In that case, the metadata for the table is changed, so
you would need to check out the metadata.
The next task is to create and populate the job.
Create and Populate the New Job
Follow these steps to create and populate a new job. To populate a job, you will create
a complete process flow diagram, from sources, through transformations, to targets.
1 On the SAS Data Integration Studio desktop, select Tools Process Designer
from the menu bar. The New Job wizard displays. (You can use this wizard to
create an empty job, into which you can drag and drop tables and transformations.
That is the approach that is described here.)
2 Enter a name for the job and click
Finish.
3
An empty job will open in the Process Designer window.
4 Add metadata for sources, targets, and transformations as needed. The goal is to
create a complete process flow diagram, from sources, through transformations, to
targets. Drag and drop transformation templates from the Process Library tree.
Drag and drop tables from the Inventory tree or from another tree in the tree
view. If you try to drop an object in a zone where it is invalid, an error message
will be written to the Status bar at the bottom of the SAS Data Integration Studio
desktop.
As you add sources, targets, and transformations to a process flow diagram, SAS
Data Integration Studio automatically maps source columns to target columns.
Depending on the nature of the job, you might or might not need to update the
automatic column mappings or the other default metadata in a job.
The next task is to view or update the job, as needed.
Update the Job as Needed
The following steps describe a general approach for updating the default metadata in
a job. The specific updates will vary according to the sources, targets, and
transformations in a job and the purpose of the job. The examples in Chapter 10,
“Example Process Flows,” on page 149 describe scenarios in which a few, specific updates
are needed to the automatic column mappings and the other default metadata in a job.
1 In the Process Designer window, select the first source in the flow, then select File
Properties from the menu bar. A properties window displays.
Main Tasks for Users Creating, Running, and Verifying Jobs 101
2 Click the Columns
tab to confirm that the needed columns are present. Add,
delete, or replace columns as necessary. Repeat these steps for each source and
target in the job, as needed. For details about updating column metadata, click
the
Help
button on the
Columns
tab.
3
In the Process Designer window, select the first transformation in the flow, then
select
File
Properties from the menu bar. A properties window displays.
4
Update the transformation as necessary to achieve the purpose of the job. Be sure
to display the
Mapping
tab for the transformation to be sure that data flows
correctly through the transformation. As needed, repeat these steps for each
transformation in the job, working in a source-to-target direction. For details
about updating mapping metadata, click the
Help button on the
Mapping tab.
When all metadata in the job is correct, the next task is to run the job.
Run the Job
After the metadata for a job is complete, you must submit the job for execution in
order to create targets on the file system. With the job displayed in the Process Designer
window, select Process
Submit from the menu bar. SAS Data Integration Studio
generates code for the job and submits the code to a SAS application server. The server
executes the code. A pop-up window is displayed to indicate that the job is running.
The next task is to check the log.
Check the Log
If a job executes and a pop-up error message appears, or if you simply want to look at
the log for the completed job, follow these steps:
1
Click the Log tab in the Process Designer window.
2
In the Log
tab, scroll through the SAS log information that was generated during
the execution of the job. (The code that was executed for the job is available in the
Source Code
tab of the Process Designer window. The source code is continuously
updated as you make changes to the job, and it is checked and updated as
necessary when you submit the job.)
3 If you find errors in the source code for a step, select the corresponding
transformation in the process flow diagram, then select File
Properties from
the menu bar. A properties window displays.
4 Correct the metadata and resubmit the job until there are no more errors.
5 After the job runs without error, save the job. Select File
Save from the menu
bar.
For more information about evaluating logs, see “Using SAS Logs to Analyze Process
Flows” on page 189.
The next task is to verify that the job created the correct output.
Verify Job Outputs
After the job runs without error and has been saved, you should confirm that the
targets contain the data you need, in the format that best communicates the purpose of
the targets.
1 To view the data for a target in the job process flow diagram, select the desired
target, then select View
View Data from the menu bar. The data in the target
is displayed. Confirm that the correct data is displayed and that the data is
correctly formatted for the purpose of the target.
102 Customizing or Replacing Code Generated for Jobs Chapter 7
For more information about viewing data, see “Viewing Data in Tables, External
Files, or Temporary Output Tables” on page 110. If a target needs to be improved,
change the properties of that target or the transformations that feed data to that
target. If the outputs are correct, and you are working in a change-managed repository,
you can check in the job.
Check In the Metadata
Follow these steps to check in all metadata objects in the Project tree:
1
In the Project tree, select the repository icon.
2
On the SAS Data Integration Studio desktop, select Project
Check In
Repository from the menu bar. All of the objects in the Project repository are
checked into the change-managed repository.
For more information abour change management, see “Working with Change
Management” on page 113.
Customizing or Replacing Code Generated for Jobs
See Appendix 2, “Customizing or Replacing Generated Code in SAS Data Integration
Studio,” on page 223.
Deploying a Job for Scheduling
Administrators can deploy a job for scheduling so that the job can run in batch mode
at a specified date and time. For more information, see “Deploying a Job for
Scheduling” on page 65.
Enabling Parallel Execution of Process Flows
When SAS Data Integration Studio generates code for a job, it can add macros that
enable parts of the job to be executed in parallel. You can enable these macros by doing
the following:
selecting YES in the Enable parallel processing macros option on the Options tab
in the properties window for a job
including a Loop transformation in a job
When you enable the parallel processing option for a job, macros are generated at the
top of the job code with comments to enable you to create your own transformations or
code to take advantage of parallel processing. When you include a Loop transformation
in a job, the transformation generates the necessary macros to take advantage of
sequential execution, symmetric multiprocessing (SMP) execution, or execution on a
grid computing network.
No special software or metadata is required to enable parallel processing on SMP
servers. If grid options have been enabled for a job, but the grid software has not been
configured and licensed, SAS Data Integration Studio does not generate grid-enabled
code for the job. It generates code that is appropriate for symmetric multiprocessing
(SMP) on the SAS application server.
The Help for SAS Data Integration Studio provides additional information about
parallel processing. To display the relevant Help topics, do the following:
1 From the SAS Data Integration Studio menu bar, select Help Contents. The
Help window displays.
Main Tasks for Users Monitoring the Status of Jobs 103
2 In the left pane of the Help window, select Task Overviews
SAS Data
Integration Studio Task Reference
Maintaining Jobs
Parallel
Processing Options.
Generating a Stored Process for a Job
Administrators can generate one or more stored processes for a job that is selected in
the Inventory tree or the Custom tree on the SAS Data Integration Studio desktop. For
more information, see “Converting Jobs into Stored Processes” on page 69.
Improving the Performance of Jobs
See Chapter 11, “Optimizing Process Flows,” on page 181.
Maintaining Iterative Jobs
An iterative job is a job with a control loop in which one or more processes are
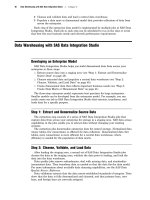
executed multiple times. For example, the following display shows the process flow for
an iterative job.
Display 7.1 Process Flow for an Iterative Job
The process flow specifies that the inner Extract Balance job will be executed
multiple times, as specified by the loop transformations and the CHECKLIB control
table. The inner job is also called a parameterized job because it specifies its inputs and
outputs as parameters.
The Help for SAS Data Integration Studio provides additional information about
iterative jobs. To display the relevant Help topics, do the following:
1 From the SAS Data Integration Studio menu bar, select Help Contents. The
Help window displays.
2 In the left pane of the Help window, select Task Overviews SAS Data
Integration Studio Task Reference
Maintaining Jobs Maintaining
Iterative Jobs.
Monitoring the Status of Jobs
About Job Status Monitoring
When you execute a job in SAS Data Integration Studio, a return code for each
transformation in the job is captured in a macro variable. The return code for the job is
set according to the least successful transformation in the job. SAS Data Integration
Studio enables you to associate a return code condition, such as Successful, with an
104 Using the New Job Wizard Chapter 7
action, such as Send Email or Send Event. In this way, users can specify how a return
code is handled for the job or transformation.
For example, you can associate a return code with an action that performs these
tasks:
aborts the job or transformation
calls a user-defined SAS macro
sends a status message to a person, a file, or an event broker that then passes the
status code to another application
You can also use status codes to capture job statistics, such as the number of records
before and after the append of the last table loaded in the job. To capture statistics
about a job, you would associate a return code with the Send Job Status action.
The
Status Handling
tab, which is included in the property windows for jobs and
for some transformations, is used to associate a return code condition with an action.
However, the property windows for most transformations do not have a
Status
Handling
tab. To return the status of a transformation that does not have a
Status
Handling
tab, you can use a Return Code Check transformation to insert
status-handling logic at a desired point in the process flow for a job. The Return Code
Check transformation can be inserted between existing transformations and removed
later without affecting the mappings in the original process flow.
Note: The Lookup transformation has its own way of handling exceptions. For
details, see the Help for the
Errors
tab in the property window for the Lookup
transformation.
The Help for SAS Data Integration Studio provides additional information about
monitoring job status. To display the relevant Help topics, do the following:
1 From the SAS Data Integration Studio menu bar, select Help Contents. The
Help window displays.
2 In the left pane of the Help window, select Task Overviews
SAS Data
Integration Studio Task Reference
Maintaining Jobs
Maintaining
Status Code Handling.
Displaying Job Status
After you have submitted one or more jobs for execution, display the Job Status
Manager window to view the name, status, starting time, ending time, and application
server that will be used for all jobs that are submitted in the current session. From the
SAS Data Integration Studio desktop, select Tools
Job Status Manager to display
the Job Status Manager window.
Using the New Job Wizard
See “New Job Wizard” on page 32.
Working With SAS Data Quality Software
SAS Data Integration Studio has a number of features that can help you to improve
the quality of your data. Except for the Data Validation transformation, these features
require your site to license SAS Data Quality Server software and to complete some
configuration tasks. For more information about setup, administrators should see
“Supporting SAS Data Quality” on page 72.