SAS Data Integration Studio 3.3- P19 ppt
Bạn đang xem bản rút gọn của tài liệu. Xem và tải ngay bản đầy đủ của tài liệu tại đây (545.39 KB, 5 trang )
Main Tasks for Administrators Example: Creating a Generated Transformation 85
value in the Minimum number of inputs
field. Therefore, only one drop zone is
displayed. If you later update the transformation to increase this minimum number of
inputs value, any jobs that have been submitted and saved will use the original value.
The increased minimum number of inputs will be enforced only for subsequent jobs.
This means that you can increase the minimum number of inputs without breaking
existing jobs.
The increased maximum number of inputs is used to allow you to drop additional
inputs into the drop zone. (In this example, you can have up to three inputs because
you set the maximum to three.) The same rules apply to outputs.
The report generated by this transformation will be sent to the
Output panel in the
Process Designer window. Therefore, you do not need to add an output drop zone to the
transformation by using the controls in the
Outputs
group box.
When you are finished defining properties for your transformation, click
Next to
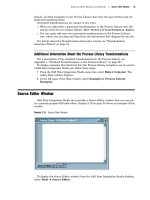
access the Wizard Finish window. The Wizard Finish window for the transformation in
this example resembles the following display.
Display 6.11 Wizard Finish Window
Use the Wizard Finish window to review the metadata that you have entered. When
you are satisfied, click
Finish. The transformation is created and saved in your
metadata repository.
86 Example: Creating a Generated Transformation Chapter 6
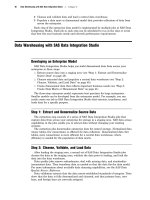
Save the Transformation
For this example, assume that the generated transformation was saved to the
current metadata repository. The transformation is now visible in the Process Library
tree, as specified in Display 3.17 on page 34. The following display illustrates the
updated Process Library tree.
Display 6.12 Process Library Tree
The new template, PrintHittingStatistics, can now be used to create a job, as described
in “Example: Using a Generated Transformation in a Job” on page 174.
Check In Your Transformation
If you are working under change management and you have added a new generated
transformation, you must check it in order to make the transformation available to
other SAS Data Integration Studio users who work with the same change-managed
repository. Unlike other new objects that are added under change management, a new
generated transformation does not appear in the Project tree. Nevertheless, you can
still check in the transformation.
After you have created a new generated transformation, as described above, follow
these steps:
1 From the SAS Data Integration Studio desktop, select the Project tab in the tree
view.
2 In the Project tree, select the repository icon.
3 On the SAS Data Integration Studio desktop, select Project Check In from
the menu bar. All objects in the project repository are checked into the
change-managed repository.
The generated transformation will now be available to other SAS Data Integration
Studio users who have access to the change-managed repository. The checked-in
transformation will appear in the Process Library tree, in the Process Library folder.
Main Tasks for Administrators Importing and Exporting Generated Transformations 87
Note: After a transformation is checked in, only an administrator can update it so
that future changes do not adversely affect other users.
Document Any Usage Details for the Transformation
The person who creates a generated transformation should document how it can be
used to get the desired result. SAS Data Integration Studio users would need to know
the following:
Any requirements for inputs and outputs.
For example, the columns in the source table for the PrintHittingStatistics
template are assumed to be similar to the columns that are shown in Display 6.1
on page 76.
Where the template sends its output: to a table, to the
Output tab in the Process
Designer window, or elsewhere.
How to specify any values that are required by the template.
For example, to produce the report that is shown in Display 6.2 on page 76, a
title must be specified, a set of columns must be selected from the source, and the
sum of the values in the HR column must be calculated.
Using a Generated Transformation in a Job
See “Example: Using a Generated Transformation in a Job” on page 174.
Importing and Exporting Generated Transformations
You can export a generated transformation to an XML file. The export feature
enables you to create a generated transformation and make it available to SAS Data
Integration Studio users who are using different metadata repositories.
The following sections explain how to export a transformation that is currently
registered in your metadata repository, and how to import a transformation from an
XML file and register it in the current metadata repository.
Exporting a Generated Transformation
Follow these steps to export a generated transformation that is registered in your
metadata repository:
1 Select the generated transformation in the Process Library tree.
2 On the SAS Data Integration Studio desktop, select Tools
Transformation
Export from the menu bar. The Export Transform window displays.
3 Enter a filename for the XML file in the
File name text box.
4 Click OK to export the transformation.
Importing a Generated Transformation
Follow these steps to import a generated transformation that has been saved in an
XML file:
1 On the SAS Data Integration Studio desktop, select Tools Transformation
Import from the menu bar. The Transformation Importer window displays. Build
a list of XML files to import by following these steps one or more times.
2 Click Add. An Import Transform window appears.
88 Additional Information About Generated Transformations Chapter 6
3 Browse for and select an XML file that represents a transformation, and click OK.
4 Click
OK in the Transform Importer window to import the transformations.
Additional Information About Generated Transformations
The Help for SAS Data Integration Studio provides additional information about
generated transformations.
To display Help topics about installation and setup, follow these steps:
1 From the SAS Data Integration Studio menu bar, select
Help
Contents. The
Help window displays.
2 In the left pane of the Help window, select Prerequisites.
To display Help topics about all administrative tasks, follow these steps:
1
From the SAS Data Integration Studio menu bar, select Help
Contents. The
Help window displays.
2 In the left pane of the Help window, select Task Overviews
SAS Data
Integration Studio Task Reference
User-Written Components and SAS
Data Integration Studio
Maintaining Generated Transformations.
Additional Information About Administrative Tasks
The Help for SAS Data Integration Studio provides additional information about
administrative tasks.
To display Help topics about installation and setup, follow these steps
1
From the SAS Data Integration Studio menu bar, select Help
Contents. The
Help window displays.
2 In the left pane of the Help window, select Prerequisites.
To display Help topics about all administrative tasks, follow these steps:
1 From the SAS Data Integration Studio menu bar, select Help
Contents. The
Help window displays.
2 In the left pane of the Help window, select Task Overviews
SAS Data
Integration Studio Task Reference.
3 See the section for administrative tasks.
89
PART
3
Creating Process Flows
Chapter 7
Main Tasks for Users
91
Chapter 8
Registering Data Sources
119
Chapter 9
Registering Data Targets
139
Chapter 10
Example Process Flows 149
Chapter 11
Optimizing Process Flows 181
Chapter 12
Using Slowly Changing Dimensions 195