Microsoft SQL Server 2008 R2 Unleashed- P89 doc
Bạn đang xem bản rút gọn của tài liệu. Xem và tải ngay bản đầy đủ của tài liệu tại đây (643.31 KB, 10 trang )
ptg
824
FIGURE 26.3 Constraints in Object Explorer.
FIGURE 26.4 A new CHECK constraint in Object Explorer.
CHAPTER 26 Implementing Data Integrity
of the constraints (PRIMARY KEY, UNIQUE, and FOREIGN KEY) are actually contained under
the Keys node.
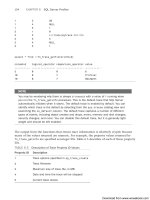
When you select the New Constraint option from the Object Explorer, the Check
Constraints dialog, shown in Figure 26.4, appears. This dialog gives you the option to
define a new CHECK constraint on the table selected. You simply fill in a valid expression
for the constraint, give it a unique name, and select the options you want.
Download from www.wowebook.com
ptg
825
Using Constraints
26
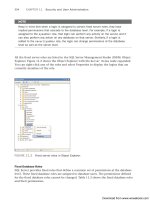
FIGURE 26.5 A new FOREIGN KEY constraint in Object Explorer.
Similarly, you can right-click the Keys node and select New Foreign Key to add a new
FOREIGN KEY constraint. Figure 26.5 shows the Foreign Key Relationships dialog displayed
after you select New Foreign Key. You click the ellipsis to the right of Tables and Columns
Specification, and you can select the primary key table you want the foreign key to relate
to. Finally, you select the desired options, and you are ready to add your new FOREIGN KEY
constraint.
TIP
When you use the Object Explorer to add or modify constraints, two windows are impor-
tant to this process. The first window is the Constraint window, which allows you to
input the constraint information. The Table Designer window that displays the column
properties for the table is the other window that is important to the change process. It
is launched in the background, and you can view it on the tabbed display of SSMS.
When you make changes using the Constraint window, those changes are not applied
via SSMS until the Table Designer window is closed. This may cause some confusion
because even though you close your Constraint window with your changes, those
changes may not be reflected in the database. You must close the Table Designer win-
dow to be able to actually make the changes to the table. When you close the Table
Designer window, a prompt appears, asking whether you want to save the changes to
the table. If you click Yes, your constraint changes are applied to the database. If you
click No, none of the constraint changes you have made are applied. You can also use
the Table Designer menu to script out the related changes and apply them manually via
a database engine query window.
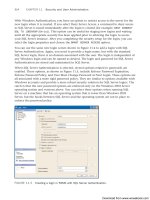
The Database Diagram Editor is another great visual tool for adding constraints. This tool
is particularly useful for viewing and adding foreign key relationships to tables. Consider,
for example, the database diagram shown in Figure 26.6. This diagram shows the
AddressType and BusinessEntityAddress tables and the relationships that exist between
Download from www.wowebook.com
ptg
826
CHAPTER 26 Implementing Data Integrity
FIGURE 26.6 Adding constraints by using a database diagram.
them. To add a new relationship, you right-click the table you want to add the foreign key
to and select the Relationships option. After you fill in the appropriate information for the
relationship, you can generate a change script by using the Table Designer menu, or you
can simply close the database diagram window and respond to the prompt to save
changes. You can also see options to add other constraints, such as CHECK constraints, by
right-clicking the table in the database diagram and selecting the desired option.
You can also launch windows for adding constraints from the Table Designer menu. To
enable the Table Designer menu, you right-click the table in Object Explorer that you
want to add constraints to and select the Design option. The table and column properties
are displayed, and the Table Designer menu is enabled. The Table Designer menu includes
options to manage relationships, indexes/keys, and CHECK constraints.
TIP
It is a good idea to generate a script to implement changes made using SSMS visual
tools. You can review the script for accuracy, run it at a later time, and save it in a file
to keep track of the changes. You can also apply the saved script to other environ-
ments, if needed.
Download from www.wowebook.com
ptg
827
Using Constraints
26
FIGURE 26.7 Executing sp_helpconstraint on the Customer table.
Managing Constraints
Managing constraints consists of gathering information about constraints, disabling and
re-enabling constraints, and dropping constraints. These actions are discussed in the
following sections.
Gathering Constraint Information
You can obtain information about constraints by using the visual tools, system stored
procedures, and information_schema views. The visual tools (including the Object
Explorer, Table Designer, and database diagrams) were introduced in the previous section.
These tools offer a simple, user-friendly means for obtaining information related to
constraints. These tools allow you to view a table’s constraints and display the relative
information.
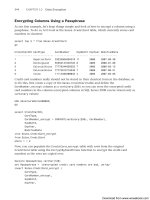
The sp_help and sp_helpconstraint system stored procedures are another good source of
information about constraints. Like the visual tools, these procedures allow you to gather
constraint information about a specific table. The sp_helpconstraint procedure provides
the most concise information related to constraints. Figure 26.7 shows the
sp_helpconstraint output for the Sales.Customer table. You need to make sure to enclose
the table name in brackets, as shown here, when the schema name is included. The output
from sp_helpconstraint includes all the constraints for the table, and it supplies a list of
tables that have foreign key references to the table.
Download from www.wowebook.com
ptg
828
CHAPTER 26 Implementing Data Integrity
Catalog views offer a flexible alternative for returning information about constraints. SQL
Server Books Online recommends using the sys.key_constraints,
sys.check_constraints, and sys.default_constraints catalog views. These catalog views
allow you to obtain constraint information for more than one table at a time. They are
very flexible and allow you to customize the type of data you want to return simply by
adjusting the selection criterion.
Listing 26.4 shows a sample SELECT statement for each of the catalog views related to
constraints and the resulting output. The SELECT statements in this example have a WHERE
clause in them that limits the results to the SalesTax table, but you can remove this
clause to retrieve constraints for all the tables.
LISTING 26.4 Using Catalog Views to Display Constraint Information
select LEFT(name,30) NAME, type from sys.key_constraints
where object_name(parent_object_id) = 'SalesTaxRate'
order by 1
select LEFT(name,30) NAME, type from sys.check_constraints
where object_name(parent_object_id) = 'SalesTaxRate'
order by 1
select LEFT(name,30) NAME, type from sys.default_constraints
where object_name(parent_object_id) = 'SalesTaxRate'
order by 1
/* Results of the previous SELECT statements
NAME type
PK_SalesTaxRate_SalesTaxRateID PK
(1 row(s) affected)
NAME type
CK_SalesTaxRate_TaxType C
(1 row(s) affected)
NAME type
DF_SalesTaxRate_ModifiedDate D
DF_SalesTaxRate_rowguid D
DF_SalesTaxRate_TaxRate D
Download from www.wowebook.com
ptg
829
Using Constraints
26
(3 row(s) affected)
*/
Dropping Constraints
You can drop constraints by using the visual tools or by using T-SQL. You can right-click a
constraint in the Object Explorer and select the Delete option to drop that constraint. The
Object Explorer also offers a script option that generates the T-SQL statements used to
drop the constraint. The ALTER TABLE command is the T-SQL command you use to make
the change. For example, to drop the CK_Employee_Gender constraint on the Employee
table, you can use the following command:
ALTER TABLE [HumanResources].[Employee]
DROP CONSTRAINT [CK_Employee_Gender]
You should use caution when dropping constraints because some constraints affect other
tables. For example, if you drop the PRIMARY KEY constraint on a table and that table is
referenced by foreign keys, the drop statement fails.
Disabling Constraints
You can disable CHECK and FOREIGN KEY constraints by using the NOCHECK clause. This
capability allows you to stop the constraints from being checked without removing the
constraints from your database. The following ALTER TABLE command allows you to
disable the FK_Customer_SalesTerritory_TerritoryID foreign key constraint on the
Customer table:
ALTER TABLE Sales.Customer
NOCHECK CONSTRAINT FK_Customer_SalesTerritory_TerritoryID
When the constraint is disabled, it no longer performs validation. You should disable
constraints with caution because the integrity of your data can be compromised. In the
previous example, disabling the FOREIGN KEY constraint would allow an invalid
TerritoryID to be inserted in the Customer table.
Why would you disable constraints? One possible reason would be to disable the
constraints during large data loads. The execution of constraints can slow the load
process. To facilitate the fastest load speed, you can disable constraints and then re-enable
them when the data load is complete. To re-enable a constraint, you use the CHECK
keyword in the ALTER TABLE statement. The following example re-enables the FOREIGN
KEY constraint for the Customer table:
ALTER TABLE Sales.Customer
CHECK CONSTRAINT FK_Customer_SalesTerritory_TerritoryID
Download from www.wowebook.com
ptg
830
CHAPTER 26 Implementing Data Integrity
Keep in mind that enabling a constraint does not necessarily mean the underlying data is
being validated against the constraint. In fact, the default behavior when enabling a
constraint in SQL Server 2008 is not to check the data against the constraint when a
constraint in enabled. The default behavior when a constraint is added is to validate the
data. You can force the data in the table to be validated using the WITH CHECK option. The
following WITH CHECK option could be used to force the validation of the underlying data
when a constraint is enabled:
ALTER TABLE Sales.Customer
WITH CHECK CHECK CONSTRAINT FK_Customer_SalesTerritory_TerritoryID
Rules
You can use rules as another method to enforce domain integrity. Rules are similar to
CHECK constraints but have some limitations. The biggest advantage when using a rule is
that one rule can be bound to multiple columns or user-defined data types. This capability
can be useful for columns that contain the same type of data and are found in multiple
tables in a database. The syntax for creating a rule is as follows:
CREATE RULE [ schema_name . ] rule_name
AS condition_expression
[ ; ]
condition_expression can include any statement that can be placed in a WHERE clause. It
includes one variable that is preceded with the @ symbol. This variable contains the value
of the bound column that is supplied with the INSERT or UPDATE statement. The name of
the variable is not important, but the conditions and formatting within the expression
are. Only one variable can be referenced per rule. The following example illustrates the
creation of a rule that could be used to enforce the format of data inserted in phone
number columns:
CREATE RULE phone_rule AS
@phone LIKE ‘([0-9][0-9][0-9]) [0-9][0-9][0-9]-[0-9][0-9][0-9][0-9]’
The variable in the condition expression is @phone, and it contains the inserted or updated
value for any column that the rule is bound to. The following example binds the
phone_rule rule to the PhoneNumber column in the person.PersonPhone table:
sp_bindrule phone_rule, 'Person.PersonPhone.PhoneNumber’
When a rule is bound to a column, any future insertions or updates to data in the bound
column are constrained by the rule. Existing data is not affected at the time the rule is
bound to the column. For example, many different phone number formats in the
person.PersonPhone table do not conform to phone_rule, but phone_rule can be bound
to this table successfully. To illustrate this point, the following UPDATE statement can be
Download from www.wowebook.com
ptg
831
Defaults
26
run against the person.PersonPhone table after the phone_rule rule is bound to the
PhoneNumber column:
update person.contact
set phone = phone
The preceding update sets the PhoneNumber value to itself, but this causes phone_rule to
execute. The following error message is displayed after the update is run because the exist-
ing data in the person.contact table violates the phone_rule rule:
Msg 513, Level 16, State 0, Line 2
A column insert or update conflicts with a rule imposed
by a previous CREATE RULE statement.
The statement was terminated.
The conflict occurred in database ‘Adventureworks2008’,
table ‘PersonPhone’, column ‘PhoneNumber’.
The statement has been terminated.
Although rules are powerful objects, Microsoft has slated them for removal in a future
version of SQL Server. Microsoft recommends using CHECK constraints on each column
instead of rules. CHECK constraints provide more flexibility and a consistent approach, and
multiple CHECK constraints can be applied to a single column.
Defaults
A default provides a value for a column when a value is not supplied. Defaults can be
anything that evaluates to a constant, such as a constant, built-in function, or mathemati-
cal expression. Defaults are of two types: declarative and bound. The two types are func-
tionally the same; the difference is in how they are implemented.
Declarative Defaults
A declarative default is a constraint defined as part of the table definition. Using declara-
tive defaults is the preferred method for assigning default values to columns. You can use
the CREATE TABLE or ALTER TABLE statement to create a default and assign it to a column.
Declarative defaults are assigned to a single column and cannot be reused for other
columns in the database. The following example shows the creation of a new column
namedCustomerType in the SalesCustomer table followed by the creation of a new default
on that column:
ALTER TABLE Sales.Customer
ADD CustomerType CHAR(1)
ALTER TABLE Sales.Customer ADD CONSTRAINT
Download from www.wowebook.com
ptg
832
CHAPTER 26 Implementing Data Integrity
DF_Customer_CustomerType DEFAULT ‘I’ FOR CustomerType
It is important to remember that a default constraint stores the default value only when a
value is not provided during the insertion of a row into the table. The creation of a default
constraint does not affect the existing data in the table. UPDATE statements do not utilize
the values specified in the default constraint, either, unless the DEFAULT keyword is explic-
itly referenced; this issue is discussed later in this chapter, in the section “When a Default
Is Applied.” Generally, the only time a default comes into play is when the row is initially
inserted. The following example shows an INSERT statement that causes the default value
defined in the DF_Customer_CustomerType constraint to be used:
INSERT Sales.Customer
(TerritoryID)
SELECT TOP 1 TerritoryID from Sales.SalesTerritory
select CustomerID, CustomerType from Sales.Customer
where CustomerID = @@identity
/*Results from previous select statement
CustomerID CustomerType
—————- ——————
30119 I
*/
The Sales.Customer table in the Adventureworks2008 database is an interesting table
because most of the columns have defaults defined, are identity columns, or are nullable.
This table has eight columns, but only one value is supplied in the previous example. The
rest of the columns, including the CustomerType column, have default definitions that
automatically populate the values upon insertion or default to null.
One common misconception with defaults is that a default value is stored when a NULL
value is supplied for a column on insertion. However, NULL is considered a value, so the
default value is not used in this situation. This is demonstrated in the following example,
where the CustomerType column is altered to accept NULL values and then a NULL value is
specified for the CustomerType column in the INSERT statement:
ALTER TABLE Sales.Customer
ALTER COLUMN CustomerType nchar(1) null
INSERT Sales.Customer
(TerritoryID, CustomerType)
SELECT TOP 1 TerritoryID, null
from Sales.SalesTerritory
The insertion in this example succeeds, and the Null value is stored in the CustomerType
column that has a default defined on it.
Download from www.wowebook.com
ptg
833
Defaults
26
To remove a declarative default constraint, you use ALTER TABLE with the DROP
CONSTRAINT clause. The following example removes the DF_Customer_CustomerType
constraint from the Sales.Customer table:
ALTER TABLE Sales.Customer DROP CONSTRAINT DF_Customer_CustomerType
Bound Defaults
Bound defaults are similar to rules in that you first create a bound default and then bind it
to a column or set of columns. Bound defaults are also similar to rules in that they are
slated for removal in a future version of SQL Server. This section covers the basics of
bound defaults, but you should keep in mind that Microsoft recommends you avoid using
them for new development work.
You use the CREATE DEFAULT command to establish a default that can be bound to a
column at a later time. The CREATE DEFAULT syntax is as follows:
CREATE DEFAULT [ schema_name . ] default_name
AS constant_expression [ ; ]
constant_expression can include any constant, built-in function, or mathematical
expression. It cannot include user-defined functions. Character and data values that are
part of the expression should be enclosed in single quotation marks. Monetary, integer,
and floating-point constants do not require the single quotation marks.
The following example creates a default named password_df that can be used to supply a
default password for any password-oriented columns:
CREATE DEFAULT password_df AS ‘defaultpw’
After you create a default, you can bind it to a column. The following example binds the
password_df default to the passwordSalt column on the person.password table:
sp_bindefault password_df, ‘person.password.PasswordSalt’
As you can see, a bound default appears to require an extra step, but after it is created, it
offers an advantage: you can bind it to other columns. This capability provides some
consistency across all the columns that the default is bound to and reduces the overall
number of database objects.
When a Default Is Applied
Defaults are applied only when no value is specified for a column during an insertion.
They can also be applied during insertions and updates when the DEFAULT keyword is
used. To demonstrate the application of defaults, consider the following examples:
CREATE TABLE test_default
(id int IDENTITY NOT NULL,
Download from www.wowebook.com