SQL Server Tacklebox- P4 potx
Bạn đang xem bản rút gọn của tài liệu. Xem và tải ngay bản đầy đủ của tài liệu tại đây (386.23 KB, 5 trang )
1 – Eating SQL Server installations for breakfast
15
The pre-installation checklist
Some DBAs I know look at each server installation as an entirely new experience.
It becomes second nature to them to install, prep and release a SQL Server into
production. However, mistakes can and will happen. You rattle through the
installation process as normal, declare the server live, and then move on to other
tasks, not realizing that you have missed a small but important step. Later, or
probably sooner, someone discovers that the server is not sending mail, or that a
new database has not had a log backup and has filled up the log drive, and all hell
breaks loose.
It is a painful experience so, before you hunker down to install SQL Server, you
will want to review your SQL Server Installation Check List. It will contain multiple
instructions for different versions of SQL Server. Many of the configuration
options, such as the collation of the SQL Server instance, are best set during
installation so it is important to know beforehand what options you need to
choose.
Check lists will vary for everyone but there are a few configurations that will be
common to all lists. For example:
• Data and Log File Standard Location
• Data: E:\DataFiles
• Logs: F:\TLogs
• Service Account: (Created service account and grant local privileges)
• TempDB Location
• T:\TempDB
• Special Permissions (memory – AWE)
• Lock Pages in Memory
• Boot.ini
• Configure for /PAE switch if 32 bit Windows 2003 and SQL
Server Standard or Enterprise
• Additional vendor-supplied (Non SQL) applications
• Defragmentation
• SQL Backup Compression
Automated command line installation
Having gathered together your pre-installation information, it's time to install. We
will place our DVD into the drive, or mount our ISO, and double-click Setup.exe.
Yeah … sure we will.
1 – Eating SQL Server installations for breakfast
16
Installing SQL Server is, at best, a mundane task. If you do it twice a month then
it is probably OK to simply springboard through the GUI installation wizard,
manually choosing, clicking, and typing your way to a successful install. However,
for me and many other DBAs, standardization and automation are important. A
constant theme of this book is that whenever a task can be simplified, automated
and repeated, you should make it so.
Installation is no exception. I need a standard install process that can be controlled
programmatically, in order to eradicate costly mistakes. As such, I want to avoid
the GUI-driven installation altogether. Fortunately, Microsoft continues to
support command line installs and that is what I will be demonstrating here: how
to automate the installation with setup options, from the command line.
I'll begin by examining some of the installation options available for SQL Server
2008. There are many optional parameters that I'll ignore, but several that are
required. I'll show how to string together the command line and execute it on your
new server. When it is done, assuming there are no errors, you will be ready for
the real fun. If there are errors, then refer to my previous comment about the 2
years spent in Help Desk. They will stand you in good stead, as you will need
every ounce of perseverance to solve any issues. I have read volumes in the
various SQL Server forums on installation errors and how to overcome them.
However, let's assume, as is typical, that there will be no errors.
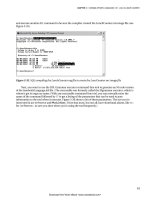
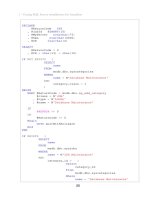
To get a full list of all of the available command line installation options for SQL
Server 2008, including the valuable samples, simply run
Setup /?, as shown in
Figure 1.1.
Figure 1.1: A few of the command line setup options.
1 – Eating SQL Server installations for breakfast
17
Figure 1.2 shows the different, less friendly outcome performing the same step for
SQL Server 2005.
Figure 1.2: If you want the answer look in Books Online.
Once you've picked the options that are right for your install, you simply need to
string them together on the command line noting that, for a SQL Server 2008
installation, there are several required options. Listing 1.1 shows a sample
command for automating an install.
setup.exe /QUIETSIMPLE /ACTION=install /FEATURES=SQL,Tools
/INSTANCENAME=MSSQLSERVER /SQLSVCACCOUNT="Network Service"
/SQLSYSADMINACCOUNTS="domain\username" /AGTSVCACCOUNT="NT
AUTHORITY\Network Service" /SECURITYMODE=SQL /SAPWD="*********"
/SQLTEMPDBDIR="C:\TempDB\\" /SQLUSERDBDIR="C:\SQLData\\"
/SQLUSERDBLOGDIR="C:\SQLLog\\"
Listing1.1: A sample command line install.
Most of the options are intuitive. For example:
•
/ACTION – this is required. It simply specifies whether the action is an
install, update or uninstall. In this case, I am going to install.
•
/FEATURES – determines what SQL Server features to install. The choices
are "SQL, AS, RS, IS, Tools". For this install, I chose SQL and Tools,
which will install the SQL Database Engine and tools such as SQL Server
Management Studio, Business Intelligence Developments Studio and
configuration tools. I chose not to install Analysis Services (AS),
Reporting Services (RS) or Integration Services (IS).
Each feature also has its own set of properties, such as service account credentials
and installation location.
Running the command initiates the installation. If you choose the
/QUIETSIMPLE
option, as I did here, then you will be able to view the progress of the installation.
However, there will be no user interaction. If the command executes as expected,
you'll see something similar to that shown in Figure 1.3, reporting the progress of
the installation.
1 – Eating SQL Server installations for breakfast
18
Figure 1.3: SQL Server 2008 installation progress.
When complete, you will have a fully installed SQL Server 2008 instance,
complete with tools. There is a good chance that you will not encounter any
errors. However, if you do, especially if you chose the silent mode installation,
then you can review the Summary.txt file, which captures any errors during
installation. You'll typically find the file in the <Install Drive>:\Program
Files\Microsoft SQL Server\100\Setup Bootstrap\Log folder.
As a DBA, you will find that it is par for the course that people bring their
troubleshooting installation problems to your door, and you will be looked upon
as an expert even though you may not have seen the specific error before.
Knowing where to look will at least buy you time to formulate a rational answer.
Of course, as DBA, you or your team should be performing all SQL installations
anyway, so you can always question why whoever got the error was brazen enough
to attempt the install in the first place.
If you have a service pack or hotfix to apply to your SQL Server installation, an
obvious next step, then you can automate the service pack installation in the same
way, by executing the setup.exe of the service pack with command line options.
NOTE
Starting with service pack 1 for SQL Server 2008, you can now "slipstream"
service packs for SQL Server, much like you can do for Windows service packs.
See />62.aspx#Slipstream for
further details.
1 – Eating SQL Server installations for breakfast
19
Installation done, now to configure
As I said earlier, installing SQL Server is the easy part. Once that portion of your
pre-production process is done, you still have many more options to configure.
Making the right choices will ensure that your SQL Server performs as you want it
to, and play amicably with whatever application will be beating it up every day.
Truly, that is what is going to happen. I have heard it said, only half-jokingly, that
the one thing you know will hinder the performance of SQL Server is to release it
to a production application.
In many organizations there exists a special area, call it staging, QA (Quality
Assurance) or Pre Production Modeling, where the entire system is deployed and
tested prior to a move to production. If you, as DBA, have the luxury of a QA
environment, you will at least know that, functionally, your server configuration is
performing as it should. However, often the QA environment is not an exact
physical copy of Production. For example, your SQL Server in QA may have only
4 Gigabytes of RAM and not 8. It is important to account for these performance
differences.
Standard configuration options
Throughout the version history of SQL Server, several configuration options,
though similar in name, functioned differently depending on a number of factors.
For example, "AWE enabled", "min server memory" and "max server memory"
are all configurable options in SQL Server 2000, 2005 and 2008. However, they
behave differently depending on the edition of SQL Server (standard, enterprise
or data center), as well as on the operating system on which SQL Server is
running. For example, SQL Server 2005 and 2008 Standard Editions allow you to
take advantage of all of the memory that the base OS can utilize; for Windows
2003 Server the amount of usable memory is variable depending on whether you
have Standard or Enterprise edition, and on whether you have a 32- or 64-bit
installation. However, for SQL Server 2000, to take advantage of memory beyond
the 4G range, you were required to purchase the Enterprise edition of SQL
Server, regardless of the OS version or edition.
With the proliferation of Windows Server 2003, many of these discrepancies have
been removed, but they are still very important when setting configuration
options. The sample installation being performed here is for SQL Server 2008 but
bear in mind that, for each option, there may be a caveat for prior versions.
There are some configuration settings that you will want to change, post-
installation, depending on whether you are running a 32- or 64-bit architecture.
For example, you will not need to enable AWE for 64-bit architecture, whereas if