101 QUICK AND EASY SECRETS FOR USING YOUR DIGITAL PHOTOGRAPHS- P28 docx
Bạn đang xem bản rút gọn của tài liệu. Xem và tải ngay bản đầy đủ của tài liệu tại đây (276.3 KB, 5 trang )
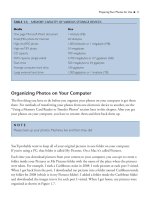
TABLE 8.1 NONEXCLUSIVE USE OF PHOTOS AT MICROSTOCK AGENCIES
Microstock Photo Pay-per-Shot Royalty Minimum Amount Needed
Agency Image Size to Be Earned to
Get Check Sent
Dreamstime.com .84–11.69 50% 3 MP $100
iStockphoto.com .30–8.40 20% 1600×1200 pixels; $100
300 dpi 5”×7”
is optimal
BigStockPhoto.com .50–3.00 flat fee 800 pixels $50 (You can request
across PayPal or Moneybookers
payment at a $30 limit)
Shutterstock.com .25 flat fee 4 MP $300
Fotolia.com Varies 30–44% 4 MP $50
Copyrighting Your Photos
Once you print a photo on a printer (or have it printed) and/or upload it to the Internet, your
photo is automatically copyrighted. But the truth is that doesn’t matter much, because if someone
takes it and makes money from it, you have to prove it’s yours. You do that by filing a copyright
form with the United States Copyright Office.
You can get copyright forms or copyright photographs online at www.copyright.gov/forms. You
can get a collection of photographs (JPG-, TIF-, and PSD-formatted images, among others)
copyrighted online for $35 by paying the fee online and uploading your photos.
There are copyright cases out there, and some get settled when the photographer and the person
who infringed on the copyright negotiate. If you find someone using your work, you can send
them a bill for three times what the photo cost for unauthorized usage. This works very well if
you have had the images copyrighted by the government. Your case is weak if they aren’t.
There is a way you can deter people from swiping your photos on the Internet. You can put
the © (Option+G on a Mac; Ctrl+Alt+C in Windows) symbol followed by your name at the
bottom of your Internet pages. (You can also make a copyright symbol in Word by typing a
capital C within parentheses—Word will convert it into the copyright symbol.) Usually, when
most people see that, they’ll figure that you mean business about copyright, even though it’s not
required by law.
Finally, there is a way that you can make copying your photos very difficult for people online.
You can add a watermark to your photographs. To do this, see the following “Adding a
Watermark to Your Photos” sidebar.
Making Big Bucks Selling Your Photos (and Donating Them,Too) ■ 121
122 ■ Making Big Bucks Selling Your Photos (and Donating Them,Too)
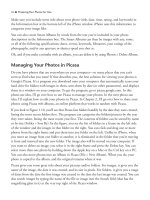
ADDING A WATERMARK TO YOUR PHOTOS
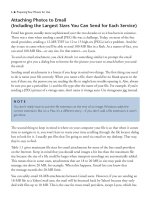
To add a watermark to a photo, as shown in Figure 8.1:
1. Open your image in Photoshop or Elements.
2. Click on the T (Text) tool in the Tools palette. Remember that as soon as you type
text into your image, you are creating a new layer.
3. Set your text color by double-clicking on the Set the Text Color swatch in the toolbar
at the top of the window. Choose a color you want for your watermark in the dialog
box that appears.
4. Type in your text.
5. Click and drag over your text and select font and font size. (Choose fonts and font
sizes at the top of the window or in the Character palette.)
6. Navigate to Layer > Style > Blending Options. A dialog box will appear, and all you
have to do is slide the Opacity slider to about 40%.
7. Navigate to Layer > Flatten Image.
Figure 8.1 A watermark is some translucent text that covers your photos so people
can’t copy them.
Selling Your Photos as Postcards
There are a few ways to get postcards made so you can sell them. Here are some options:
❈
Buy a backing. One way you can make your photos into postcards is by buying a backing
for them. The2Buds (www.the2buds.com) has backings for 4×6 and 5×7 prints. For 4×6, if
you buy 10, they’re 39 cents apiece; if you buy 500, they’re 20 cents apiece. For 5×7, if you
buy 10, they’re 59 cents apiece; if you buy 250, they’re 38 cents apiece.
❈
Have postcards made and mailed online. At PremiumPostcard (www.premiumpostcard.com),
you can have postcards with your photo(s) made and mailed (the next business day) by
U.S. Mail. All you have to do is follow prompts to help you upload a pic, fill out the return
address and message, and then mail it to as many recipient addresses as you want.
❈
Order printed postcards online. If you want your photo put on a professionally made
postcard, Zazzle’s your place. At www.zazzle.com/custom/postcards, you can make and sell
postcards with your photos on them. To experiment with this interactive product maker,
you click on Create a Postcard. In the next window that comes up, click on Select Image
and Make It Now. In the next window, click on My Computer and Select Images to Upload.
Navigate to your image on your computer on the next prompt. Click OK. Click Make It
Now. Your picture will then come up in an editing window, where you can tweak it so that
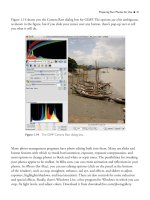
it looks good on the postcard. Figure 8.2 shows you the editing window. At the bottom of
the window, you have two options—Add to Cart or Post for Sale. Selling on Zazzle is covered
in the next section.
Making Big Bucks Selling Your Photos (and Donating Them,Too) ■ 123
To make putting a watermark on any photo easier, you can save the steps as an action.
1. Open a new file.
2. Navigate to Window > Action.This will bring up your Actions palette.
3. Click on Create New Action at the bottom of the palette, next to the trash bin.
4. In the dialog box that appears, give the action a name (Watermarks) and click on
Record.
5. Repeat Steps 2 through 7 above.
After you’ve done your second watermark, all the rest will be a breeze. All you have to do is
the Watermark action in the Actions palette and then click on the small arrow (Play) to run
the action, which gets the watermark on your image.
Selling Your Photo Designs at Zazzle.com
In the previous section, you learned that you can make postcards at Zazzle.com. That’s not all
you can make there. You can make T-shirts, mugs, business cards, greeting cards, posters, and
more. Basically, to make an item, you follow similar prompts to those shown in the “Selling
Your Photos as Postcards” section. Best yet is that you can take what you make and sell it on
their site.
At the top of the Zazzle window, there are the following tabs: Shop, Create, Sell, Community.
In the Shop area, you are taken to items people who have registered to sell at Zazzle have made.
On the left side of the window, you’ll see the categories of products. You’ll see that some of the
designs on the products have been made in Photoshop and/or have been scanned from prints.
Be warned when you shop that some categories have thousands of products to browse. You can
narrow your search on the product page by clicking on Narrow by Product (buttons, hats, and
posters, for example), then Narrow by Topic (technology, events, and humor, for example).
In the Create section, there are clickable images from which to choose products you can make.
After you click on T-shirts, for example, you’re taken to an assortment of tees. You then click on
one of those to be taken to the interactive product maker, where you upload your image.
124 ■ Making Big Bucks Selling Your Photos (and Donating Them,Too)
Figure 8.2 Zazzle.com has an online postcard maker.
In the Sell area, you sign up to sell products with your designs or images on them. To register,
you enter the usual username, password, and email address. In addition, you give your birth
date and agree to Zazzle’s user agreement. That’s all you do—there’s no email confirmation or
anything else to do except click Continue in one window and Create Store in the next.
The next thing you do is choose or customize a template. Then you can check out all the tabs
at the top of the Appearance page: Dashboard, Account, Store, Products, Images, Favorites, and
Earnings. Dashboard is where you create your products. Account is where you can edit your
profile and upload an image of yourself. In the Store section, you can add a description of your
store by clicking Basic Information on the left side of the window. The Products section lists the
products you have up for sale. In the Images section, every image you’ve uploaded is stored. In
the Favorites section, you record products you like. In the Earnings section, you see how much
money you’ve made. To get paid by Zazzle, you need to earn at least $25.
Selling Photos to Regional Magazines
Wanted: photos for regional magazines. As a freelancer, I’ve written articles and submitted
photographs for local publications in the Palm Springs area of California. Figure 8.3 shows
a photo taken on the same shoot as one that appeared in the regional magazine Palm Springs
Life. It is similar to the one that appeared in the magazine.
Making Big Bucks Selling Your Photos (and Donating Them,Too) ■ 125
NOTE
Your username will be contained in the URL you will receive for your store (www.zazzle.com/
username).
NOTE
Zazzle supports both JPEG and TIFF files (as well as GIF and PNG).
NOTE
Other similar sites to Zazzle.com are CafePress.com and redbubble.com.