Wordpress 3.0 jQuery - part 19 ppsx
Bạn đang xem bản rút gọn của tài liệu. Xem và tải ngay bản đầy đủ của tài liệu tại đây (2.03 MB, 10 trang )
jQuery Animation within WordPress
[ 166 ]
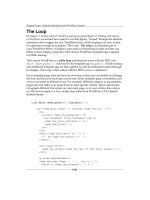
If you have an animation that absolutely should not kick-off until the current
animation function has completed, the
.delay() function might not be the best way
to go. You can use the
step and complete parameters to kick off other functions and
animations in the exact order you wish.
jQuery('.post:first')
.hide()
.fadeTo(0, .1)
.css("height","5px")
.animate({
height: '+=500px',
},
{
duration: 4000,
easing: 'swing',
queue: false,
step: function() {alert('step done!');},
complete: function() {alert('completely done!');}
}
)
.fadeTo(4000, 1);
The previous code snippet will generate JavaScript alerts at the .animate()
function's completed steps once it's completely nished.
I've personally never needed to hook into the step parameter for a WordPress
project, but I can see how it could be very useful for hooking into and creating a
chain of cascading type effects. I have found the complete parameter very useful
for many of my animations.
Chapter 5
[ 167 ]
Grabbing the user's attention
OK, sample code snippets aside, it's time to get to work! Back in "hypothetical land",
our previous clients have enthusiastically touted our jQuery solutions to a few
associates and we now have quite a few requests for help with WordPress sites.
Let's walk through a few new hypothetical client situations and see if we can solve
their problems.
First up: a common way many sites employ "sticky" posts and how to enhance them
with a little jQuery animation.
Project: Animating an alert sticky post
Here's a quick and simple one. You've got a client who has a good friend, who runs
a non-prot educational organization's site, and they need a favor (meaning; do this
"for free" please).
The organization's after-school care runs on the public school's schedule (as many
kids are bussed over from different schools). If the public school system takes a snow
day or some other emergency day, the after-school program also closes down. The
organization does their best to notify people through their WordPress site.
Despite making it clear to parents that it's their responsibility to check the site, or call
to nd out the center's schedule, there's been a few misunderstandings with people
who claim that they checked the site but "didn't see the closing alert". Apparently, even
though they've been making the posts "sticky" so they stay at the top, the posts look
awfully similar to the rest of the site's content.
You're happy to help (especially as they were referred to you by a client with
well-paying gigs). It helps that this is a really easy x. First off, you can simply add
a few
.sticky styles to their theme's style.css le, which makes the sticky posts
stand out a lot more on the site.
They've made it clear they only use the "sticky" feature for daycare and other center
alerts that affect the organization's center building being open to the public so you
decide to do a quick Google search for "
creative commons, public domain,
alert icon svg
" and download a very nice SVG le from http://commons.
wikimedia.org/wiki/File:Nuvola_apps_important.svg
.
jQuery Animation within WordPress
[ 168 ]
Let's open that SVG le into Inkscape and size it down to 48 pixels wide to save a
transparent .png of it (I took the liberty of adding a little blur to the shadow, but
you may not want to). Name the PNG
sticky-alert.png.
You then add the new sticky-alert.png image to their theme's image directory
and update the stylesheet at the very bottom or below the existing .sticky class, if
one exists, with a few class rules for the .sticky calls like so:
/*change the .sticky background */
.home .sticky { background-color: #ffff9c;}
/*add the icon to the entry-content div inside the sticky post*/
.home .sticky .entry-content{
background: url(images/sticky-alert.png) no-repeat 0 20px; }
/*nudge the paragraph and lists out of the way of the icon*/
.home .sticky .entry-content p,
.sticky .entry-content ul{margin-left: 60px;}
Chapter 5
[ 169 ]
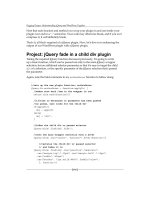
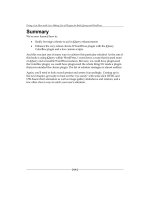
The following screenshot shows the newly re-styled sticky posts:
This is more than good enough. Now anyone going to the site regardless of
JavaScript being available will certainly notice that. But hey, since you're poking
around in the theme anyway, and you've decide to register jQuery, the jQuery Color
plugin from the WordPress bundle, and include a custom-jquery.js page to their
header.php le, you might as well add in this nice and simple few lines of code.
jQuery(function(){
jQuery('.home .sticky')
.animate({'backgroundColor':'#ff6600'}, 'slow')
.animate({'backgroundColor':'#ffff99'}, 'slow')
.animate({'backgroundColor':'#ff6600'}, 'slow')
.animate({'backgroundColor':'#ffff99'}, 'slow');
});
jQuery Animation within WordPress
[ 170 ]
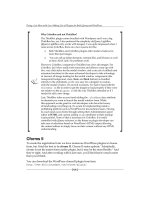
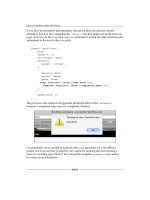
The previous code will fade our sticky posts from light yellow to darker orange,
and then repeat it again for emphasis. The following image shows the post faded
to darker orange:
Again, a bit hard to see the animation in a book, but we just made sure that the alert
.sticky post, upon loading, will fade up to orange (#ff9900) and back down to the
yellow (#ffffcc), and then repeat one more time for quite the "orange alert" effect.
The alert posts are very noticeable now and the organization can't thank you enough!
Which is more than enough for your few minutes worth of work.
Creating easy, animated graphs
The non-prot organization was so impressed with your alert sticky post solution,
they've allocated some funds together and have got another request for you. They
noticed how you xed up the alert icon using Inkscape and they've asked you how
much trouble it would be to generate a monthly graph for them for another post
they put up. The post is their top ve stats from their green recycle program.
While the bulleted list is super easy for the site administrator to implement, people
don't really notice or remember the information, so they were thinking of posting
graphs to the site, but need someone to draw them or generate them in some way.
Chapter 5
[ 171 ]
Looking through their site, you notice the editor always consistently formats
the information posted. All post titles have "… Monthly Stats" in them, all the
information is in bullets, and the percentage number always comes after a colon ":".
It is great that the admin has been so consistent. It will make it very easy to work out
a solution that allows the editor to continue doing what they've always done. The
posts currently look like this:
You let the admin know as long as he/she continues to consistently format the posts
in this way, you can write up a jQuery script that will draw the chart for them. They
almost don't believe you, and are happy to have you proceed.
To get started, we'll need to rst make sure we're targeting the correct posts for
Monthly Stats only. We'll do this by setting up a jQuery selector like so:
jQuery('
.post h2:contains(Monthly Stats)')
.siblings('.entry-content')
.children('ul:first')
.css({background: '#ccffee'});
jQuery Animation within WordPress
[ 172 ]
As we can see, this little "test" selection grabs all h2 tags which are inside .posts that
only contain the text "
Monthly Stats". We then move along the DOM and target the
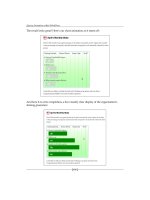
.entry-content div and then the rst ul inside that. We can see the previous code
is properly targeting what we want in these posts by changing the background color,
as shown in the next screenshot:
Now that we can target the specic posts we want, without changing the theme's
output or making our client do any work, let's get to work on the rest of the graph!
First up, because we'll be loading a background image, and those just load a lot nicer
from a theme's stylesheet (it's easier to target the images), let's use Inkscape again to
help us create a basic background about 450 pixels wide that shows the progression
from "Just getting started" to "Yes!", like so:
Chapter 5
[ 173 ]
Let's export a PNG of that graphic and add it to the image directory of our client's
theme. Then, using jQuery, let's dynamically add a class to all our targeted ul:
jQuery('.post h2:contains(Monthly Stats)')
.siblings('.entry-content').children('ul').addClass('greenStats');
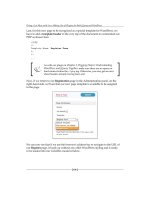
We can now go into the client's theme stylesheet, and just as we did for the sticky
alert posts, create custom CSS rules for our new class. Open up the theme's
style.css stylesheet and add these rules at the end:
.entry-content .greenStats{
margin: 0;
background:url(images/greenBackground.png) no-repeat;
border: 1px solid #006633;
padding: 40px 20px 5px 20px;
}
.entry-content .greenStats li:before{content:none;}
.entry-content .greenStats li{padding-left: 10px; margin: 0}
jQuery Animation within WordPress
[ 174 ]
The rst rule adds our new greenBackground.png chart image and sets some basic
properties so that the list items can start accommodating our upcoming jQuery
additions. The next two rules after that x specic .entry-content li issues that
the client's theme (in this case, the default theme) places on every
li element inside
an
.entry-content div. We don't want the "little squares" before our chart items,
and we want the padding on each li moved in about 10px more. Again, we only
want to affect the
.entry-content li items if jQuery has added our .greenStats
class so we're sure to add that class name into the CSS rule.
Now, we're ready for some serious jQuery magic. I hope you've been getting really
comfortable working with selectors and traversing the DOM until now. We're going
to have to put a fair amount of that knowledge to work to accomplish the next
few tasks.
We want to place an
.each() function item on our targeted li and begin
manipulating the content inside of them.
We'll start by setting up this jQuery statement:
jQuery('.post h2:contains(Monthly Stats)')
.siblings('.entry-content').children('ul').children('li')
.each(function(){
//code here
});//end jQ li
Next, inside our .each() function, we'll place code that start's manipulating the
HTML and text inside each li object. We want to look for the colon ":" and use that
as a point to wrap a div around the number that comes after it. After that, we'll look
for the ending
</li> tag and use that as a point to close our div that we started.
We'll accomplish this by using the
.text() and .replace() functions like so:
var string1 =
jQuery(this).text().replace(': ',':<div class="nVal">');
var string2 = string1.replace('</li>','</div></li>');
//place back into the li element as html markup and text:
jQuery(this).html(string2);
Chapter 5
[ 175 ]
That previous code snippet now gives us custom div with the class .nVal that we
can start working with. The
.nVal divs are ultimately going to be the "bars" in our
green stats graph! Underneath the previous code, we'll continue to esh-out our
.each() function with the following code, again inside the .each() function:
//set the default css values of each nVal div:
jQuery(this).children('.nVal').css({width: '0',
padding: '10px 0 10px 20px', fontSize: '130%',
color: '#ffffff', marginBottom: '5px'});
//retrieve the number text from inside the nVal div:
var nVar = jQuery(this).children('.nVal').text();
//animate the nVal divs with the nVar values:
jQuery(this).children('.nVal').delay(600)
.animate({backgroundColor: '#006600', width: nVar*(3.8)}, 2000);
In the previous code snippet, note that I used the .delay() function. That function
is optional if you're not using jQuery 1.4.2 or a higher library. I just think a good half
second or so pause to make sure that users notice the animation is helpful.
We again used the
.text() function to pull the text from inside the .nVal divs
and use it in a mathematical equation to calculate the width of the divs with the
.animate() function. We multiply nVar by 3.8 because within our chart design, a
div width of about 380 pixels wide would be the equivalent of 100 percent. If your
chart has different dimensions, you'd change those accordingly to have the chart
bars extend out properly.