Wordpress 3.0 jQuery - part 16 ppsx
Bạn đang xem bản rút gọn của tài liệu. Xem và tải ngay bản đầy đủ của tài liệu tại đây (2.14 MB, 10 trang )
Doing a Lot More with Less: Making Use of Plugins for Both jQuery and WordPress
[ 136 ]
Last, for this new page to be recognized as a special template for WordPress, we
have to add a template header to the very top of the document in commented out
PHP as shown here:
<?php
/*
Template Name: Register Form
*/
?>
As with our plugin in Chapter 3, Digging Deeper: Understanding
WordPress and jQuery Together
, make sure there are no spaces or
hard returns before the <?php tag. Otherwise, you may get an error
about headers already having been sent.
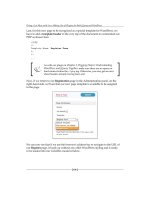
Now, if we return to our Registration page in the Administration panel, on the
right-hand side, we'll see that our new page template is available to be assigned
to the page.
We can now see that if we use the browser's address bar to navigate to the URL of
our Register page, it loads up without any other WordPress styling and is ready
to be loaded into our ColorBox modal window.
Chapter 4
[ 137 ]
That's the rst half of our solution. Let's now nish it.
Creating the custom category template
We now need to create a special category template for the Events category. Again,
we'll want each event to have a registration link. That link will pass the event's title
to the registration form.
Doing a Lot More with Less: Making Use of Plugins for Both jQuery and WordPress
[ 138 ]
To get started with this, if you'll recall the Template Hierarchy from Chapter 3,
Digging Deeper: Understanding WordPress and jQuery Together, the
category.php
template page trumps the archive.php template page. Turns out, the default
template that we're using doesn't have a
category.php page. We'll simply create
one by duplicating the
archive.php page and naming it category.php.
But wait; we don't just want this page to show any category. We want to only show
the Events category. You'll also recall from Chapter 3, Digging Deeper: Understanding
WordPress and jQuery Together, that you can further trump the
category.php
template with a specic category-ID.php template page such as category-3.php.
It just so happens that in my local setup of WordPress, the ID for the Event category
is 3, so that's what we'll name the le.
Finding your category ID
Those of you working in your own WordPress installation, the category
ID numbers are assigned as you create categories. First, you'll need to
determine what your Events category's ID number is. You can do this by
navigating to the Posts | Categories page in the Administration panel
and selecting Edit under the Events category. You can then check the
URL in that category's Edit page. At the very end of the URL you'll see
the category's ID number.
We're now ready to customize the category-3.php template for the Events page.
Chapter 4
[ 139 ]
First up, as we saw in the previous chapter, this page calls the get_template_part(
'loop', 'category' )
function from the loop.php template page. We actually
want a custom, very simple setup for the Events category only. While we certainly
could update the if else statement of loop.php with an additional custom
loop (which is a tad beyond the scope of this book, stay tuned for the upcoming
WordPress 3.0 Theme Design book from Packt!), for this custom client project we'll
just comment out the call to that loop and add in our own very simple loop that,
thanks to the Template Hierarchy, will only work on our Events category page.
<?php
//start the loop:
while (have_posts()) : the_post(); ?>
<div <?php post_class() ?>>
<h2 id="post-<?php the_ID(); ?>" class="entry-title">
<a href="<?php the_permalink() ?>" rel="bookmark"
title="Permanent Link to
<?php the_title_attribute(); ?>">
<?php the_title(); //adds the title ?></a></h2>
<div class="entry">
<?php
//add the content
the_content() ?>
</div>
<?php //add the registration button ?>
<p><a class="register"
href="/wp-jqury/register/?evnt=<?php the_title(); ?>">
Register</a>
</p>
<div class="register-separate"></div>
</div>
<?php endwhile; ?>
If you haven't done so, you might want to deactivate your Add Author
Bio plugin that we built in the previous chapter. It's not necessary for this
project, though it doesn't hurt to have it activated (it will just be sitting
there in the Event's posts).
Doing a Lot More with Less: Making Use of Plugins for Both jQuery and WordPress
[ 140 ]
Notice that in the loop towards the bottom, we made a link tag that references the
register form. I've ammended a variable string named
evnt to that link and added
the title of the event using the
get_title() template tag as shown:
<p><a class="register"
href="/wp-jqury/register/?evnt=<?php the_title(); ?>">
Register</a>
</p>
<div class="register-separate"></div>
We'll now go back up to the top of the template page and make sure that the header
title makes sense. There's a bunch of if else statements at the top checking to see
if the content returned is from an archive, category, or tag (remember, this page was
duplicated from the default template's archive.php page). As this template page will
only load up Event posts now, we don't really need all that PHP, but it doesn't hurt.
Mostly, we'll want to add in a main header with the following markup and code:
<h1 class="pagetitle"> Upcoming Events <?php single_cat_title(); ?></
h1>
That will give us a title named Upcoming Events on the page (or whatever you
actually named your own Events category, that is, Shows, Parties, and so on—you
get to name it. That single_cat_title() template tag will pull it in for you).
At the very bottom of the theme's
style.css sheet, we'll add the following rules
to style our registration link and oat it to the right:
.register {
display:block;
background-color: #ccc;
border: 1px solid #069;
width: 100px;
padding: 10px;
text-align: center;
}
p a.register{
float: right;
}
Chapter 4
[ 141 ]
.register-separate{
clear:both;
padding-top: 10px;
border-bottom:1px solid #999;
}
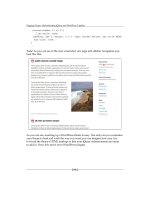
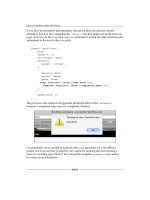
When we look at an event post now, we'll see our Event post with a dynamic link at
the bottom to Register:
Getting jQuery in on the game plan
Alright! I don't know about you, but I feel that was quite a bit of prep-work. It's all
going to come together now as we load up the ColorBox plugin and cook up a few
nal custom jQuery scripts.
Doing a Lot More with Less: Making Use of Plugins for Both jQuery and WordPress
[ 142 ]
Including the ColorBox plugin
In our theme, let's create a js directory, and within that directory, let's create an
additional directory named colorbox. This will allow us to place in the CSS sheet
and image collateral for the ColorBox plugin and keep everything tidy and working
the way it prefers to work in the colorbox.css sheet.
We'll unzip our ColorBox plugin and move over the minied version into our
js/colorbox directory. We'll then take the stylesheets and collateral from the
example1 folder (I like it the best, the striped, transparent background and rounded
corners are great), and drop them into the colorbox directory. We'll then go to our
theme's header.php le and include both the colorbox.css stylesheet, underneath
the theme's main stylesheet as shown:
<link rel="stylesheet" type="text/css" media="all"
href="<?php bloginfo( 'stylesheet_url' ); ?>" />
<link rel="stylesheet" href="<?php bloginfo('stylesheet_directory');
?>/js/colorbox/colorbox.css" type="text/css" media="screen" />
Then, above the wp_head function, we'll add in our main jQuery include as well as
the ColorBox plugin using the methods that we learned in the previous chapters,
taking advantage of the script API as shown:
wp_enqueue_script( 'jquery' );
wp_enqueue_script('colorbox', get_bloginfo('stylesheet_directory') .
'/js/colorbox/jquery.colorbox-min.js', array('jquery'), '20100516' );
Chapter 4
[ 143 ]
Writing a custom jQuery script
Now, in the root of our js directory, let's create a new custom-jquery.js le
and also be sure to include it in our header.php le, under our ColorBox includes
as follows:
wp_enqueue_script('custom-jquery', get_bloginfo('stylesheet_
directory') . '/js/custom-jquery.js', array('jquery'), '20100510' );
Get set for some jQuery fun now. Since we've gone through the trouble of hand
including the ColorBox plugin into our WordPress theme, we might as well make
sure it can load up images in addition to our registration form.
To ensure that ColorBox only loads up images, and not every link on the page, we'll
think of some examples back to Chapter 2, Working with jQuery in WordPress, and do
a little creative selecting. We'll add this rule to our
custom-jquery.js le:
jQuery(function(){
jQuery(".entry-content a:has(img)").colorbox({height:"98%"});
});//end docReady
This selection only works on tag links that are in posts, inside the .entry class, that
have thumbnail img tags. No other links will activate ColorBox.
Doing a Lot More with Less: Making Use of Plugins for Both jQuery and WordPress
[ 144 ]
Now, to get the registration page to launch ColorBox, we'll be a bit more clever.
While I've added a .registration class, I don't want to rely on it to launch
ColorBox. The only link that should trigger the modal window is a link to the
registration form, so I'll be sure to select for that. In my cb-registration.js le,
inside my document ready function and after my image select
colorbox function,
I'll add this script:
jQuery("a[href*='register']")
.colorbox({iframe:true, width:"500px", height: "600px"});
That particular jQuery selector will make sure that again, only links that contain
(that's what the asterisk * is for) the word register in the href attribute will
trigger the ColorBox modal window, in ColorBox's iframe mode.
You'll notice that I also used ColorBox's available parameters to set a constrained
height and width for the registration form's modal box.
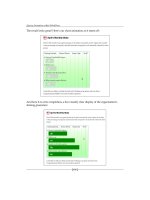
Now, only our Registration links and image links with thumbnails launch ColorBox:
Chapter 4
[ 145 ]
Pulling it all together: One tiny cforms II hack
required
You'll recall that we set up our registration link to pass the name of the event in the
URL via a GET call, sometimes called a variable string, to the Registration form.
Right now, there is no way that the cforms administration panel will pick up that
variable, but there's a quick, and fairly commonly used "hack" for cforms to make
sure you can pass your own custom variables to the form.
cforms II creates little-bracket-enclosed template names for the variables it can pick
up, like adding the variable template:
{Title} will display post or page title that the
form is on. We want to pass it a post title from another page (rather than having to
manually add this form to every Event post), so we'll add our own variable template
to the cformsII plugin.
Customizing a plugin? Keep copious notes!
WordPress and jQuery developers usually keep updating and rening
their plugins. Your best bet is to try to nd a solution that doesn't require
you to edit the actual plugin source les. However, as in this case, if you
nd you do edit a plugins source le, add your own customization-
readMe.txt le to the directory and keep detailed notes of what you
amended or edited in the plugin. When the developer releases and
upgrades their plugin, especially WordPress plugins that sometimes need
updating to keep up with the current WordPress core version, you'll lose
your amendments and hacks when you update the plugin. Your notes
will make it easy to reintegrate them.
In the cforms II plugin directory, locate the lib_aux.php le. Around line 421, just
after code that looks like $m = str_replace( '{BLOGNAME}', add this
line of code:
$m = str_replace( '{Event}', esc_attr($_GET['evnt']), $m );