Tìm Hiểu về Wordpress - part 14 ppt
Bạn đang xem bản rút gọn của tài liệu. Xem và tải ngay bản đầy đủ của tài liệu tại đây (1.29 MB, 10 trang )
117
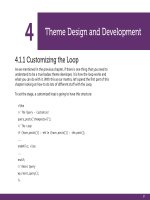
4.5.1 Creating and Using Child Themes
WordPress supports an interesting theme-development technique known as child
themes. The idea is that you can declare a base theme (or a “parent” theme as
makes more sense with this metaphor) and override the styling of that theme
without touching the base theme at all.
Why bother with this? Why not just duplicate the theme and make changes? Well
there is plenty of debate around this. Some folks think child themes are a waste
of time and others wholeheartedly endorse them. There are some things to think
about to help you reach your own conclusion. Here are a few…
Does your theme release updates that you like to stay up to date with? Theme
frameworks like to do this. If you have altered your theme, it becomes a big pain
to update it with a fresh release from the author. If you are using a child theme,
it’s not a big deal, just replace the parent and your alterations are intact. Are
you a theme author that wishes to release multiple variations on a theme? Child
themes may be the way to go. This way, you can offer up a theme and users can
just activate the one they like the best, without any manual alterations by them or
duplicate code by you.
Creating a child theme is remarkably simple. Just create a folder (named as you
wish) in your wp-content/themes directory, and within that folder place a single
style.css file.
The CSS file will have some specially formatted comments at the top of it which will
identify it, and most importantly, identify the parent theme which it intends to use.
Here is an example:
/*
Theme Name: My Cool Child Theme
Theme URI: />Description: Child Theme for Digging Into WordPress
118
Author: Chris Coyier
Author URI: />Template: DigWP
Version: 2.0
*/
@import url(" /digWP/style.css");
The most important line there is the “Template: DigWP” line,
which references the folder of the parent theme. The last
line imports the stylesheet from that parent theme. That is
optional, but very common, as the whole point is to start with
the parent theme as a base and overwrite/add to it. Anything
you write in the CSS file below this will overwrite anything
from the parent theme.
For example, if the link color is red in the parent (i.e., a {
color: red; }), but you declare it green (i.e., a { color: green;
}), your declaration in the child theme will be applied even
though it uses the exact same selector, because it is declared
after the parent style. No need for any fancy !important rules
or more specific selectors.
4.6.1 Styling Your Theme
In any WordPress theme, the style.css is required. In fact, WordPress won’t even
recognize a folder in your themes folder unless it includes this file. It has to be
there, but you aren’t necessarily required to use it. You don’t even have to call this
CSS file from your theme if you don’t want to, but since it’s required and definitely
standard practice, you might as well use it.
119
4.6.2 Dierent Inclusion Methods
When it comes to including CSS stylesheets for your WordPress-powered site, there
are plenty of options available to you. Let’s take a look.
The not-so-dynamic method
<link rel="stylesheet" href="/wp-content/themes/Your-Theme/style.css"
type="text/css" media="screen, projection" />
The super-direct method
<link rel="stylesheet" href="<?php bloginfo('stylesheet_url'); ?>"
type="text/css" media="screen, projection" />
The dynamic method
<link rel="stylesheet" href="<?php bloginfo('stylesheet_directory'); ?>/
style.css" type="text/css" media="screen, projection" />
IE-specific stylesheets
<! [if IE 6]>
<link rel="stylesheet" type="text/css" href= "<?php
bloginfo('stylesheet_directory'); ?>/css/style-ie6.css" />
<script type='text/javascript' src='<?php bloginfo('template_url'); ?>/
js/DD_belatedPNG_0.0.8a-min.js'></script>
<![endif] >
Linking to multiple CSS files
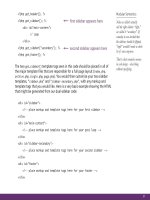
<link rel="stylesheet" href="<?php bloginfo('stylesheet_directory'); ?>/
DD_belatedPNG
That example JavaScript le
right over there is actually a
really useful script for getting
alpha-transparent PNG les to
work in IE 6.
/>120
style.css" type="text/css" media="screen, projection" />
<link rel="stylesheet" href="<?php bloginfo('stylesheet_directory'); ?>/
forms.css" type="text/css" media="screen, projection" />
@import
One somewhat common technique is to use the dynamic method to call your
theme’s style.css file at the root of the theme, but then have that file be empty
save for a few lines that load in additional stylesheets. This is perfectly acceptable,
but do note that this method is just as taxing (or more) than loading multiple
stylesheets directly in the <head>. The cleanliness of this though, is appealing.
@import "style/css/reset.css";
@import "style/css/typography.css";
@import "style/css/layout.css";
Conditionally loading extra CSS files
<?php if (is_page_template("page-snippet.php")){ ?>
<link rel="stylesheet" type="text/css"
href="<?php bloginfo('stylesheet_directory'); ?>/css/snippets.css" />
<?php } ?>
4.6.3 To Reset or Not To Reset?
While we are on the subject of CSS, but not on the subject of actually writing any
particular theme, we may as well talk about “resetting” stylesheets. The theory of
a reset stylesheet is that it removes the various default styling applied to elements
by browsers. These default CSS styles can be a bit unpredictable.
For example, the amount of default padding applied to the <body> element is
different in Firefox than it is in Internet Explorer. Likewise for other browsers – they
each apply their own set of CSS rules to various elements. In order to rein in these
121
differences, we use reset stylesheets to eliminate certain default styles and start
fresh. If we want some padding on our <body>, we can then apply it according to
our specific needs and have that value be consistent across all browsers.
Popular CSS Resets
• Eric Meyer’s Reset Reloaded - From the man himself: />• YUI (Yahoo User Interface) Reset CSS - />• Star Selector Reset - Looks like this: * { margin: 0; padding: 0; }
Reset stylesheets are not specific to WordPress, but rather a common consideration
for all websites. But since we are WordPress folks, this is how we might include a
reset stylesheet in our theme:
<link rel="stylesheet" href="<?php bloginfo('stylesheet_directory'); ?>/
reset.css" type="text/css" media="screen, projection" />
<link rel="stylesheet" href="<?php bloginfo('stylesheet_directory'); ?>/
style.css" type="text/css" media="screen, projection" />
Notice we included it before the main style.css file. Because we ultimately reset
the reset-styles with our own values, the reset will need to go first. Critics of reset
stylesheets will say that, because we ultimately reset the reset, it’s unnecessary.
Proponents say that the reset is there to catch things we normally wouldn’t write
into our own stylesheet but may pop up in the lifespan of the site.
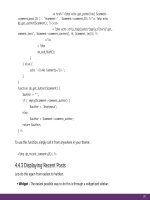
4.6.4 Basic CSS Optimization
Now that we’ve just shown you how you might include a reset stylesheet in your
theme, we’ll tell you that might not be the best way to do it. Ha! You really gotta
watch us!
The problem with including a reset stylesheet isn’t the reset stylesheet itself, but
CSS Reset Library
There are many, many
different pre-made CSS resets
available to you. For a fairly
comprehensive collection of
some of the best, check out:
/>122
rather because it’s a separate file, meaning yet another thing the browser needs to
download. In geek speak, it’s another page resource, or another HTTP request. The
more HTTP requests, the slower your page will download and render.
If speed is of the utmost concern, you may want to include the reset at the top
of your CSS file instead of as a separate file. In this case, that makes perfect
sense because the reset will be loaded on all pages of the site. But what about
CSS files that you load conditionally? For example, perhaps you have a unique
homepage with its own unique set of CSS rules. Loading a homepage.css file in that
circumstance makes perfect sense, because otherwise every other page on the site
will be loading that CSS file despite it not needing it. So even though it’s a separate
HTTP request, it probably makes the most sense.
Reducing the number of CSS files used isn’t the only way to optimize CSS though,
you might also employ techniques to reduce the file size of the CSS itself. When we
write CSS, we write it so it is best readable for us. That means spacing declarations,
tabbing new lines, and including comments such that reading and maintaining
the file works best for us. But all of the spacing, tabbing, new lines, and comments
adds extra weight to the CSS file, and thus produces a larger file for visitors
to download.
Nicely formatted CSS is for you, not for the browser, and not for your visitors. So
there is no particular need to serve up that nicely formatted version. You may want
to use a tool like the CSS Optimiser – – to strip all of that extra
stuff away from the CSS file and keep the file size as small as possible. Of course, as
soon as you do this, the file becomes nearly impossible to maintain, so be sure to
keep an always-up-to-date copy of the original stylesheet. Then make changes to
the original, optimize it, and serve up the optimized version live.
Here is a good example of what an optimized stylesheet might look like:
#mainNav{position:absolute;bottom:8px;left:0;width:780px;list-
style:none;z-index:100}#mainNav li{display:inline}#mainNav li a{-webkit-
transition:opacity .15s ease-in-out;display:block;oat:left;width:144
WordPress Optimization
We explain how to minimize
the number of HTTP
requests for your site in more
detail, and explore many other
optimization techniques in
Chapter 9.5.1.
123
px;height:50px;background:url(images/nav.png) no-repeat;text-indent:-
9999px;margin:0 10px 0 0;opacity:0.5;lter:alpha(opacity=50)}#mainNa
v li.forums a{background:-144px 0}#mainNav li.videos a{background:-
288px 0}#mainNav li.downloads a{background:-432px 0}#mainNav li.snippets
a{background:-576px 0}
Not very readable eh? But that chunk above had a 43% file-size savings compared
to the CSS it originally came from.
4.7.1 Using Multiple Themes
Of course, only one theme can be displayed to any one person at a time. But that
doesn’t mean you can’t serve up different themes to different people. Why would
you want to do such a thing?
• Give users the choice of themes
• Serve a different theme to yourself, admins, or other registered users
• Have users arriving in different circumstances (e.g. mobile devices) see
a different theme
How we accomplish this witchcraft depends on which of these scenarios we are
trying to accommodate. Let’s look at each one…
Giving Users Choice
It might be a fun feature to allow your users to choose a custom theme for viewing
your site. This is probably not practical for a large number of sites, but if done with
class it can be very cool! For example, Perishable Press offers theme switching right
in the sidebar (or footer, depending on theme). On Digging Into WordPress, we
have a “Theme Clubhouse” – – where we show off our free
themes using a single installation of WordPress.
124
This technique is made possible through the excellent Theme Switcher plugin:
/>Check out Perishable Press for an example of this, where Jeff offers visitors the
choice of a whole bunch of different themes to choose from: />Make sure that you incorporate a way for visitors who have just switched themes
a way to switch back. Also, this could be an awesome technique to combine with
child themes! (Refer back to Section 4.5.1 for more information on child themes.)
Dierent theme for administrators
The most common use for the theme-switching technique is theme development.
As any good designer knows, to do the best work possible you need to design
against real content, not a bunch of lorem-ipsum filler. If you could go commando
and develop against a live theme, but only you saw that theme while everyone else
was seeing the old theme, that would be an ideal way to develop. That is exactly
what is possible with the Theme Switch plugin – (not to be
confused with the aforementioned Theme Switcher plugin, yeeesh).
Upload and activate this plugin, and you’ll have an options panel for selecting the
theme to display based on the user’s role. For example, you could show only admin-
level users a particular theme. This goes for all user roles, so you could theoretically
show a different theme to all registered users. Or perhaps if you are working on
a new design, open that up beyond admins to show your author-level users the
design as well.
Dierent theme for mobile viewers
Another reason you might want to serve up an alternate theme is based on the
circumstances by which the user has arrived at your site. A good example of this is
delivering a special theme for users arriving via mobile device.
As with just about everything else you need to do with WordPress, there are
plugins specifically designed to accommodate your site’s mobile visitors. The
125
WPtouch plugin – – detects for high-capability mobile devices
(e.g., the iPhone, iPod Touch, Android, and Blackberry) and serves up a very nice
and fully functional theme for those users.
If you would rather roll your own theme, one possibility is to do your own mobile
device sniffing and redirect those users to another URL. Here is a JavaScript way to
go about it that you could put in your site’s <head>. Just make sure that the script
is not also located on the URL to which it redirects, otherwise your visitors will be
caught in an infinite loop!
<script type="text/javascript">
if (screen.width <= 699) {
document.location = "mobile.html";
}
</script>
This technique could be combined with the Theme Switcher plugin (see previous
section on Giving Users Choice), as that plugin allows for special URLs which can
switch the theme. The possibilities are endless!
Mobify
Another option for creating a special theme for
mobile viewers is a free service called Mobify. Mobify
doesn’t actually create WordPress themes, but the
end result is essentially the same. They process the
content from your site, and then apply new CSS
styles (created and controlled by you) to create the
mobile view. This means that the mobile view is just
as dynamic as the regular site. Mobify will serve this
content from the Mobify domain, or just as easily,
through a subdomain located on your own site (e.g.,
m.ilovetypography.com) with a simple CNAME change on
your domain registry.
126
4.8.1 Widgetizing
Many themes you’ll find around
abouts the interweb are already
“widgetized.” That is, they contain
the code necessary to let the
WordPress Admin know about areas
that are ready to accept widgets and
be managed by the Appearance >
Widgets settings area in the Admin.
Theme authors who intend their
work to be used by a wide audience
almost always include widgetized
areas, but it’s not a guarantee.
If you are building your own theme,
it’s totally up to you if you wish to
include this.
As we have seen earlier in this
chapter, widgets can do some pretty
cool stuff so at least you should
probably consider it. You can have
static stuff in your sidebar along
with a widgetized area too, so the
commitment here is pretty low.
Here’s how to do it:
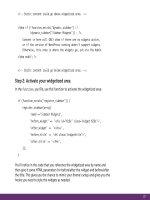
Step 1: Declare your widgetized area
The most common place for widgets is in the sidebar. So in the sidebar.php file: