CCNA Wireless Official Exam Certification Guide part 40 potx
Bạn đang xem bản rút gọn của tài liệu. Xem và tải ngay bản đầy đủ của tài liệu tại đây (992.1 KB, 10 trang )
Figure 18-2 WCS Home Page Tabs
Administration > Settings > Data Management. You can also configure the WCS to send
email to a user when an event is triggered. To configure the email preferences, go to
Administration > Settings > Mail Server.
Adding Controllers to the WCS
To add controllers to the WCS, use the Configure tab. From there, you cannot only add
controllers, but you can configure APs. You can also create templates here that allow the
deployment of common configurations among multiple devices. To add controllers,
browse to Configure > Controllers, as shown in Figure 18-3.
The Configure Controllers page summarizes all the controllers in the WCS and allows you
to add controllers. Using the Select a command drop-down (seen in Figure 18-3), select
Add Controller, and then select GO. This takes you to the configuration page shown in
Figure 18-4.
Notice that the Add Format Type is configured for Device Info. The other option is File.
You use the File option if you want to bring in several devices from a CSV file. When you
add a controller to the WCS using the Device Info option, you use SNMP. You need to
enter the IP address of the device as well as the SNMP version, retries, timeout in seconds,
and community string. Click OK to apply. After you have added the controller, you can
configure it on an individual basis. This is good, but the power of using the WCS comes in
using templates. This is the second way you can configure the controller. The next section,
“Working with Templates,” provides more information.
362 CCNA Wireless Official Exam Certification Guide
21_1587202115_ch18.qxp 9/29/08 2:40 PM Page 362
Figure 18-3 Configuring Controllers in the WCS
Figure 18-4 Add Controller to the WCS
Chapter 18: Enterprise Wireless Management with the WCS and the Location Appliance 363
Key
Topi
c
21_1587202115_ch18.qxp 9/29/08 2:40 PM Page 363
364 CCNA Wireless Official Exam Certification Guide
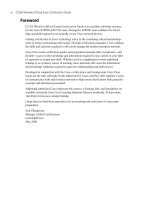
Figure 18-5 Controller Audit Report
You can also configure APs from the Configure menu by selecting Configure > Access
Points. As with controllers, you can configure the APs using templates.
You now have the WCS, designed to manage many devices. It is important for the config-
uration on the controller to be the same as the configuration in the WCS database. To
make sure all the configurations are consistent, you should run an audit regularly. You run
an audit by going to Configure > Controllers. Select a controller and then, using the drop-
down, choose Audit Now and click Go. Figure 18-5 shows the resulting Audit Report
page.
Working with Templates
Everyone likes to save time, and templates can help with that. WCS templates allow ad-
ministrators to save time by configuring them once and then applying them to more than
one device.
To add templates, follow these steps:
Step 1. Choose Configure > Controller Templates.
Step 2. Choose Add Template from the Select a command drop-down menu and click
GO.
Key
Topi
c
21_1587202115_ch18.qxp 9/29/08 2:40 PM Page 364
Chapter 18: Enterprise Wireless Management with the WCS and the Location Appliance 365
Step 3. Enter the template name.
Step 4. Provide a description of the template.
Step 5. Click Save.
You have several templates available. Some of the common ones include the following:
■ Configure WLAN Templates
■ Configure a RADIUS Authentication Template
■ Configure a Local EAP General Template
■ Configure a Local EAP Profile Template
■ Configure an EAP-FAST Template
■ Configure Access Control List Templates
■ Configure a TFTP Server Template
■ Configure a Telnet SSH Template
■ Configure a Local Management User Template
■ Configure Radio Templates
Again, the benefit is that you can save the template and apply it to multiple controllers.
You can apply a controller template to a controller by following these steps:
Step 1. Go to Configure > Controller Templates.
Step 2. Using the left sidebar menu, choose the category of templates to apply.
Step 3. Select the box next to the template from the Template Name column that you
want to apply to the controller. In Figure 18-6, you can see several WLAN
templates.
Step 4. Click the Apply to Controllers button. (You may need to scroll down to see
it.)
Taking things a step further, you can create what is known as a configuration group. A
configuration group is a way to apply configuration to many controllers as if they were
one. The design here is for consistent configuration of a mobility group. A change in con-
figuration changes all controllers in the group. You can also apply controller templates to
a configuration group. You can access the configuration groups by selecting Configure >
Config Groups. Figure 18-7 shows the Config Groups page. Notice that the group name
Config is applied to one controller and 105 templates are applied to it. The 105 templates
applied represent a great deal of manual configuration that was not necessary because
templates were used.
Key
Topi
c
21_1587202115_ch18.qxp 9/29/08 2:40 PM Page 365
366 CCNA Wireless Official Exam Certification Guide
Figure 18-6 WLAN Templates
Figure 18-7 Config Groups
21_1587202115_ch18.qxp 9/29/08 2:40 PM Page 366
Chapter 18: Enterprise Wireless Management with the WCS and the Location Appliance 367
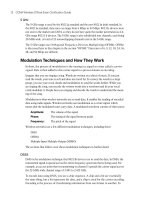
Figure 18-8 Auto Provisioning
Auto Provisioning
You can configure auto provisioning to simplify deployments when you have many con-
trollers. To set up auto provisioning, browse to Configure > Auto Provisioning to access
the page shown in Figure 18-8.
Start by creating a filter to define which devices will be auto provisioned. To do this, use
the Select a command drop-down and select Add Filter. Then click Go.
Next, select the desired filter properties.
After the filter is created, configure how the controller is detected on the network. You do
this from the Auto Provisioning Setting page, the link for which you can find on the left
side of the Auto Provisioning page. When you click on the Auto Provisioning Setting link,
you are taken to the Auto Provisioning Primary Search Key Setting page, shown in Figure
18-9.
What happens when auto provisioning is configured? When a controller running version
5.0 or later is connected to the network for the first time, if it does not have a valid config-
uration, it first gets an IP address from a DHCP server. The DHCP server then returns
through option 150, the IP address of a server with the configuration file of the controller.
The server address is the WCS server.
21_1587202115_ch18.qxp 9/29/08 2:40 PM Page 367
368 CCNA Wireless Official Exam Certification Guide
Figure 18-9 Auto Provisioning Primary Search Key Setting Page
Maps and APs in the WCS
Maps in the WCS are designed to give you a visual representation of the wireless network.
Not only do maps help with monitoring after a deployment, but they help in the imple-
mentation and deployment process. You can use planning mode to determine how many
APs you need in an area and where to place them.
To access the maps, browse to Monitor > Maps. From here you can see a list of maps, as
illustrated in Figure 18-10.
You start by adding a building and then adding floors. After you have the building and
floors, you add APs.
The maps begin in the context of a campus. To create a new campus, use the drop-down
and select New Campus. Then click GO. This brings you to a page where you enter the
campus name and contact and browse to the image file. After you have created the cam-
pus, it appears in the list of maps. You can now add a building to the campus; however,
buildings do not necessarily need to be added to a campus. They can be standalone. To
add a building, select New Building from the drop-down list, as shown in Figure 18-11.
21_1587202115_ch18.qxp 9/29/08 2:40 PM Page 368
Chapter 18: Enterprise Wireless Management with the WCS and the Location Appliance 369
Figure 18-10 Maps in the WCS
Figure 18-11 Add Building
Key
Topi
c
21_1587202115_ch18.qxp 9/29/08 2:40 PM Page 369
370 CCNA Wireless Official Exam Certification Guide
Figure 18-12 Two Floor Building
Note: When adding buildings to a campus map, consider that the horizontal and vertical
span should be larger than or the same size as any floors that you might add later. This can
be a problem later when you build a map for the basement of a building and then work your
way up to the first floor. If the first floor is larger than the basement, you cannot create the
first floor. In fact, you cannot create any floor if it is larger than the basement. The WCS
will not allow the larger level to then be added. You can find more information in the sec-
tion “Adding and Using Maps” in the Cisco Wireless Control System Configuration
Guide, Release 4.1 at />When you add a building, you need to enter the following information:
■ Building name
■ Contact
■ Number of floors
■ Number of basements
■ Horizontal and vertical dimensions in feet
Figure 18-12 shows a two-floor building.
21_1587202115_ch18.qxp 9/29/08 2:40 PM Page 370
Chapter 18: Enterprise Wireless Management with the WCS and the Location Appliance 371
Figure 18-13 Heat Maps in the WCS
You can add a new floor area from the drop-down list. A floor area is what gives you a
view of the environment and lets you add valuable information such as the floor type, the
height, and the image file. Figure 18-13 shows this configuration page. The floor types in-
clude Cubes and Walled Offices, Drywall Office Only, and Outdoor Open Space. This is
important because it assists the WCS with RF modeling.
After you have created the floor area, you can add APs to it. As you can tell, each element
is layered on top of the prior (for example, Campus > Building > Floor Area > AP). It is re-
ally a logical method. Now when you add the AP, take care in your accuracy. Make sure
you add them as the correct AP type, antenna configuration, location, and so on. When
you place each AP on the floor area, RF prediction can take place. RF prediction generates
heat maps and includes APs, clients, and rogues.
When you create the map as an administrator, you add obstructions, walls, windows, and
doors. This information as well as the placement of the APs is used for RF prediction. The
usage of the heat map created by RF prediction is to accurately display coverage. You can
click on elements of the map to get more information. Figure 18-13 shows a sample of a
heat map.
You might be wondering what the difference is between the RF prediction and the site sur-
vey. It is simple really. A site survey is a measurement of a certain point in time. That
point in time is when you did the site survey. The values you determine from the site sur-
vey can change as influences to RF are added to the area where you performed the site
survey.
Key
Topi
c
21_1587202115_ch18.qxp 9/29/08 2:40 PM Page 371