CCNA 1 and 2 Companion Guide, Revised (Cisco Networking Academy Program) part 97 doc
Bạn đang xem bản rút gọn của tài liệu. Xem và tải ngay bản đầy đủ của tài liệu tại đây (477.17 KB, 10 trang )
Installation Process 929
3. Before cutting into the wall, use a carpenter’s level to make sure the opening
will be straight. Use a utility knife to cut the opening. Push the knife through the
drywall, inside the template outline, until you have an opening large enough to
accommodate the blade of either a keyhole saw or a drywall saw.
4. Insert the saw into the hole, and cut along the edge of the penciled outline. Con-
tinue cutting carefully along the line until you can pull out the piece of drywall.
Make sure the box or bracket will fit the opening.
If you are using a box to flush-mount the jack, do not secure the box until you bring
the cable to the opening.
Mounting Jacks in Plaster
It is more difficult to cut into a plaster wall than it is to cut into drywall. To achieve the
best results, follow these steps:
1. Determine the appropriate location for the jack.
2. Use a hammer and chisel to remove the plaster from the wall so that the lath
behind the plaster is exposed.
3. Use a utility knife to carefully trim plaster away from the lath.
4. Place the template against the lathwork so that it overlaps three strips of lath,
equally, at the top and bottom of the opening. Trace an outline around the
template. Use an electric saw to cut away the full lath strip that is exposed in
the center of the opening.
5. Make several small cuts on the full strip, first on one side and then on the
other. Continue to make these small cuts until you completely cut through the
center lath.
Finish preparing the opening by removing the required portions of the lath strips at the
top and bottom. Cut vertically along the sides of the hole, making several small cuts
first on one side and then on the other as before. Continue until the laths are notched
evenly with the top and bottom of the hole. Now, cut a curve in the bottom piece of
lath from the top-right corner to the bottom-left corner. Bottom out the curve so that it
is flat just before it gets to the corner. Remove the lath that should fall free when the
cut reaches the corner. Turn the saw around and cut flush along the bottom of the hole
until you reach the opposite corner. The remaining lath should fall free. Repeat the
process for the top piece of lath.
CAUTION
Be careful when
doing this step. If you
attempt to cut all the
way through one side
before cutting into
the other side, the saw
will cause the lath
to vibrate when you
make the second cut.
This vibration can
cause the plaster
around the opening
to crack and separate
from the lath.
appen_a.fm Page 929 Tuesday, May 20, 2003 4:54 PM
930 Appendix A: Structured Cabling
Mounting Jacks in Wood
To prepare wood for flush-mounting a jack, follow these steps:
1. Select the position where you want to place the box. Remember, if you place
the RJ-45 jack on a wooden baseboard, avoid cutting the box opening into the
bottom 5 cm (1.5 in) of the baseboard.
2. Use the box as a template, and trace around the outside. Drill a starter hole in
each corner of the outline. Insert a keyhole saw, or jigsaw, into one of the holes
and saw along the outline until you reach the next hole. Turn the saw and con-
tinue cutting until you can remove the piece of wood.
Flush-Mounting a Jack in a Wall
After preparing an opening in which to position the jack, place it in the wall. If using
a box to mount the jack, hold the cable and feed it through one of the slots into the
box. Then, push the box into the wall opening. Use the screws to secure the box to the
wall’s surface. As you tighten the screws, you will pull the box tighter to the wall.
If you are mounting the jack in a flat, low-voltage mounting bracket, sometimes called
a “wallboard adapter” or “old work box,” position it now. Place the bracket against
the wall opening, the smooth side facing outward. Push the top and bottom flanges
toward the back so that the bracket grips the wall. Then, push one side up and the
other down to securely mount the bracket.
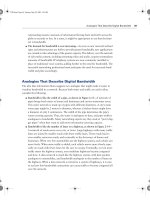
Pulling Cable to the Jacks
At the work-area end of the cables, you must pull the cable to the jack or outlet location.
If conduits run behind the walls from the ceiling to the outlet boxes, you can insert a
fish tape into the outlet box at the end of the conduit and push it up the conduit until
it comes out into the open ceiling. You can attach the cable directly to the fish tape and
then pull it down from the ceiling and out through the outlet box. (See Figure A-32.)
Figure A-32 Pulling Cable to the Jacks with a Fish Tape
appen_a.fm Page 930 Tuesday, May 20, 2003 4:54 PM
Installation Process 931
If no conduits are in the walls, you can pull the cable behind the wall. First, cut a hole
into the drywall at the location of the jack. You must take care to avoid making the
hole too large. Drill another hole into the top plate of the wall. This hole should be
1-2 cm (.39 79 in) in diameter. Push a fish tape down through the top hole and find it
at the lower hole. Some installers use a weight and a string instead, which they drop
down from the top hole and tie off so that it cannot accidentally drop down through
the hole. At the bottom (outlet) hole, the installer can use a hook or a coat hanger to
find the string.
Once you capture the end of the fish tape at the outlet location, tie a pull string to it.
Then, pull the fish tape back up to the original location where the cables are tied to
the pull string. Finally, pull the pull string down to the outlet location with the cables
attached.
Some walls, like concrete or brick walls, will obviously not have the cables run behind
them. These types of walls have surface-mounted raceways instead. Before you install
cables, you should secure the surface-mounted raceways to the wall following the
manufacturer’s recommendations. After you pull the cable through to the outlets, you
return to the telecommunications room to finish pulling the cable at that end.
Fishing Cable from Below a Wall
When running horizontal cabling in a building that has a basement, fish cable from
there to the work areas on the first floor. Do this by following these steps:
1. Drill a 3.2 mm (1/8 in) hole, at an angle, through the floor next to a baseboard.
2. Push a coat hanger or stiff piece of wire into the hole to indicate the spot in the
basement.
3. Go to the basement and locate the wire.
4. Use a tape measure to mark a spot under the area of the wall. This mark should
be 57 mm from the hole.
5. Drill a new hole in this spot. This hole should be 19 mm in diameter. Unlike
the first hole that you drilled at an angle, drill this hole straight up through the
subfloor and wall plate.
6. Push the cable up through this second hole to the wall opening where you want
to locate the work-area outlet.
7. Be sure to allow enough excess cable so that it can reach the floor and extend
another 60-90 cm (2-3 feet).
appen_a.fm Page 931 Tuesday, May 20, 2003 4:54 PM
932 Appendix A: Structured Cabling
Vertical Cable Installation
Pulling cables vertically is quite different from pulling cables horizontally. Vertical cable
installation can include network-distribution cables and backbone cables. Although back-
bone cables can be pulled horizontally, they are considered part of the vertical distribu-
tion system. Network-distribution cables, on the other hand, are part of the horizontal
distribution system.
Vertical installations generally are done in conduits, in conduit sleeves through the
floors, or in slots cut through the floor. A rectangular opening in the floor is called a
slot or a pipe chase. Risers are a series of holes in the floor, typically 10 cm (3.9 in.) in
diameter, possibly with conduit sleeves installed (see Figure A-33). The conduit sleeves
can protrude up to 10 cm (3.9 in.) above and below the floor. Not all risers are stacked
perfectly above one another; sometimes they are offset, so riser alignment should be
checked before the rough-in phase.
Figure A-33 Typical Riser
Vertical cable installation takes place either from an upper floor to a lower floor or
from a lower floor to an upper floor. In most cases, pulling cables from an upper floor
to a lower floor is easier because gravity assists in the effort, and mechanical aids such
as winches or cable pullers generally are not needed. Because it is not always possible
to bring large reels of cable to upper floors in a building, in some instances vertical
cables must be pulled from a lower floor. When pulling upwards, mechanical aids such
as winches or cable pullers are generally not needed, but reel brakes are required to
prevent a cable free fall.
Sleeve
Backbone (Riser)
Cable
appen_a.fm Page 932 Tuesday, May 20, 2003 4:54 PM
Installation Process 933
Cable Winches
Vertical pulls require care when lowering cable so that the cable does not start paying off
the reel too fast and falling out of control. A reel brake can help provide added tension.
For lifting cables, a cable winch often is employed (see Figure A-34). Because the
equipment used for pulling cable can pose a danger for both cable installers and
onlookers, only members of the cable installation crew should be in the area. Pulling
large cables with a cable winch creates a great deal of tension on the pulling rope. If
this rope were to snap, someone in the area could be injured. Experienced cable install-
ers know that they should avoid being too close to the pull rope under tension.
Figure A-34 Capstan Winch
Cables can be ordered from the factory with a pulling eye installed, which is particu-
larly useful for large, heavy pulls. If this is not possible, a Kellem grip can be used.
Again, when the pull begins, it should be a slow steady pull. The pull should not be
interrupted unless absolutely necessary. When the cable is pulled into place, the pull
rope and winch hold it in place until it is fastened permanently between floors using
strut systems, friction clamps, or Kellem grips secured with bolts (see Figure A-35).
Fastening Vertical Cables
One method for fastening vertical cables is to use a split wire-mesh grip, like a Kellem
grip, and a large bolt that is 25 cm to 30 cm (9.8 in. to 11.8 in.) long. It is important
that the grip size be appropriate for the bundle of cables. While the winch or the reel
brake supports the cable, a split wire-mesh grip is installed at each floor, and the bolt is
installed through the loops in the grip. The cable then is lowered gently until it is sup-
ported by the grips. This is a permanent installation.
appen_a.fm Page 933 Tuesday, May 20, 2003 4:54 PM
934 Appendix A: Structured Cabling
Figure A-35 Split Kellem Grip Secured with a Through Bolt
Cable Installation Tips
The following are tips for pulling cable:
■ Whenever possible, the staging area should be close to the first 90° bend. It is
much easier to pull cable around a bend when it first comes out of the box or off
the reel than it is to pull it around a bend near the end of the pull. This is because
the installer will be pulling the weight of all the cable pulled up to that point.
■ Pulling lubricant should be used for long, difficult pulls to prevent damage to
cables.
■ Adjust the reel so that cable comes off the top of the reel instead of from beneath it.
■ If a fish tape appears to be stuck in a conduit bend, rotate the fish tape a few
turns while pushing.
■ Pull an additional piece of pull string with the cable. This can be used as a pull
string if additional cables are needed later, eliminating the need to use a fish tape
through this space again.
■ If cable must be coiled on the floor for a secondary pull, coil the cable in a figure-8
configuration to eliminate tangles when uncoiling. Use two safety cones or even
buckets as guides for coiling the cable.
appen_a.fm Page 934 Tuesday, May 20, 2003 4:54 PM
Installation Process 935
■ Supporting cables vertically through multiple floors can be a challenge. Run a
steel strand or messenger between the floors, and anchor it at both ends. Vertical
cable runs can be tie-wrapped to this steel strand for vertical support.
Fire-Stops
The choice of cabling materials and how they are installed can greatly affect how a fire
moves through a building, the type of smoke and gasses emitted, and the speed at which
the smoke and flames spread. Using plenum-rated cables where required, minimizing
penetrations through fire walls, and using proper fire-stopping when penetration is
unavoidable can reduce and slow the spread of smoke and flames. It is usually smoke
that kills, not flame.
Firewall
A firewall is constructed out of special materials and techniques that resist the move-
ment of smoke and gasses from one area to another. Fire-rated walls also limit the
spread of flames from the area where a fire originates into areas that are not affected
directly. If an area does catch fire, a fire-rated wall slows the spread of flames to new
areas. These measures can protect building occupants and firefighters from being
exposed to toxic smoke, as well as give them extra time to evacuate the building.
Firewall Penetrations
Sometimes cables must pass through a firewall. This requires making a special opening
called a penetration (see Figure A-36).
Figure A-36 Typical Firewall Penetration
appen_a.fm Page 935 Tuesday, May 20, 2003 4:54 PM
936 Appendix A: Structured Cabling
Several construction materials are used to construct firewalls. The most common used
is likely drywall or sheetrock. When applied floor to ceiling, each layer of this material
can resist the spread of flame for roughly a half hour. Two overlapping layers provide
protection for twice as long. Other common firewall materials include concrete blocks
and poured concrete.
When cable is to be pulled through a firewall, a hole must be drilled through the firewall.
This is called a penetration. Penetrations can go all the way through the firewall or can
go through one side only. In this case, the penetration is called a membrane penetration.
After the hole is drilled, the penetration usually is sleeved. To do this, a small section of
conduit is inserted in the hole. The conduit must be large enough to hold the cables,
with extra room for additional cables in the future. This conduit also must protrude
0.3m (11.3 in.) on both sides of the wall. Cables then are pulled through the conduit.
After the cables have been pulled through the conduit, the conduit must be sealed with
an approved fire-stop material. This prevents fire from spreading from one section of a
building to another through the hole in the firewall.
When cables are installed in an existing firewall penetration, the fire-stop material
must be removed to clear space for the new cables. After the new cables have been
pulled, the hole and conduits should be sealed with new fire-stop material.
Terminating Copper Media
Communications cables are color-coded to identify individual pairs. The color-coding
is the same for all telecommunications cables in North America. The use of color codes
ensures uniformity in identifying individual cable pairs. Each colored cable pair is
associated with a specific number.
Four-pair Color Code
For most voice and data cabling, UTP cables are used. These cables have four pairs of
twisted wires in each cable. The four pair color code is as follows:
■ Pair 1—White/blue
■ Pair 2—White/orange
■ Pair 3—White/green
■ Pair 4—White/brown
Pair 1 always appears on positions, or pins, 4 and 5 on an eight-pin jack or plug. Pair 4
always appears on positions, or pins, 7 and 8 on an eight-pin jack or plug. The other
pairs have different appearances depending upon the standard (either T568A or T568B)
used for the wiring plan (see Figure A-37).
appen_a.fm Page 936 Tuesday, May 20, 2003 4:54 PM
Installation Process 937
Figure A-37 TIA/EIA T568A and T568B Wiring Schemes
T568A or T568B always should be used for this wiring scheme. A new wiring scheme
never should be created because each wire has a specific purpose. If the wiring is not
correct, the devices on either end will not be capable of communicating or will experi-
ence severely degraded performance.
If the installation is in a new building, whether to use either T568A or T568B is likely
to be dictated by contract. If the choice is left to the installers, use whatever scheme is
most popular in the area. If there is existing wiring in the building that is either T568A
or T568B, follow the existing scheme. Remember that every installer on the team must
use the same wiring scheme.
Occasionally there is some confusion over pair numbers and pin numbers. A pin is a
specific location on a plug or a jack. The colored pairs are always the same. For example,
pair 2 is always the white/orange pair. On an RJ-45 jack, however, pair 2 may connect
to pins 3 and 6, or to pins 1 and 2, depending on whether T568A or T568B is used.
RJ-45 Plugs and Jacks
RJ-45 jacks are eight conductor jacks that are designed to accept either RJ-45 plugs or
RJ-11 plugs (see Figure A-38). Jacks should be wired to the T568A or T568B standards.
Figure A-38 8P8C (RJ-45) Jack
appen_a.fm Page 937 Tuesday, May 20, 2003 4:54 PM
938 Appendix A: Structured Cabling
RJ-45 plugs have eight pins that will accommodate up to four pairs of wires. As with
RJ-11 plugs and jacks, pair 1 always is terminated on the center pins—in this case,
pins 4 and 5. Pair 4 (white/brown) always is terminated on pins 7 and 8. Pairs 2 and 3
might differ depending on the wiring plan. Using T568B, pair 2 (white/orange) termi-
nates on pins 1 and 2. Pair 3 (white/green) terminates on pins 3 and 6. T568A reverses
pairs 2 and 3 so that pair 2 terminates on pins 3 and 6, while pair 3 terminates on pins
1 and 2.
A RJ-45 jack terminates one end of the horizontal cable. The other end of the cable
typically is terminated on a patch panel with a 110-style connector or a 110-style
connecting block.
110-Block
110-blocks are high-density termination blocks suitable for either voice or data
applications (see Figure A-39). The insulation displacement connection provides a low-
resistance gas-tight connection. 110-blocks come in many configurations. Blocks are
designed to be stacked in different combinations to accommodate different size require-
ments. The 110 system includes wire-management troughs that also act as spacers
between the blocks. 110-blocks can use a special multipunch tool that can punch down
up to five pairs of wire at a time. Care must be taken to avoid using such a tool on patch
panels that contain printed circuit boards, however, because the impact could damage
the internal wiring.
Figure A-39 110-Block
Lab Activity Category 5e Jack Termination
In this lab, you learn the proper safety procedures when using cabling tools, as
well as how to use the T568B standard when terminating Category 5e cable on
a modular jack at the modular patch panel.
appen_a.fm Page 938 Tuesday, May 20, 2003 4:54 PM