Publishing PHP eclipse - part 11 ppsx
Bạn đang xem bản rút gọn của tài liệu. Xem và tải ngay bản đầy đủ của tài liệu tại đây (284.28 KB, 10 trang )
Testing and Debugging
100
About the Debugger
Eclipse's JDT includes a full-featured debugger for Java applications. When Eclipse debugs Java
applications, it launches the Debug perspective. From there, you can see details on how your
program is executing. The Debug perspective also gives you tools to manipulate your program's
execution and see the results.
PHPEclipse integrates Eclipse's Debug perspective with a PHP debugger called PHP Debugger
DBG or commonly known as DBG. DBG is a product created by Dmitri Dmitrienko. There are
two versions of DBG—a commercial version and an open-source version, which supports less
features but is more than sufficient for basic debugging.
DBG works as a PHP extension. It watches the PHP engine. If the engine attempts to execute a
PHP script, DBG intercepts this action and watches the traffic between the engine and client. It
then returns this to a DBG client.
This setup allows different clients to use DBG since DBG sits between and independent from the
PHP engine and client callers. Dmitrienko has released a free UNIX command-line client. The
majority of clients that exist are IDEs, like PHPEclipse, that wish to integrate PHP debugging into
their product.
Installing the Debugger
Before we can even start to configure Eclipse, we need to prepare our environment. We will need
to install and configure DBG to listen to our PHP engine.
First, we need to install DBG. There are precompiled binaries for Windows, Linux, and FreeBSD.
The source code is also available for you to download and compile yourself. We may need to do
this to install DBG for Mac OS X or if we need to install for a version of PHP that is not officially
supported by the binaries.
The second part of this is to configure Eclipse to act as the DBG client. We will set global
preferences and application-specific settings.
Before we start, we need a bit of a warning. Installing and configuring the PHPEclipse
debugger is not an easy task. We are configuring PHP, Apache, DBG, and PHPEclipse to
work together as a unit. It gets even more complicated when we consider container
packages for these products like Eclipse, XAMPP, and Marc Liyanage's PHP package. You
will need to be meticulous and detailed-oriented. Very often, a typo or a missing trailing
slash in a path will cause the whole debugger setup to fail. However, if you're patient and
precise, these instructions do work and the benefits of a debugger are a great payoff.
Second, these instructions will assume that you are installing PHP 5. PHP 5 has a
directive in the php.ini file, zend.ze1_compatability, which turns on PHP 4
compatibility mode if you need to test PHP 4 code. The instructions for PHP 4 and PHP 5
installations are the same except in two cases—installing precompiled DBG binaries and
configuring php.ini files for XAMPP on Windows.
Chapter 5
Installing DBG
Installing DBG can be done by installing a precompiled DBG binary, or you can download the
source and compile it yourself. If you are running Windows or Linux, consider using a precompiled
binary. The only issue for precompiled binaries is whether you are using a version of PHP that is
officially supported by DBG. When you download a precompiled binary package, you will see
that there is one precompiled binary for every incremental version of PHP. While the DBG project
is very good at keeping binaries up to date, there is sometimes a disconnect between the latest
version of PHP and the included DBG binaries.
Warning About DBG Precompiled Binaries on Windows
As of this writing, a precompiled version of DBG does not exist for the latest available
versions of PHP 4 (4.4.1) and PHP 5 (5.1.1). You can get precompiled binaries for PHP
4.3.x and PHP 5.0.x. The free version of DBG for PHP 5.1.1 and PHP 4.4.1 is scheduled
to be released in January 2006. See the thread at
viewtopic.php?t=1759
. You can either buy the commercial version of DBG or use an
older version of PHP until then.
If you are using an unsupported version of PHP, or Mac OS X, you will need to compile your own
version of DBG. We'll walk through the installation instructions for both cases.
Before we start, we'll need to know where PHP keeps its extensions. The PHP extensions directory is
where PHP grabs modules at run time. This directory is defined by the
extension_dir parameter in
your
php.ini file. By default, this will probably be './'. DBG, however, requires an absolute path
to be defined here. Accepted convention is to add this to an
ext or extensions directory under their
PHP install directory. For example, this can be:
extension_dir = \usr\local\php5\ext\
If you compiled PHP from source using the previous instructions, the path will be \usr\local\
php5\ext\
.
If you are using XAMPP, this should already be set to an absolute path. On Windows, it should be
set to
\xampp\php\extensions\ (for PHP 4) or \xampp\php\ext\ (for PHP 5). Make sure you
specify the entire path beginning from the directory name.
Whether the directory is already defined or you have defined one, make a note of this directory.
Precompiled Binary Instructions
Follow these instructions to install a precompiled DBG binary for Linux or Windows:
1. Download a DBG package from
There are several packages available for download on this page. For each platform,
you can download a DBGlistener, command-line interface client (CLI), or DBG
modules. The modules are the server components, which are what we need. They are
further divided into different versions of PHP. Download the correct DBG module
version for your version of PHP.
101
Testing and Debugging
2. Decompress the package and select a binary. The binaries come optimized for 386
and 686 processors. Select the right one for your system. Notice that there is one
DBG binary for each incremental version of PHP. Do not take this for granted. DBG
can be very picky about having binary versions and PHP versions match up. If you
do not see your version of PHP here, follow the instructions for compiling the DBG
source code instead.
3. Rename the selected binary to php_dbg.dll (for Windows) or php_dbg.so (for
Linux). The
.dll and .so extensions are standard PHP module extensions for
Windows and Linux/Unix systems respectively.
4. Move the php_dbg.dll (or php_dbg.so) to your PHP extensions directory. Move the
binary that you renamed in step 3 to the PHP extensions directory defined in
102
php.ini.
This is the last step to install a precompiled DBG binary. You can skip the following instructions
to manually compile DBG and jump right to the
php.ini configuration section.
Compiling DBG Yourself
If you are using Mac OS X, you will need to compile DBG yourself. You will also need to
compile DBG manually if there is no version of DBG that matches your version of PHP.
To compile on Windows, you will need a compiler. The .NET Framework SDK
(
has a compiler as well as the Visual C++ Toolkit
2003 (
Chapter 5
To compile on Mac OS X or Linux, follow these instructions:
1.
Download the DBG module source files from />The source code for the command-line interface client is also available, but we can ignore
that package.
2. From the command line, unzip this package and move into the
dbg directory.
[Blossom:/usr/local/src] shuchow% tar -xvzf dbg-2.32.11.tar.gz…
[Blossom:/usr/local/src] shuchow% cd dbg-2.32.11
3. Customize your deferphpize script by specifying the location of phpize.
deferphpize is the script used to configure the DBG build. It is located in the newly
decompressed
dbg directory. Open this file. On line three, the phpize variable is set
to the location of the
phpize script. Customize this variable with the specific
absolute path to
phpize script on your installation. phpize will probably be in the
bin directory of your PHP installation.
#!/bin/sh
phpize=${phpize:-"/usr/local/php5C/bin/phpize"}
if test -f $phpize; then
$phpize
4. If you are on Mac OS X, specify Darwin in deferphpize. Near the top of
deferphpize, there will be a case statement evaluating the platform. Add Darwin as
an option to the line with Linux and Solaris.
case "$PLAT" in
FreeBSD)
libtoolize13 -f -c
aclocal
autoconf213
autoheader213
;;
Linux|SunOS|Darwin)
aclocal
;;
*)
echo "unspecified platform"
exit
;;
esac
5. Run deferphpize and make. deferphpize will set up the make environment; make
will create the actual binary.
Buttercup:/usr/local/src/dbg-2.11.32 root# ./deferphpize
Configuring for:
PHP Api Version: 20031224
Zend Module Api No: 20041030
Zend Extension Api No: 220040412
6. After you run make, move the dbg.so module to the PHP extensions directory.
dbg.so is the final binary created from this whole process. Move this to the PHP
extension directory you specified in
php.ini.
103
Testing and Debugging
104
Configuring php.ini to Use DBG
Now that DBG is in the correct location, we must edit the php.ini file to tell PHP to load and use
DBG at script-execution time.
Remember, if you are using XAMPP with Windows, you will need to make these
changes in three php.ini files if you are going to switch between PHP 4 and PHP 5. You
will need to edit the active php.ini file at \xampp\apache\bin\php.ini, the PHP 4
template at \xampp\php\php4\php4.ini, and the PHP 5 template at \xampp\php\
php5.ini. If you are not going to switch back and forth, you will just need to edit the
active php.ini file.
1. Set implicit_flush to On. Find the implicit_flush directive in the file. By default,
it should be set to
Off. Turn this to On.
; Implicit flush tells PHP to tell the output layer to flush itself
; automatically after every output block. This is equivalent to
calling the
; PHP function flush() after each and every call to print() or echo()
and each
; and every HTML block. Turning this option on has serious performance
; implications and is generally recommended for debugging purposes
only.
implicit_flush = On
2. Add the debugger parameters by adding the following lines to the end of the file.
These lines tell PHP to load the DBG extension at run time and passes necessary
parameters to the debugger.
extension=php_dbg.dll
[debugger]
debugger.enabled = true
debugger.profiler_enabled = true
debugger.JIT_host = clienthost
debugger.JIT_port = 7869
3. Deactivate eAccelerator and Zend Optimizer if installed. If eAccelerator or Zend
Optimizer extension is installed, comment out all lines in
php.ini that begin with
eAccelearator or Zend Optimizer. Do this by placing a semicolon at the beginning of
the line. The debugger will not work with eAccelerator. However, since you're
installing this on a pure code development machine, speed is not a concern, right?
Make sure that the lines below (if present) are commented out:
;extension="eaccelerator.so"
;zend_extension="/usr/lib/php4/eaccelerator.so"
;zend_extension_ts="/usr/lib/php4/eaccelerator.so"
;extension="eaccelerator.dll"
;zend_extension_ts="c:\php4\eaccelerator.dll"
;zend_extension_manager.optimizer_ts = "\xampp\php\zendOptimizer\lib\
Optimizer"
;zend_optimizer.optimization_level=15
;zend_extension="c:\php4\eaccelerator.dll"
Chapter 5
Testing Your PHP Installation
At this point, you have installed the DBG debugger and told PHP to load it through the settings in
the
php.ini file. It's time to see if it has all come together.
Stop and restart Apache. In your browser, pull up the
phpinfo() calling page again. DBG should
register itself in the copyright notice:
Your page will also now include a separate section for the DBG module. You can see the various
features supported by DBG. However, not all of them are supported by the open-source version.
If DBG is loaded, your server set up is now complete. Every time a PHP script executes, DBG will
intercept the execution and hold information about the execution. It's now time to set up Eclipse as
the client to read and use this information.
Configuring Eclipse as the Debugger Client
PHPEclipse debugger configuration can be divided into two parts.
The first part is specifying the interpreter. In other words, you are telling PHPEclipse where the
DBG-enhanced PHP executable is in your system. PHPEclipse passes the debugging file to this
binary, listens to the DBG output, and manipulates Eclipse to give you feedback on what the PHP
script is doing.
The second part is to create a debugging configuration for the file you want to test.
Specifying an Interpreter
To specify an interpreter, go to Windows | Preferences | PHPeclipse Web Development | PHP |
Installed Interpreters
.
105
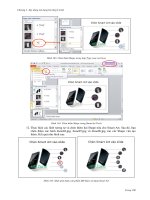
Testing and Debugging
Click on the
106
Add button to add a new interpreter. This will bring up an dialog box. Open File
Using this dialog box, specify the absolute path to the PHP binary.
If you are using XAMPP, use the PHP executable in the \xampp\apache\bin\ directory (for
example,
c:\apachefriends\xampp\apache\bin\) as opposed to the one in the \xampp\php\
directory. The \apache\bin\ directory is also where the active php.ini file resides.
If you are using the Entropy PHP package, the binary is located in \usr\local\php5\bin\ for
PHP 5 or
\usr\local\php\bin\ for PHP 4.
Chapter 5
Creating a Debugging Configuration
This is the final step in getting the debugger working. We need to create the testing parameters and
settings. Each file you wish to debug will get its own set of parameters and settings. In Java
debugging, these settings allow us to experiment with the execution environment, or recreate a
JVM environment that is closer to our production server. Most of the debugging parameters
available for tweaking are irrelevant in PHP. However, debugging configurations in PHPEclipse
are still necessary. The few PHPEclipse debugging settings that are available allow us to
experiment a little bit without changing our code. Even if we do not wish to alter debugging
parameters, Eclipse still needs a configuration to debug an application.
Each configuration is tied to a single PHP file. We will need to create a file to debug before we
can set up a configuration for it. Create a simple PHP file in our ShelterSite project. Name it
debug.php and enter this code:
<?php
$a = 1;
$b = 2;
$a = 5;
?>
As we go through this chapter, we'll encounter small snippets of code to demonstrate
debugging features and principles. All of these snippets are included in the example
debug.php file available in the code download for this chapter. Each snippet is
commented out with an explanation of which feature it demonstrates. To follow along,
you can either type these snippets into your Eclipse environment, or copy-paste them
from the example debug.php file.
In the left margin of the debugger, double-click on the area next to line number 5 to set a
breakpoint. Breakpoints tell the application to stop executing right before evaluating the line of
code. In essence, this freezes the program. When frozen, we can examine the program's state. We
can examine variable values and method execution. After stopping, we can choose to continue
executing the program or execute it one line at a time to further investigate how the program runs.
Breakpoints appear as blue dots in the margin. You can also set breakpoints by right-clicking on
the margin and selecting
. Toggle PHP Breakpoint
107
Testing and Debugging
This script sets two variables, changes one of them, and has a breakpoint. While very rudimentary,
it gives us a chance to test the debugger's ability to stop at a breakpoint and monitor variable
values. If these two functions work, we can conclude that our setup of the debugger has been
successful. In this script, we now have a target for a debugging configuration. Debugging
configurations are set in the
menu option. Click on
108
Run | Debug… Debug to bring up the Debug
configuration and management screen.
We are going to debug a PHP application using the DBG debugger, so select PHP DBG Script
and click on the
New button. In future, you can return to this screen to delete or change settings
for a configuration.
Chapter 5
The File tab asks for specific information about the file you wish to debug. Give this configuration
a name in the
Name field. Specify the project and file in their respective fields. You can manually
type them in or click the
Browse buttons to find the items. We can safely skip configuring the
Arguments tab for now, but we should be aware of it and take a look at it:
109